


NX1348E Icon Keypad
Page 23
SETTING THE SYSTEM CLOCK
Step 1
Press [
]-[9]-[7]. Enter Code icon will appear.
Step 2
Enter a [“Master Code”]. Then the service icon will begin to flash.
Step 3
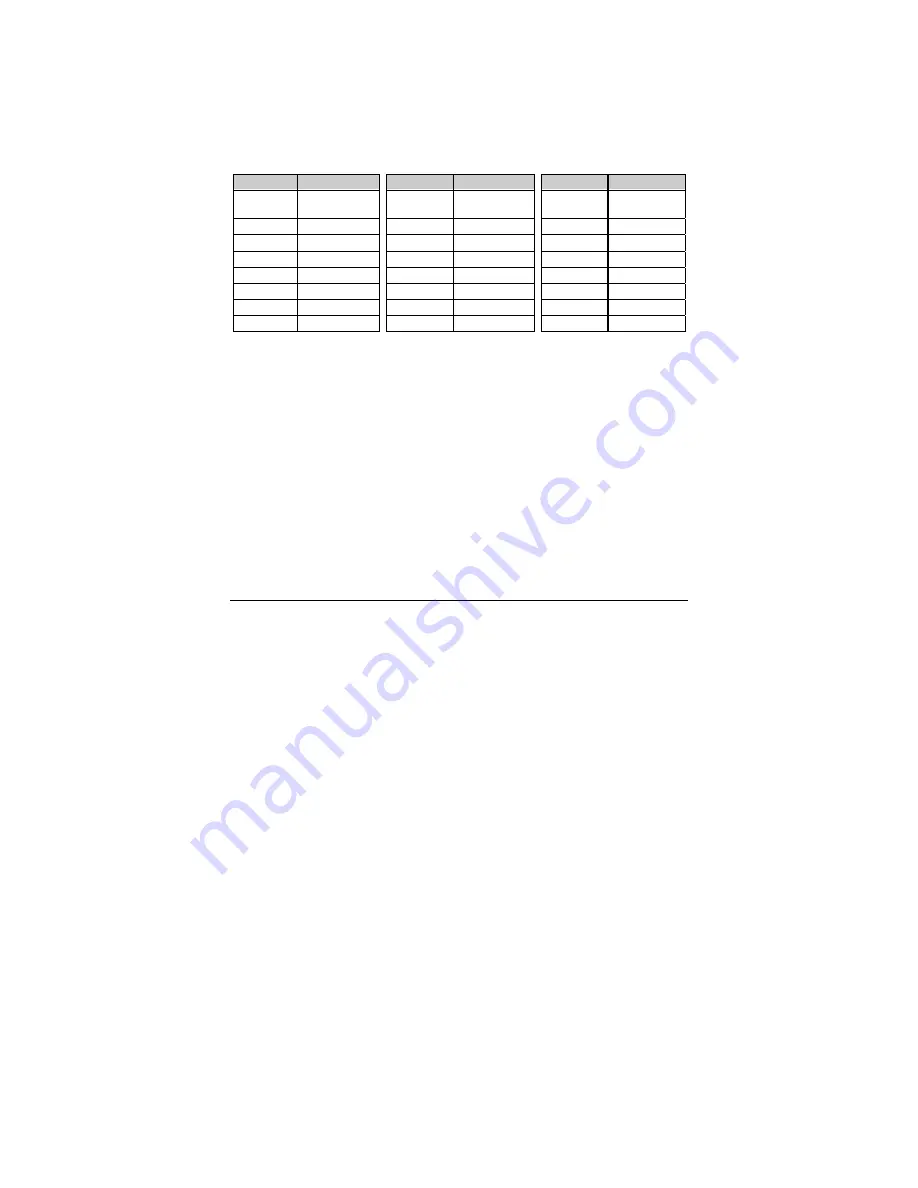
Enter the “hour code” which must be two (2) digits. Note: The clock is a
24-hour clock. Refer to the following table.
Step 4
Enter the “minutes code” which must be two (2) digits. Then the ready icon
will come on constant.
Example: 7 minutes after would be entered [0]–[7].
Time
Hour Code
Time
Hour Code
Time
Hour Code
12:00
Midnight
00
8:00 AM
08
4:00 PM
16
1:00 AM
01
9:00 AM
09
5:00 PM
17
2:00 AM
02
10:00 AM
10
6:00 PM
18
3:00 AM
03
11:00 AM
11
7:00 PM
19
4:00 AM
04
12:00 Noon
12
8:00 PM
20
5:00 AM
05
1:00 PM
13
9:00 PM
21
6:00 AM
06
2:00 PM
14
10:00 PM
22
7:00 AM
07
3:00 PM
15
11:00 PM
23
SETTING THE KEYPAD LIGHTING
Step 1
Press [
]-[9]-[1].
Step 2
Press the [
•
] and [
–
] scroll keys to lighten or darken the illumination
behind the buttons and the LCD display. It is usually easier to set this
adjustment in a darkened room.
SERVICE MENU
The service icon will be “on” if the security system requires service.
If the service icon is “on”, press [
]-[2] to determine the service condition. If a
zone(s) is tampered, the tamper icon will flash and the zone icon(s) will be on. If a
zone(s) is troubled, the trouble icon will flash and the zone icon(s) will be on. If the
service icon is flashing, one or more zone icon(s) will illuminate indicating what
service(s) is required. Press the [
•
] and [
–
] to scroll between tamper, trouble and
other service conditions. Call your service provider immediately for these problems.
The following table provides a list of what each icon means in a service condition.


