background image

Network Settings 

26

AC750 Dual Band WiFi Range

 Extender 

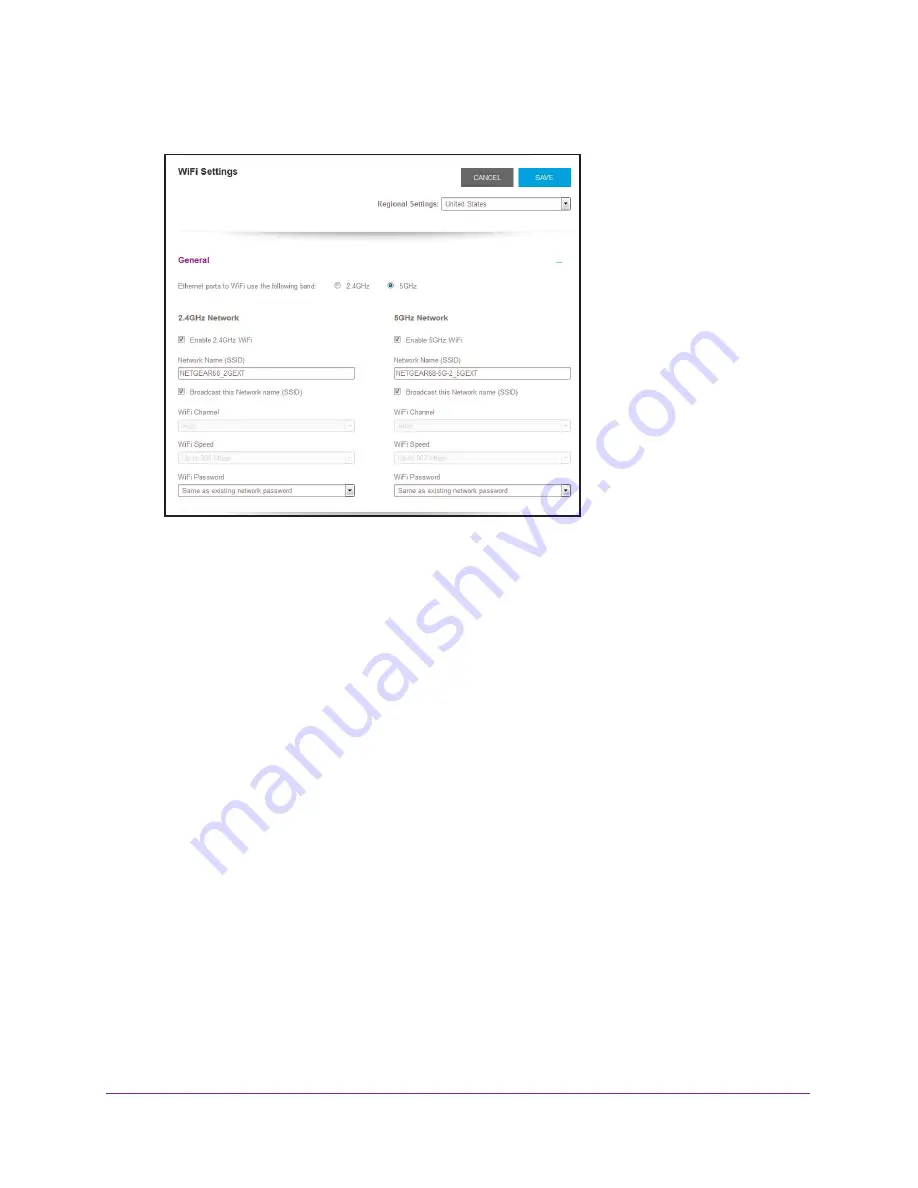
5. 

Select 

Settings > Wireless

.

6. 

In each 

WiFi Speed 

menu, select a speed.

7. 

Click the 

SAVE

 button.

Your settings are saved.

Use WPS to Add a Computer to the Extender’s WiFi 
Network

WPS (WiFi Protected Setup) lets you connect a computer or WiFi device to the extender’s 
network without entering the WiFi network passphrase or key. Instead, you use a 

WPS

 button 

or enter a PIN to connect.

If you use the push button method, the WiFi device that you are trying to connect must 
include a physical button or a software button. If you use the PIN method, you must know the 
PIN of the WiFi device that you are trying to connect.

WPS supports WPA and WPA2 WiFi security. If your extender network is open (no WiFi 
security is set), connecting with WPS automatically sets WPA + WPA2 WiFi security on the 
extender network and generates a random passphrase. You can view this passphrase on the 
WiFi Settings page (for more information, see 

View WiFi Settings 

on page


22).

For information about using WPS to connect the extender to a WiFi network during setup, 
see 

Use the Extender in Access Point Mode 

on page


15.

Summary of Contents for EX6000

Page 1: ...350 East Plumeria Drive San Jose CA 95134 USA September 2015 202 11554 01 AC750 Dual Band WiFi Range Extender Model EX6000 User Manual...

Page 2: ...y official NETGEAR support resources Conformity For the current EU Declaration of Conformity visit http kb netgear com app answers detail a_id 11621 Compliance For regulatory compliance information vi...

Page 3: ...ected Devices 20 Boost Your Video Streaming With FastLane Technology 20 View WiFi Settings 22 Change the WiFi Network Names 22 Turn Off the SSID Broadcast to Create a Hidden Network 23 Disable or Enab...

Page 4: ...ration Settings 38 Restore the Configuration Settings 39 Return the Extender to Its Factory Default Settings 40 Update the Firmware 42 Restart the Extender Remotely 43 Chapter 5 FAQs and Troubleshooti...

Page 5: ...s chapter covers the following topics Meet Your Extender When to Use Your Extender How the Extender Works Note For more information about the topics covered in this manual visit the support website at...

Page 6: ...describes the LEDs Table 1 Front panel LEDs LED Description Router Link LED This LED indicates the connection between the extender and the router or access point Solid green Best connection Solid amb...

Page 7: ...ork is poor or nonexistent Data traffic routed through the extender is inherently slower than traffic routed directly from the network Power LED Solid amber The extender is booting Solid green The ext...

Page 8: ...iFi device connects to a network The extender acts as an access point for WiFi devices The extender broadcasts its own WiFi network that WiFi devices can join In its role as an access point the extend...

Page 9: ...2 2 Get Started This chapter covers the following topics Use the Extender in Extender Mode Use the Extender in Access Point Mode Log In to the Extender After Installation Run Smart Setup Installation...

Page 10: ...3 Wait for the Power LED to light amber and then turn green If the Power LED does not light press the Power On Off button on the side of the extender Check for Extender Mode To make sure that the ext...

Page 11: ...press the WPS button on your router or access point When the extender connects to your existing WiFi network the WPS Mode LED on the extender lights solid green and the Router Link LED lights If the R...

Page 12: ...er WiFi signal and return to the extender b Check the Device Link LED on the extender If the Device Link LED is solid green or amber your extended WiFi network reaches the area with a poor router WiFi...

Page 13: ...d click the NEXT button 9 Set the network name SSID and password for your new extender WiFi network and click the NEXT button Wait for the page to display a list of available extended WiFi networks wh...

Page 14: ...ork 19 Test the extended WiFi range by moving your computer or WiFi device to the area with a poor router WiFi signal a Leave your computer or WiFi device in the area with a poor router WiFi signal an...

Page 15: ...o the extender using an Ethernet cable The device can then access your existing network through the extender s WiFi connection Figure 4 Connect a device to the extender s Ethernet port Use the Extende...

Page 16: ...nd and connect to the NETGEAR_EXT SSID WiFi network After the connection with the computer or WiFi device is established the Device Link LED lights 7 Launch a web browser and enter www mywifiext net i...

Page 17: ...n use Smart Setup to change the extender settings This is an easy way to connect the extender to a different router or to change the extender WiFi network name SSID or WiFi password To run Smart Setup...

Page 18: ...k names and WiFi passwords During this change the extender disconnects you from its WiFi network 10 When prompted connect your WiFi devices to the extender WiFi network and click the CONTINUE button T...

Page 19: ...ork Names Turn Off the SSID Broadcast to Create a Hidden Network Disable or Enable the WiFi Radios Change the WiFi Speed Use WPS to Add a Computer to the Extender s WiFi Network Deny Access to a Compu...

Page 20: ...LOG IN button The Status page displays 4 Click the Menu icon The extender menu displays 5 Select Settings Connected Devices Boost Your Video Streaming With FastLane Technology Get the most out of your...

Page 21: ...that you want to use for gaming and streaming support the 5 GHz band but your WiFi router supports the 2 4 GHz band To activate FastLane mode 1 On a computer or WiFi device that is connected to the ex...

Page 22: ...ch a web browser 2 In the address field of your browser enter www mywifiext net A login window opens 3 Enter your email address and password and click the LOG IN button The Status page displays 4 Clic...

Page 23: ...saved Turn Off the SSID Broadcast to Create a Hidden Network By default the extender broadcasts its WiFi signal so that its WiFi network names SSIDs are easy for you to find and connect to from your...

Page 24: ...the SAVE button Your settings are saved Disable or Enable the WiFi Radios By default the extender s WiFi radios broadcast signals in the 2 4 GHz and 5 GHz bands If you disable the WiFi radios then no...

Page 25: ...5 GHz WiFi check box 8 Click the SAVE button Your settings are saved Change the WiFi Speed To change the WiFi speed 1 On a computer or WiFi device that is connected to the extender network launch a w...

Page 26: ...the WiFi device that you are trying to connect must include a physical button or a software button If you use the PIN method you must know the PIN of the WiFi device that you are trying to connect WPS...

Page 27: ...address field of your browser enter www mywifiext net A login window opens 3 Enter your email address and password and click the LOG IN button The Status page displays 4 Click the Menu icon The extend...

Page 28: ...window opens 3 Enter your email address and password and click the LOG IN button The Status page displays 4 Click the Menu icon The extender menu displays 5 Select Settings Do More Connect Devices WP...

Page 29: ...is on the label of the WiFi device If you cannot access the label you can display the MAC address using the network configuration utilities of the computer You might also find the MAC addresses on the...

Page 30: ...ific periods of the day You can set up an access schedule that prevents Internet access through the extender network based on the times that you set To set up an access schedule 1 On a computer or WiF...

Page 31: ...000 To change the extender s device name 1 On a computer or WiFi device that is connected to the extender network launch a web browser 2 In the address field of your browser enter www mywifiext net A...

Page 32: ...address field of your browser enter www mywifiext net A login window opens 3 Enter your email address and password and click the LOG IN button The Status page displays 4 Click the Menu icon The exten...

Page 33: ...control or ACL For information about how to disable your router s MAC filter WiFi access control or ACL see your router s documentation 2 Power on the extender and connect all of your WiFi devices to...

Page 34: ...ssword Protection Off and On Recover a Forgotten User Name or Password Automatically Adjust for Daylight Saving Time Manually Set the Extender Clock Back Up and Manage the Extender Configuration Back...

Page 35: ...ch a web browser 2 In the address field of your browser enter www mywifiext net A login window opens 3 Enter your email address and password and click the LOG IN button The Status page displays 4 Clic...

Page 36: ...Off or Password On radio button 7 Click the SAVE button Your settings are saved Recover a Forgotten User Name or Password If you changed the password to access the extender and set up password recove...

Page 37: ...N button The Status page displays 4 Click the Menu icon The extender menu displays 5 Select Do More Access Schedule The Access Schedule page displays 6 Select the Automatically adjust for daylight sav...

Page 38: ...ou change the extender configuration settings but are not content with the new settings you can restore the extender configuration to the backed up settings Back Up the Configuration Settings You can...

Page 39: ...ted to the extender network launch a web browser 2 In the address field of your browser enter www mywifiext net A login window opens 3 Enter your email address and password and click the LOG IN button...

Page 40: ...u can either use the Factory Reset button on the side panel or log in to the extender and reset it For a list of factory default settings see Factory Default Settings on page 48 To use the Factory Res...

Page 41: ...mywifiext net A login window opens 3 Enter your email address and password and click the LOG IN button The Status page displays 4 Click the Menu icon The extender menu displays 5 Select Settings Other...

Page 42: ...click the LOG IN button The Status page displays 4 Click the Menu icon The extender menu displays 5 Select Settings Firmware Update 6 Click the CHECK ONLINE button 7 If new firmware is available foll...

Page 43: ...tely 1 On a computer or WiFi device that is connected to the extender network launch a web browser 2 In the address field of your browser enter www mywifiext net A login window opens 3 Enter your emai...

Page 44: ...44 5 5 FAQs and Troubleshooting This chapter covers the following topics FAQs Cannot Connect to the Extender Cannot Join a WiFi Network and Receive an Error Message...

Page 45: ...in email address and password What can I do In the login window click the Username Password Help link and answer the security questions that you set up during the initial setup For more information se...

Page 46: ...5 is not the same as Password25 or password25 If the extender cannot detect your WiFi network check to see if your WiFi network is still working Make sure that the WiFi router is turned on If possible...

Page 47: ...47 A A Factory Settings and Technical Specifications This appendix covers the following topics Factory Default Settings Technical and Environmental Specifications...

Page 48: ...s Table 2 Factory default settings Feature Default Settings Smart Setup Enabled WiFi communication Enabled WiFi network name SSID NETGEAR_EXT Security Disabled Transmission speed Auto1 1 Maximum WiFi...

Page 49: ...hnical Specifications Network protocol and standards compatibility Data and routing protocols TCP IP DHCP server and client DNS relay Physical specifications Dimensions 55 17 x 67 17 x 39 mm 2 17 x 2...

Reviews: