


User’s Manual
28
CAUTION: The
remote connection will be disconnected temporarily after changing the SSL settings.
NOTE: This product includes software developed by the OpenSSL Project for use in the OpenSSL Toolkit
(http://www.openssl.org/).
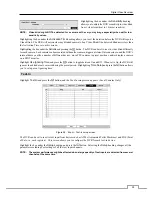
Highlight the first box beside
Remote Watch
–
bps/ips
. Press the
Up
and
Down
arrow buttons to set the Transfer
Speed from 50Kbps to 1Gbps.
Highlight the second box beside
Remote Watch
–
bps/ips
. You can select the unit of measure for the transfer speed
between:
bps
and
ips
. Press the
button to set the transfer speed.
Highlight the box beside
Remote Watch
–
Quality
and press the
button. You can select the Quality from:
Very
High
,
High
,
Standard
and
Basic
. Press the
button to set the Quality.
Highlight the box beside
Remote Watch
–
Resolution
and press the button. You can select the Resolution from:
High (Half D1)
and
Standard (CIF)
. Press the
button to set the Resolution.
NOTE: The higher Quality and Resolution settings require higher Transfer Speed settings. The transfer speed
you set is the maximum speed. Depending on the network environment, this speed may not be achieved.
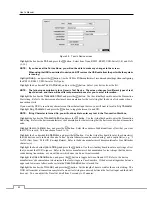
Highlight
Use WebGuard Service
and press the
button to toggle between On and Off. See
Appendix – WebGuard
for detailed descriptions of the WebGuard service.
Highlight the box beside
Port
and press the
button. Set the port number used when accessing WebGuard by using
the
Up
and
Down
arrow buttons to increase or decrease the numbers.
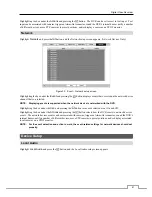
IP Address
Highlight
IP Address
and press the button, and the IP Address setup screen displays.
Figure 19 : Network – IP Address (Manual) setup screen.
Highlight the box beside
Type
and press the
button. You can select the type of network configuration from:
Manual
,
DHCP
and
ADSL (with PPPoE)
. Select the desired type and press the
button.
Selecting
Manual
from the Type allows you to set up LAN parameters manually.
Change the numbers by highlighting them and using the
Up
and
Down
arrow buttons to increase or decrease the number.
The factory default LAN settings are:
IP
Address: 192.168.1.129
Gateway:
192.168.1.254
Subnet
Mask:
255.255.255.0
NOTE: You will need to get the appropriate IP Address, Gateway and Subnet Mask from your network
administrator.
Summary of Contents for 16-channel models
Page 1: ......
Page 2: ......
Page 16: ...User s Manual 8 ...