6-8
Screen
Type
4:3 Screen
16:9 Screen
Input
Signal
4:3
4:3
4:3 Window
4:3 Fill
Letterbox
Squeeze
Wide Screen
Wide Screen
Letterbox
Crop
Letterbox
Image Options
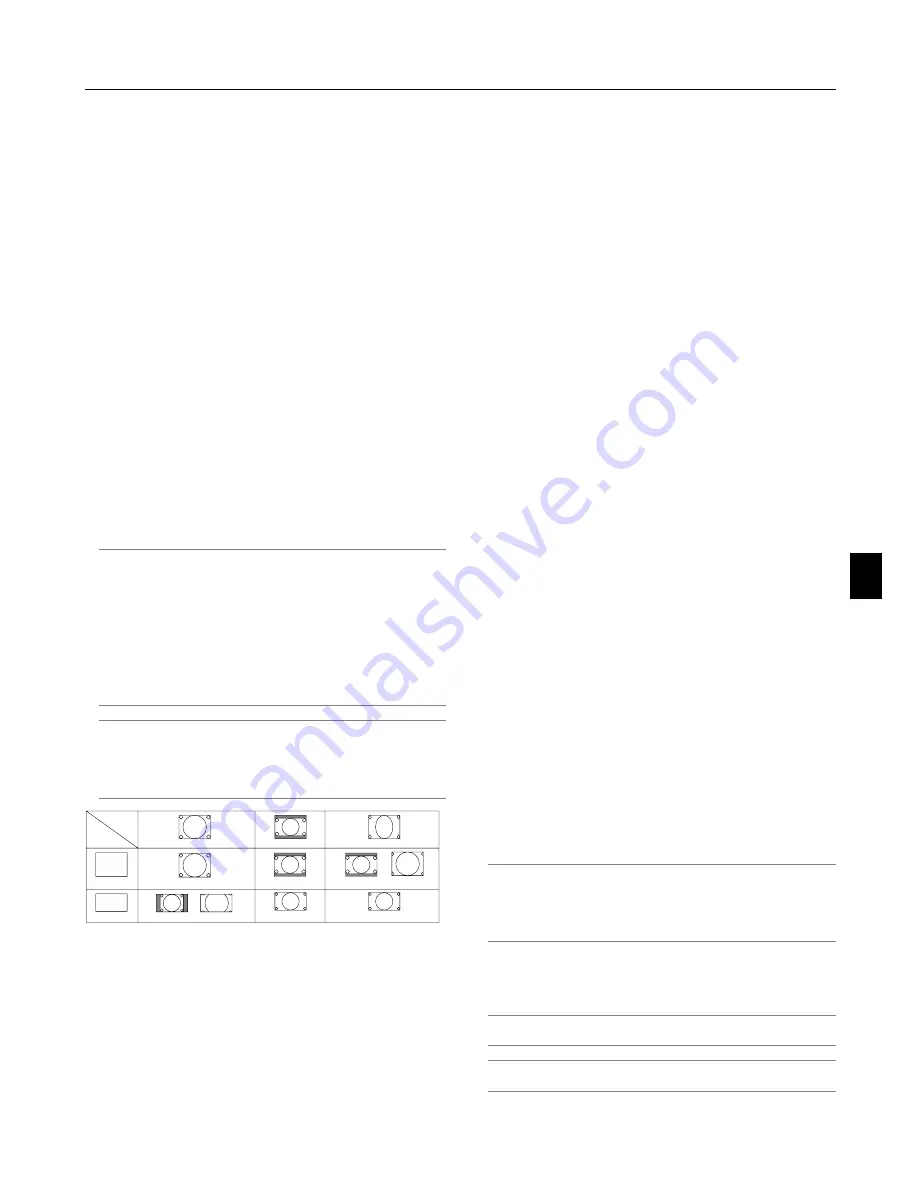
Selecting Aspect Ratio (not available for Viewer and LAN)
Aspect Ratio allows you to select the best Aspect mode to dis-
play your source image.
When screen size 4:3 is selected for the source, the following
selections will display:
4:3 ............... Standard 4:3 aspect
Letter Box .... Reduced to display the true aspect with black
borders on top and bottom
Wide Screen .. Left & Right stretched with black borders on top
and bottom
Crop ............ Left & Right stretched.
Left & Right sides cut. Available for 4:3 only.
When screen size 16:9 is selected for the source, the follow-
ing selections will display:
4:3 Window .. Reduced to display the true aspect with black
borders on right and left
Letter Box .... Standard 16:9 aspect
Wide Screen Left and right stretched to display the true as-
pect
4:3 Fill .......... Stretched to display in 16:9 aspect ratio
NOTE: You can adjust image positions vertically for source with black
borders. See page 6-18 “Selecting Aspect Ratio and Position for
Screen” for setting image positions.
Copyright
Please note that using this projector for the purpose of commercial
gain or the attraction of public attention in a venue such as a coffee
shop or hotel and employing compression or expansion of the screen
image with a "Aspect Ratio" or "Screen" setting may raise concern
about the infringement of copyrights which are protected by copy-
right law.
NOTE: During 3D Reform adjustment, "Aspect Ratio" may not be avail-
able.
Should this happen, first reset the 3D Reform data and then do set-
ting again. Second repeat the 3D Reform adjustment.
Changing the aspect ratio can limit 3D Reform in its adjustable range.
Masking Unwanted Area (Blanking)
This feature allows you to mask any unwanted area of the screen
image.
Adjust the Top, Bottom, Left or Right blanking with the SELECT
왗
or
왘
button.
Adjusting Position and Clock
This allows you to manually adjust the image horizontally and
vertically, and adjust Clock and Phase.
Horizontal/Vertical Position:
Adjusts the image location horizontally and vertically using the
SELECT
왗
and
왘
buttons. This adjustment is made automati-
cally when the Auto Adjust is turned on. See "Auto Adjust" on
page 6-16 for turning on or off the Auto Adjust feature.
Clock ........... Use this item to fine tune the computer image
or to remove any vertical banding that might
appear. This function adjusts the clock frequen-
cies that eliminate the horizontal banding in the
image.
Press the SELECT
왗
and
왘
buttons until the
banding disappears. This adjustment may be
necessary when you connect your computer for
the first time. This adjustment is made automati-
cally when the Auto Adjust is turned on.
Phase .......... Use this item to adjust the clock phase or to
reduce video noise, dot interference or cross talk.
(This is evident when part of your image ap-
pears to be shimmering.) Use the SELECT
왗
and
왘
buttons to adjust the image.
Use "Phase" only after the "Clock" is complete.
This adjustment is made automatically when the
Auto Adjust is turned on.
Selecting Resolution
This allows you to activate or deactivate the Advanced AccuBlend
feature.
Auto ............. Turns on the Advanced AccuBlend feature. The
projector automatically reduces or enlarges the
current image to fit the full screen.
Native .......... Turns off the Advanced AccuBlend feature. The
projector displays the current image in its true
resolution.
See "Auto Adjust" on page 6-16 for turning on
or off the Auto Adjust feature.
NOTE:
* When "Resolution" is set to "Native", "3D Reform", "Aspect Ratio",
"Screen" and "Overscan" are not available.
* While you are displaying an image with higher resolution than the
projector's native resolution, “Resolution” is not available.
Selecting Overscan Percentage
Select overscan percentage (0%, 5%, 10% and 25%) for signal.
NOTE: When "Resolution" is set to "Native", this feature is not avail-
able, and the stored settings and adjustments are invalid.
NOTE: When "4:3 Fill" or "Crop" is selected in "Aspect Ratio", this fea-
ture is not available.
6. Using On-Screen Menu
Summary of Contents for WT600 - XGA DLP Projector
Page 1: ...WT600 Projector User s Manual...
Page 77: ...Printed in Japan 7N8P3012...


