


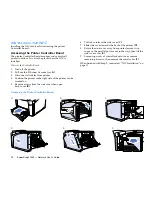


Configuring the NIC
15
CONNECTING THE PRINTER
C
ONFIGURING
THE
NIC
Using the Network Printer Manager
The SuperScript 1800 Network Printer Manager (NPM) is an
administrative tool that can also be used for configuring the
NIC.
The NPM must be installed on a computer running
Windows 95, 98, or NT 4.0 and which is connected to the
network. For more information about NPM, see Appendix B,
on page 47.
To configure the NIC using the Network Printer Manager:
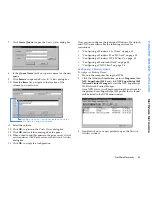
1.
Click the Windows
Start
button, point to
Programs
, then
NEC SuperScript 1800
, and click
NEC SuperScript 1800
Network Printer Manager
to start the NEC SuperScript
1800 Network Printer Manager.
Once NPM starts, it will begin searching the network for
the printer. Every SuperScript 1800 printer found will be
listed in the NPM main window.
2.
Select the printer that must have it’s NIC setup.
The printer can be identified from the
Printer Name
column by its NIC serial number, NECnnnnnnnnnnnn,
where
nnnnnnnnnnn
is the MAC address of the card.
The MAC Address for the NIC can be determined by
printing a Network Configuration page. For instructions
about printing that page, see “Printing a Network
Configuration Page” on page 16.
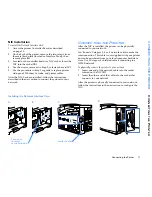
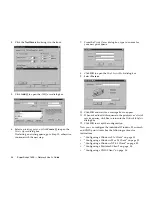
3.
From the
Settings
menu, select
Network Interface
to
open the Network Interface properties window.
4.
Click the
General
tab to bring it to the front.
5.
In the
Printer Name
text box, type in a name for the
printer.
6.
In the
Printer Description
text box, type in a description
for the printer; for example, its location.
7.
Click the
TCP/IP
tab to bring it to the front.
8.
Assure the
TCP/IP
check box is selected.
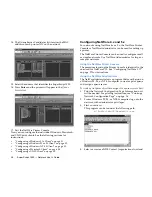
9.
From the
IP Address Assignment Method
drop-down
list, select the method used by the Network Operating
System (NOS) for assigning IP addresses to computers
and printers connected to the network.
10. If the
STATIC
method was selected, in the
IP Address
text boxes, type in the IP address for the printer.
•
In the
Subnet Mask
text boxes, type in the subnet
mask.
•
In the
Default Gateway
text boxes, type in the
gateway (router) IP address.
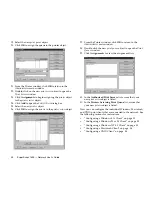
11. If print jobs will be received from NetWare clients, click
the
NetWare
tab to bring it to the front.
•
Select the
Enable NetWare
check box.
•
From the IPX Frame type options, select how the
printer must determine the type of Ethernet frames it
is receiving. If you do not know, select
Auto
.
Item
Description
Static
Select this item if you want to manually enter a
permanent IP address for the printer.
BOOTP
Select this item if you want the NIC to broadcast
a request to a BOOTP server for an IP address.
The printer must be restarted after the NIC is
configured.
RARP
Select this item if you want a the NIC to
broadcast a request to a RARP server for an IP
address. The printer must be restarted after the
NIC is configured.
DHCP
Select this item if you want a DHCP server to
assign an IP address to the printer that may
automatically be changed by the server. One
cause for address change is if the printer is
restarted.
Summary of Contents for SuperScript 1800
Page 1: ...S U P E R S C R I P T 1 8 0 0 NETWORK USER S GUIDE July 1999 808 878291 011A...
Page 6: ...vi SuperScript 1800 Network User s Guide...
Page 10: ...4 SuperScript 1800 Network User s Guide...
Page 14: ...8 SuperScript 1800 Network User s Guide...
Page 28: ...22 SuperScript 1800 Network User s Guide...
Page 52: ...46 SuperScript 1800 Network User s Guide...
Page 62: ...56 SuperScript 1800 Network User s Guide...


