8-12 System Upgrade
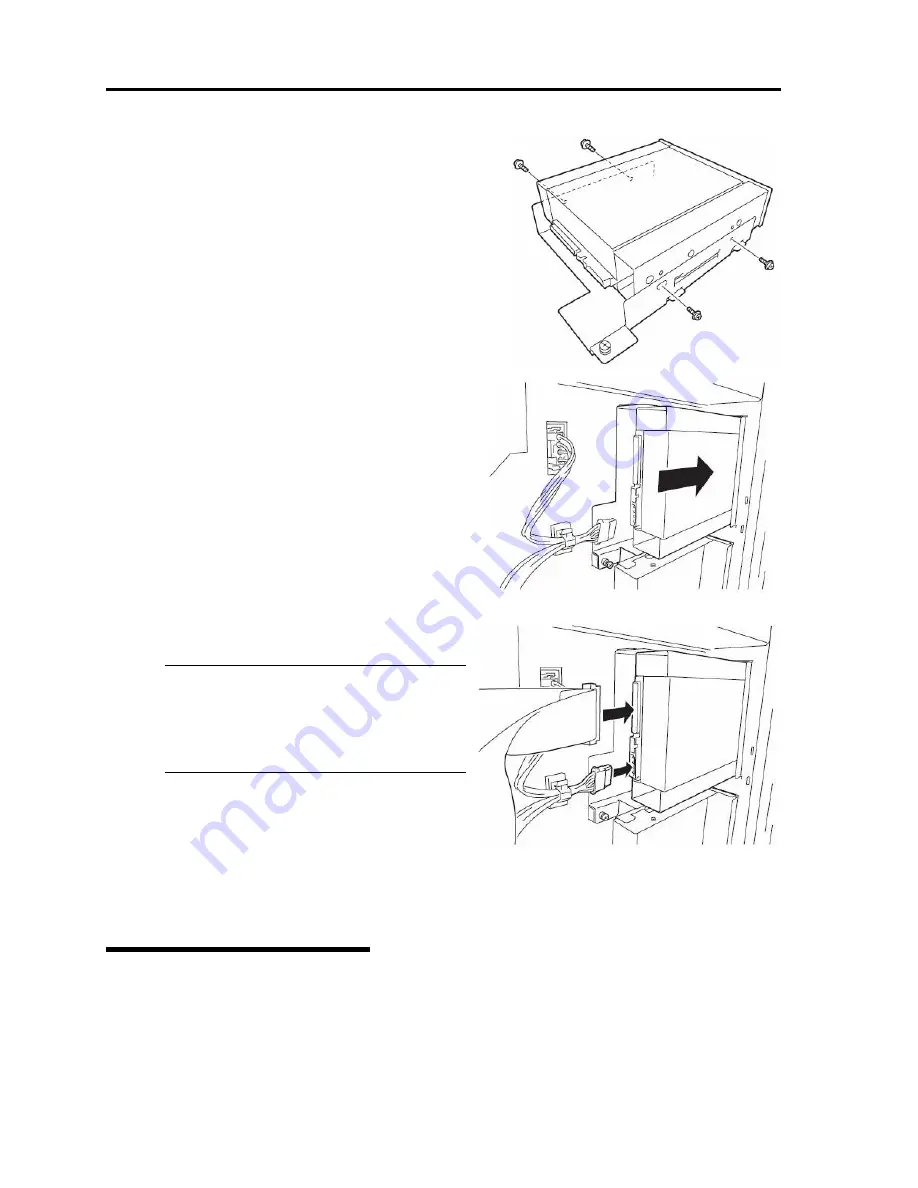
5.
Fix the device to the tray for adding devices with the
four screws.
6.
Gently insert the device into the tray and secure
it with the screw.
ᴾ
7.
Connect the SCSI cable and power cords to the
device.
IMPORTANT:
Distorted connector pins or loose
connections may cause malfunction. Make
sure that the device and cable connectors are
connected correctly.
8.
Secure the side cover with the screws.
9.
Set up the SCSI BIOS referring to the manual
shipped with the SCSI controller.
10.
Install the device driver of the installed device.
Removing 5.25-inch Device
Removal is the reverse of the installation.
Summary of Contents for N8800-096F
Page 8: ...NEC Express5800 WARNING CAUTION CAUTION...
Page 9: ......
Page 15: ......
Page 22: ...Precautions for Use 1 3 Rack model Front Rear...
Page 24: ...Precautions for Use 1 5 Water Cooling kit...
Page 34: ...Precautions for Use 1 15 SAFETY INDICATIONS WARNING 32 5 CAUTION...
Page 35: ...1 16 Precautions for Use WARNING CAUTION P IW 9 6 7...
Page 36: ...Precautions for Use 1 17 CAUTION 1...
Page 37: ...1 18 Precautions for Use WARNING CAUTION...
Page 38: ...Precautions for Use 1 19 CAUTION CAUTION...
Page 39: ...1 20 Precautions for Use WARNING CAUTION...
Page 40: ...Precautions for Use 1 21 CAUTION...
Page 44: ...Precautions for Use 1 25 SAFETY INDICATIONS WARNING POWER CAUTION...
Page 45: ...1 26 Precautions for Use WARNING CAUTION AC 4 5m 14 76 ft V 10A 6 7...
Page 46: ...Precautions for Use 1 27 WARNING CAUTION...
Page 47: ...1 28 Precautions for Use CAUTION NEC...
Page 48: ...Precautions for Use 1 29 WARNING CAUTION...
Page 49: ...1 30 Precautions for Use CAUTION CAUTION...
Page 50: ...Precautions for Use 1 31 CAUTION EIA...
Page 51: ...1 32 Precautions for Use 1 9 836 56 3RZHU KXWH3OXV a e a 173 WR e WR 1 SUHVV IW e 1...
Page 52: ...Precautions for Use 1 33...
Page 53: ...1 34 Precautions for Use 5 5 WARNING...
Page 55: ...1 36 Precautions for Use...
Page 68: ...General Description 2 13 Rack model with the front door open...
Page 73: ...2 18 General Description Rear View Tower model Rack model...
Page 110: ...Windows Setup and Operation 3 15 7 Configure the mirror of the extended volume...
Page 128: ...Windows Setup and Operation 3 33 4 The confirmation dialog box appears Click Yes button...
Page 164: ...System Configuration 4 27 Exit Move the cursor onto Exit to display the Exit menu...
Page 225: ...4 88 System Configuration This page is intentionally left blank...
Page 286: ...Installing and Using Utilities 5 61 Sample screen of Server Maintenance Utility...
Page 327: ...6 14 Maintenance This page is intentionally left blank...
Page 381: ...7 54 Troubleshooting This page is intentionally left blank...
Page 424: ...Specifications A 3...
Page 425: ......


