background image

安全注意事項


電源及電源線注意事項


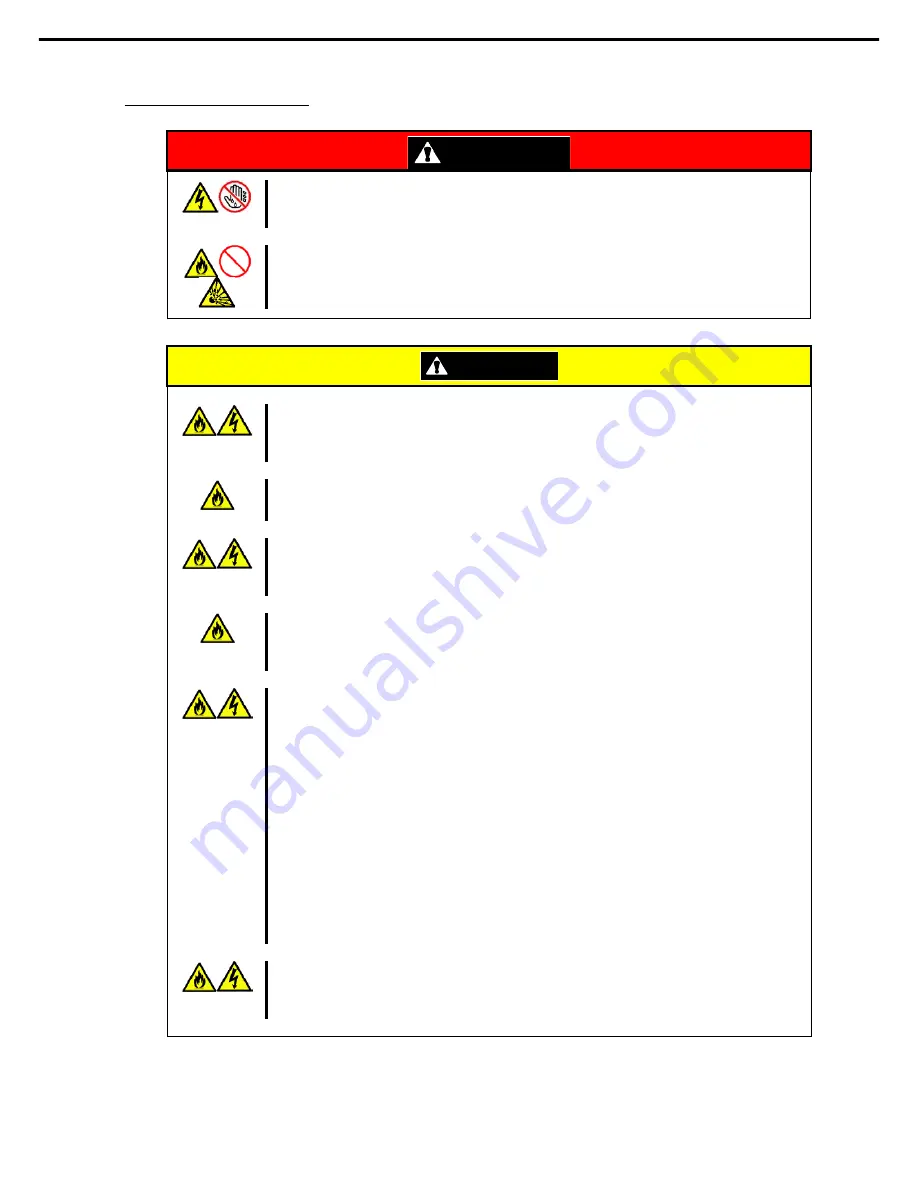
WARNING


請勿以濕的手拿取電源插頭。


請勿以濕的手插拔電源插頭,否則有觸電的危險。


請勿將接地線連接到瓦斯管線。


請勿將接地線連接到瓦斯管線,忽視此警告可能導致瓦斯爆炸。


CAUTION


請插入適當的插座。


請使用指定電壓的接地壁式插座。使用不當電源可能引起火災和漏電。


請勿使用延長線安裝伺服器。如果連接與本伺服器電源規格不符的電線,會因過熱而導致火災。


請勿連接電源線到有數個連接頭的非法電源插座。


插座如果超過額定電流,會因過熱而導致火災的危險。


請勿用拉的方式拔下電源線。


要從伺服器拔下電源線時,請握住電源線的連接頭並直直的拔下,若僅拉住線的部份,會給予連
接頭過大壓力,導致線及連接頭的損壞,進而導致電擊傷害或火災。


插入電源線到電源插頭時,請儘可能插入到底。


若僅插入一半會因接觸不良而發熱造成火災。另插入一半的插頭部份,若附著灰塵或水滴等,也
會發熱而導致火災。


請勿使用未經授權的電源線。


請使用隨伺服器所檢附的電源線,若使用未經授權的電源線,當電流超過流動速率時可能引起火
災。


此外,請注意下列事項以避免因電源線損壞導致電擊或火災。


請勿伸長電源線。


請勿夾住電源線。


請勿彎折電源線。


請勿讓電源線靠近化學藥品。


請勿扭轉電源線。


請勿在電源線上放置物品。


請勿捆綁電源線。


請勿對電源線進行改造、加工及修復。


請勿用

訂書針或其他東西

等固定電源線。


請勿使用任何已損壞的電源線。(損壞的電源線要立即更換為相同規格的電源線。更換事宜請
與服務代表聯繫)


請勿使用其他設備所檢附的電源線。


請使用隨伺服器所檢附的電源線,此電源線乃針對您伺服器所設計,安全性已經過測試,所以請
勿使用其他用途所檢附的電源線,否則可能引起電擊或火災。


Express5800/R320c-E4, R320c-M4, R320d-E4, R320d-M4    User's Guide 

26 

Summary of Contents for Express5800/R320d-M4 Series

Page 1: ...apter 1 General Description Chapter 2 Preparations Chapter 3 Setup Chapter 4 Appendix 30 104 01 101 05 May 2014 fifth Edition NEC Corporation 2014 Express5800 R320c M4 Model Number N8800 174F EXP320Q...

Page 2: ...cation for this server Chapter 3 Setup System BIOS configurations and summary of EXPRESSBUILDER Chapter 4 Appendix Specifications PDF Installation Guide Chapter 1 Installing OS Installation of OS and...

Page 3: ...and on warning labels 14 Safety notes 15 Safety Instructions 15 General 15 Rack installation 16 Power supply and power cord use 17 Installation relocation storage and connection 18 Cleaning and worki...

Page 4: ...4 70 2 3 1 Installing the Tower Conversion Kit 70 2 3 2 Installing the Rack mount Model to the Tower Conversion Kit 72 2 4 Connection 77 2 4 1 Connecting to a uninterruptible power supply UPS 79 Chapt...

Page 5: ...data loss and other serious malfunctions could occur Note Indicates items that must be confirmed when handling the hardware or operating software Tips Indicates information that is helpful to keep in...

Page 6: ...his document Official names of Windows Windows Server 2012 Windows Server 2012 Standard Windows Server 2012 Datacenter Windows Server 2008 R2 Windows Server 2008 R2 Standard Windows Server 2008 R2 Ent...

Page 7: ...ptec its logo and SCSI Select are registered trademarks or trademarks of Adaptec Inc of the United States LSI and the LSI logo design are trademarks or registered trademarks of LSI Corporation Adobe t...

Page 8: ...to cause harmful interference in which case the user will be required to correct the interference at his own expense Industry Canada Class A Emission Compliance Statement Avis de conformit la r glemen...

Page 9: ...3 2 3 2 1 20A UPS JIS C 6802 IEC 60825 1 1 Vietnum Complying with CIRCULAR No 30 2011 TT BCT Hanoi August 10 2011 Temporary regulations on content limit for certain hazardous substances in electrical...

Page 10: ...tronic equipment TR on RoHS The content of hazardous substance with the exemption of the applications listed in the Annex 2 of TR on RoHS 1 Lead Pb not over 0 1wt or 1000wt ppm 2 Cadmium Cd not over 0...

Page 11: ...ation Technology ICT equipment or electrical accessories such as cables or DVDs When disposing of used products you should comply with applicable legislation or agreements you may have The mark on the...

Page 12: ...ess of article 4 NEC Corporation assumes no responsibility for effects resulting from your operations 6 The sample values used in this document are not the actual values Keep this document for future...

Page 13: ...ree of danger These terms are defined as follows WARNING Indicates there is a risk of death or serious personal injury CAUTION Indicates there is a risk of burns other personal injury or property dama...

Page 14: ...with wet hand Otherwise an electric shock may be caused Do not touch the component specified by this symbol Otherwise an electric shock or burn may be caused Do not use the server in the place where...

Page 15: ...nated standard This server can be mounted onto a 19 inch rack that conforms to EIA standards Do not mount the server onto any rack that does not conform to EIA standards Doing so may cause a server ma...

Page 16: ...he door make sure that both upper and lower hinge pins are held in place Incomplete attachment may cause components to fall off as well as personal injury Do not extend any device from the rack that i...

Page 17: ...urrent exceeding the rated flow overheats the outlet which may cause a fire Insert the power plug into the outlet as far as it goes Heat generation resulting from a halfway inserted power plug imperfe...

Page 18: ...ces or any place other than specified in this User s Guide Failure to follow this instruction may cause a fire A dusty place A humid place such as near a boiler A place exposed to direct sunlight An u...

Page 19: ...loose cable connections Do not use any damaged cable Cleaning and working with internal devices WARNING Do not disassemble repair or alter the server Never attempt to disassemble repair or alter the...

Page 20: ...c shock from lightning strike Keep animals away from the server Keep animals such as pets away from the server Pet hair or other waste enters the server which may cause a fire or electric shock Do not...

Page 21: ...gnale qu il y a un risque de br lures d autre blessure ou de d g ts mat riels Les pr cautions et notices contre les risques sont pr sent es avec l un des trois symboles suivants Les diff rents symbole...

Page 22: ...ette pr caution n est pas observ e une d charge lectrique ou un incendie peut tre caus N utilisez pas le produit dans un endroit o de l eau ou un liquide peut tre vers Si cette pr caution n est pas ob...

Page 23: ...d ration la connexion de l quipement l alimentation du circuit et l effet que la surcharge des circuits pourrait avoir sur la protection contre les surintensit s et les c bles d alimentation Il faudra...

Page 24: ...SAFETY INDICATIONS WARNING EIA 19 EIA EIA 19 CAUTION Express5800 R320c E4 R320c M4 R320d E4 R320d M4 User s Guide 24...

Page 25: ...CAUTION 44U Express5800 R320c E4 R320c M4 R320d E4 R320d M4 User s Guide 25...

Page 26: ...WARNING CAUTION Express5800 R320c E4 R320c M4 R320d E4 R320d M4 User s Guide 26...

Page 27: ...WARNING CAUTION CPU IO 18Kg 2 bezel bezel Express5800 R320c E4 R320c M4 R320d E4 R320d M4 User s Guide 27...

Page 28: ...CAUTION NEC Express5800 R320c E4 R320c M4 R320d E4 R320d M4 User s Guide 28...

Page 29: ...WARNING CAUTION Express5800 R320c E4 R320c M4 R320d E4 R320d M4 User s Guide 29...

Page 30: ...CAUTION Express5800 R320c E4 R320c M4 R320d E4 R320d M4 User s Guide 30...

Page 31: ...with potential hazards to draw attention from users to potential hazards involved in handling the server This label is either attached or printed on the component Do not remove or black out this label...

Page 32: ...Warning labels Express5800 R320c E4 R320c M4 R320d E4 R320d M4 User s Guide 32 External view Front view Rear view...

Page 33: ...ose that guarantee server operations temperature 10 to 35 C humidity 20 to 80 Check the system clock approximately once per month Use of a time server NTP server is recommended if high accuracy timing...

Page 34: ...t for a sufficient period to use the server and components in the operating environment Reference Time effective at avoiding condensation in winter more than 10 C differences between the room temperat...

Page 35: ...on a carpet where static electricity is likely to be generated be sure to take anti static measures beforehand Using the Work Table Place the server on an anti static mat to work with Clothing Do not...

Page 36: ...screen from reflecting bright lights and to make the display contents easy to see Working without adjusting the display to a comfortable angle makes it difficult for you to maintain a proper posture a...

Page 37: ...e of each part 1 Preface 2 Accessories Verify the condition of your server s accessories 3 Standard Features This section describes the server s features and the server management 4 Names and Function...

Page 38: ...instantaneously isolate the failed parts to assure non stop running operation will be moved smoothly from one module to the other minimizing damage to it You can use this Express5800 ft series in a mi...

Page 39: ...to read the documents so make sure you have it installed in your PC Make sure you have all accessories and inspect them If an accessory is missing or damaged contact your sales representative Importa...

Page 40: ...Mbps supported 10GBASE T 1000BASE T 100BASE TX 2 ports interface 10Gbps 1Gbps 100Mbps supported Express5800 R320c M4 R320d M4 only High reliability Memory monitoring feature error correction error det...

Page 41: ...320d E4 2 ports Express5800 R320c M4 R320d M4 4 ports Management LAN port 1 port Ready to use No cable connection is required to install a hard disk drive hot swap supported Many built in Features El...

Page 42: ...res eliminate server downtime that is usually caused by network disconnection or trouble with the I O controller network adapter or disk drive and support operation of the network and server applicati...

Page 43: ...ser access without stopping application service Automatic reconfiguration When the failed module restarts after the trouble is corrected Express5800 ft series will perform reconfiguration automaticall...

Page 44: ...re The above are screens when Express5800 R320c E4 is used For Express5800 R320c M4 up to 16 logical CPUs are displayed in the one CPU configuration and up to 32 logical CPUs are displayed in the two...

Page 45: ...er supply and others Temperature Monitors the temperature inside of the chassis Fan Monitors the fans Voltage Monitors the voltage inside of the chassis Power supply Monitors the power supply unit Cov...

Page 46: ...r and ExpressUpdate Agent allows you to manage versions of firmware and software as well as update them by applying update packages This feature automatically updates modules without stopping the syst...

Page 47: ...odules fails the LED goes on amber Details can be known by checking 14 EXPRESSSCOPE The LED goes on amber when the failed CPU IO module cannot be identified 3 System FT LED Displays the device status...

Page 48: ...ls can be confirmed by checking 14 EXPRESSSCOPE The LED goes on amber when the failed CPU IO module cannot be identified 9 System FT LED Displays the device status Green operating under duplex conditi...

Page 49: ...E4 model R320c M4 R320d M4 model 1 3 5 1 5 2 6 1 6 2 6 4 6 5 6 3 7 1 7 2 8 9 2 2 1 2 2 5 1 1 5 1 2 5 2 1 5 2 2 1 3 5 1 5 2 6 1 6 2 6 4 6 5 6 3 7 1 7 2 8 9 2 2 1 2 2 5 1 1 5 1 2 5 2 1 5 2 2 4 1 4 2 4...

Page 50: ...supporting 1000BASE T 100BASE TX 10BASE T 5 1 LAN1 5 1 1 LINK ACT LED 5 1 2 SPEED LED 5 2 LAN2 5 2 1 LINK ACT LED 5 2 2 SPEED LED 6 Power unit Standard power supply unit 6 1 Stopper Lever for the CPU...

Page 51: ...onents Chapter 1 General Description 4 4 External View 1 Front bezel The cover to protect devices in the front 2 LEDs For more information see Chapter 1 4 8 LEDs 1 2 Express5800 R320c E4 R320c M4 R320...

Page 52: ...1 Status LED Lights while accessing the loaded optical disk 2 Tray eject button Ejects the tray 3 Emergency hole If the tray eject button fails to eject tray insert a metal pin into this hole to forci...

Page 53: ...ions of Components Chapter 1 General Description 4 6 CPU IO Module R320c E4 R320d E4 without top cover R320c M4 R320d M4 without top cover PCI riser card Express5800 R320c E4 R320c M4 R320d E4 R320d M...

Page 54: ...ows internal view of CPU IO module without ducts 1 HDD BP Backplane 2 Cooling fan 3 Processor CPU Mounted below the heat sink 4 DIMM Option 5 CPU IO board 6 PCI Riser card R320c M4 R320d M4 only 7 Pow...

Page 55: ...5 HDD BP connector 6 CMOS Clear jumper Refer to Chapter 1 10 3 Clearing BIOS Settings CMOS Memory in Maintenance Guide 7 Password Clear jumper Refer to Chapter 1 10 3 Clearing BIOS Settings CMOS Memo...

Page 56: ...FAULT LED System FT LED System ID LED Module POWER LED Disk ACCESS LED EXPRESSSCOPE Optical disk STATUS LED Front View With front bezel removed LINK ACT LED SPEED LED 1G LAN connector Power unit LED M...

Page 57: ...lling Internal Optional Devices Describes how to install or remove optional devices You can skip this section if you did not purchase any optional devices 2 Installation and Connection You must place...

Page 58: ...ional device requiring installation you may skip this section Important We recommend that optional devices be installed by a maintenance service staff from your maintenance service company authorized...

Page 59: ...hard disk drive or CPU IO module remove the front bezel Removal Insert the provided security key bezel lock key into the key slot and push lightly Turn the key to the left to unlock 1 Hold the right...

Page 60: ...precautions to use the server safely Failure to observe the precautions may cause burns injury and property damage For details see Safety precautions in Precautions for Use Do not carry or install th...

Page 61: ...Place where chemicals may be accidentally sprayed over Place where a carpet not subject to anti static process is laid Place where some objects may be fallen on the rack Place near a device generatin...

Page 62: ...chassis weighs about 10 kgs At least two persons are required to install it CPU IO module weighs about 18 kgs At least two persons are required to install it Do not leave the CPU IO module of the serv...

Page 63: ...provided with the rack Checking the place to install Decide the place height to install Next to the square hole of the rack an imprinted mark is placed for 1U This is the unit to show the height of t...

Page 64: ...flat side facing inside Place them with the panhead screws with washers that come with the device symmetrically total 4 Fasten the screws tentatively not tightly 3 Fix the core nuts to the front side...

Page 65: ...a flat blade screwdriver Note Make sure that the core nuts on left and right sides are level 4 Remove two CPU IO modules from the chassis 5 Loosen the screw and remove the DVD drive unit from the chas...

Page 66: ...s attached to the device to the 4 places at the top and the bottom on front and back sides total 8 from the rear 9 Fasten tightly the pan head screws attached to the device to each 2 places right and...

Page 67: ...m Backplane removed in Step 6 and secure it with screws 12 Mount the DVD drive unit removed in Step 5 and secure it with screws 13 Mount the CPU IO module 0 removed in Step 4 Tips Mount the module whi...

Page 68: ...Raise the lock levers on the left and right sides 15 Fasten the levers on the left and right sides with screws 16 Mount the CPU IO module 1 in the same way as described in Steps 13 through 15 Express5...

Page 69: ...ver is powered off and remove all the power cords and interface cables from the server 2 Remove the front bezel 3 Loosen the screws on the left and right sides of the front panel of the CPU IO module...

Page 70: ...o observe the following precautions to use the server safely Failure to observe the precautions may cause burns injury and property damage For details see Safety precautions in Precautions for Use Do...

Page 71: ...atic carpet Place that may be subject to falling objects Place that is close to some equipment that generates intense magnetic field e g TV set radio broadcasting communications antenna power transmis...

Page 72: ...ls see Safety precautions in Precautions for Use Do not drop the server 4U chassis weighs about 10 kgs At least two persons are required to install it CPU IO module weighs about 18 kgs At least two pe...

Page 73: ...on the rear of the tower conversion kit 4 Remove the AC lock bracket 5 Remove two CPU IO modules from the chassis 6 Remove the DVD drive unit from the chassis 7 Remove the rack mount bracket handle f...

Page 74: ...rom the front side of the tower conversion kit Note Push the chassis to the end of tower conversion kit 9 Fix each 2 places top and bottom on the front side total 4 with 4 pan head screws attached to...

Page 75: ...rsion kit with 4 flat screws 11 Mount AC lock bracket and secure it with a screw 12 Insert the DVD drive unit to the chassis and secure it with screw Tower conversion kit on the rear top Tower convers...

Page 76: ...on the way press down the lever to unlock Keep pressing down the lock lever to keep it unlocked and push the module to the end 14 Close the levers on the top and the bottom and secure the CPU IO modu...

Page 77: ...cautions in Precautions for Use Do not hold the power plug with wet hands Do not connect the ground wire to a gas pipe CAUTION Be sure to observe the following precautions to use the server safely Fai...

Page 78: ...s with USB interface Connecting a powered peripheral device to the powered server will cause malfunctions and failures In the case of standard configuration you need to complete setup of the operating...

Page 79: ...er to link the server with the power supply from the UPS To change the settings select Server and then AC LINK in the BIOS setup utility and change the displayed parameters Select Power On to perform...

Page 80: ...tructions in this section 3 EXPRESSSCOPE Engine 3 EXPRESSSCOPE Engine 3 provides useful features through the Baseboard Management Controller BMC 4 EXPRESSBUILDER EXPRESSBUILDER helps you to install an...

Page 81: ...er wait at least 30 seconds before turning it on again 1 Power on the display unit and other peripheral devices connected to the server Note If the power code is connected to a power controller like a...

Page 82: ...connect or disconnect USB device while POST is running Do not power off the server while POST is running While the NEC logo is displayed on the screen Express5800 ft series executes a power on self t...

Page 83: ...ETUP you will be prompted to enter password after the logo is displayed If you enter the incorrect password three times consecutively POST aborts You can no longer proceed In this case power off the s...

Page 84: ...and perform POST For details on the utility refer to Chapter 3 3 SAS Configuration Utility in Maintenance Guide 7 The screen shows the ID numbers of the connected disk drive 8 The OS starts when POST...

Page 85: ...an error message displayed The following devices are connected to the primary CPU IO module When one CPU IO module is disconnected because of a failure the remaining module is selected automatically...

Page 86: ...r a while the following message will be displayed on the lower left of the screen The on screen message depends on your system environment Press F2 SETUP F4 ROM Utility F12 Network If you press F2 key...

Page 87: ...is selected Enter key Press this key to confirm the selected parameter Esc key Pressing this key cancels pop up dialog or takes you to the previous screen on submenu screen If you keep pressing this...

Page 88: ...press this key the following window appears If you select Yes restore the parameters of the currently selected item to the default setting This might be different from the parameters configured befor...

Page 89: ...X is PCI slot number of the option board Boot Change the boot order of devices Boot Boot Option Priorities Change the boot priority When you use EXPRESSBUILDER set the highest priority to CD DVD Use...

Page 90: ...ected to the network you can remotely perform the following over a web browser or SSH client Manage the server Remotely control the keyboard video and mouse KVM Remotely access a CD DVD floppy disk IS...

Page 91: ...on the lower left of the screen Press F2 SETUP F4 ROM Utility F12 Network 2 Press the F4 key to launch Off line TOOL while the message is displayed You can also press the F4 key while the message is...

Page 92: ...ess Subnet Mask 6 Connect the LAN cable to the management LAN connector in order to connect to the network It will be available for use if you access EXPRESSSCOPE Engine 3 via Web browser from managem...

Page 93: ...ruction manuals Stores various manuals such as User s Guide Installation Guide and Maintenance Guide 4 2 Usage of EXPRESSBUILDER Use EXPRESSBUILDER to install operating system or diagnose your system...

Page 94: ...3 Setup 5 Installing Software Components Continue to install software components such as OS Refer to the instructions below Installation Guide Windows Installation Guide VMware Express5800 R320c E4 R3...

Page 95: ...on that controls the UPS 1 Shut down the OS 2 The server automatically turns off after the OS shuts down The Module POWER LED on each CPU IO module will be blinking while AC power is supplied 3 Power...

Page 96: ...C Express5800 Series Express5800 R320c E4 R320c M4 R320d E4 R320d M4 Appendix 1 Specifications Describes specifications of the server 4 4 Express5800 R320c E4 R320c M4 R320d E4 R320d M4 User s Guide 9...

Page 97: ...esolution 16 770 000 colors 640 480 800 600 1 024 768 65536 colors 1 280 1 024 Interface 4xUSB 2 0 1x Front 3x Rear 1x Analog RGB Mini D sub 15 pin 1x Rear 2x1000BASE T LAN connector 1000 100 10BASE T...

Page 98: ...y resolution 16 770 000 colors 640 480 800 600 1 024 768 65536 colors 1 280 1 024 Interface 4xUSB 2 0 1x Front 3x Rear 1x Analog RGB Mini D sub 15 pin 1x Rear 2x1000BASE T LAN connector 1000 100 10BAS...

Reviews: