background image

4-4 Windows Setup

Step 1: Things Required for Setup

The following explains the setup procedure using the Express Setup program:

IMPORTANT:

Because “Express Setup” formats the entire area of the disk used for installation, all

data on that disk will be deleted. If there is any data partition other than system partition

that contains OS on the disk for reinstallation, you must back up important data in the

data partition first and then start “Express Setup.”

Do not apply service packs to NEC Express5800/320Fc system based on your judgment.

If you desire to apply service packs, contact your sales agent about application status and

apply service packs to NEC Express5800/320Fc system.

TIPS:

For the latest information on support for Windows Service Pack, contact your sales agent.

You need the following to install Windows Server 2003 R2 32-bit Enterprise Edition:

Startup CD-ROM

NEC EXPRESSBUILDER (CD-ROM)

ft Server Control Software UPDATE CD-ROM

This CD-ROM is used to update ft Server Control Software; it may not be shipped with

the equipment. (Not included if “NEC EXPRESSBUILDER” CD-ROM contains the

latest version of software programs at the time of shipment.)

Microsoft® Windows Server™ 2003 R2 32-bit Enterprise Edition Disk1
(hereinafter referred to as “Windows Server 2003 CD-ROM”)

Microsoft® Windows Server™ 2003 R2 32-bit Enterprise Edition Disk2

Windows Server 2003 Service Pack CD-ROM
It is recommended to apply the latest service pack supported by ft Server.

User’s Guide (Setup) (this manual)

User’s Guide

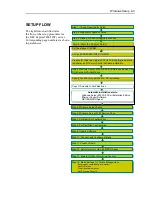
: Entered or selected by the user

: Proceeds automatically

Setup completed

Step 15: Back up Sys tem Information

Summary of Contents for Express5800/320Fc-LR/MR

Page 1: ...NEC Express5800 320Fc system NEC Express5800 320Fc LR MR Setup Guide...

Page 2: ......

Page 3: ...N8800 103F EXP320HR NEC Express5800 320Fc MR User s Guide Setup 1st Edition 7 2007 856 126614 903 A...

Page 4: ...ssed in this document are warranted in accordance with the terms of the Warranty Statement accompanying each product However actual performance of each such product is dependent upon factors such as s...

Page 5: ...r damage to physical assets This guide uses the following three types of symbols to give indications and precautions against a danger They are defined as follows Indicates that there is a risk of a da...

Page 6: ...yesight due to laser beam Indicates a risk of an explosion Indicates a risk of a personal injury Prohibited actions Indicates a general prohibition that is not defined herein Do no touch the indicated...

Page 7: ...There is a risk of an electric shock or fire Indicates a general action to take that is not defined herein Make sure to follow the instructions For detailed notes to set up the machine safely refer to...

Page 8: ...wn expense This class A digital apparatus meets all requirements of the Canadian Interference Causing Equipment Regulations Cet appareil num rique de la classe A respecte toutes les exigences du R gle...

Page 9: ...ows Server 2003 R2 32 bit Standard Edition operating system Microsoft Windows Server 2003 R2 32 bit Enterprise Edition operating system Microsoft Windows Server 2003 Standard Edition operating system...

Page 10: ...ut prior written permission of NEC Corporation 4 All efforts have been made to ensure the accuracy of all information in this manual If you find any part unclear incorrect or omitted in this manual co...

Page 11: ...llow the system to instantaneously isolate the failed parts to assure non stop running operation will be moved smoothly from one module to the other minimizing damage to it Youcan use NEC Express5800...

Page 12: ...system operation after you purchased the product Read the guide in order from Chapter 1 If you perform procedures according to this guide you will set up the product properly Chapter 4 describes how...

Page 13: ...keep in mind when using the server or software CHECK Something you need to make sure when using the server or software TIPS Helpful information something useful to know About our Web Service Informat...

Page 14: ...vi Contents Preface iii About This User s Guide iv How to Use This User s Guide iv Additional symbols v About our Web Service v...

Page 15: ...pter 1 Before Using This chapter includes information necessary for proper and safe operation of the server the main unit and its accessories Go through this chapter before you start setup of the prod...

Page 16: ...nd safely Warning Labels Warning labels are placed in certain parts of the system so that the user stays alert to possible risks Do not remove or damage these labels If some label is missing about to...

Page 17: ...Before Using 1 3 Inside of device...

Page 18: ...y accidents or damage to physical assets resulting from the use of this equipment in such systems or facilities Do not continue to use the server if you detect smoke odor or noise If the server emits...

Page 19: ...rent is exceeded there is a risk of overheating that could lead to a fire Do not plug the cords insecurely Insert the plug firmly into an outlet There is a risk of heat or fire due to poor contact If...

Page 20: ...chloride and or sulfur Avoid installing this product in an environment that may have excessive metal flakes or conductive particles in the air Such environments may cause corrosion or short circuits w...

Page 21: ...ile the power cords are connected to power source be sure to follow the instructions described in this User s Guide Do not touch any internal device of the server unless instructed by this User s Guid...

Page 22: ...the server to cause a fire or electric shock Do not place any object on top of the server The object may fall off to cause injuries damage to hardware and or a fire Do not leave the DVD tray ejected D...

Page 23: ...the rail when you mount dismount the server into from the rack Carry or install the server by more than 3 people To avoid a risk of injuries users should not attempt to carry or install the server int...

Page 24: ...wer branch circuit is not exceeded For more information on installation and wiring of power related facilities contact your electrician or local power company Do not pull out a device during operation...

Page 25: ...l items If any component is missing or damaged contact your sales agent Keep the accessories in a safe place Youwill need them when you perform setup addition of options or replacement of failed compo...

Page 26: ...1 12 Before Using...

Page 27: ...2Chapter 2 About Operating System This chapter gives essential information on the Windows system supported by the server and how to install it...

Page 28: ......

Page 29: ...erating system Windows Server 2003 and various utilities Use the NEC Express5800 320Fc system setup program for the first installation and reinstallation of the operating system This program accomplis...

Page 30: ...package which is to be purchased separately is also provided with the documentation for installation However see this User s Guide for installation into this server After completing the Express Setup...

Page 31: ...ter 3 Installing Server This chapter describes requirements for using the product properly and safely the setup procedures to make NEC Express5800 320Fc system ready for use and how to connect periphe...

Page 32: ...to use the server in a room where temperature can be kept between 15 and 25 C Wall outlet within the reach of supplied power cord 100V 120 V or 200V 240 V parallel bi polar power outlet with grounding...

Page 33: ...s the server may malfunction Place where you cannot pull out the components fully Place that cannot sustain the total weight of the rack and its components Place where you cannot use stabilizers or wh...

Page 34: ...s close to some equipment that causes power noises e g sparks caused by power on off using a relay If you must install the server close to such equipment request your sales agent for separate power ca...

Page 35: ...see Notes for Safe Handling in Chapter 1 Do not install or remove a rack alone Do not install the server with the cover removed Do not squeeze your fingers in the product IMPORTANT Temperature increas...

Page 36: ...is device is as high as 4U about 176 mm so install it between the imprinted marks that indicate the height of 4U Installing this device Follow the steps below to set the 4U chassis to the rack IMPORTA...

Page 37: ...ion that comes with the rack and open them 2 Install the brackets from the rear side of the rack Install the brackets with its flat side facing inside Place them with the round screws with washers tha...

Page 38: ...core nut from inside of the rack Hook either of the clips of the core nut to a square hole of the rack and hook the other clip to a hole by a flat blade screwdriver 4 Insert the 4U chassis from the fr...

Page 39: ...htly the washers and round screws long to the 2 places on the left and right sides total 4 from the front 7 Fasten tightly the 4 round screws on the back side and the 8 plate screws on the side panels...

Page 40: ...0 Mount the module while lowering the lock so the module stacks on the way 9 Fasten the levers on the left and right sides with screws 10 Mount the CPU IO module 1 in the same way Plate screws on the...

Page 41: ...Check that the device is powered off and remove all the power cords and interface cables that are connected to the device 2 Remove the front bezel 3 Loosen the screws on the left and right sides of th...

Page 42: ...he equipment safely There is a risk of a burn personal injury or damage to physical assets For details see Notes for Safe Handling in Chapter 1 Do not plug the power cord in a nonconforming outlet Do...

Page 43: ...rchased separately If N8803 034 is mounted be sure to connect cables to the FC array unit before going on to the next step USB floppy disk drive USB connection modem Keyboard via keyboard hub to USB m...

Page 44: ...cords from the server to an uninterruptible power supply UPS use service outlets on the rear of the UPS The UPS service outlets are categorized into two groups SWITCH OUT and UN SWITCH OUT They may be...

Page 45: ...Installing Server 3 15...

Page 46: ...4Chapter 4 Windows Setup This chapter describes procedures for configuring OS Boot Monitoring function setting dual LAN configuration setting dual disk configuration and so on...

Page 47: ...2003 in the NEC Express5800 320Fc system The setup program that is specific to NEC Express5800 320Fc system is called Express Setup This setup program is run by using the startup CD ROM that comes wit...

Page 48: ...d disk drive Select language for HotFix Automatic installation starts Windows Server 2003 R2 32 bit Enterprise Edition ftServer Control Software NEC ESMPRO Agent Insert Windows Server 2003 R2 32 bit E...

Page 49: ...nformation on support for Windows Service Pack contact your sales agent Youneed the following to install Windows Server 2003 R2 32 bit Enterprise Edition Startup CD ROM NEC EXPRESSBUILDER CD ROM ft Se...

Page 50: ...t the latest release of ft Server Control Software and purchase of the latest version of its Update CD ROM ask your sales agent Before starting the setup decide the size of the partition where the ope...

Page 51: ...aging file correct debug information memory dump may not be collected The maximum paging file size is 4095MB in a partition If 1 5 times the size of installed memory is larger than 4095MB set the size...

Page 52: ...s Remove optional SCSI devices such as a tape device from the SCSI connector IMPORTANT Do not mount any hard disk into any slots of any modules unless specified If multiple hard disks are inserted the...

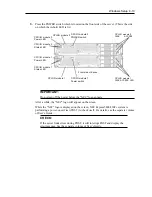
Page 53: ...supply is turned off When the AC power is off The power cord is not plugged into the outlet Connect the power cords to NEC Express5800 320Fc system in the following order 1 Connect the power cord to...

Page 54: ...RTANT If you skip the settings described here the system will be restarted forcefully while Windows setup screen is shown and the setup will be unsuccessful BIOS may repeat Windows setup in an invalid...

Page 55: ...ystem is performing a power on self test POST to check itself For details see the separate volume of User s Guide CHECK If the server finds errors during POST it will interrupt POST and display the er...

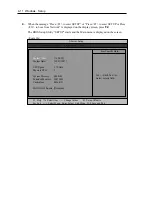
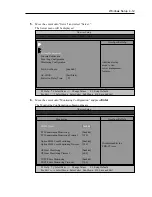
Page 56: ...displayed on the screen Example Main Advanced Security Server Boot Exit ftServer Setup F1 Help Select Item Change Values F9 Setup Defaults Esc Exit Select Menu Enter Select Sub Menu F10 Save and Exit...

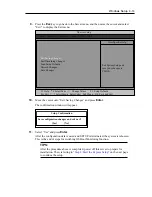
Page 57: ...rror Pause Enabled AC LINK Last State Power On Delay Time 0 Item Specific Help Additional setup menu to view server management features Main Advanced Security Server Boot Exit ftServer Setup F1 Help S...

Page 58: ...Server Setup F1 Help Select Item Change Values F9 Setup Defaults Esc Exit Select Menu Enter Select Sub Menu F10 Save and Exit Monitoring Configuration Item Specific Help Disables enables the FRB 2 Tim...

Page 59: ...onitoring function TIPS After the procedure above is completed power off this server to prepare for installation Then referring to Step 4 Start the Express Setup on the next page to continue the setup...

Page 60: ...essary to sit by the system and check the status during the setup Also if you use the Configuration diskette that has been used last time you can create the same setup condition as the previous one Yo...

Page 61: ...the NEC EXPRESSBUILDER CD ROM Copy the OS difference module Copy the selected application module Remove the FD CD ROM Automatic installation Automatic logon After rebooting the installation completes...

Page 62: ...nstalled on the hard disk press the Enter key while the message Press any key to boot from CD is displayed Youdo not need to perform this operation if the OS that can be started does not exist 3 If th...

Page 63: ...d and erased all Information on other partitions will be retained If an existing hard disk drive partition that has been upgraded to the dynamic disk remains you cannot reinstall OS refer to page 4 16...

Page 64: ...o be used you may be asked to enter the product key Enter the product key and select Next The automatic startup has been started Applications specified as Windows Server 2003 will be automatically ins...

Page 65: ...Windows Setup 4 20 Step 5 Windows Setup Wizard When the immediately preceding operation was Step 4 Start the Express Setup proceed to Step 6 Windows Server 2003 Service Pack Installation...

Page 66: ...rver 2003 Service Pack is not applied to the system Refer to Applying Windows Service Pack on page 5 14 and apply the Windows Server 2003 Service Pack IMPORTANT If the Windows Server 2003 Service Pack...

Page 67: ...same segment and automatically switches the process of the primary controller to the backup controller when any trouble occurred on the primary Adaptive Load Balancing ALB Adaptive Load Balancing ALB...

Page 68: ...e adapters e g 2 Set the dual configuration for more than one LAN connection Dual Configuration Setup The following describes the procedure to set dual LAN configuration The procedure to set dual LAN...

Page 69: ...et network adapter right click on it and select Properties from the displayed menu to display the Properties window 3 Select the Teaming tab in the Properties window Check the radio button of Team wit...

Page 70: ...m name and click Next 5 Select the check boxes of the adapters you want to include to the team and click Next 6 Select Adapter Fault Tolerance or Adaptive Load Balancing as a team mode Usually select...

Page 71: ...tart a command prompt and confirm the physical MAC address of the team adapter with ipconfig all 9 Select the team adapter that has been set right click on it and select Properties from the menu displ...

Page 72: ...up 10 Select the Advanced tab in the Properties window Select Locally Administered Address from the Settings list box and enter the MAC address of team adapter that you have checked in the Value text...

Page 73: ...t and monitors and manages each part The IO function part is referred to as PCI module in this section Setting Dual Disk Configuration by RDR Rapid Disk Resync function This device sets dual configura...

Page 74: ...installed is Boot configured Active or Imported performing the steps 2 to 4 are not required Go to step 5 If the disk status is other than Boot configured Active or Imported go on to step 2 To check...

Page 75: ...k status it takes time to set RDR and RDR Utility may be stopped for a few minutes This is not an error Please wait for a while 3 Click Yes 4 Click OK IMPORTANT If you set RDR on the disk that include...

Page 76: ...isks dual configuration is not set normally As for physical format refer to SAS BIOS Adaptec SAS SATA Configuration Utility in Chapter 4 System Configuration in the separate volume of the User s Guide...

Page 77: ...ing RDR Virtual Disk Simplex Resync x x 0 10 20 90 IMPORTANT The time required for synchronization deffers depending on the size of the partition that exists on the disk As for the partition with the...

Page 78: ...disk where RDR has been set and which is duplexed the created partition area is automatically synchronized If you have changed a disk where RDR has been set and which is duplexed to a dynamic disk the...

Page 79: ...4 34 Step 9 Update Software If you use ftServer Control Software UPDATECD ROM see Installing ftServer Control Software page 6 12 to update the software When there are other update modules apply them...

Page 80: ...port Services for details of specification method BOOT INI file exist on C It is displayed by clicking Folder Options View in Explorer and choosing Show hidden files and folders option Below shows the...

Page 81: ...guration the area is mirrored automatically You do not need to perform mirroring for each partition volume For more details about performing mirroring by the RDR function see Setting Dual Disk Configu...

Page 82: ...ns After entering the IP address of the NEC ESMPRO Manager machine of the send destination in the Host name IP or IPX address box click the Add button IMPORTANT If the IP address or host name of the r...

Page 83: ...If the SNMP service was added to the system after the service pack had been applied at OS installation apply it again If not the SNMP service may not operate properly This can cause the improper oper...

Page 84: ...anced Security Server Boot Exit ftServer Setup F1 Help Select Item Change Values F9 Setup Defaults Esc Exit Select Menu Enter Select Sub Menu F10 Save and Exit Monitoring Configuration Item Specific H...

Page 85: ...system startup when a failure has occurred after making settings described here and you have restarted the system to save the memory dump Continue the startup If you restart the system you may not be...

Page 86: ...ded to larger than 2 GB change Write Debugging Information to Kernel Memory Dump before expanding the memory Size of the debugging information memory dump to be collected will change due to memory inc...

Page 87: ...Windows Setup 4 42 5 Click Settings in the Performance box The Performance Options window appears 6 Click the Advanced tab on the Performance Options window...

Page 88: ...is set for Initial Size of the paging file accurate debug information memory dump may not be collected For the Recommended value see Size of the Partition to be Created page 4 6 To be prepared for fa...

Page 89: ...alog box appears 3 Specify where you want to save diagnostic information in the Log File Path box Diagnostic information is saved under the file name DRWTSN32 LOG CHECK Do not specify a network path B...

Page 90: ...rt menu select Control Panel and click Add Remove Windows Programs The Add Remove Windows Programs dialog box appears 2 Click Add Remove Windows Components The Windows Components Wizard dialog box app...

Page 91: ...ve Programs dialog box Youcan also activate the network monitor by clicking Start pointing to All Programs pointing to Administrative Tools and then clicking Network Monitor For details on the operati...

Page 92: ...the server is repaired Take the following steps to make a backup copy of the system information 1 Prepare a 3 5 inch floppy disk 2 Insert the NEC EXPRESSBUILDER CD ROM into the DVD ROM drive of the s...

Page 93: ...Windows Setup 4 50...

Page 94: ...ter Completion of Installation This chapter describes how you install management utilities how you back up system information and setup of PCs on the network Youmay need to confirm these procedures wh...

Page 95: ...on is changed When the system is restored When the system is restored from the backup media TIPS Use the Windows Server 2003 CD ROM that includes ServicePack1 to install this server 320Fc MR Log on to...

Page 96: ...n installed while setting up the Fault Tolerant Server series install it separately IMPORTANT Make sure that NEC ESMPRO Agent is installed because it is indispensable for continuous operation of NEC E...

Page 97: ...system installation or setup To operate NEC ESMPRO Agent you need to make settings of TCP IP and the SNMP of components associated with TCP IP TCP IP Setting See the Help started from the Start menu...

Page 98: ...or IPX address box click the Add button IMPORTANT If the IP address or host name of the remote NEC ESMPRO Manager specified as the trap send destination in the setup of the manager report TCP IP the m...

Page 99: ...ring OS installation if the SNMP service is added to the system after applying the service package during OS installation apply it again If not the SNMP service may not operate properly and this can c...

Page 100: ...DVD ROM drive TIPS The DVD ROM drive may be either the drive connected to the system or any drive located on the network and connected by the LAN Manager These are collectively called DVD ROM drive h...

Page 101: ...up the message asking whether to stop or not to stop the installation will appear Youcan stop the installation by clicking on the Stop button the main menu remains displayed However the file having be...

Page 102: ...the full path including the drive name and click the Next button 8 When the installation end window appears click the OK button The installed is complete The functions of installed NEC ESMPRO Agent wi...

Page 103: ...sequentially to open Control Panel If you double click the NEC ESMPRO Agent icon in Control Panel the property dialog box will appear Modify the setting of each sheet in the dialog box to be fit to t...

Page 104: ...nt after the system is started completely In the system that operates Windows Server 2003 do not change the setting of Local security policy from the default The error occurs by InstallShield if the u...

Page 105: ...es alerts from the server When a failing module in the server is to be replaced NEC ESMPRO Manager enables logical module disconnection from the server and logical installation after module replacemen...

Page 106: ...tolerance Perform the procedure when you need to check the ft Server Control Software version of the current system before adding units or attachment to NEC Express5800 320Fc system Confirm the versi...

Page 107: ...he Service Pack applied to NEC Express5800 320Fc system is the same as the standard Windows Server 2003 Service Pack Applying Windows Service Pack Follow the procedure below to apply Service Packs to...

Page 108: ...compressing the System Drive The Windows Server 2003 directory is labeled as Windows If you compress the root directory and the Windows directory operational stability cannot be ensured because the W...

Page 109: ...mba worm as a past example will be immediately tested Security Rollup Package SRP Tests will be performed along with the publications of SRP and the results will be informed to NEC sales agents Other...

Page 110: ...6 Chapter 6 Troubleshooting This chapter describes what to do when files needed to operate the OS are damaged and any trouble occurs on the product...

Page 111: ...tem disk is a dynamic disk the following settings need to be configured beforehand If these settings are not done files on the hard disk cannot be updated on the Recovery Console and the message Acces...

Page 112: ...default the Windows Server 2003 Recovery Console is not allowed to write data from the basic dynamic disk to a floppy disk However after the setting shown above is made a floppy disk can be written c...

Page 113: ...4 Insert the NEC EXPRESSBUILDER CD ROM into the drive of the server 5 Then reset pressing Ctrl Alt Delete or power off on NEC Express5800 320Fc system to reboot it The system will start up from the C...

Page 114: ...Start up Recovery Console from the Windows Server 2003 CD ROM Installing Recovery Console on the system 1 Start up the NEC Express5800 320Fc system and log on to Windows Server 2003 2 Insert the Windo...

Page 115: ...following message appears press any key to start up from the CD ROM IMPORTANT Press any key while the message is displayed Otherwise the system will be started up from a hard disk and Recovery Console...

Page 116: ...ppy disk drive and press Enter Continue the operations by following the messages 4 When you start up Recovery Console from Windows Server 2003 CD ROM the following message appears Press the R key to b...

Page 117: ...selected in Monitoring Configuration of Server is not set to Disabled disable it See Step 3 Disable OS Boot Monitoring Function page 4 9 for details When updating the system considerations on setting...

Page 118: ...d a setup of LAN will be deleted Note down the setup information a Start Device Manager b Select the team adapter that you want to cancel duplication and select Properties from the menu displayed by r...

Page 119: ...og box for confirmation of executing system update appears click OK The system update will start Follow the instructions 5 After the system update is completed the dialog box below will be displayed C...

Page 120: ...oubleshooting however disk mirroring is disabled Make sure to check disk mirroring in 8 When Found New Hardware wizard appears at the reboot click Cancel If the same message appears again click Cancel...

Page 121: ...tart the system 8 Reboot the system 9 After the system has rebooted log on as a user with Administrative account IMPORTANT Check that the dual system is configured properly confirm that the STATUS LED...

Page 122: ...n appears click Setup and select ft Server Control Software on the menu Follow the instructions to with the installation The message ft Server Control Software Now Installing Please Wait is displayed...

Page 123: ...appropriate corrective action according to the error codes listed in the table below Message Cause and Remedy This machine is not supported This NEC EXPRESSBUILDER version is not designed for this ser...

Page 124: ...tion See Step 1 Things Required for Setup page 4 4 and Step 2 Prepare for Express Setup page 4 7 Rebooted during the setup See Step 3 Disable OS Boot Monitoring Function page 4 9 and set the parameter...

Page 125: ...x of HDDs Complete memory dump cannot be specified to the write debug information on Set Memory Dump Debug Information Complete memory dump cannot be specified not displayed if the memory size exceeds...

Page 126: ...s there any partition other than the partition to be reused If there was no area other than the partition to be reused the entire area is reserved for Windows installation The settings for joining a d...

Page 127: ...y clicking Stop the main menu remains displayed However the file having been setup halfway will not be deleted Start the uninstallation of NEC ESMPRO Agent after the system is started completely If NE...

Page 128: ...M REPAIR in this chapter to start again The screen turns out to be black for a while when booting the Recovery Console If you start the Recovery Console that is installed in the system the screen turn...

Page 129: ...Appendix A About Services Information on NEC Express5800 320Fc system is provided the web at NEC Express5800 320Fc system Web ASIA PACIFIC http www nec co jp express...

Page 130: ......

Page 131: ......

Page 132: ......

Reviews: