background image

 7 

1.

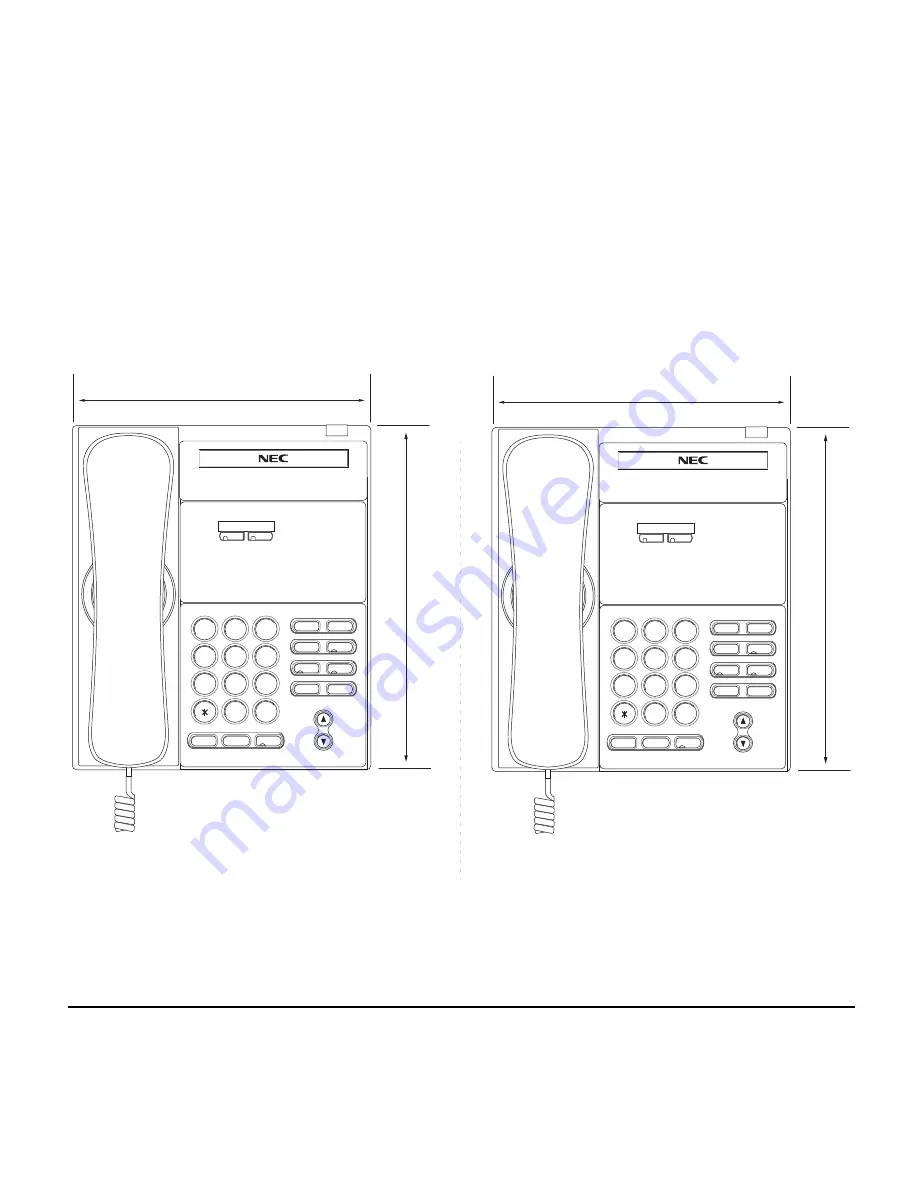
ITL-2E-1 (DT710 Series)

DTL-2E-1 (DT310 Series)

1

2

ABC

3

DEF

4

GHI

5

JKL

6

MNO

7

PQRS

8

TUV

9

WXYZ

0

#

HOLD

Transfer

Speaker

Recall

Feature

Redial

Conf

Directory

Mic

Message

Answer

225 [mm]

179 [mm]

1

2

ABC

3

DEF

4

GHI

5

JKL

6

MNO

7

PQRS

8

TUV

9

WXYZ

0

#

HOLD

Transfer

Speaker

Recall

Feature

Redial

Conf

Directory

Mic

Message

Answer

225 [mm]

179 [mm]

Summary of Contents for DT310

Page 1: ...DT730 DT710 DT330 DT310 USER S GUIDE NEC Corporation 2010 August NWA 039300 001 ISSUE 4 0 ...

Page 2: ...ed this document for use by its employees and customers The information contained herein is the property of NEC Cor poration and shall not be reproduced without prior written approval from NEC Corporation All brand names and product names on this document are trademarks or registered trademarks of their respective companies Copyright 2008 2010 NEC Corporation ...

Page 3: ... DT700 SERIES 25 2 INSTALLATION PROCEDURE ADJUSTING ANGLE OF TILT LEG 27 TO REMOVE TILT LEG 28 TO ATTACH TILT LEG 28 CONNECTING LAN CABLE 29 CONNECTING LINE CORD 30 INSTALLING DIRECTORY CARD 31 ATTACHING HANDSET 31 INSTALLING REMOVING KEY SET UNIT 32 WALL MOUNTING 33 3 TERMINAL SETUP SETUP WITH UP DOWN KEY 37 SETUP WITH FEATURE KEY 38 SETUP WITH MENU KEY FOR DT700 SERIES 42 SETUP WITH MENU KEY FOR...

Page 4: ...LL 105 HOW TO INPUT CHARACTERS 107 SECURITY MODE 121 EMERGENCY CALL 123 5 FEATURE OPERATION TO ORIGINATE A CALL USING SELECTIVE DIALING DYNAMIC DIAL PAD PRESET DIAL 125 TO ORIGINATE A CALL USING SPEED CALLING ONE TOUCH SPEED CALLING KEYS 126 TO REGISTER NAME ON ONE TOUCH SPEED CALLING KEY 129 TO ORIGINATE A CALL USING SPEED CALLING STATION GROUP 129 TO ORIGINATE A CALL USING SPEED CALLING SYSTEM 1...

Page 5: ... 140 OUTGOING TRUNK QUEUING 141 OFF HOOK TRUNK QUEUING 141 EXECUTIVE OVERRIDE 141 LAST NUMBER REDIAL 142 CALL FORWARDING ALL CALLS 142 CALL FORWARDING BUSY LINE 144 CALL FORWARDING DON T ANSWER 145 LOGGED OUT IP STATION CALL DESTINATION 146 CALL BACK 148 TO SAVE AND REPEAT A NUMBER 148 TO LEAVE A MESSAGE 150 TO ANSWER A MESSAGE 150 VOICE MAIL SYSTEM 151 MEET ME PAGING 151 PAGING TRANSFER 152 BOSS ...

Page 6: ...RECTORY 198 TO ADD PREFIX TO NUMBER 199 TO EDIT DIRECTORY DATA 201 TO DELETE ALL DATA 202 TO DELETE A SPECIFIC DATA 203 7 CALL HISTORY OPERATION FOR DT730 SERIES TO VIEW CALL HISTORY 206 TO MAKE A CALL FROM CALL HISTORY 208 TO ADD CALL HISTORY DATA TO DIRECTORY 209 TO EDIT DIRECTORY DATA FROM CALL HISTORY 212 TO DELETE ALL DATA 215 TO DELETE A SPECIFIC DATA 216 FOR DT330 SERIES TO VIEW CALL HISTOR...

Page 7: ...ETE A SPECIFIC DATA 223 8 SPECIFICATIONS TECHNICAL SPECIFICATIONS 225 9 MENU LIST MENU LIST FOR DT730 SERIES 227 MENU LIST FOR DT710 Series 234 MENU LIST FOR DT330 Series 237 10 WEB PROGRAMMING OUTLINE 239 TO LOGIN 240 TO LOGOUT 242 HOW TO OPERATE 244 ...

Page 8: ...This page is for your notes ...

Page 9: ... DEF 4 GHI 5 JKL 6 MNO 7 PQRS 8 TUV 9 WXYZ 0 Menu HOLD Transfer Speaker Recall Feautre Feature Answer Mic Scroll Exit Help Redial 264 mm 179 mm 1 2 ABC 3 DEF 4 GHI 5 JKL 6 MNO 7 PQRS 8 TUV 9 WXYZ 0 Menu HOLD Transfer Speaker Recall Feature Answer Mic Scroll Exit Help Redial 264 mm 179 mm ...

Page 10: ...4 GHI 5 JKL 6 MNO 7 PQRS 8 TUV 9 WXYZ 0 Menu HOLD Transfer Speaker Recall Feature Answer Mic Exit Help Redial 258 mm 205 8 mm 1 2 ABC 3 DEF 4 GHI 5 JKL 6 MNO 7 PQRS 8 TUV 9 WXYZ 0 Menu HOLD Transfer Speaker Recall Feature Answer Mic Exit Help Redial 258 mm 205 8 mm ...

Page 11: ...F 4 GHI 5 JKL 6 MNO 7 PQRS 8 TUV 9 WXYZ 0 Menu HOLD Transfer Speaker Recall Feature Answer Mic Exit Help Redial 258 mm 179 mm 1 2 ABC 3 DEF 4 GHI 5 JKL 6 MNO 7 PQRS 8 TUV 9 WXYZ 0 Menu HOLD Transfer Speaker Recall Feature Answer Mic Exit Help Redial 258 mm 179 mm ...

Page 12: ...F 4 GHI 5 JKL 6 MNO 7 PQRS 8 TUV 9 WXYZ 0 Menu HOLD Transfer Speaker Recall Feature Answer Mic Exit Help Redial 258 mm 179 mm 1 2 ABC 3 DEF 4 GHI 5 JKL 6 MNO 7 PQRS 8 TUV 9 WXYZ 0 Menu HOLD Transfer Speaker Recall Feature Answer Mic Exit Help Redial 258 mm 179 mm ...

Page 13: ...GHI 5 JKL 6 MNO 7 PQRS 8 TUV 9 WXYZ 0 Menu HOLD Transfer Speaker Line Recall Feature Answer Mic Exit Help Redial 258 mm 193 mm 1 2 ABC 3 DEF 4 GHI 5 JKL 6 MNO 7 PQRS 8 TUV 9 WXYZ 0 Menu HOLD Transfer Speaker Line Recall Feature Answer Mic Exit Help Redial 258 mm 193 mm ...

Page 14: ... JKL 6 MNO 7 PQRS 8 TUV 9 WXYZ 0 Menu HOLD Transfer Speaker Recall Feature Answer Mic Exit Help Redial 225 mm 179 mm 1 2 ABC 3 DEF 4 GHI 5 JKL 6 MNO 7 PQRS 8 TUV 9 WXYZ 0 HOLD Transfer Speaker Exit Help Recall Feature Redial Conf Directory Mic Message Answer 225 mm 179 mm ...

Page 15: ... JKL 6 MNO 7 PQRS 8 TUV 9 WXYZ 0 HOLD Transfer Speaker Recall Feature Redial Conf Directory Mic Message Answer 225 mm 179 mm 1 2 ABC 3 DEF 4 GHI 5 JKL 6 MNO 7 PQRS 8 TUV 9 WXYZ 0 HOLD Transfer Speaker Recall Feature Redial Conf Directory Mic Message Answer 225 mm 179 mm ...

Page 16: ...n 4 Exit To exit Menu or Help mode and go back to the time display 5 Soft Keys Any feature shown at the bottom of the LCD is available The appropriate feature key is displayed on the screen according to the call handling pro cess 6 Help Explanations of the Soft Keys can be called up on the LCD by pressing this key 7 Programmable Keys These keys can be programmed as Flexible Line key Programmable F...

Page 17: ...various features with simple operation Details on Cursor key a Up Down DOWN UP Used to adjust LCD contrast speaker receiver vol ume and ringer volume LCD Contrast Press or key while idle Speaker Receiver Volume Press or key during conversation Ringer Volume Press or key during ringing b Redial Last Number Call Speed Calling Station Group Press key to activate redial feature Press redial and scroll...

Page 18: ...eed Calling Station Group Press key to activate redial feature Press redial and scroll back through numbers that have been dialed When the desired number is displayed press the or key to activate dialing Conf only for DTL 2E 1 ITL 2E 1 and DTL 6DE 1 Press key to establish a conversation LED on key lights when key is active Directory only for DTL 2E 1 ITL 2E 1 and DTL 6DE 1 Press key to activate sp...

Page 19: ...display For setting of the programmable key contact Tele phony Server Administrator When Telephony Server Administrator sets One Touch Speed Dial key on the programmable keys you can assign any numbers ex Telephone num ber etc to the key see TO ORIGINATE A CALL USING SPEED CALLING ONE TOUCH SPEED CALLING KEYS and TO REGISTER NAME ON ONE TOUCH SPEED CALLING KEY For the assignment of the keys confir...

Page 20: ...g an Incoming Call During Conversation Individual Use Call Transfer Conference Steady Lit During Conversation Other Party Use Active Feature Under a setting of feature key like a Call Forwarding Key Description Maximum digits to be displayed Line Key Name and Number informa tion 8 digits One Touch Speed Dial Key Speed Dial Name Informa tion Number Information 8 digits Feature Key Feature Name 6 di...

Page 21: ...ou can register name on each One Touch Speed Dial key For the procedures see TO REG ISTER NAME ON ONE TOUCH SPEED CALLING KEY Note For example when an incoming call is terminated to a line key on Page 3 while Page 1 is being dis played on the screen the screen is not automati cally switched from Page 1 to page 3 You must display Page 3 manually and then answer the incoming call Scroll Scroll BEN R...

Page 22: ...n chapter 7Call History Operation Directory To use Directory features There are the following three types of directory features Personal Directory Controlled by tele phone set For details see 6 DIRECTO RY OPERATION Phonebook Controlled by the system For details see PHONEBOOK in chap ter 5 Corporate Directory Controlled by the external XML server For details please contact the system administrator ...

Page 23: ...em administrator Menu Item Description Call History To view Call History For details see 7 2FOR DT330 SERIES in chapter 7Call History Operation Directory To use Phonebook function For details see PHONEBOOK in Chapter 5 Setting To control settings for ringing volume LCD display and Music on Hold For details see SETUP WITH MENU KEY FOR DT300 SERIES 1 0 Config OK Back Tool 1 0 1 2 Menu 3 OK Back Sett...

Page 24: ...Answer Mic Redial Press Menu key Press Directory key 2 Directory 1 Hisotry Menu 2 System 1 Personal Directory 3 Tool Up Down Back OK Up Down Back OK Up Down Back OK Feature Icon Description Missed Call This icon appears when there is a missed call Once you have checked the missed call this icon will disappear Voice Mail This icon provides notification of incoming Voice Mail Once you have checked t...

Page 25: ...2 Select Missed Calls and then press Enter Right cursor or OK soft key STEP 3 The log data of the last call is displayed Note Unavailable Menu items are grayed out Feature Description Missed Calls Access history of Missed Calls Voice Mail Access history of incoming Voice Mail IM Currently Not Used grayed out Presence Currently Not Used grayed out Bluetooth Currently Not Used grayed out GHI 9 WXYZ ...

Page 26: ...e For unanswered incoming calls will be dis played on the left of the name Note If you make answer a call to from the telephone number which is registered to Personal Directory the corresponding name will be displayed as call history data Note While the log data is displayed you cannot make a call by dialing a telephone number 1 Missed Option Back 12 JUL 2010 MON 10 00 Ken Kobus 7205 ...

Page 27: ... Forwarding Don t Answer feature MICM Press key to activate Manual Intercom MSG Message Press key to leave message indication at station in no answer or busy condition MULTILINE APPEARANCE A programmable extra extension key Press this key to see status of extra extension MW SET Press key to leave message waiting indication on boss station from secretary s station MW OFF Press key to cancel message...

Page 28: ...andset receiver volume Feature 3 Selects ringer tone Feature 4 Adjusts transmission receiving volume Feature 5 Activates hands free operation Feature 6 Deactivates hands free operation Feature 7 Turns call indicator lamp on or off for incoming call notification If turned off this lamp will still light to indicate message waiting Feature 8 Selects between Normal Dynamic Dial Pad and Preset Dial Not...

Page 29: ...mation about that key MIC Microphone Press the Soft Key below MIC to activate or deactivate the Microphone LED on MIC key will illuminate when MIC is on DND Do Not Disturb Press the Soft Key to reject call termination to the preassigned station Default Displays for Each Status Default Soft Key settings are provided corresponding to particular functions Different Soft Key settings are displayed at ...

Page 30: ...s already been registered is in logout status E OVR Executive Override Enables selected station users upon encountering a busy condition at an internal station to bridge into the busy connection CW Call Waiting Enables a busy station to receive a second incoming call A camp on indication tone is sent to the busy station and you can use a switchhook flash to answer the second call CB Call Back Prov...

Page 31: ...ows you to send a switchhook flash while on an outside trunk UCDBO UCD Busy Out Allows a station user to block UCD calls and to cancel Busy Out FLASH Flash Provides the station with a switchhook flash FDN Call Forward No Answer Permits a call to an unanswered station to be forwarded to a predesignated station if the called station does not answer within a predetermined period of time C RPT ISDN Ma...

Page 32: ...ated group IDCHG Call ID Change Display Allows you to toggle between standard display and an alternate display GPICK Call Pickup Group Enhancement Allows you to answer any ringing station within your expanded call pickup group CHCNF Call Hold Conference Allows a station user to establish a conference connection by adding a third party who is held on another line to the existing two party connectio...

Page 33: ...in of Online Monitoring Feature 3 Selects ringer tone For the settings contact the Administrator You can confirm the settings in Audio Visual Set tings Audio Settings Ring Settings of On line Monitoring Feature 4 Adjusts transmission receiving volume For the settings contact the Administrator You can confirm the settings in Audio Visual Set tings Audio Settings Receive Bias Re ceive Gain Send Gain...

Page 34: ...26 1 This page is for your notes ...

Page 35: ...ide down STEP 2 Adjust the tilt leg in the direction of the arrow until you hear it click TO LOWER TILT LEG STEP 1 Turn the telephone set upside down STEP 2 While lifting the center of the stopper adjust the tilt leg in the direction of the arrow until you hear it click DT730 710 DT330 310 First Level Second Level Third Level Fourth Level Tilt Leg Stopper Tilt Leg ...

Page 36: ...leg downward Remove the tilt leg from the termi nal TO ATTACH TILT LEG STEP 1 Turn the telephone set upside down STEP 2 Align the hooks c h of the tilt leg over the ap propriate slots C H of the telephone set STEP 3 Slide the tilt leg upward until the hooks c and b click into place STEP 4 Fit the indicated portions a and b of the stop per into the grooves A and B on the tilt leg DT730 710 DT330 31...

Page 37: ...one to the network device using the LAN cable STEP 3 Thread the LAN cable through the groove on the back of the telephone STEP 4 When AC adapter is used to supply power to the telephone connect the AC DC adapter to the telephone as shown below DT730 710 Telephone To LAN Groove LAN Straight Cable To PC Telephone AC Adapter Plug AC Adapter Cord Groove Connector for AC Adapter ...

Page 38: ...until you hear it click STEP 2 Thread the line cord through the groove on the back of the telephone STEP 3 Lead the line cord out through the groove on the tilt leg as shown in the figure below DT330 DT310 Line Cord Line Cord Plug Line Connector Telephone Line Code Groove Telpehone Tilt Leg Groove Line Cord ...

Page 39: ...ry card and then attach it to the directory card holder ATTACHING HANDSET STEP 1 Insert the coiled cord plug into HANDSET connector on the back of the telephone until you hear it click STEP 2 Thread the coiled cord through the groove as shown in the figure below Note To remove the directory card pinch the two sides of the directory card holder inward until the tabs release and pull the holder out ...

Page 40: ...he telephone STEP 3 Remove the line key card TO INSTALL KEY SET UNIT STEP 1 Align the holes in the line key card with the buttons on the telephone STEP 2 Align the holes in the line key panel button panel with the buttons on the telephone and then push the four corners of the panel until the panel clicks into place DT730 710 DT330 310 Line Key Panel Button Panel Line Key Card Line Key Card Line Ke...

Page 41: ...3 Attach WM L UNIT to the wall directly or the wall plate When attaching WM L UNIT to the wall directly Secure WM L UNIT with the six screws in cluded with the telephone set or hang WM L UNIT on the wall with the two screws pur chased separately inserted into the wall WARNING Be careful not to drop the telephone set while mounting it on the wall It can cause injury Make sure the telephone set is f...

Page 42: ...wing figure If the modular connector is attached directly on the wall or the wall plate is used instead of modular ter minal skip this step STEP 5 Insert the line cord plug included with the telephone set into the modular connector STEP 6 Insert the line cord plug into the LINE connec tor on the back of the telephone Wrap the ex cess cord and secure it with a tie wrap STEP 7 Thread the coiled cord...

Page 43: ...TEP 8 Insert the four tabs on WM L UNIT in the tab slots on the back of the telephone Tuck the excess cord into WM L UNIT Wall Line Cord WM L Line Connector Telephone Groove Modular Plug Wall Tabs Tab Slots ...

Page 44: ...36 This page is for your notes ...

Page 45: ...T HANDSET RECEIVER VOLUME Press Up Down or key in the off hook status or during the call LCD indication for North America Latin America Asia Middle East and Russia LCD indication for Australia TO ADJUST SPEAKER VOLUME Press Up Down or key during speakerphone operation or during the call TO ADJUST RINGER TONE Press Up Down or key during ringing Feature Menu Menu DT730 710 DT330 310 HANDSET HANDSET ...

Page 46: ...ume status STEP 2 Press and key to alternate be tween Large and Small volume TO SELECT RINGER TONE DT Series has 10 kinds of ringer tones that you can select STEP 1 Press and key The LCD displays the selected tone number n 1 10 DT730 710 DT330 310 LCD DT730 710 DT330 310 Mic Feature 1 DT330 310 Feature 2 No Frequency Hz Modulation Hz 1 520 660 16 2 520 660 8 3 1100 1400 16 4 660 760 16 5 Melody 1 ...

Page 47: ...39 8 Melody 4 9 Melody 5 10 Melody 6 Note Tone number 5 6 8 10 Melody 1 2 4 6 will sound continuously No Frequency Hz Modulation Hz ...

Page 48: ...ng STEP 1 Press and key The LCD displays SELECT DIAL MODE You can select one pattern from Normal Dynamic Dial Pad or Preset Dial to originate a call When only Dynamic Dial Pad is activated DT330 310 Feature 4 4 26 PM MON 12 JUL 2010 T R VOL SMALL Feature 4 4 26 PM MON 12 JUL 2010 T R VOL LARGE DT330 310 Feature 5 4 26 PM MON 12 JUL 2010 HANDS FREE ON Feature 6 Note The call indicator lamp lights w...

Page 49: ...r details see TO ORIGINATE A CALL USING SELECTIVE DIALING DYNAMIC DIAL PAD PRESET DIAL Note When this feature is ON you may initiate a call by pressing Speaker Key or going off hook after dialing the number For details see TO ORIGI NATE A CALL USING SELECTIVE DIALING DYNAMIC DIAL PAD PRESET DIAL Feature 8 4 26 PM MON 12 JUL 2010 Direct Dial Pad ON 4 26 PM MON 12 JUL 2010 Direct Dial Pad OFF Featur...

Page 50: ...tions Highlight an item by using and then press or OK soft key Press key STEP 4 Select Incoming Call Select an item by either of the following operations Highlight an item by using and then press or OK soft key Press key STEP 5 Select Offhook Ring DT730 Off hook Ring DT710 Select an item by either of the following operations Highlight an item by using and then press DT730 DT710 Menu 5 2 5 2 1 2 To...

Page 51: ...ing operations Highlight an item by using and then press or OK soft key Press or key and then press or OK soft key Note Default setting is 2 Enable Note The enabled item is highlighted 2 1 1 2 Headset Ring Incoming Call 3 4 5 6 Ring Tone Headset Ring Volume OK Back Illumination Ring Volume Offhook Ring 1 2 1 2 Offhook Ring OK Back 1 2 Disable Enable ...

Page 52: ... and then press or OK soft key Press key STEP 4 Select Incoming Call Select an item by either of the following operations Highlight an item by using and then press or OK soft key Press key STEP 5 Select Headset Ring Select an item by either of the following operations Highlight an item by using and then press or OK soft key Press key DT730 Menu 5 5 1 2 Tool Menu 3 4 5 6 0 Call Func Presence Favori...

Page 53: ...ghlight an item by using and then press or OK soft key Press or key and then press or OK soft key Note Default setting is 1 Disable Note The enabled item is highlighted 1 2 Incoming Call 3 4 5 6 Ring Tone Headset Ring Volume OK Back Illumination Ring Volume Offhook Ring Headset Ring 1 2 1 2 Headset Ring OK Back 1 2 Enable Disable ...

Page 54: ... and then press or OK soft key Press key STEP 4 Select Incoming Call Select an item by either of the following operations Highlight an item by using and then press or OK soft key Press key STEP 5 Select Ring Tone DT730 Ring Tone DT710 Select an item by either of the following operations Highlight an item by using and then press or OK soft key Press key DT730 key DT710 DT730 DT710 Menu 5 2 5 2 1 2 ...

Page 55: ... then press or OK soft key For example press to select Download1 1 2 Incoming Call 3 4 5 6 Headset Ring Volume OK Back Illumination Ring Volume Offhook Ring Headset Ring Ring Tone 1 2 1 2 1 2 IM Ring Tone 3 Internal Call OK Back External Call 0 9 Note The enabled item is highlighted No Menu Item Frequency Hz Remarks 1st 2nd 0 Automatic 520 660 16Hz modulation 1 Tone Type1 520 660 16Hz modulation 1...

Page 56: ...pplied Note When selecting Automatic the preview function will not operate Also when selecting Download 1 2 3 the ringer tone file must be downloaded in advance If there is no downloaded file you hear no tone Note Tone Type 1 to Tone Type 8 In the preview function each ringer tone sounds continuously Actual ringer pattern of each tone is determined by the initial system settings No Menu Item Frequ...

Page 57: ...hlight an item by using and then press or OK soft key Press key STEP 4 Select Incoming Call Select an item by either of the following operations Highlight an item by using and then press or OK soft key Press key STEP 5 Select Illumination Select an item by either of the following operations Highlight an item by using and then press or OK soft key Press key DT730 Menu 5 5 1 2 Tool Menu 3 4 5 6 0 Ca...

Page 58: ... OK soft key 1 2 Incoming Call 3 4 5 6 Headset Ring Volume OK Back Ring Volume Offhook Ring Headset Ring Ring Tone Illumination 1 2 1 2 1 2 Illumination 3 IM OK Back External Call Internal Call Note When selecting Automatic the preview function will not operate Note When selecting Automatic or not performing this illumination setting Red is automatically applied Note You can set illumination patte...

Page 59: ...item by using and then press or OK soft key Press key STEP 4 Select Talk Select an item by either of the following operations Highlight an item by using and then press or OK soft key Press key STEP 5 Select RTP Alarm Select an item by either of the following operations Highlight an item by using and then press or OK soft key Press key DT730 DT710 Menu 5 2 5 2 1 2 Tool Menu 3 4 5 6 0 Call Func Pres...

Page 60: ...matic Follow the setting on the System If no setting is made in the Sys tem the default setting Alarm ON is applied 1 Disable Follow the setting on the terminal OFF 2 Enable Follow the setting on the terminal ON 1 2 Talk 3 4 5 OK Back DTMF Tone Key Touch Tone Hold Music Prefix RTP Alarm 0 1 2 0 2 0 1 RTP Alarm 2 Automatic OK Back Disable Enable Note For the setting on the System contact the Sys te...

Page 61: ...em by using and then press or OK soft key Press key STEP 4 Select Talk Select an item by either of the following operations Highlight an item by using and then press or OK soft key Press key STEP 5 Select DTMF Tone Select an item by either of the following operations Highlight an item by using and then press or OK soft key Press key DT730 DT710 Menu 5 2 5 2 1 2 Tool Menu 3 4 5 6 0 Call Func Presen...

Page 62: ...ch Tone Hold Music Prefix RTP Alarm DTMF Tone 0 1 2 0 2 0 1 DTMF Tone 2 OK Back Disable Automatic Enable Menu Items Descriptions 0 Automatic Follow the setting on the System If no setting is made in the Sys tem the default setting DTMF ON is applied 1 Disable Follow the setting on the terminal OFF 2 Enable Follow the setting on the terminal ON Note For the setting on the System contact the Sys tem...

Page 63: ... the following operations Highlight an item by using and then press or OK soft key Press key STEP 4 Select Talk Select an item by either of the following operations Highlight an item by using and then press or OK soft key Press key STEP 5 Select Key Touch Tone Select an item by either of the following operations Highlight an item by using and then press or OK soft key Press key DT730 DT710 Menu 5 ...

Page 64: ...r OK soft key Press key and then press or OK soft key Note When 0 Automatic is set the default setting Tone is applied Note The enabled item is highlighted Note 3 Voice can be selected on DT730 only 1 2 Talk 3 4 5 OK Back Hold Music Prefix RTP Alarm DTMF Tone Key Touch Tone 0 1 2 3 0 3 0 1 Key Touch Tone 2 OK Back No Tone Tone Automatic 3 Voice ...

Page 65: ...ight an item by using and then press or OK soft key Press key STEP 4 Select Talk Select an item by either of the following operations Highlight an item by using and then press or OK soft key Press key STEP 5 Select Hold Music Select an item by either of the following operations Highlight an item by using and then press or OK soft key Press key DT730 DT710 Menu 5 2 5 2 1 2 Tool Menu 3 4 5 6 0 Call ...

Page 66: ...ight an item by using and then press or OK soft key Press or key and then press or OK soft key 1 2 Talk 3 4 5 OK Back Prefix RTP Alarm DTMF Tone Key Touch Tone Hold Music 1 2 1 2 1 2 Hold Music OK Back Download Default Note You can preview the designated music on hold When selecting Download the music on hold file must be downloaded in advance If there is no downloaded file you hear no tone in the...

Page 67: ... Display Select an item by either of the following operations Highlight an item by using and then press or OK soft key Press key STEP 5 Select Time Format Select an item by either of the following operations Highlight an item by using and then press or OK soft key Press key Note This setting is available for Time Display only Call Log feature displays the time in 24 hour for mat regardless of this...

Page 68: ... Meaning 0 Automatic Follow the setting on the system default 1 12 hour Indication 12 hour clock 2 24 hour Indication 24 hour clock Note For the setting on the System contact the Sys tem Administrator Note The enabled item is highlighted 1 2 Display 3 4 5 6 Back Light Language OK Back Font Size Local Volume Screen Saver Time Format 0 2 0 1 Time Format 2 OK Back 12 hour Indication 24 hour Indicatio...

Page 69: ...er of the following operations Highlight an item by using and then press or OK soft key Press key STEP 4 Select Display Select an item by either of the following operations Highlight an item by using and then press or OK soft key Press key STEP 5 Select Local Volume Select an item by either of the following operations Highlight an item by using and then press or OK soft key Press key DT730 DT710 M...

Page 70: ...ress or OK soft key Menu Item Meaning 0 Automatic Each volume level is displayed on LCD default 1 Disable Each volume level is not displayed on LCD 2 Enable Each volume level is displayed on LCD Note The enabled item is highlighted 1 2 Display 3 4 5 6 Back Light Language OK Back Font Size Screen Saver Time Format Local Volume 0 2 0 1 Local Volume 2 OK Back Disable Enable Automatic ...

Page 71: ... and then press or OK soft key Press key DT730 key DT710 STEP 3 Select User Setting Select an item by either of the following operations Highlight an item by using and then press or OK soft key Press key STEP 4 Select Display Select an item by either of the following operations Highlight an item by using and then press or OK soft key Press key Note For details on the XML service contact the Sys te...

Page 72: ...nd then press or OK soft key Press or key and then press or OK soft key STEP 8 The display goes back to the Screen Saver screen When Enable is selected Step 7 Select Wait Time Input Wait Time to launch the screen saver 1 999min and then press or OK soft key 3 3 1 2 Display 3 4 5 6 Back Light Language OK Back Font Size Local Volume Screen Saver Time Format 1 1 1 2 Screen Saver OK Back Screen Saver ...

Page 73: ...ither of the following operations Highlight an item by using and then press or OK soft key Press key STEP 4 Select Display Select an item by either of the following operations Highlight an item by using and then press or OK soft key Press key STEP 5 Select Back Light Select an item by either of the following operations Highlight an item by using and then press or OK soft key Press key DT730 Menu 5...

Page 74: ...soft key Press or key and then press or OK soft key Menu Item Meaning 1 Disable Backlights of LCD and digit keys are disabled 2 Enable Backlights of LCD and digit keys are enabled Note The enabled item is highlighted 1 2 Display 3 4 5 6 Language OK Back Font Size Screen Saver Time Format Local Volume Back Light 1 2 1 2 Back Light OK Back Disable Enable ...

Page 75: ...y using and then press or OK soft key Press key STEP 4 Select Display Select an item by either of the following operations Highlight an item by using and then press or OK soft key Press key STEP 5 Select Font Size Select an item by either of the following operations Highlight an item by using and then press or OK soft key Press key DT730 Menu 5 5 1 2 Tool Menu 3 4 5 6 0 Call Func Presence Favorite...

Page 76: ... operations Highlight an item by using and then press or OK soft key Press or key and then press or OK soft key Note The enabled item is highlighted 1 2 Display 3 4 5 6 Language OK Back Screen Saver Time Format Local Volume Back Light Font Size 1 2 1 2 Font Size OK Back Small 12dot Standard 16dot ...

Page 77: ... press or OK soft key Press key STEP 4 Select Display Select an item by either of the following operations Highlight an item by using and then press or OK soft key Press key STEP 5 Select Language DT730 Lan guage DT710 Select an item by either of the following operations Highlight an item by using and then press or OK soft key Press key DT730 key DT710 DT730 DT710 Menu 5 2 5 2 1 2 Tool Menu 3 4 5 ...

Page 78: ...a selection press or OK soft key 1 2 Display 3 4 5 6 OK Back Screen Saver Time Format Local Volume Back Light Font Size Language 0 9 1 5 15 Note The enabled item is highlighted 0 1 Language 2 3 4 5 6 7 Automatic OK Back 8 9 16 15 14 13 12 11 10 17 18 19 20 21 Japanese NEC English NEC Spanish NEC French German Italian NEC Portuguese Dutch Norwegian Danish Swedish Greek Portuguese French Spanish Eng...

Page 79: ...lect User Setting Select an item by either of the following operations Highlight an item by using and then press or OK soft key Press key STEP 4 Select Change Password Select an item by either of the following operations Highlight an item by using and then press or OK soft key Press key STEP 5 The Change Password screen is displayed Enter the old password and then press or Set soft key DT730 DT710...

Page 80: ...assword for the first time enter 0000 as the old password New Pass Change Password OK Cancel Set BK 1 Old Pass Retry Pass Change Password OK Cancel Set BK 1 Old Pass Retry Pass New Pass Note A maximum of 32 digits 0 9 and can be set as a password Note When the password entry ends in failure the fol lowing error message is issued In that case press OK soft key and try again Change Password OK Cance...

Page 81: ... either of the following operations Highlight an item by using and then press or OK soft key Press key STEP 4 Select Setting Reset Select an item by either of the following operations Highlight an item by using and then press or OK soft key Press key STEP 5 Enter the password and then press or OK soft key DT730 DT710 Menu 5 2 5 2 1 2 Tool Menu 3 4 5 6 0 Call Func Presence Favorite Config Directory...

Page 82: ...74 STEP 6 Press or OK soft key to clear the person al data of the telephone Setting Reset OK Back BK 1 Input a password Setting Reset OK Back Are you sure ...

Page 83: ...t as the directory for downloading STEP 2 Select Setting DT730 Setting DT710 on the Menu screen Select an item by either of the following operations Highlight an item by using and then press or OK soft key Press key DT730 key DT710 STEP 3 Select Download Select an item by either of the following operations Highlight an item by using and then press or OK soft key Press key STEP 4 Select Protocol Se...

Page 84: ...TP Settings Select an item by either of the following operations Highlight an item by using and then press or OK soft key Press key STEP 8 Select User ID Select an item by either of the following operations Highlight an item by using and then press or OK soft key Press key STEP 9 Enter a User ID by using digit keys then press or OK soft key 1 2 Download Menu 3 4 FTP Settings OK Back Download Files...

Page 85: ...ory where the download file is stored and then press or OK soft key STEP 14 The display goes back to the FTP Settings screen Press or Back soft key to display Note For details on character entry method see HOW TO INPUT CHARACTERS in chapter 4 Basic Operation User ID OK Back BK A Input a user ID 2 2 1 2 FTP Settings 3 OK Back Folder User ID Password OK Back BK A Password Input a password Note For d...

Page 86: ...lect Download Files Select an item by either of the following operations Highlight an item by using and then press or OK soft key Press key STEP 18 Select a file to be downloaded 1 2 FTP Settings 3 OK Back Folder User ID Password 2 2 1 2 Download Menu 3 4 FTP Settings OK Back Download Files Protocol Download Address When downloading a file for Music on Hold Select Hold Music and go to STEP 20 When...

Page 87: ...e for ringer tone the default file name is Melody1 2 3 wav When downloading a file for Directory the default file name is Directory csv Note DT710 can select 1 Hold Music only 1 2 Download Files 3 OK Back Directory Hold Music Ring Tone 2 1 2 3 1 3 1 2 Ring Tone 3 OK Back Download3 Download1 Download2 File Format Maximum Size PCM µ law 8kHz s wav under 32 seconds File Format Maximum Size PCM µ law ...

Page 88: ...of 20 characters 0 9 A Z a z or _ can be entered as a file name Note To delete an entered character press BK soft key Note Be sure not to turn OFF the DT700 Series while Saving is displayed on the LCD Note When the downloading process ends in failure Downloading Failed is displayed on the LCD Check to see the following and then retry Check Points Actions Download file is not placed in the specifie...

Page 89: ...2 Select Setting DT730 Setting DT710 on the Menu screen Select an item by either of the following operations Highlight an item by using and then press or OK soft key Press key DT730 key DT710 STEP 3 Select Data Backup Restore Select an item by either of the following operations Highlight an item by using and then press or OK soft key Press key STEP 4 Select Protocol Select an item by either of the...

Page 90: ...an item by either of the following operations Highlight an item by using and then press or OK soft key Press key STEP 8 Select User ID Select an item by either of the following operations Highlight an item by using and then press or OK soft key Press key STEP 9 Enter a User ID by using digit keys then press or OK soft key 1 2 Backup Restore 3 4 OK Back Data Backup Data Restore Server Address 5 FTP...

Page 91: ...K soft key Press key STEP 13 Enter the destination directory of the FTP TFTP server and then press or OK soft key Note For details on character entry method see HOW TO INPUT CHARACTERS in chapter 4 Basic Operation User ID OK Back BK A Input a user ID 2 2 1 2 FTP Settings 3 OK Back Folder User ID Password OK Back BK A Password Input a password Note For details on character entry method see HOW TO I...

Page 92: ...rate with an asterisk After entering an IP address press or OK soft key STEP 17 The display goes back to the Backup Re store screen Select Data Backup Select an item by either of the following operations Highlight an item by using and then press or OK soft key Press key STEP 18 The default file name will be displayed as fol lows 1 2 FTP Settings 3 OK Back Folder User ID Password 3 3 1 2 Backup Res...

Page 93: ...on Note A maximum of 20 characters 0 9 A Z a z or _ can be entered as a file name Note To delete an entered character press BK soft key Note Be sure not to turn OFF the DT700 Series while Saving is displayed on the LCD Exec Cancel BK A Data Backup Input a folder name PersonalData tgz Note When the data backup ends in failure Upload Failed is displayed on the LCD Check to see the following and then...

Page 94: ...then specify it as the directory for downloading STEP 2 Select Setting DT730 Setting DT710 on the Menu screen Select an item by either of the following operations Highlight an item by using and then press or OK soft key Press key DT730 key DT710 STEP 3 Select Data Backup Restore Select an item by either of the following operations Highlight an item by using and then press or OK soft key Press key ...

Page 95: ... Select an item by either of the following operations Highlight an item by using and then press or OK soft key Press key STEP 8 Select User ID Select an item by either of the following operations Highlight an item by using and then press or OK soft key Press key STEP 9 Enter a User ID by using digit keys then press or OK soft key 1 2 Backup Restore 3 4 OK Back Data Backup Data Restore Server Addre...

Page 96: ...tory where the backup file is stored and then press or OK soft key STEP 14 The display goes back to the FTP Settings screen Press or Back soft key to display Note For details on character entry method see HOW TO INPUT CHARACTERS in chapter 4 Basic Operation User ID OK Back BK A Input a user ID 2 2 1 2 FTP Settings 3 OK Back Folder User ID Password OK Back BK A Password Input a password Note For de...

Page 97: ...n IP address press or OK soft key STEP 17 The display goes back to the Backup Re store screen Select Data Restore Select an item by either of the following operations Highlight an item by using and then press or OK soft key Press key STEP 18 The default file name will be displayed as fol lows 1 2 FTP Settings 3 OK Back Folder User ID Password 3 3 1 2 Backup Restore 3 4 OK Back Data Backup Data Res...

Page 98: ...9 A Z a z or _ can be entered as a file name Note To delete an entered character press BK soft key Note Be sure not to turn OFF the DT700 Series while Saving is displayed on the LCD Exec Cancel BK A Data Restore Input a folder name PersonalData tgz Note When the downloading process ends in failure Download Failed is displayed on the LCD Check to see the following and then make a retry Check Points...

Page 99: ...and then press or OK soft key Press key STEP 2 Select Ring Volume Select an item by either of the following operations Highlight an item by using and then press or OK soft key Press key STEP 3 Ring Volume can be set in 13 levels 0 12 Adjust the ringer tone volume by using key and then press or OK soft key DT330 Menu 3 3 1 2 Menu 3 OK Back Directory Call History Settings 1 1 Turn the volume up Turn...

Page 100: ...ations Highlight an item by using and then press or OK soft key Press key STEP 3 To disable enable the off hook ringing select Disable or Enable Select an item by either of the following operations Highlight an item by using and then press or OK soft key Press or key and then press or OK soft key DT330 Menu 3 3 1 2 Menu 3 OK Back Directory Call History Settings 2 2 1 2 Settings 3 OK Back Back Ligh...

Page 101: ...Highlight an item by using and then press or OK soft key Press key STEP 3 Make a selection from the following list Select an item by either of the following operations Highlight an item by using and then press or OK soft key Press or key and then press or OK soft key STEP 4 After Making a selection press or OK soft key DT330 Menu 3 3 1 2 Menu 3 OK Back Directory Call History Settings 3 3 Menu Item...

Page 102: ...llowing operations Highlight an item by using and then press or OK soft key Press key STEP 3 To disable enable the ringing of headset se lect Disable or Enable Select an item by either of the following operations Highlight an item by using and then press or OK soft key Press or key and then press or OK soft key DT330 Menu 3 3 1 2 Menu 3 OK Back Directory Call History Settings 4 4 1 2 Settings 3 OK...

Page 103: ...f DT Series TO LOGIN TO LOGOUT TO MAKE AN EXTERNAL CALL TO MAKE AN INTERNAL CALL TO ANSWER AN EXTERNAL CALL TO ANSWER AN INTERNAL CALL MULTILINE APPEARANCE TO HOLD A CALL TO PLACE A CALL ON EXCLUSIVE HOLD TO TRANSFER A CALL HOW TO INPUT CHARACTERS SECURITY MODE EMERGENCY CALL ...

Page 104: ... 2 LOGOUT is displayed on the LCD of the terminal STEP 3 Press the Logout Feature Key on the termi nal again Note This feature is only available for DT700 Series DT730 710 Cancel Back Set OK Password Login ID Cancel Back Set OK Password Login ID 2000 Cancel Back Set OK Password Login ID 2000 MIC DND 7 25 AM MON 12 JUL 2010 Note This feature is only available for DT700 Series Note The soft key loca...

Page 105: ...istered in Personal Directory Note Personal Directory Name Display function is available only for DT730 Series Note This section describes the Normal Dial Mode Regarding the other mode see TO ORIGINATE A CALL USING SELECTIVE DIALING DYNAMIC DIAL PAD PRESET DIAL in Chapter 5 DT730 710 DT330 310 Speaker 1 25 PM MON 12 JUL 2010 MIC DND 31313 Station Number of My Line 1 25 PM MON 12 JUL 2010 MIC DND 9...

Page 106: ...is an actual line that is directly associ ated with station number of the telephone You can make answer a call via this line Usually My line is seized automatically only by lifting the handset or pressing the Speaker key 00 05 Elapsed Time MIC DND Dialed Code 9XXXXXXXXX Number ...

Page 107: ...egistered in Personal Directory STEP 3 Use the handset or MIC to start a conversa tion while in a conversation When dialed station number is registered in Personal Di rectory When dialed station number is not registered in Personal Directory Note Personal Directory Name Display function is available only for DT730 Series Note This section describes the Normal Dial Mode About the other mode see TO ...

Page 108: ...tly associ ated with station number of the telephone You can make answer a call via this line Usually My line is seized automatically only by lifting the handset or pressing the Speaker key 1 25 PM MON 12 JUL 2010 31314 Dialed Station Number MIC DND ...

Page 109: ...r is not registered in Personal Directory When caller ID is not received STEP 2 Press key or touch the appropriate Line Key STEP 3 Lift the handset to answer the call while in a conversation When calling party telephone number is registered in Per sonal Directory When calling party telephone number is not registered in Personal Directory Note Personal Directory Name Display function is available o...

Page 110: ...Note When an incoming call is terminated to My Line of the telephone you can usually answer the call only by lifting the handset or pressing the Speaker Key 1 25 PM MON 12 JUL 2010 DDD 3 Trunk Trunk Number Type MIC DND 00 05 Elapsed Time ...

Page 111: ... number is not registered in Personal Directory STEP 2 Press key or touch the appropriate Line Key STEP 3 Lift the handset to answer the call while in a conversation When calling station number is registered in Personal Di rectory When calling station number is not registered in Personal Directory Note Personal Directory Name Display function is available only for DT730 Series Name Information reg...

Page 112: ...eld line Use handset to converse If unanswered STEP 1 After preprogrammed time Automatic Recall is initiated STEP 2 Visual and audible signal rapid flash and ring burst is sent to station that placed call on hold Note Hold shows as a flashing green LED on your phone The same line on other phones shows as a flashing red LED Recall shows as a flashing green LED on your phone and flashing red LED on ...

Page 113: ...g ask party to hold STEP 2 Press key Receive interrupted dial tone STEP 3 Dial destination station s extension hang up or wait for answer Note If held line appears on other DT Series stations LED remains steadily lit red Note Only the DT Series that set Exclusive Hold option can retrieve the call DT730 710 DT330 310 HOLD MIC Held Station Number 2001 E_HOLD 1 25 PM MON 12 JUL 2010 Speaker Note Excl...

Page 114: ...106 STEP 4 If transferring party hangs up that station s number appears in the center of recipient s display MIC 1 25 PM MON 12 JUL 2010 TRANSFER 2000 DDD 3 Transferring station ...

Page 115: ...screen uppercase lowercase The enabled entry mode is indicated in the top portion of the LCD screen DT730 only DT730 Uppercase Alphabetic Lowercase Alphabetic Numeric Character Mode By pressing key Indicates the enabled character mode DT730 only Input a name Name OK Back Option BK A A Input a name Name OK Back Option BK A a Input a name Name OK Back Option BK A 1 1 2 Word width SubMenu 3 4 5 6 7 8...

Page 116: ... lower case alphabetic and numeric character Word case Switch between uppercase and lowercase Word width Not used Delete Delete a single character Copy Copy the specified characters Cut Cut the specified characters Paste Paste the specified characters Space Enter a space Return Start a new line Overwrite Insert Write over existing characters Menu 1 2 Word width SubMenu 3 4 5 6 7 8 Paste Space Chan...

Page 117: ...h 7th 8th 9th 10th 11th 12th 13th 1 Note A B C 2 a b c 2 D E F 3 d e f 3 G H I 4 g h i 4 J K L 5 j k l 5 M N O 6 m n o 6 P Q R S 7 p q r s 7 T U V 8 t u v 8 W X Y Z 9 w x y z 9 SP 0 Note Not available from Firmware version 3 0 0 0 and later 1 A a 2 A a 3 A a 4 A a 5 A a 6 A a 7 A a 8 A a 9 A a 0 A a ...

Page 118: ...h 16th 17th 18th 19th 20th Note2 _ 21th 22th 23th 24th 25th 26th 27th 28th 29th 30th Note1 Used as a case shift key Shifts the characters between alphabetic and numeric Note1 and key is the same for Russian Turkish and other Languages Note2 Not available from Firmware version 3 0 0 0 and later A a A a A a ...

Page 119: ...h 12th 13th 14th 15th A Б В Г а б в г Д Е Ё Ж З д е ё ж з И Й К Л и й к л М Н О П м н о п Р С Т У р с т у Ф Х Ц Ч ф х ц ч Ш Щ Ъ Ы Ь ш щ ъ ы ь Э Ю Я э ю я SP Note and key is the same for English Refer to the Character Code For English 2 2 1 A a 2 A a 3 A a 4 A a 5 A a 6 A a 7 A a 8 A a 9 A a 0 A a ...

Page 120: ...10th 11th 12th 13th 14th 15th A B C Ç a b c ç D E F d e f G H I g h I J K L j k l M N O Ö m n o ö P R S p r s T U Ü V t u ü v Y Z y z SP Note and key is the same for English Refer to the Character Code For English 2 2 1 A a 2 A a 3 A a 4 A Ğ İ a ğ i 5 A a 6 A a 7 A Ş a Ş 8 A a 9 A a 0 A a ...

Page 121: ...Æ Ç a b c à á â ã ä å æ ç D E F È É Ê Ë d e f è é ê ë G H I Ì Í Î Ï g h i ì í î ï J K L j k l M N O Ñ Ò Ó Ô Õ Ö Œ Ø m n o ñ ò ó ô õ ö œ ø P Q R S ß p q r s ß T U V Ù Ú Û Ü t u v ù ú û ü W X Y Z w x y z SP Note and key is the same for English Refer to the Character Code For English 2 2 1 A a 2 A a 3 A a 4 A a 5 A a 6 A a 7 A a 8 A a 9 A a 0 A a ...

Page 122: ...0th 11th 12th 13th 14th 15th 1 2 3 4 5 6 7 8 9 0 _ Used as a case shift key Shifts the characters between alphabetic and numeric Note When entering password 0 9 and are available is entered by pressing key is entered by pressing key 1 1 2 1 3 1 4 1 5 1 6 1 7 1 8 1 9 1 0 1 1 1 ...

Page 123: ... Press or OK soft key on the Sub Menu to go back to text input screen STEP 4 Enter en by using digit keys Press key twice to enter e Press key twice to enter n STEP 5 Press key once to enter a space 5 Input a name Name OK Back Option BK A K Menu 2 1 2 Word width SubMenu 3 4 5 6 7 8 Paste Space Change word OK Cancel Cut Delete Copy Return Overwrite Insert 9 10 Word case Input a name Name OK Back Op...

Page 124: ...or Option soft key to display SubMenu screen and then select Word case to switch the text input mode from low ercase to uppercase Menu 2 1 2 Word width SubMenu 3 4 5 6 7 8 Paste Space Change word OK Cancel Cut Delete Copy Return Overwrite Insert 9 10 Word case Input a name Name OK Back Option BK A Ken 5 Input a name Name OK Back Option BK A Ken K Menu 2 1 2 Word width SubMenu 3 4 5 6 7 8 Paste Spa...

Page 125: ...EP 11 Enter obus by using digit keys Press key three times to enter o Press key twice to enter b Press key twice to enter u Press key four times to enter s STEP 12 Press or OK soft key Input a name Name OK Back Option BK a Ken K 6 2 8 7 Input a name Name OK Back Option BK a Ken Kobus ...

Page 126: ...b Menu screen select Overwrite Insert and then press or OK soft key STEP 4 Enter new words over existing characters In this example F is entered Input a name Name OK Back Option BK A ABCDE Menu 10 1 2 Word width SubMenu 3 4 5 6 7 8 Paste Space Change word OK Cancel Cut Delete Copy Return 9 10 Word case Overwrite Insert Input a name Name OK Back Option BK A ABFDE ...

Page 127: ...ft key STEP 4 Place the cursor at the end point of the target characters and then press End soft key STEP 5 Place the cursor at position where you want to paste the copied characters and then press key or Option soft key Menu Input a name Name Back BK A ABCDE Option OK 5 5 1 2 Word width SubMenu 3 4 5 6 7 8 Paste Space Change word OK Cancel Cut Delete Return 9 10 Word case Overwrite Insert Copy In...

Page 128: ...ss or OK soft key or press key STEP 7 The copied characters CD are inserted as follows 7 7 1 2 Word width SubMenu 3 4 5 6 7 8 Space Change word OK Cancel Cut Delete Return 9 10 Word case Overwrite Insert Copy Paste Input a name Name Back BK A CDABCDE Option OK ...

Page 129: ...hile the telephone is locked key becomes disabled Also any features pro vided by the telephony server such as call origination or call answering cannot be per formed The Incoming call cannot be picked up though Ringing or Voice call are pos sible It is necessary to release the security mode to respond DT730 Security Lamp lights up Security lock will be released Please input a password Press Securi...

Page 130: ...Security Lamp is extinguished and Security Mode is canceled Security Lock Security lock will be released OK Cancel Please input a password BK Note When the password entry ends in failure the fol lowing error message is issued In that case press or OK soft key and then retry Note After a third attempt if incorrect password entered three times the following error message is issued Press or OK soft k...

Page 131: ...determined number For details on the setting of the emergency number contact the system administrator Note Emergency call cannot be made with Speaker key Note When pressing Unlock soft key the telephone prompts for the Security mode cancellation pass word Note Emergency telephone number needs to be set in advance For the setting of the emergency tele phone numbers contact the system administra tor...

Page 132: ...124 This page is for your notes ...

Page 133: ...Keys 0 9 and STEP 2 The dialed number appears on the top of LCD STEP 3 Lift handset or press key or STEP 3 Press the originating Line Key and lift hand set Note Pressing the Speaker Key or going off hook is not necessary DT730 710 DT330 310 Speaker 2000 MIC 1 25 PM MON 12 JUL 2010 DT730 710 DT330 Note Originating call operation is cancelled by the fol lowing Soft Key operation Press Exit key or Ca...

Page 134: ...ogrammed DT730 710 DT330 310 Speaker Feature Feature SPEED SET 1 25 PM MON 12 JUL 2010 MIC DND Feature Note To program a hook switch for transfer or feature activation press key as first digit dis plays on LCD Note To program a pause press the key as any digit other than the first digit displays on LCD Note To program a Voice Call press key after dialing station number V displays on LCD Note One T...

Page 135: ...rcase European characters The following tables show available characters for One Touch Speed Calling keys ALPHABETIC CHARACTER UPPERCASE EUROPEAN CHARACTER UPPERCASE DIGIT KEY 1 2 3 4 5 6 7 8 9 0 CHARACTER 1 A D G J M P T W 0 B E H K N Q U X C F I L O R V Y a d g j m S t Z b e h k n p u w c f i l o q v x 2 3 4 5 6 r 8 y s z 7 9 DIGIT KEY 1 2 3 4 5 6 7 8 9 0 CHARACTER A D G J M P T W 0 B E H K N Q ...

Page 136: ...IGIT KEY 1 2 3 4 5 6 7 8 9 0 CHARACTER a d g j m p t w 0 b e h k n q u x c f i l o r v y à è ì 5 ñ s ù z á é í ò ú 9 â ê î ó 7 û ã ë ï ô ü ä 3 4 õ 8 å ö æ œ ç ø 2 6 1 Note The shaded area indicates the characters which cannot be entered ...

Page 137: ...CALLING STATION GROUP STEP 1 Press Redial STEP 2 Press the desired speed calling number TO ORIGINATE A CALL USING SPEED CALLING SYSTEM To Program Speed Calling System Key On One Touch Speed Calling Key STEP 1 Press key STEP 2 Press desired One Touch Speed Calling key The LCD displays previously stored dig its Note To delete the entry press DEL or BK key and delete each one character Note To delete...

Page 138: ...T Series does not have the Speed Calling System key dial the Speed Calling System access code then the abbreviated call code To Operate From Directory Key Only DT710 Series and DT310 Series are equipped with Directory key STEP 1 Press key STEP 2 Dial the abbreviated call code maximum of 4 digits Feature SPEED SET 1 25 PM MON 12 JUL 2010 XXXX 1 25 PM MON 12 JUL 2010 Directory XXXX 1 25 PM MON 12 JU...

Page 139: ...ature access code receive service set tone STEP 3 Enter Forced Account Code up to 10 dig its receive dial tone AUTHORIZATION CODE To Enter Without Account Code STEP 1 Lift handset or press key receive dial tone STEP 2 Enter feature access code receive service set tone STEP 3 Enter Authorization Code up to 10 digits STEP 4 Receive dial tone dial desired number Or STEP 4 Lift handset receive dial to...

Page 140: ...nly if system is pro grammed with Least Cost Routing Note If a 4 8 16 or 32 button display terminal is used the display indicates all of the digits dialed DT730 710 DT330 310 VOICE 2000 1 25 PM MON 12 JUL 2010 Note A Voice Call may be programmed on a One Touch Speed Calling key by pressing One Touch Speed Calling key dialing the extension and pressing the key V displays if pro gramming on an DT Se...

Page 141: ...ights solid green STEP 3 If called station is engaged in a non intercom call the station may press AICM after placing original caller on hold with key To Bridge Into An Automatic Intercom Call STEP 1 Press the AICM key lift handset or press key Note If privacy is required lift handset DT730 710 DT330 310 Mic Calling station VOICE 2001 1 25 PM MON 12 JUL 2010 DT730 710 DT330 310 Speaker Called part...

Page 142: ...d with key To Bridge Into A Manual Intercom Call STEP 1 Press MICM lift handset or press key STEP 2 A three party conference is established CONF 1 25 PM MON 12 JUL 2010 DT730 710 DT330 310 Speaker Called party ICM 2 1 25 PM MON 12 JUL 2010 Calling party ICM 1 1 25 PM MON 12 JUL 2010 Speaker Note Bridging is an optional feature Note The SIG key signals the corresponding station when speaking over t...

Page 143: ...after placing the original call on hold with key To Bridge Into A Dial Intercom Call STEP 1 Press the DICM key lift handset or press key STEP 2 A three party conference is established DT730 710 DT330 310 Speaker Called party ICM 2 1 25 PM MON 12 JUL 2010 Speaker HOLD Calling party ICM 2 1 25 PM MON 12 JUL 2010 Note Bridging is an optional feature Note Dial intercom provides a Dial Intercom group w...

Page 144: ... caller Third party is automatically placed on hold STEP 4 By repeating these steps it is possible to al ternate between calls TO ANSWER A CAMPED ON CALL STEP 1 While engaged in a call receive the camp on indication one short tone burst LED of key flashes STEP 2 Press key Call in progress is placed on hold STEP 3 Connection to camped on call is established STEP 4 Press key to return to original ca...

Page 145: ...eceive busy tone STEP 2 Press CALL WAITING STEP 3 Receive special ringback tone STEP 4 Call waiting tone is sent to busy station Or STEP 4 Lift handset or press key STEP 5 Dial Call Waiting access code receive dial tone STEP 6 Dial busy station Using Soft Key STEP 1 Dial desired station and receive busy tone Note To program a hook switch for transfer or feature activation press as first digit dis ...

Page 146: ...Display indi cates connected station or trunk at any given time Using Soft Key STEP 1 Hear burst of tone Display indicates C WAIT and key flashes STEP 2 Press key receive call waiting tone To Disconnect STEP 1 Press key Station user is automati cally connected to original party Called station number C WAIT SET 2000 MIC 1 25 PM MON 12 JUL 2010 Answer Answer Calling station number C WAIT 2001 1 25 P...

Page 147: ...etrieve A Parked Call From Originating Station STEP 1 Dial Call Park local retrieval code STEP 2 Station user is connected to parked call To Retrieve A Parked Call From A Remote Station STEP 1 Dial Call Park local retrieval code STEP 2 Station user is connected to parked call DT730 710 DT330 310 Feature Recall Feature Parked station or trunk CALLPARK SET DDD 3 1 25 PM MON 12 JUL 2010 Elapsed time ...

Page 148: ...STEP 2 Press One Touch Speed Calling key STEP 3 Dial Direct Call Pick up access code STEP 4 Press key again When A Station Within System Rings STEP 1 Lift handset receive dial tone STEP 2 Press PICK DIRECT and dial the station number to be picked up Or STEP 2 Dial Direct Call Pick up access code and the station number to be picked up STEP 3 Connection to calling party is established STEP 4 If busy...

Page 149: ... tone and leaves speaker on STEP 4 The desired number is automatically dialed when a trunk becomes available EXECUTIVE OVERRIDE If Called Station Is Busy STEP 1 Press OVERRIDE STEP 2 Interrupted parties receive warning tone STEP 3 Three way conference is initiated STEP 4 Conf LED lights Using Soft Key STEP 1 Press E OVR Soft Key STEP 2 Interrupted parties receive warning tone and three way confere...

Page 150: ...Receive service set tone STEP 5 FWD LED lights at your station or at the DT Series of the multiline station you are setting STEP 6 Press key Call Forwarding All Calls is set Using Soft Key STEP 1 Press FDA Soft Key Receive special tone STEP 2 Dial destination wait for service set tone Note Override may be programmed by the Telephony Server Admin for one of the Programmable fea ture keys or may be ...

Page 151: ...arding All Calls cancel code Receive service set tone LED goes out at your station or the DT Se ries of the multiline station STEP 3 Press key Call Forwarding All Calls is cancelled Using Soft Key STEP 1 Press FDA Soft Key STEP 2 Receive service set tone and FORWARD CANCEL is displayed Note With Soft Key operation FDB flashes on the dis play FORWARD SET MIC 1 25 PM MON 12 JUL 2010 Forwarding stati...

Page 152: ...TEP 2 Dial destination wait for service set tone STEP 3 FORWARD SET is displayed Call Forward ing Busy Line is set To Verify Only For Terminal With LCD STEP 1 Press FWD BY STEP 2 Display indicates the station number calls are forwarded to To Cancel STEP 1 Press key Receive dial tone If can celing for another station press MULTILINE APPEARANCE STEP 2 Press FWD BY or dial Call Forwarding Busy Line c...

Page 153: ...D NA LED lights at your station or at the DT Series of the multiline station you are set ting STEP 6 Press key Call Forwarding Don t Answer is set Using Soft Key STEP 1 Press FDN Soft Key Receive special dial tone STEP 2 Dial destination wait for service set tone STEP 3 FORWARD SET is displayed Call Forward ing Don t Answer is set To Verify Only For Terminal With LCD STEP 1 If verifying for anothe...

Page 154: ...P Station Call Destination access code STEP 3 Dial destination station number receive ser vice set tone STEP 4 Replace handset or press key Logged Out IP Station Call Destination is set Using Soft Key STEP 1 Press FDL Soft Key receive special Dial Tone STEP 2 Dial destination station number STEP 3 Receive service set tone FORWARD SET is displayed Note Call Forwarding for Busy Line and Don t Answer...

Page 155: ...P 3 Replace handset or press key Logged Out IP Station Call Destination is canceled Using Soft Key STEP 1 Lift handset or press key receive Dial Tone STEP 2 Press FDL Soft Key receive service set tone STEP 3 Dial destination station number receive ser vice set tone STEP 4 Logged Out IP Station Call Destination lamp goes off and FDL indication disappears on the LCD Note With Soft Key Operation FDL ...

Page 156: ...s displayed and the CB Soft Key flashes on the display TO SAVE AND REPEAT A NUMBER To Save STEP 1 Press key STEP 2 Dial desired telephone number STEP 3 Press S R Dialed number is now stored S R LED lights Or STEP 3 Receive internal call STEP 4 Press S R Number is stored in memory DT730 710 DT330 310 Called party CALLBACK SET 2000 1 25 PM MON 12 JUL 2010 Called party CALLBACK 2000 1 25 PM MON 12 JU...

Page 157: ...tes digits sorted To Repeat STEP 1 Press key STEP 2 Press S R DT Series automatically redials the programmed number STEP 3 S R automatically cancelled LED goes out Using Soft Key STEP 1 Press flashing S R Soft Key Stored number is automatically redialed S R disappears from display Note If saved number is busy or no answer is received to save it again press S R again before hanging up Speaker ...

Page 158: ...ch left message is au tomatically redialed STEP 3 Message is erased To Erase STEP 1 To erase a message without returning the call press MSG to display desired message Note Up to four messages can be stored in DT Series memory Note If a fifth message is attempted reorder tone is heard and display indicates as follows Note If station is not equipped to receive messages reorder tone is heard and disp...

Page 159: ... ringback tone MEET ME PAGING Example Station A can page Station B When Station B dials answer code they are connected To Page Station A STEP 1 Dial Paging access code receive continu ous ringback for one second STEP 2 Page station B STEP 3 Remain off hook or hang up Note If station that left message is busy callback or MSG may be set If station that left message does not answer MSG may be set not...

Page 160: ...d transfer it to Station B Station A Paging STEP 1 Ask calling party to hold STEP 2 Press key Receive interrupted dial tone STEP 3 Dial Paging access code Receive continu ous ringback for one second STEP 4 Page Station B STEP 5 Remain off hook or hang up To Answer Station B If Station A remained off hook STEP 1 Station B dials Paging answer code and is connected with Station A Station A announc es...

Page 161: ...TEP 3 Station A hangs up Station B and the calling party are connected Or Dependent on System Programming STEP 3 Station B dials Paging answer code and is immediately connected to the calling party DDD 3 1 25 PM MON 12 JUL 2010 Stations A and B each display the other s number flashing TRANSFER DDD 3 1 25 PM MON 12 JUL 2010 Calling trunk number DDD 3 1 25 PM MON 12 JUL 2010 PAGING DDD 3 1 25 PM MON...

Page 162: ...s Station With caller on the line STEP 1 Lift handset or press key STEP 2 Press boss ringing line Ask calling party to hold STEP 3 Press the MW SET line feature key No ser vice set tone is heard Boss sees MW on display and can call secretary to receive message Without caller on the line STEP 1 After taking message press key and receive dial tone STEP 2 Press the MW SET line feature key Receive ser...

Page 163: ...intended for boss To Program Boss Secretary Override Key STEP 1 Press key STEP 2 Press a One Touch Speed Calling key STEP 3 Dial Boss Secretary Override access code STEP 4 Press key displays on LCD STEP 5 Dial boss station number STEP 6 Press key again Secretary STEP 1 Lift handset to answer Trunk B ask caller to hold STEP 2 Press CALL HOLD feature key or key and dial call hold access code Receive...

Page 164: ...der tone hangs up STEP 4 Boss can alternate between the two parties by pressing key Option 3 STEP 1 If boss does not respond to 3 bursts of tone secretary presses key STEP 2 Secretary is connected to Trunk B Option 4 STEP 1 Boss presses key and converses with Secretary Trunk A is placed on hold STEP 2 Boss denies call presses key to re turn to Trunk A STEP 3 Secretary is returned to Trunk B DO NOT...

Page 165: ...swer being set at the station Call Redirect To Call Forward Don t Answer Destination STEP 1 Station A sets Call Forward Don t Answer to Station B STEP 2 Station C dials Station A it rings and displays Station C s number on the display STEP 3 Station A presses the Call Redirect Key STEP 4 REDIRECT is displayed on the LCD and the call immediately forwards to Station B Using Soft Key STEP 1 Station A...

Page 166: ...n C Using Soft Key STEP 1 Station B calls Station C STEP 2 Station C answers the call and transfers it to Station A and then releases the call STEP 3 Station A rings STEP 4 Station A presses the REDIR Soft Key STEP 5 REDIRECTING is displayed on Station A and the call immediately recalls to Station C PRIVACY While Off Hook STEP 1 Press DND LED lights STEP 2 Privacy feature prevents interruptions fo...

Page 167: ...or presses key STEP 2 Station A presses the line appearance of Sta tion B STEP 3 Station B LCD indicates as follows STEP 4 Station B may allow Station A to enter the conversation by pressing P RLS STEP 5 Warning tone is sent to the interrupted parties optional STEP 6 A three way conference is established Note DND must be programmed by the Telephony Server Admin on a Programmable feature key Note S...

Page 168: ...egistered for each dial number Up to 24 characters can be registered for each name SYSTEM PHONEBOOK To Search And Make A Call Example To Search For NEC BNET STEP 1 Press Pbook soft key while Station is in Idle state Note Station A can be a single line station if it appears on the Station B DT Series Note Up to six parties can break into a two party con versation additional devise is required Note ...

Page 169: ... perform a search Ex To enter NEC Press key twice to enter N Press key four times to enter E Press key twice to enter C Note Select an item on the menu screen in either of the following two ways Press an appropriate digit key Highlight a desired item and then press or OK soft key Pbook MIC DND 1 25 PM MON 12 JUL 2010 Menu 2 History Back OK 1 2 Tool 3 Directory 2 Note This feature cannot be activat...

Page 170: ...r Note More soft key appears in Phonebook data screen when the number of characters name or digits telephone number are exceeding displayable limit Up to 17 characters or digits can be displayed at a time If the name or telephone number exceeds the displayable limit press or More soft key to display the last 17 characters digits of the name telephone number Example Name Suzuki Taro JapanSumida 24 ...

Page 171: ... enter NEC Press key twice to enter N Press key twice to enter E Press key three times to enter C Note Select an item on the menu screen in either of the following two ways Press an appropriate digit key Highlight a desired item and then press or OK soft key Pbook MIC DND 1 25 PM MON 12 JUL 2010 Menu 2 History Back OK 1 2 Tool 3 Directory Note If soft Key is pressed on the above screen the followi...

Page 172: ...mpty appears STEP 2 Name Entry screen appears STEP 3 Enter a name in this example NEC is en tered and then press or OK soft key If no appropriate data exists the message En try not found appears Note To delete an entered character press or Clr soft key Note To move the cursor one space to the right press key or soft key once Note To delete an entered digit press or Clr soft key Eu l Cnl Upper case...

Page 173: ...ght press key or soft key once Eu s Cnl Lower case character Eu l Cnl Upper case character Name NEC Cnl OK DOWN NEC ABIKO UP NEC BNET Cnl OK Name NEC DOWN UP Speaker Note More soft key appears in Phonebook data screen when the number of characters name or digits telephone number are exceeding displayable limit Up to 17 characters or digits can be displayed at a time If the name or telephone number...

Page 174: ... times to enter s Press key twice to enter e STEP 6 The following number edit screen appears Pref Cnl Number 0123456789 Name Home More EDIT DEL Number 0123456789 Name Home Edit Name OK Clr Home Edit Name OK Clr Ho Note If soft Key is pressed on the above screen the following soft keys appear Pressing or Eu s Eu l soft key shifts characters between uppercase and lowercase Note To delete an entered ...

Page 175: ...s or OK soft key to delete the cur rently displaying data STEP 4 The data deletion has completed Two sec onds later the display returns to Name Entry screen To Add A Prefix To Telephone Number The procedure shown below is available in Local Phonebook Example To add a prefix 0184 in front of telephone number 0123456789 Number 01234567 Cnl Name House Clr OK Number 0123456712 Name House Clr OK Cnl En...

Page 176: ...igit press or Clr soft key Pref Cnl Number 0123456789 Name Takahashi More Clr Number 0184 Prefix Number Input Cnl OK Cnl Number 01840123456789 Name Takahashi More Note More soft key appears in Phonebook data screen when the number of characters name or digits telephone number are exceeding displayable limit Up to 17 characters or digits can be displayed at a time If the name or telephone number ex...

Page 177: ...RACTER SP Blank Space Digit Code 1 2 3 4 5 6 7 8 9 0 Character A D G J M P T W SP B E H K N Q U X 0 C F I L O R V Y À È Ì 5 Ñ S Ù Z Á É Í Ò Ú 9 Â Ê Î Ó 7 Û Ã Ë Ï Ô Ü Ä 3 4 Õ 8 Å Ö Æ Œ Ç Ø 2 6 1 Digit Code 1 2 3 4 5 6 7 8 9 0 Character a d g j m p t w SP b e h k n q u x 0 c f i l o r v y à è ì 5 ñ s ù z á é í ò ú 9 â ê î ó 7 û ä ë ï ô ü å 3 4 õ 8 æ ö 1 ç 6 2 ...

Page 178: ...y while the current time is displayed on LCD OR STEP 1 Press key to display the Menu screen On the Menu screen select History for DT730 Series Call History for DT330 Series and then press or OK soft key or press key STEP 2 The history data of the last received call is displayed STEP 3 Press or soft key to display a desired history data Note When the system administrator invalidates the Phonebook t...

Page 179: ...ou cannot make a call by dialing a telephone number Pbook 51500 12 55 PM MON 12 JUL 2010 Speaker Pbook 31300 1 03 PM MON 12 JUL 2010 DEL 31300 1 03 PM MON 12 JUL 2010 END Pref Note A maximum of 10 digits 0 9 and can be set as a prefix Note When prefix is added up to 32 digits including the prefix can be sent as dial number Note To delete an entered character press or Clr soft key Note More soft ke...

Page 180: ...be added to the Per sonal Directory described in 6 DIRECTORY OPERATION controlled by the telephone Pbook 31300 1 03 PM MON 12 JUL 2010 DEL 31300 1 03 PM MON 12 JUL 2010 END Pref Pbook 31300 1 03 PM MON 12 JUL 2010 Note Local Phonebook feature allows you to register up to 100 records If exceeding 100 records at this point the error message shown below appears Press OK soft key to go back to the abo...

Page 181: ...The telephone number stored on the call his tory is displayed The telephone number can be changed if necessary Press OK soft key to add the displayed data to Local Phone book Clr Name OK Cnl Number NEC ABIKO 31300 ...

Page 182: ...174 This page is for your notes ...

Page 183: ...le indicating the current time on LCD press key to open the Menu screen OR Press Directory key The Directory screen shown at STEP 3 can be directly displayed STEP 2 Select Directory Select an item by either of the following operations Highlight an item by using and then press or OK soft key Press key Note A maximum of 500 entries can be registered in Directory DT730 Menu Note Directory feature is ...

Page 184: ...ess or OK soft key Press key STEP 6 Enter a name to be registered in directory Enter a name by using digits keys After entering the Note When using Phonebook feature is disabled this screen will not be displayed In that case skip this step History 1 2 Tool Menu 3 4 5 6 0 Call Func Setting Presence Favorite Config Directory OK Back 1 1 1 2 Directory 3 Corporate System OK Back Personal 2 2 Search 1 ...

Page 185: ...EP 9 Select Tel 1 Select an item by either of the following operations Highlight an item by using and then press or OK soft key Press key Note Up to 32 characters can be entered as a name For details on character entry method see HOW TO INPUT CHARACTERS in chapter 4 Input a name Name OK Back Option BK A 2 2 1 2 Edit 3 4 5 OK Back 6 7 8 9 0 Save Gr No Tel 1 Company Name Ring Tone Ken Kobus Tel 4 Te...

Page 186: ...r Next soft key In this example Company is selected Selectable categories are as follows STEP 12 Select either Disable or Enable Select an item by one of the following operations Highlight an item by using and then press or OK soft key Press or key and then press or OK soft key 1 2 Edit 3 4 5 OK Back 6 7 8 9 0 Save Gr No Company Name Ring Tone Ken Kobus Tel 4 Tel 2 Tel 3 Illumination 0 Colleagues ...

Page 187: ...ng the company name press or OK soft key Note A maximum of four telephone numbers can be set to an entry If two or more telephone numbers are required to be set set the remaining tele phone numbers to Tel 2 Tel 4 Note If multiple telephone numbers are registered to an entry and Priority Flag is disabled to all of the telephone numbers the telephone number set to Tel 1 is automatically set as first...

Page 188: ...ey Press key 8 8 1 2 Edit 3 4 5 OK Back 6 7 8 9 0 Save Gr No Ken Kobus Tel 4 Tel 2 Tel 3 Illumination 0 Colleagues 31300 Ring Tone NEC 0 9 Note You can set ringer tone for calls routed to the specified name calling party here Ringer Tone type can be set for Name Group and Tele phone set The ringer Tone type set for Name has higher priority than the types set for Group and Terminal set Note Set 2 D...

Page 189: ... illumination type for calls routed to the specified name calling party here Illumina tion type can be set for Name Group and Telephone set The illumination type set for Name has higher priority than the types set for Group and Terminal set Note Set 2 Default when you don t want to change the illumination type here The setting for Group or Telephone set is applied Also when 1 Auto matic is set 4 R...

Page 190: ... Press key or OK soft key The display returns to the Directory screen TO CHANGE GROUP NAME STEP 1 Open the Directory screen see TO ADD NEW DATA STEP 2 On the Directory screen select Group Note A memory number is automatically set in ascend ing numeric order 1 2 Edit 3 4 5 OK Back 6 7 8 9 0 Save Gr No Ken Kobus Tel 4 Tel 2 Tel 3 0 Colleagues 31300 NEC Automatic Automatic 0 Note If Name is not enter...

Page 191: ...ss key and then press or OK soft key STEP 4 Select Name Select an item by either of the following operations Highlight an item by using and then press or OK soft key Press key STEP 5 Enter a new group name Enter a group name by using digits keys After entering the group name press or OK soft key 3 Search 1 2 Directory 3 4 0 Own Number Delete All Edit OK Back Group Setting 1 1 1 2 Group 3 4 5 6 20 ...

Page 192: ... a group name For details on character entry method see HOW TO INPUT CHARACTERS in chapter 4 Note You can set ringer tone select 2 Ring Tone and illumination types select 3 Illumination for calls routed to the specified group here Ringer tone and illumination types can be set for Name Group and Telephone set The ringer tone and illumination types set for Name have higher priority than the types se...

Page 193: ...6 To display the detailed data for a specific name press Detail soft key while the name is highlighted In the following Detail screen you can make a call to the selected number by pressing or Call soft key 2 2 1 2 Group 3 4 5 6 20 Colleagues OK Back Group 6 Family Friends Default VIPs Group 20 John Smith Directory Call Back Option Detail Ken Kobus Julia Note If no entry is set to the selected grou...

Page 194: ...e assigned to an entry a top priority telephone number will be dialed 1 1 1 2 Directory 3 4 0 Own Number Delete All Edit OK Back Group Setting Search 2 2 1 2 Search 3 4 Others OK Back Tel Number Group Name Note A distinction is made between upper case and lower case characters according as the system settings For example Ken Kobus and ken kobus are distinguished as different character strings For ...

Page 195: ...ed number by pressing or Call soft key Note If two or more telephone numbers are assigned to an entry a top priority telephone number is automatically selected when the Detail screen appears Directory Call Back Option Detail Abe Ichiro Abe Sabro Abe Kentaro 1 2 Detail 3 4 5 6 7 8 9 0 Gr No Call Back Tel 4 Tel 3 0 Colleagues NEC Automatic Automatic 0800XXXXXX 31300 Abe Kentaro ...

Page 196: ... name by pressing In the following Directory Name List screen you can make a call to the selected party by pressing or Call soft key If two or more tele phone numbers are assigned to an entry a top priority telephone number will be dialed 1 1 1 2 Directory 3 4 0 Own Number Delete All Edit OK Back Group Setting Search 3 3 1 2 Search 3 4 Others OK Back Tel Number Group Name Note Even if the telephon...

Page 197: ...you can make a call to the selected number by pressing or Call soft key Note If two or more telephone numbers are assigned to an entry a top priority telephone number is automatically selected when the Detail screen appears 1 2 Detail 3 4 5 6 7 8 9 0 Gr No Call Back Tel 4 Tel 3 0 Colleagues NEC Automatic Automatic 0800XXXXXX 31300 Abe Kentaro ...

Page 198: ...ss or OK soft key Press key STEP 5 Enter a memory number 0 499 After entering the memory number press or OK soft key The list of memory numbers will be displayed with the entered memory number or the number clos est to the entered number in front STEP 6 Select a target name by pressing Up down cursor In the following Directory Name List screen you can make a call to the selected party by pressing ...

Page 199: ... to the selected number by pressing or Call soft key Note If no data exists in Directory No data is issued on the screen Note If two or more telephone numbers are assigned to an entry a top priority telephone number is automatically selected when the Detail screen appears Directory Call Back Option Detail Abe Sabro Abe Kentaro 1 2 Detail 3 4 5 6 7 8 9 0 Gr No Call Back Tel 4 Tel 3 0 Colleagues NEC...

Page 200: ...r OK soft key Press key STEP 5 Select a desired category In this example Company is selected Select an item by one of the following operations Highlight an item by using and then press or OK soft key Press key and then press or OK soft key STEP 6 Select a target name by pressing In the following Directory Name List screen you can make a call to the selected party by pressing or Call soft key If tw...

Page 201: ...mber by pressing or Call soft key Note If there is no entry corresponding to the selected category No data is issued on the screen Note If two or more telephone numbers are assigned to an entry a top priority telephone number is automatically selected when the Detail screen appears Directory Call Back Option Detail Abe Sabro Abe Kentaro Abe Taro 1 2 Detail 3 4 5 6 7 8 9 0 Gr No Call Back Tel 4 Tel...

Page 202: ...name After entering the name Press or OK soft key 1 1 1 2 Directory 3 4 0 Own Number Delete All Edit OK Back Group Setting Search 4 4 1 2 Search 3 4 OK Back Tel Number Group Name Others Note A distinction is made between upper case and lower case characters For example Ken Kobus and ken kobus are distinguished as dif ferent character strings Note A blank space is also distinguished while search in...

Page 203: ...ame is highlighted In the following Detail screen you can make a call to the selected number by pressing or Call soft key Note If there is no entry corresponding to the selected Company No data is issued on the screen Note If two or more telephone numbers are assigned to an entry a top priority telephone number is automatically selected when the Detail screen appears Directory Call Back Option Det...

Page 204: ...EP 4 Select Alphabet Select an item by either of the following operations Highlight an item by using and then press or OK soft key Press key STEP 5 Select a desired group of alphabets In this example ABC is selected Select an item by one of the following operations Highlight an item by using and then press or OK soft key Press key and then press or OK soft key 1 1 1 2 Directory 3 4 0 Own Number De...

Page 205: ... pressing or Call soft key Note Select Others to find names which begin with a character other than alphabet such as numerics or symbols 1 2 Alphabet 3 4 5 6 7 8 OK Back PQRS JKL MND All DEF GHI TUV WXYZ Others ABC Directory Call Back Option Detail Abe Sabro Abe Kentaro Abe Taro Note If there is no entry corresponding to the group of alphabets No data is issued on the screen Note If two or more te...

Page 206: ...umber by pressing and then press or Call soft key to make a call to the selected number Note While Directory screen is being displayed you cannot make a call by dialing a telephone num ber DT730 Abe Jiro Directory Call Back Option Detail Abe Ichiro Abe Kentaro Abe Jiro Directory Call Back Option Detail Abe Ichiro Abe Kentaro Note If multiple telephone numbers are registered to a target party a cal...

Page 207: ... key STEP 3 Select User Setting Select an item by either of the following operations Highlight an item by using and then press or OK soft key Press key STEP 4 Select Talk Select an item by either of the following operations Highlight an item by using and then press or OK soft key Press key 1 2 Detail 3 4 5 6 7 8 9 0 Gr No Call Back Tel 4 Tel 3 Colleagues NEC Automatic Automatic Abe Kentaro 0800XXX...

Page 208: ...lay goes back the Prefix screen at STEP 5 If multiple prefixes need to be set re peat STEP 6 and STEP 7 In that case select Prefix 2 and Prefix 3 Incoming Call 1 2 Display Incoming Call 3 4 5 6 7 0 Change Password Peripherals Setting Reset Config OK Back Security Talk 5 5 RTP Alarm 1 2 Key Touch Tone Talk 3 4 5 Hold Music OK Back DTMF Tone Prefix 1 1 Note A maximum of 10 digits 0 9 and can be set ...

Page 209: ...ined prefixes are displayed Select a prefix and then press or OK soft key to make a call TO EDIT DIRECTORY DATA STEP 1 Display the Name List screen for a target party see TO FIND A REGISTERED DATA Note If multiple telephone numbers are registered to a target party a call is made to the first priority tele phone number Directory Call Back Option Detail Abe Kentaro Abe Jiro Abe Ichiro Menu Directory...

Page 210: ... by referring to TO ADD NEW DA TA After the data modification is complete press Save soft key on the Edit screen TO DELETE ALL DATA STEP 1 Open the Directory screen see TO ADD NEW DATA STEP 2 Select Delete All Select an item by either of the following operations Highlight an item by using and then press or OK soft key Press key Menu Directory Call Back Option Detail Abe Kentaro Abe Jiro Abe Ichiro...

Page 211: ...ssing and then press key or Option soft key STEP 3 Select Delete One Select an item by either of the following operations Highlight an item by using and then press or OK soft key Press key and then press or OK soft key Note To cancel the data deletion press or Back soft key 1 2 Directory 3 4 0 Own Number Edit OK Back Group Setting Search Delete All Delete All Directory Directory OK Back Deleted Di...

Page 212: ...directory data STEP 5 After the appropriate directory data is delet ed the display changes as follows STEP 6 Press or OK soft key Note To cancel the data deletion press or Cancel soft key 1 2 SubMenu 3 OK Cancel Delete All Prefix 4 Edit Delete One Delete this entry Directory OK Back Deleted Directory OK ...

Page 213: ...ECTORY TO EDIT DIRECTORY DATA FROM CALL HISTORY TO DELETE ALL DATA TO DELETE A SPECIFIC DATA FOR DT330 SERIES TO VIEW CALL HISTORY TO MAKE A CALL FROM CALL HISTORY TO DELETE ALL DATA TO DELETE A SPECIFIC DATA Note Register call history data to Personal Directory as necessary Call History data will be cleared when powering off the telephone However call history data can be backed up to your PC Abou...

Page 214: ...using and then press or OK soft key Press key Note This feature is available for DT730 Series DT710 Series does not support this feature The following are examples of LCD display of DT730 Series DT730 Menu DT730 Series 1 History 2 Directory 3 Tool Menu Back OK 1 1 Item Description Missed Display the history of unanswered incoming calls Outgoing Display the history of outgoing calls Incoming Displa...

Page 215: ...be dis played on the left of the name Note If you make answer a call to from the telephone number which is registered to Personal Directory the corresponding name will be displayed as call history data Note If there is no history data No data will be dis played on LCD Note To go back to former menu STEP 3 press or Back soft key 1 Incoming Option Back 12 JUL 2010 MON 10 00 Ken Kobus 7205 ...

Page 216: ...ct Call by using or pressing key and then press or OK soft key Note While the history data is displayed you cannot make a call by dialing a telephone number DT730 2 Incoming Option Back 12 JUL 2010 MON 9 58 Abe Kentaro 7207 Note When making a call from Call History a prefix can be added to the dial number In that case select 3 Prefix on the SubMenu indicated at STEP 2 of CASE 2 to display the Pref...

Page 217: ...t an item by using and then press or OK soft key Press key and then press or OK soft key STEP 3 Select New Select an item by either of the following operations Highlight an item by using and then press or OK soft key Press key STEP 4 Select a category In this example Company is selected Select an item by either of the following operations Highlight an item by using and then press or Next soft key ...

Page 218: ...s or OK soft key Press or key and then press or OK soft key STEP 6 The following Edit screen is displayed 31312 has been registered to Tel 1 See TO ADD NEW DATA in Chapter 6 Di rectory Operation and register detailed data such as name group etc to directory Category ICON Company Mobile Voice Mail Home Others 1 2 Category 3 4 5 Company Next Back Others Home Mobile Voice Mail 1 2 2 Note If the corre...

Page 219: ...211 Note If the corresponding data has already stored in the directory the detailed data such as name group etc is displayed ...

Page 220: ...d then press or OK soft key Press key and then press or OK soft key STEP 3 Select Addition Select an item by either of the following operations Highlight an item by using and then press or OK soft key Press key STEP 4 Select a search method See TO FIND A REGISTERED DATA for the procedure of the searching method In this example Group is selected Select an item by either of the following operations ...

Page 221: ...em by either of the following operations Highlight an item by using and then press or OK soft key Press key and then press or OK soft key 1 2 Directory Search 3 4 Group OK Back Others Name Tel Number 2 2 1 2 Group 3 4 5 6 20 Colleagues OK Back Group 6 Family Friends Default VIPs Group 20 Note If there is no corresponding data No data will be displayed on LCD Note In this example a mobile telephone...

Page 222: ...phone number is automatically selected when you make a call with out specifying a specific telephone number Select an item by either of the following operations Highlight an item by using and then press or OK soft key Press or key and then press or OK soft key STEP 10 The display moves to the Edit screen of Di rectory 7205 has been registered to Tel 2 See TO EDIT DIRECTORY DATA in Directory Opera ...

Page 223: ...ng and then press or OK soft key Press key STEP 4 The following confirmation message appears Press or OK soft key to delete all the da ta STEP 5 After all history data is deleted the display changes as follows Press or OK soft key DT730 Menu 1 1 1 2 Tool Menu 3 4 5 6 0 Call Func Setting Presence Favorite Config Directory OK Back History 4 4 Note To cancel the data deletion press or Back soft key 1...

Page 224: ...ct an item by either of the following operations Highlight an item by using and then press or OK soft key Press key and then press or OK soft key STEP 3 The following confirmation message appears Press or OK soft key to delete the appro priate history data DT730 1 Incoming Option Back 12 JUL 2010 MON 11 00 Ken Kobus 31310 Menu 4 4 Note By selecting 5 Delete All all records of Incoming Call can be ...

Page 225: ...217 STEP 4 After the appropriate call history data is delet ed the display changes as follows Press or OK soft key OK Deleted Incoming ...

Page 226: ...cted Select an item by either of the following operations Highlight an item by using and then press or OK soft key Press key Note This feature is DT730 Series and DT330 Series The following are examples of LCD displays of DT730 Series and DT330 Series DT330 Menu DT330 Series 1 Call History 2 Directory Menu Back OK 1 1 Item Description Incoming Calls To view the history of incoming calls Outgoing C...

Page 227: ...ormer records or pressing an appropri ate digit key For example press 0 key to dis play the tenth record Note If no history data is saved No data will be dis played on LCD Incoming Calls OK Back Del Ken Kobus 10 12 JUL 13 17 Incoming Calls OK Back Del 09012345678 10 12 JUL 13 17 Note To go back to name display press key For the telephone without the cursor key switching between name and telephone ...

Page 228: ... a missed call indicate that the telephone has received a voice mail Note When voice mail service is not used is displayed instead of Voice Mail 19 20 PM MON 12 JUL 2010 1 1 1 2 Shortcut 3 OK Back Voice Mail Missed Calls 2 2 2 Note If two or more records exist use key to dis play the next former records or pressing an appropriate digit key For example press 0 key to display the tenth record Note T...

Page 229: ... RY The following is an example when the history data of an incoming call is displayed STEP 2 Press key while the history data for the target telephone number is displayed on LCD Note While the history data is displayed you cannot make a call by dialing a telephone number DT330 Incoming Calls OK Back Del Ken Kobus 10 12 JUL 13 17 ...

Page 230: ...s or OK soft key Press key STEP 3 Press Del soft key The display changes as follows STEP 4 Press or OK soft key to delete all the his tory data of selected call type Item Description Incoming Calls To delete all the history data of incoming calls Outgoing Calls To delete all the history data of outgoing calls DT330 1 1 1 2 Menu 3 OK Back Settings Directory Call History 1 1 1 2 Call History OK Back...

Page 231: ...an example when the history data of an incoming call is displayed STEP 2 Press Del soft key The display changes as follows STEP 3 Press or OK soft key to delete the select ed history data Note To cancel the data deletion press or Back soft key DT330 Incoming Calls OK Back Del Ken Kobus 10 12 JUL 13 17 Delete One Back Incoming Calls OK ...

Page 232: ...224 This page is for your notes ...

Page 233: ...eys with Menu Cursor button Note 2 12 Keys 12 Keys Backlight Display and Digit Key lit for 10 seconds when operating For 32D 24D 12D Display Backlight is optional None Soft Key 4 Keys None Call History Outgoing Call 10 record Incoming Call 10 records None Hands free Standard equipment Full duplex Standard equipment Half duplex Headset Available Not available Power Consumption 2 2 W 1 2 W Adapter o...

Page 234: ...ex Headset Available Not available LAN Interface 2 port 10BASE T 100BASE TX Full duplex Half duplex Auto Negotiation Fixed Voice CODEC G 711 µ law A law G 729a G 722 G 711 µ law A law G 729a IP Address Setting Sets via DHCP server Sets Directly QoS ToS IP Precedence Diffserv VLAN Tag VLAN IEEE802 1Q p Security IEEE802 1x authentication EAP MD5 EAPOL Forwarding SIP RTP Encryption Power Supply Cente...

Page 235: ...ing three types of directory features Personal Directory Phonebook and Corporate Directory This chapter explains the menu list for Personal Directory feature Tool Uses when accessing external XML server For details please contact the system administrator Call Func Not used Setting To access user settings Presence Not used Favorite Not used Config To make the configuration setting of DT Series For ...

Page 236: ...ke a call to the currently displayed party 2 Directory Add Add the currently displayed history data to the personal directory 1 New Add call history data to the personal directory Category Set Select Company Mobile Voice Mail Home or Others Company Priority Flag Select either Enable or Disable Disable Edit Edit the directory data 2 Addition Edit the personal directory data from call history Direct...

Page 237: ...a group of alphabets 2 Edit Add a new data to the personal directory 1 Name Enter a name of the target party to be added to the directory 2 Group Select a group to which the target party belongs Default 3 6 Tel 1 Tel 4 Enter the telephone number Category Set Select Company Mobile Voice Mail Home or Others Company Priority Flag Select either Enable or Disable Disable 7 Company Name Enter the compan...

Page 238: ...Enter a new group name 2 Ring Tone Select a ringer tone type per group Default follows terminal set tings Note 1 3 Illumination Select a illumination pattern color of the call indication lamp Default follows terminal set tings Note 1 4 Own Number Displays the number of the telephone itself 0 Delete All Delete all the registered directory data Menu Item Description Default Value 3 Tool 1 Service Ac...

Page 239: ...ion Automatic Red 6 Headset Ring Vol ume Not used 2 Talk Settings for telephone conversation 1 RTP Alarm Enable disable RTP alarm Automatic 2 DTMF Tone Enable disable DTMF tone Automatic 3 Key Touch Tone Set key touch tone generated when the digit keys are pressed while the telephone is off hook Automatic 4 Hold Music Select a Music on Hold to be heard by DT Series user Default 5 Prefix Register P...

Page 240: ...ad files for ringer tones 1 Download 1 Download files for ringer tone Download 1 Melody1 wav 2 Download 2 Download files for ringer tone Download 2 Melody2 wav 3 Download 3 Download files for ringer tone Download 3 Melody3 wav 3 Directory Download the directory files Directory csv 2 Download Address Enter an IP address of the FTP TFTP server 0 0 0 0 3 Protocol Select a protocol of the server eithe...

Page 241: ... the server either FTP or TFTP FTP 5 FTP Settings Set necessary data when using FTP service 1 User ID Enter a user ID for the data backup via FTP server 2 Password Enter a password for data backup via FTP server 3 Folder Specify the destination directory of FTP server Menu Item Description Default Value ...

Page 242: ...ess key while indicating the current time on LCD Tool Not used Setting To make the user setting of DT Series Config To make the configuration setting of DT Series For details please contact the system administrator Menu Item Description Default Value 1 Tool 1 Not used Menu 1 2 0 1 ...

Page 243: ...ook Automatic 4 Hold Music Select a Music on Hold to be heard by DT Series user Default 3 Display Settings for LCD display 1 Time Format Determines whether time is displayed with a 12 hour or 24 hour clock format Automatic 12 hour format 2 Local Volume Determines whether or not to display the following volume levels handset receiver volume speaker volume ringer tone volume and LCD contrast Automat...

Page 244: ...e directory where the download file is stored 3 Data Backup Restore Set the data required for the file backup restore 1 Data Backup Specify the file name to be backed up PersonalData tgz 2 Data Restore Specify the file name to be restored PersonalData tgz 3 Server Address Enter an IP address of the FTP TFTP server 0 0 0 0 4 Protocol Select a protocol of the server either FTP or TFTP FTP 5 FTP Sett...

Page 245: ...data Directory To access Phonebook feature For details see PHONEBOOK in chapter 5 Settings To make the user setting of DT Series Menu Item Description Default Value 1 Call History 1 Incoming Displays the history of incoming calls You can also make a call from this menu 3 Outgoing Displays the history of outgoing calls You can also make a call from this menu Menu 1 2 3 1 ...

Page 246: ...238 This page is for your notes ...

Page 247: ...ame network When downloading the files for Music on Hold Ringer Tone and Directory to the DT Series FTP TFTP server is required on the net work For details on the FTP service contact the System Administrator Note Terminal settings through the Web Programming is available while the DT700 Series logs into the system Items Operating Conditions Operating System Microsoft Windows XP Vista CPU Comply wi...

Page 248: ...T700 Series on the address toolbar and then press Enter key STEP 3 The Web Programming Login screen appears Enter a user name type USER and a password Note 1 then click Note Enter the same password used when logging into the DT750 0000 is used as password by the default setting Note For IP address of DT Series contact the System Administrator OK ...

Page 249: ... The following Web Programming Home screen appears Note When the login screen does not appear check the LAN connection status and entered IP address If the problem persists please contact the system administrator ...

Page 250: ...the steps below to exit the Web Programming STEP 1 Click at the lower left of the screen STEP 2 The confirmation message appears Click to log out of Web Programming STEP 3 The display changes as follows Click Logout OK Back ...

Page 251: ...close the Internet browser Note Make sure to perform the logout operation after the data setting of the telephone Note When 15 minutes have passed leaving the PC without operation after log in to Web Programming you are forcibly logged out from the Web Programming ...

Page 252: ...SERIES in 3 TERMINAL SETUP STEP 1 From the Home screen click User Setting Incoming Call Ring Tone External Call STEP 2 Select a desired tone type by clicking the corresponding radio button STEP 3 Click to save the change to the database STEP 4 A confirmation dialog appears Click on the dialog OK STEP 1 Click items to navigate through the menu STEP 3 Click OK button STEP 2 Click the radio button to...

Page 253: ...Printed in Japan 1008 040 ...

Page 254: ......

Reviews: