background image

3-16   Option Installation

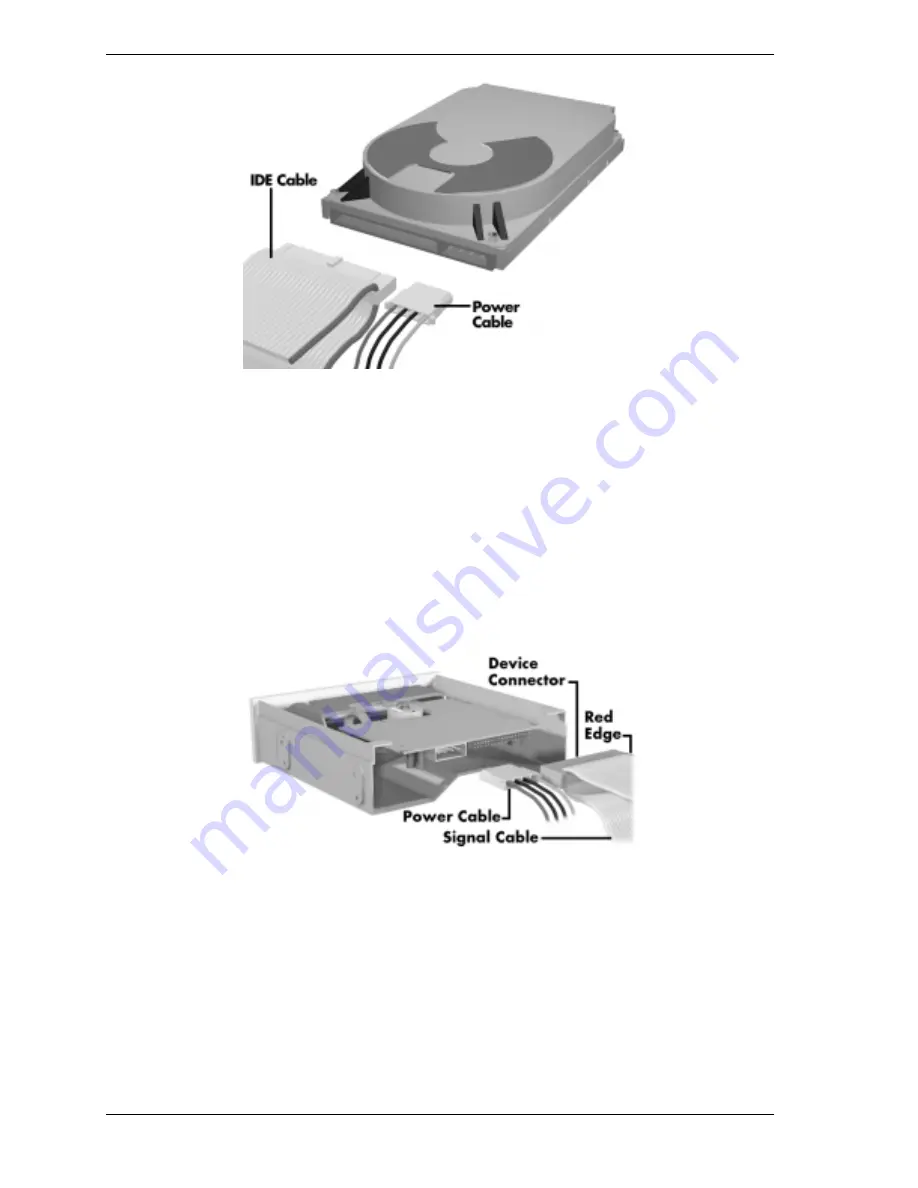
Connecting IDE Device Cables

4. 

If installing an IDE CD-ROM drive, also connect the audio cable (see the
instructions that come with the drive).

Cabling an Accessible 5 1/4-Inch Device

1. 

Connect the diskette drive signal cable connector to the signal connector on
the device (see the following figure).

2. 

Locate an available power connector.

3. 

Connect the power cable to the power connector on the device.

Connecting an Accessible 5 1/4-Inch Device

Storage Device Installation

The following subsections describe how to install 3 1/2-inch and 5 1/4-inch
devices. The installation procedures include:

„


removing the front panel

„


removing the CD-ROM/DVD drive

„


installing a 3 1/2-inch device

Summary of Contents for Direction SP E-Series

Page 1: ...dependent upon factors such as system configuration customer data and operator control Since implementation by customers of each product may vary the suitability of specific product configurations and applications must be determined by the customer and is not warranted by NEC CSD To allow for design and specification improvements the information in this document is subject to change at any time wi...

Page 2: ...rd Drive 1 8 CD ROM DVD Drive 1 8 Zip Drive 1 8 Power Supply 1 8 Power Management 1 8 2 Setup Utility Configuration Information 2 2 When to Use Setup 2 2 How to Start Setup 2 3 How to Use Setup 2 3 Menu Bar 2 4 Legend Bar 2 5 Selecting a Menu Item 2 5 Displaying a Submenu 2 5 Getting Help 2 5 Main Menu 2 5 Advanced Menu 2 6 Peripheral Configuration Submenu 2 7 IDE Configuration Submenu 2 8 Floppy ...

Page 3: ... Cabling an IDE Device 3 15 Cabling an Accessible 5 1 4 Inch Device 3 16 Storage Device Installation 3 16 Removing the Front Panel 3 17 Removing the CD ROM DVD Drive 3 17 Installing a 3 1 2 Inch Device 3 18 Installing a 5 1 4 Inch Device 3 22 Replacing the Front Panel 3 24 External Options 3 24 Parallel Printer 3 24 RS 232C Device Connection 3 25 4 Maintenance and Troubleshooting Maintenance 4 2 S...

Page 4: ...A 4 Device Slots A 4 Graphics A 5 Sound System A 5 Dimensions A 6 Weight A 6 Power A 6 Recommended Operating Environment A 6 B Connector Pin Assignments Serial Interface Connector B 4 Parallel Interface Connector B 5 Video Connector B 5 Power Supply Primary B 6 Keyboard and Mouse Connectors B 6 Front Panel B 7 Diskette Drive Interface Connector B 8 IDE Interface Connector B 9 DIMM Sockets B 10 ISA...

Page 5: ...e Device 3 23 Locating the Parallel Port 3 25 Locating the Serial Port 3 25 Removing the Mouse Ball Cover 4 4 Locating the Battery 4 10 Removing the Board 5 3 Releasing the Front Panel 5 4 Locating the Device Cage Screw 5 5 Locating the Two Diskette Drive Clips 5 5 Removing the 5 1 4 Inch Device Screws 5 6 The 3 1 2 Inch Device Bracket Screws 5 7 Removing the Securing Screw 5 7 Removing the Drive ...

Page 6: ...l Connectors B 3 System Board Connector Numbers and Types B 4 RS 232C Serial Port Connector Pin Assignments B 4 Parallel Port Connector Pin Assignments B 5 Video Connector Pin Assignments B 5 Primary Power Supply Connector Pin Assignments B 6 Keyboard and Mouse Connector Pin Assignments B 6 Front Panel Connector Pin Assignments B 7 Diskette Drive Connector Pin Assignments B 8 IDE PCI Connector Pin...

Page 7: ...rogram Section 3 Option Installation provides installation procedures for adding optional expansion boards diskette and hard drive storage devices system memory and processor updates Section 4 Maintenance and Troubleshooting includes recommended maintenance information lists possible computer problems and their solutions and has battery replacement procedures Section 5 Disassembly and Reassembly i...

Page 8: ...acknowledge DC direct current DIP dual in line package DLAB Divisor Latch Address bit DMA direct memory access DMAC DMA controller DOS disk operating system DRAM dynamic RAM ECC error checking and correction EDO extended data output EGA Enhanced Graphics Adapter EPROM erasable and programmable ROM EVGA Enhanced Video Graphics Array F Fahrenheit FAX facsimile transmission FCC Federal Communications...

Page 9: ...lel input output pixel picture element PLCC plastic leaded chip carrier PLL phase lock loop p p peak to peak PPI programmable peripheral interface PROM programmable ROM QFP quad flat pack RAM random access memory RAMDAC RAM digital to analog converter RAS row address strobe RGB red green blue RGBI red green blue intensity ROM read only memory rpm revolutions per minute R read RTC real time clock R...

Page 10: ...1 Technical Information System Board U S Robotics Modem Board Diskette Drive Hard Drive CD ROM DVD Drive Zip Drive Power Supply Power Management ...

Page 11: ...GRAM 4 MB SGRAM 4 MB SGRAM Sound Yamaha 1 XG YMF740 V and Analog Devices AD1819A SOUNDPORT Yamaha 1 XG YMF740 V and Analog Devices AD1819A SOUNDPORT Yamaha 1 XG YMF740 V and Analog Devices AD1819A SOUNDPORT Hard Drive 4 3 GB 11 4 GB 4 3 GB 11 4 GB 4 3 GB 11 4 GB CD ROM Drive 32x or DVD 32x or DVD 32x or DVD Power Supply 235 W 235 W 235 W System Board The system board contains most of the component...

Page 12: ... paths and data paths for transfers between the processor s host bus PCI bus Accelerated Graphics Port AGP and main memory Intel 82371EB PCI ISA IDE Xcelerator PIIX4E implements the PCI to ISA bridge PCI IDE functionality Universal Serial Bus USB host hub functions and enhanced power management PCI Local Bus The 32 bit industry standard PCI bus is a highly integrated input output I O interface tha...

Page 13: ... and PCI bus A0000 C7FFF 160 KB Video memory and BIOS 00000 9FFFF 640 KB Conventional memory Plug and Play Support The system comes with Plug and Play BIOS technology Plug and Play eliminates complicated setup procedures for installing Plug and Play expansion boards To add a Plug and Play expansion board simply power off the system install the board and power on the system There are no jumpers to ...

Page 14: ...rs when adding PCI boards with minimal user intervention The following tables list system IRQ and DMA default settings Interrupt Level Assignments IRQ System Resource NMI I O channel check 00 Reserved interval timer 01 Reserved keyboard controller 02 Reserved cascade interrupt from slave PIC 03 User available 04 COM1 05 Diskette drive 06 LPT1 07 Real time clock 08 Reserved 09 USB user available 10...

Page 15: ...one buffered high speed serial port and two Universal Serial Bus USB ports The enhanced parallel port supports Enhanced Capabilities Port ECP and Enhanced Parallel Port EPP modes for devices that require ECP or EPP protocols These protocols allow high speed bi directional transfer over a parallel port and increase parallel port functionality by supporting more devices The one buffered high speed s...

Page 16: ...le 8 bit palette DAC with gamma correction Direct3D texture lighting DDC1 and DDC2B support 4 MB of SGRAM Game acceleration U S Robotics Modem Board Two optional modem boards are available the U S Robotics x2 capable data fax Winmodem and the x2 capable data fax voice modem Each modem board contains fax and modem capabilities The data fax Winmodem provides fax and modem capabilities The data fax v...

Page 17: ...has a data transfer rate up to 1 4 MB per second Power Supply The 235 watt power supply is mounted inside the system unit It supplies power to the system board option boards diskette drives hard drives keyboard and mouse A fan inside the power supply provides system ventilation The power supply has several cables for attaching to the various devices requiring power Power Management The Advanced Po...

Page 18: ...2 Setup Utility Configuration Information When to Use Setup How to Start Setup How to Use Setup Main Menu Advanced Menu Security Menu Power Menu Boot Menu Exit Menu ...

Page 19: ...onfiguration information when system power is off When to Use Setup The Setup utility allows the user to view and set system parameters Use the Setup utility program to set the time and date to update or check system parameters when adding or removing expansion options to change or set power management features to correct a hardware discrepancy when the Power On Self Test POST displays an error me...

Page 20: ... in the system How to Use Setup The Setup utility has a Main Menu window and six top level menus with submenus The Main Menu window contains the following areas A title line the top line of the Main Menu This line displays the Setup utility name and copyright message The menu bar the line under the Setup title line The menu bar contains six top level menus to set system parameters A Main Menu summ...

Page 21: ...anced Use the Advanced menu to set serial port and printer port addresses and interrupts diskette drive and hard drive parameters and to enable disable the system s IDE and diskette drive interfaces The Advanced menu also provides submenu items for setting keyboard features video configurations and DMI event logging Security Use this menu to set User and Administrator Passwords and the Unattended ...

Page 22: ...n all the menus Displaying a Submenu To display a submenu use the up down arrow keys to move the cursor to the desired submenu Then press Enter A pointer a right pointing triangle marks all selectable submenus Getting Help A Field Help window or Item Specific Help window on the right side of each menu displays the help text for the currently selected Setup option It updates as the cursor moves to ...

Page 23: ...rect time and date To change them press Tab to highlight the field you want to change then press the or keys to change the setting To return to the Main Menu press Esc To move to the Advanced Menu press the right arrow key Advanced Menu This section describes the Advanced Menu parameters Other menu parameters are available by selecting submenus Use the arrow keys to move the cursor to a parameter ...

Page 24: ...configuring Parallel Port This option configures the system s Parallel Port Choose Auto Enabled or Disabled The Enabled setting is bidirectional 378h IRQ7 Note If you select the Enabled option you can see additional options that allow you to specify the Base I O address and IRQs for the port you are configuring Mode Parallel Port This option sets the mode for the parallel port The options include ...

Page 25: ...the submenu for an IDE device highlight the appropriate device field and press Enter Note Jumpers on the IDE device must be set to the master or slave device see the documentation that comes with the device IDE Controller This option configures the system s integrated IDE controller Select from Primary Secondary Both or Disabled Hard Disk Pre Delay This option set the time delay to allow the hard ...

Page 26: ...IDE translation mode LBA causes Logical Block Addressing to be used in place of Cylinders Heads Sectors You can enable or disable default this option This option cannot be changed when Auto is selected CAUTION Do not change the translation mode setting from the option selected when the hard drive was formatted Changing the option after formatting could result in corrupted data Transfer Mode This o...

Page 27: ...e A and Floppy Write Protect options Floppy Disk Controller This option configures the system s diskette drive controller Select Enabled or Disabled Diskette A These fields specify the capacity and physical size of Diskette Drive A To change these highlight the field for the drive press Enter and select from the following options Disabled 360KB 5 25 inch 1 2MB 5 25 inch 720KB 3 5 inch 1 44 1 25 MB...

Page 28: ...ing of DMI events Choose Disabled or Enabled Mark DMI Events as Read This option is used to mark off all DMI Events as read If necessary press Enter to access the Confirmation dialog box and confirm your preference To return to the Advanced Menu press Esc Video Configuration Submenu This submenu can be used to configure specific video features To enter the submenu highlight the field then press En...

Page 29: ... the arrow keys then press Enter to change the setting CAUTION An asterisk symbol appearing next to an option indicates that the selected IRQ is set to conflict with another device To return to the Advanced Menu press Esc twice Then press the right arrow cursor key to move to the Security Menu Security Menu The Security Menu can be used to set a user password and or an administrator password A Use...

Page 30: ... is issued to the hard drives when the system goes into a low power mode Your choices are Enabled or Disabled VESA Video Power Down This option controls power to the monitor during the low power modes Your choices are Disabled Standby Suspend or Sleep Press the right arrow cursor key to move to the Boot Menu Boot Menu The Boot Menu can be used to adjust the system s boot features The Boot Menu fea...

Page 31: ...ce listed on the Hard Drive submenu If no operating system is found the system continues trying the drives in the order they are listed until an operating system is located To see a list of available drives highlight this field and press Enter You can select the boot device by pressing your keyboard s or key To exit from the Hard Drive submenu press Esc Removable Devices Submenu This submenu lists...

Page 32: ...he Setup program s default values Load Custom Defaults This option loads Custom default settings Save Custom Defaults This option saves your changes to Custom default settings Discard Changes This option loads previous values from CMOS RAM for all BIOS settings Note If your system s CMOS fails the BIOS will load custom default settings if you ve saved them or factory default settings Finally press...

Page 33: ...3 Option Installation General Rules Precautions Access Cover Removal Access Cover Replacement Expansion Boards Memory Upgrade Data Storage Devices External Options ...

Page 34: ...ed in the procedure Use a Phillips head screw driver unless otherwise specified Label any removed connectors Note where the connector goes and in what position it was installed Precautions Take care when working inside the system and when handling computer components Avoid electric shock or personal injury by observing the following warning WARNING Before removing the access cover turn off the pow...

Page 35: ...ponents and is out of the path of the system unit cover Prevent damage to the connectors by aligning connector pins before you connect the cable When disconnecting a cable always pull on the cable connector or strain relief loop not on the cable Access Cover Removal The following procedure describes how to remove the access cover from the desktop or minitower system WARNING Before removing the acc...

Page 36: ...s the left release tab While pressing the tab push down and back on the left rear of the cover The cover slides back about a half inch Releasing the Cover 5 Lift the access cover off the system Access Cover Replacement To replace the access cover use the following procedure 1 Gently set the access cover inside the edge of the case taking care not to bend the metal tabs 2 Align the tabs on the acce...

Page 37: ...an accommodate accessory adapter boards such as a network board Depending on the system you purchased some of these devices may be installed in your system The Direction SP E Series supports ISA Plug and Play expansion boards with one ISA slot Plug and Play allows the installation of a board in an expansion slot without changing the hardware settings There are no system resource conflicts to resol...

Page 38: ...nce Expansion Slot Locations Your system has three expansion slots one ISA slot two PCI slots The following figure shows expansion slot locations Locating Expansion Slots Expansion Board Installation Install expansion boards in the system as follows 1 Remove the access cover 2 Follow any preinstallation instructions that come with the expansion board such as setting switches or jumpers on the boar...

Page 39: ...stem Take care to keep the slot cover from falling when removing the screw If the slot cover does fall into the unit remove it before replacing the cover 4 Hold the board by its edges and insert it into the expansion slot 5 Press the board firmly into the expansion slot connector Gently rock the board from side to side to seat it into the connector 6 Insert the screw removed earlier to secure the ...

Page 40: ...ry Upgrade Your system comes factory installed with 32 MB to 256 MB of main system memory Memory is factory installed in one to two 168 pin Dual In line Memory Module DIMM sockets on the system board Install memory in one or two sockets The memory size and speed may vary between sockets Single and double sided DIMMs are supported Depending on product upgrade availability your system memory can be ...

Page 41: ...llowing table to determine the DIMM configuration needed to upgrade memory The table provides sample memory configurations it is not a complete list of all memory configurations Sample Memory Configurations Bank 0 Bank 1 Total RAM 1 M x 64 8 MB Empty 0 MB 8 MB min memory Empty 0 MB 1 M x 64 8 MB 8 MB min memory 1 M x 64 8 MB 1 M x 64 8 MB 16 MB 2 M x 64 16 MB 2 M x 64 16 MB 32 MB 2 M x 64 16 MB 4 ...

Page 42: ...ket away from the DIMM 4 Carefully rock the DIMM to pull it from the socket Removing a DIMM 5 Store the DIMM in an antistatic bag available at electronic supply stores or a cardboard box DIMM Installation Use the following procedure to install a DIMM 1 Remove the access cover 2 Locate the DIMM sockets 3 Remove any currently installed DIMMs that are not needed See the previous section DIMM Removal ...

Page 43: ...em board in your computer supports the following storage devices two diskette drives including the standard 1 44 MB diskette drive and a tape backup unit up to four IDE drives Device Slots Your computer has seven storage device slots a 3 5 inch accessible device slot contains the standard 1 44 MB diskette drive two internal 3 5 inch hard drive slots one contains the hard drive four accessible devi...

Page 44: ... the device IDE device check the jumper settings on the device before installing it See the documentation that comes with the device for jumper setting information An IDE device such as an IDE hard drive or IDE CD ROM drive must be set correctly as the first master or second slave device on the IDE channel The standard IDE hard drive is set as the master device on the primary IDE connector The sta...

Page 45: ...gnal Cable A two connector diskette drive signal cable comes attached to the system board and to the standard 1 44 MB diskette drive If your system comes standard with an Iomega Ditto tape backup unit the signal cable has three connectors Depending on your system installation of a tape backup unit may require the replacement of the existing diskette drive signal cable with a three connector cable ...

Page 46: ...a Zip drive also comes attached to the primary IDE cable The following figure shows a typical three connector IDE cable If the IDE cable is not keyed with a connector tab align the colored edge of the cable with the pin 1 side of the drive connector IDE Signal Cable System Power Cables Power cables come from the power supply and are attached to the standard storage devices System power cables vary...

Page 47: ...ion Devices shipped with the system are already connected Cable optional devices as follows Cabling an IDE Device 1 Connect the IDE signal cable connector to the connector on the IDE device Take care to prevent bending drive connector pins Align the IDE cable connector as shown in the following figure 2 Locate an available power connector coming from the power supply 3 Connect the appropriate powe...

Page 48: ...onnector to the signal connector on the device see the following figure 2 Locate an available power connector 3 Connect the power cable to the power connector on the device Connecting an Accessible 5 1 4 Inch Device Storage Device Installation The following subsections describe how to install 3 1 2 inch and 5 1 4 inch devices The installation procedures include removing the front panel removing th...

Page 49: ...ss down on the two tabs and press in a third tab at the end of the panel to release the panel see the following figure Releasing the Front Panel 3 Pull the panel away from the chassis Removing the CD ROM DVD Drive If you need to remove the CD ROM DVD drive you need to remove the accessible device cage Use the following procedure to remove the accessible device cage 1 Locate the screw on the front ...

Page 50: ...llowing procedure to install a 3 1 2 inch device 1 Follow the preinstallation instructions that came with the device such as setting jumpers and switches 2 Remove the access cover 3 Remove and label any cables that interfere with installing the device 4 Remove the front panel see the previous section 5 Choose the slot for the device being installed see the following figure ...

Page 51: ...wo screws securing the 3 1 2 inch hard drive bracket to the front of the system unit Removing the Bracket Screws Slide the 3 1 2 inch hard drive bracket towards the back of the system unit until it is free of the molded plastic Align the two screw holes on the hard drive with the two tabs on the bracket Slide the hard drive onto the tabs ...

Page 52: ...he molded plastic drive slot Secure the bracket to the front panel with the two screws shown in Removing the Bracket Screws If you are installing the device in the standard 3 1 2 inch internal device slot simply insert the drive into the opening until it is secured see the following figure Secure the drive with two screws inserted into the front of the system ...

Page 53: ... device in an accessible slot go to step 6 Otherwise continue to step 7 6 To install a 3 1 2 inch device in an accessible slot Remove the plastic blank panel from the selected slot by pressing the panel tab inward and swinging the blank panel out see the following figure ...

Page 54: ...l 9 Replace the access cover Installing a 5 1 4 Inch Device Install an accessible device into the device slot as follows 1 Follow the preinstallation instructions that came with the device such as setting jumpers and switches Note If your 5 1 4 inch device comes with drive rails do not attach them Remove any rails attached See the documentation that comes with the device 2 Remove the access cover ...

Page 55: ... the device slot Note To easily access device connectors for cabling do not insert a 5 1 4 inch device all the way into the slot 9 Connect the device cables see Cabling Storage Devices 10 Align the holes in the device with the holes in the chassis 11 Secure the device with the screws that came with the device see the following figure Installing the Device Note If you removed the accessible device ...

Page 56: ...r a variety of industry standard options This subsection provides the installation procedures for the most commonly used external options which are as follows parallel printer serial device For other external devices see the instructions that come with the option Parallel Printer Note Before connecting a printer to the system be sure the printer is set up correctly Follow the setup instructions th...

Page 57: ...ollow the setup instructions that come with the option 1 Turn off power to the system and to the serial device 2 Connect one end of the serial cable to the serial port on the rear of the computer see the following figure 3 Secure the cable with the screws provided 4 Connect the other end to the serial device 5 Turn on the serial device and the computer Locating the Serial Port ...

Page 58: ...4 Maintenance and Troubleshooting Maintenance Troubleshooting ...

Page 59: ...sh SM use the automated service to have the latest Technical Information Bulletins sent to your fax machine 24 hours a day In the U S call 1 888 329 0088 call 1 888 FAX 0088 Outside the U S call 1 978 635 6090 To send technical questions over email tech support neccsd com To fax technical questions to customer support In the U S fax 1 978 635 4666 To access the NEC CSD website www necnow com To ac...

Page 60: ...ing As necessary inspect and clean the inside of the keyboard as follows 1 Remove the eight screws holding the keyboard enclosure together Note The keyboard and cable together are considered a whole unit field replaceable assembly Therefore disassembly of the keyboard is necessary only when cleaning the inside 2 Separate the two halves of the enclosure Clean the enclosure and keys with a damp clot...

Page 61: ...stem malfunctions at the field level Step by step instructions for diagnosing and solving system hardware problems are provided Technical support is available at 1 888 632 2678 If disassembly is required see Section 5 Connector pin assignments are given in Appendix B Jumper settings are given in the appendices Diagnosing and Solving Problems One beep indicates that the system has completed its pow...

Page 62: ...drives do not spin monitor blank interface ports not working and keyboard lamp out and or cannot input from the keyboard Perform the first four checks in the solution for the No power problem in this table Check power supply voltages Voltages should be measured with a load on them system board plugged in See Connector Pin Assignments Replace the power supply Operating system does not boot Intermit...

Page 63: ...cable Replace as necessary Check power supply Replace diskette drive Replace system board Hard drive malfunction Hard drive lamp does not light but hard drive can be accessed Check cable connections between lamp and system board Hard drive controller failure message displayed Check that the IDE port and hard drives are enabled in Setup Cannot access the hard drive Check signal power connections be...

Page 64: ...iver used Check that the utility is not selecting a refresh rate resolution that is not supported by the monitor Check that the driver used matches the capabilities of the video controller and memory Wavy display Check that the computer and monitor are not near motors or electric fields Blank display Press any key and move the mouse to ensure power management has not blanked the display Check that...

Page 65: ...y Check the power supply Replace as necessary Check the system board Replace as necessary No sound from CDs Check that speaker power is on and volume is adjusted Check audio software settings Check the CD disc Check the drive audio cable Replace as necessary Replace the CD ROM DVD drive Replace the system board Zip drive malfunction System power not on Turn system power on Cannot access Zip drive ...

Page 66: ...e timer tick interrupt shutdown test unexpected interrupt in protected mode gate A20 RAM test interval timer channel 2 test clock serial and parallel port test numeric processor system board select and extended CMOS RAM The following table provides a description of the beep codes Beep Code Descriptions Beeps Description 1 2 Search for option ROMs 1 2 2 3 BIOS ROM checksum 1 3 1 1 Test DRAM refresh...

Page 67: ...d causes the computer to lose system configuration information If possible run Setup and record the system configuration settings before removing the battery Use that information to restore the system after replacing the battery 2 Remove the system access cover 3 Locate the battery and its socket on the system board see the following figure Locating the Battery 4 Use fingers to carefully pull the ...

Page 68: ...hen replacing the battery Lithium acts as a catalyst when exposed to water and causes spontaneous combustion on contact Discard used batteries according to the manufacturer s instructions 5 With the positive side facing up press the new battery into the socket 6 Replace the system access cover 7 Connect external peripherals and power cables 8 Run Setup to reconfigure system parameters see Setup Ut...

Page 69: ...5 Disassembly and Reassembly Disassembly Illustrated Parts Breakdown ...

Page 70: ...uence Part See Page 1 System access cover 5 3 2 Expansion board s 5 3 3 Front panel 5 4 4 Side panel 5 4 5 Device cage 5 4 6 Diskette drive 5 5 7 5 1 4 inch device 5 6 8 Optional 3 1 2 inch hard drive 5 6 9 Standard 3 1 2 inch hard drive 5 7 10 Fan assembly 5 8 11 DIMM module 5 8 12 Power supply 5 9 13 System board 5 10 When disassembling the system unit follow these general rules Disconnect all p...

Page 71: ...power cord is unplugged System Access Cover To remove and replace the system access cover see Option Installation Expansion Board Removal Remove any installed expansion board s per the following steps 1 Remove the system access cover as described in Option Installation 2 Disconnect any cables leading from the expansion board s 3 Remove the screw that secures the board to the support bracket 4 Pull...

Page 72: ...anel Removal Remove the side panel from the system unit as follows 1 Remove the system access cover and front panel as previously described 2 Locate the two side panel securing tabs at the front of the system 3 Pull the tabs out and away from the system 4 Slide the side panel towards the rear of the unit and away from the unit Device Cage Removal Remove the device cage from the system unit as foll...

Page 73: ...ette drive from the system unit as follows 1 Remove the system access cover and front panel as previously described 2 Label and unplug the signal and power cables for the diskette drive 3 Locate the two clips at the front of the system that secure the diskette drive Locating the Two Diskette Drive Clips 4 Squeeze the two clips and pull the diskette drive out of the front of the system ...

Page 74: ...nal CD ROM drive 3 Remove the screws holding the device in the cage see the following figure Removing the 5 1 4 Inch Device Screws 4 Slide the device out from the front of the system unit Optional 3 1 2 Inch Hard Drive Removal Remove the optional 3 1 2 inch hard drive as follows 1 Remove the system access cover and front panel as previously described 2 Label and unplug the hard drive power and sig...

Page 75: ...ut of the two securing tabs on the opposite side of the bracket Standard 3 1 2 Inch Hard Drive Removal Remove the standard 3 1 2 inch hard drive as follows 1 Remove the system access cover and front panel as previously described 2 Unplug the hard drive power and signal cables from the optional hard drive 3 Locate the two screws securing the 3 1 2 inch hard drive in the molded plastic cage at the f...

Page 76: ... securing the assembly to the chassis 3 Remove the fan by pulling it outward away from the system board DIMM Module Removal Remove any optional DIMM modules from the system board as follows 1 Remove the system access cover and any expansion boards as previously described 2 Press the locking clips at the ends of the socket away from the DIMM memory module see the following figure 3 Gently rock the ...

Page 77: ...Remove the power supply as follows 1 Remove the system access cover as previously described 2 Label and unplug the power cable attached to the system board 3 Label and unplug the power cables from all installed devices 4 At the back of the system unit remove the two screws securing the power supply to the system unit see the following figure Removing the Power Supply Screws 5 Pull the power supply...

Page 78: ...ear of the metal shielding and the alignment clips 5 Lift the board out of the system at an angle 6 If replacing the system board remove any installed DIMMs from the board Reinstall the DIMMs on the new board 7 Replace the access cover and reconnect all the cables Turn the system and monitor on and note the initial boot up screen If the displayed board s processor speed does not match the actual p...

Page 79: ...ries Desktop Field Replaceable Parts List Item Description Part Number 1 Keyboard Ergo 229 00012 2 32x CD ROM drive 730330 3 Iomega ATAPI Zip drive 320703 4a 3 2 GB hard drive IDE UDMA 300823 01 4b 4 3 GB hard drive IDE UDMA 215 00125 4c 6 4 GB hard drive IDE UDMA 300820 01 4d 8 4 GB hard drive IDE UDMA 300819 01 4e 11 5 GB hard drive IDE UDMA 300851 5 3 5 inch diskette drive 219 00012 6 Microphon...

Page 80: ...4b 300 MHz Pentium II with active heatsink 158 056693 000 24c 333 MHz Pentium II with active heatsink 158 056694 000 Top bar heatsink not shown in figure 235 00006 25 System board 158 056786 000 26a 32 MB DIMM non parity 081779 26b 64 MB DIMM non parity 081794 27 AC power cable 070135 28 I O shield 130260 System power switch not shown in figure 130047 Phone cable modem not shown in figure 146585 C...

Page 81: ...re 144850 SPE 333 logo plate not shown in figure 144851 Cable VGA loopback for PCI video board 0602210 not shown in figure 070832 Front panel LED adapter cable not shown in figure 130095 Direction SP E Series User s Guide not shown in figure 102082 Cable PCI video board board to board not shown in figure 070831 DVD drive Hitachi not shown in figure 730124 ...

Page 82: ...ction SP E Series Desktop Illustrated Parts Breakdown _______ This data was prepared June 1998 For an up to date listing of spare parts please call FaxFlashSM at 1 888 329 0088 or 1 978 635 6090 outside the U S and order document 42102082 ...

Page 83: ...692 000 14b 300 MHz Pentium II with active heatsink 158 056693 000 14c 333 MHz Pentium II with active heatsink 158 056694 000 Top bar heatsink not shown in figure 235 00006 15 Retention mechanism kit 130083 16a 32 MB DIMM non parity 081779 16b 64 MB DIMM non parity 081794 17 Power supply Sparkle 190300 18 Fan assembly 158 056683 000 19a Altec Lansing speakers ACS90 160323 19b Altec Lansing speaker...

Page 84: ...gure 130047 Phone cable modem not shown in figure 146585 Front panel LED adapter cable not shown in figure 130095 Direction SP E Series User s Guide not shown in figure 102082 Wavetable board AWE64 option not shown in figure 030402 Monitor NEC 15 C550 not shown in figure 011001 Monitor NEC 17 C700 not shown in figure 011002 Monitor NEC 17 A700 not shown in figure 010438 Monitor NEC 19 C900 not sho...

Page 85: ...tion SP E Series Minitower Illustrated Parts Breakdown _______ This data was prepared June 1998 For an up to date listing of spare parts please call FaxFlashSM at 1 888 329 0088 or 1 978 635 6090 outside the U S and order document 42102082 ...

Page 86: ...om Access Memory RAM Read Only Memory ROM Video SGRAM Calendar Clock Input Output I O Facilities Expansion Slots Keyboard and Mouse Storage Devices Device Slots Graphics Sound System Dimensions Weight Power Recommended Operating Environment ...

Page 87: ...r is implemented on the processor card for system board installation Retension Mechanism RM is inserted over slot 1 to act as an insertion guide and prevent movement of processor after subsystem mounting For thermal protection a heatsink is supported by a Heat Sink Support HSS which is attached to the system board Random Access Memory RAM Standard RAM 32 MB to 256 MB of 66 MHz SDRAM installed in i...

Page 88: ...ts per second 9 pin connector Universal Serial Bus USB two USB ports support two USB peripherals directly to the system with appropriate connector each port supports up to 127 daisy chained devices supports 12 megabits Mbs per second Keyboard PS 2 compatible 6 pin connector mini DIN Mouse PS 2 compatible 6 pin connector mini DIN IDE dual IDE channels two fast IDE channels CD ROM drive and hard dri...

Page 89: ...ices 3 1 2 inch 1 44 MB diskette drive CD ROM DVD drive Zip Drive Iomega Zip 100 ATA drive on some systems removable 100 MB data disks data transfer rate up to 1 4 MB per second Device Slots Seven device slots a 3 5 inch accessible device slot contains the standard 1 44 MB diskette drive one internal 3 5 inch hard drive slot for the hard drive a second internal 3 5 inch hard drive slot is availabl...

Page 90: ... by 1024 pixels 256 colors 1024 by 768 pixels 256 64 000 colors 800 by 600 pixels 256 64 000 16 8 million colors 640 by 480 pixels 16 256 64 000 16 8 million colors Text 80 columns by 25 lines 132 columns by 25 lines 132 columns by 43 lines Sound System Audio integrated on the system board based on the Yamaha 1 XG YMF740 V PCI bus digital controller and the Analog Devices AD1819A SOUNDPORT analog ...

Page 91: ...dth 19 0 in 48 3 cm Depth 8 4 in 21 3 cm Weight The following weights are averages Weights depend upon the system configuration System Unit 27 5 lb 12 46 kg Keyboard 3 5 to 4 lb 1 6 to 1 8 kg Power Universal Power Supply 235 W Power Management Partial and full power reductions Sleep button Recommended Operating Environment Temperature 50 F to 95 F 10 C to 35 C Relative Humidity 20 to 80 ...

Page 92: ...Interface Connector Video Connector Power Supply Primary Keyboard and Mouse Connectors Front Panel Diskette Drive Interface Connector IDE Interface Connectors DIMM Sockets ISA Expansion Bus Connectors PCI Expansion Bus Connectors Universal Serial Bus USB Connectors ...

Page 93: ...les following the figures list each connector by its function number and type The first figure shows the locations of the slots on the system board The second figure shows the locations of the connectors on the back of the system unit System Board Connectors Connector s Page Number Power Supply B 6 Diskette Drive B 8 IDE B 9 DIMM Sockets B 10 Front Panel B 7 ISA B 12 PCI B 14 Parallel Interface B ...

Page 94: ...Board External Connectors System Board Internal Connectors Description Connector Number CD ROM Audio J2C3 Auxiliary Line in Audio J2C2 Telephony J2C1 Fan 3 J5J1 Diskette Drive J10F1 PCI IDE J9D1 J9D2 Fan 1 J2J1 Fan 2 J4J1 Power Supply J7H1 ...

Page 95: ...2 pin single inline connector IDE Interface Primary J9D2 2 x 20 pin header IDE Interface Secondary J9D1 2 x 20 pin header Front Panel J10D1 1 x 25 pin header USB J1H1 female USB stacked connector Serial Interface Connector Pin assignments for the serial interface port connector are listed in the following table RS 232C Serial Port Connector Pin Assignments Pin Signal Description 1 DCD Carrier dete...

Page 96: ...ta bit 1 16 INIT Initialize 4 Data bit 2 17 SLCT IN Select in 5 Data bit 3 18 Ground 6 Data bit 4 19 Ground 7 Data bit 5 20 Ground 8 Data bit 6 21 Ground 9 Data bit 7 22 Ground 10 ACK Acknowledge 23 Ground 11 Busy 24 Ground 12 Error 25 Ground 13 Select Video Connector Pin assignments for the video connector are listed in the following table Video Connector Pin Assignments Pin Signal Pin Signal 1 R...

Page 97: ... 3 Ground 13 Ground 4 5V 14 PS ON Power supply remote on off control 5 Ground 15 Ground 6 5V 16 Ground 7 Ground 17 Ground 8 PWRGD Power Good 18 5V 9 5VSB 19 5V 10 12V 20 5V Keyboard and Mouse Connectors The keyboard and mouse use standard PS 2 connectors Pin assignments are given in the following table Keyboard and Mouse Connector Pin Assignments Pin Keyboard Connector Mouse Connector 1 Keyboard D...

Page 98: ...panel LEDs power and hard disk The connector pin assignments are given in the following table Front Panel Connector Pin Assignments Pin Signal Pin Signal 1 HD_PWR 10 FPSLP 2 HDR_BLNK_GRN 11 IRRX 3 HAD 12 GND 4 HDR_BLNK_YEL 13 GND 5 GND 14 N C 6 FPBUT_IN 15 IRTX 7 FP_RESET 16 IR_PWR 8 GND 17 N C 9 5V 18 N C ...

Page 99: ...erved 5 Key 6 FDEDIN 7 Ground 8 FDINDX Index 9 Ground 10 FDM00 Motor enable A 11 Ground 12 No connect 13 Ground 14 FDDS0 Drive select A 15 Ground 16 No connect 17 No connect 18 FDDIR Stepper motor direction 19 Ground 20 FDSTEP Step pulse 21 Ground 22 FDWD Write data 23 Ground 24 FDWE Write enable 25 Ground 26 FDTRK0 Track 0 27 No connect 28 FDWPD Write protect 29 Ground 30 FDRDATA Read data 31 Gro...

Page 100: ...ely active signals are prefixed with a designation IDE PCI Connector Pin Assignments Pin Description Pin Description 1 Reset IDE 2 Ground 3 Data 7 4 Data 8 5 Data 6 6 Data 9 7 Data 5 8 Data 10 9 Data 4 10 Data 11 11 Data 3 12 Data 12 13 Data 2 14 Data 13 15 Data 1 16 Data 14 17 Data 0 18 Data 15 19 Ground 20 Key 21 DDRQ0 DDRQ1 22 Ground 23 I O write 24 Ground 25 I O read 26 Ground 27 IOCHRDY 28 P_...

Page 101: ...8 135 NC 10 DQ7 52 CB2 94 DQ39 136 CB6 11 DQ8 53 CB3 95 DQ40 137 CB7 12 VSS 54 VSS 96 VSS 138 VSS 13 DQ9 55 VSS 97 DQ41 139 DQ48 14 DQ10 56 DQ17 98 DQ42 140 DQ49 15 DQ11 57 DQ18 99 DQ43 141 DQ50 16 DQ12 58 DQ19 100 DQ44 142 DQ51 17 VDD 59 VDD 101 DQ45 143 VDD 18 VDD 60 DQ20 102 VDD 144 DQ52 19 DQ14 61 NC 103 DQ46 145 NC 20 DQ15 62 NC VREF 104 DQ47 146 NC VREF 21 CB0 63 CKE1 105 CB4 147 NC 22 CB1 6...

Page 102: ...S 157 VDD 32 VSS 74 DQ28 116 VSS 158 DQ60 33 A0 75 DQ29 117 A1 159 DQ61 34 A2 76 DQ30 118 A3 160 DQ62 35 A4 77 DQ31 119 A5 161 DQ63 36 A6 78 VSS 120 A7 162 VSS 37 A8 79 CK2 121 A9 163 CK3 38 A10 80 NC 122 BA0 164 NC 39 NC BA1 81 NC 123 NC A11 165 SA0 40 VDD 82 SDA 124 VDD 166 SA1 41 VDD 83 SCL 125 CK1 167 SA2 42 CK0 84 VDD 126 NC A12 168 VDD ...

Page 103: ...1 B8 Input SRDY N0WS A9 Input Output SD0 B9 Power 12V A10 Input IOCHRDY B10 Ground Ground A11 Output AEN B11 Output SMEMW SMWTC A12 Input Output SA19 B12 Output SMEMR SMRDC A13 Input Output SA18 B13 Input Output IOW IOWC A14 Input Output SA17 B14 Input Output IOR IORC A15 Input Output SA16 B15 Output DACK3 A16 Input Output SA15 B16 Input DRQ3 A17 Input Output SA14 B17 Output DACK1 A18 Input Output...

Page 104: ...0 C4 Input Output LA21 D4 Input IRQ11 C5 Input Output LA20 D5 Input IRQ12 C6 Input Output LA19 D6 Input IRQ15 C7 Input Output LA18 D7 Input IRQ14 C8 Input Output LA17 D8 Output DACK0 C9 Input Output MEMR MRDC D9 Input DRQ0 C10 Input Output MEMW MWTC D10 Output DACK5 C11 Input Output SD8 D11 Input DRQ5 C12 Input Output SD9 D12 Output DACK6 C13 Input Output SD10 D13 Input DRQ6 C14 Input Output SD11 ...

Page 105: ...erved B9 PRSNT1 A40 SDONE B40 PERR A10 5V I O B10 Reserved A41 SBO B41 3 3V A11 Reserved B11 PRSNT2 A42 Ground B42 SERR A12 Ground B12 Ground A43 PAR B43 3 3V A13 Ground B13 Ground A44 AD15 B44 C BE1 A14 3 3V aux B14 Reserved A45 3 3V B45 AD14 A15 RST B15 Ground A46 AD13 B46 Ground A16 5V I O B16 CLK A47 AD11 B47 AD12 A17 GNT B17 Ground A48 Ground B48 AD10 A18 Ground B18 REQ A49 AD09 B49 Ground A1...

Page 106: ...l Pin Signal Pin Signal A30 Ground B30 AD19 A61 5V B61 5V A31 AD18 B31 3 3V A62 5V B62 5V Universal Serial Bus USB Connectors The following table lists the pin assignments and signal names for the USB connectors USB Connectors Pin Signal Name 1 Power 2 USBP0 USBP1 3 USBP0 USBP1 4 Ground ...

Page 107: ...C System Resources IRQ Settings Viewing System Resources Locating the Jumper ...

Page 108: ...ows Sound System user available IRQ11 user available video IRQ12 mouse IRQ13 numeric processor IRQ14 primary IDE IRQ15 secondary IDE The interrupts with an asterisk are the default settings but can be changed to another IRQ Viewing System Resources Some hardware option installations might require system resources such as interrupt request IRQ lines direct memory access DMA channels and input outpu...

Page 109: ...on the system board Locating the Jumper The following table summarizes the system board jumper settings System Board Jumper Settings Function Jumper J8E1 Configuration Normal Mode 1 2 Factory setting Sets the system for normal operation The BIOS uses current configuration information and passwords for booting Configure Mode 2 3 Allows system configuration After POST Setup runs automatically The Ma...

Page 110: ...ins 2 3 We recommend that you use needle nose pliers to move a jumper 6 Replace the access cover see Replacing the Access Cover 7 Connect system power cables and monitor 8 Power on the system The system enters Setup and the Maintenance menu appears You can disable the user and administrator passwords If you removed the jumper the system attempts to recover the BIOS A recovery diskette is needed 9 ...

Page 111: ...access the jumper see Expansion Board Removal 5 Remove the jumper block from pins 1 2 We recommend that you use needle nose pliers to move a jumper 6 Replace the access cover see Replacing the Access Cover 7 Connect system power cables and monitor 8 Power on the system The system attempts to recover the BIOS A recovery diskette is needed 9 Power off unplug the system and monitor and remove the acc...

Page 112: ...l options 3 24 parallel printer 3 24 serial devices 3 25 F Front panel removal 3 17 Front panel replacement 3 24 H Hard drive 1 8 optional 3 1 2 inch hard drive removal 5 6 standard 3 1 2 inch hard drive removal 5 7 Hard drive parameters 2 8 I Installing options interrupts C 2 system resources C 2 Interrupts C 2 IRQs C 2 J Jumper location C 3 Jumper settings C 3 K Keyboard cleaning 4 3 M Maintenan...

Page 113: ... 2 removal 5 10 System cleaning 4 3 System configurations 1 2 System resources C 2 System unit disassembly 5 3 System unit disassembly 5 3 3 1 2 inch hard drive 5 6 5 1 4 inch device 5 6 DIMM module 5 8 expansion board 5 3 front panel 5 4 power supply 5 9 standard 3 1 2 inch hard drive 5 7 system board 5 10 T Troubleshooting 4 4 problems and solutions 4 4 ...

Page 114: ...r there is no guarantee that interference will not occur in a particular installation If this equipment does cause harmful interference to radio or television reception which can be determined by turning the equipment off and on the user is encouraged to try to correct the interference by one or more of the following measures Reorient or relocate the receiving antenna Increase the separation betwe...

Page 115: ...nt incorrect de la batterie Remplacer uniquement avec une batterie du même type ou d un type recommandé par le constructeur Mettre au rébut les batteries usagées conformément aux instructions du fabricant Battery Disposal Do not place used batteries in your regular trash The nickel cadmium or nickel metal hydride batteries must be collected recycled or disposed of in an environmentally approved ma...

Reviews: