background image

Product Overview 1-25

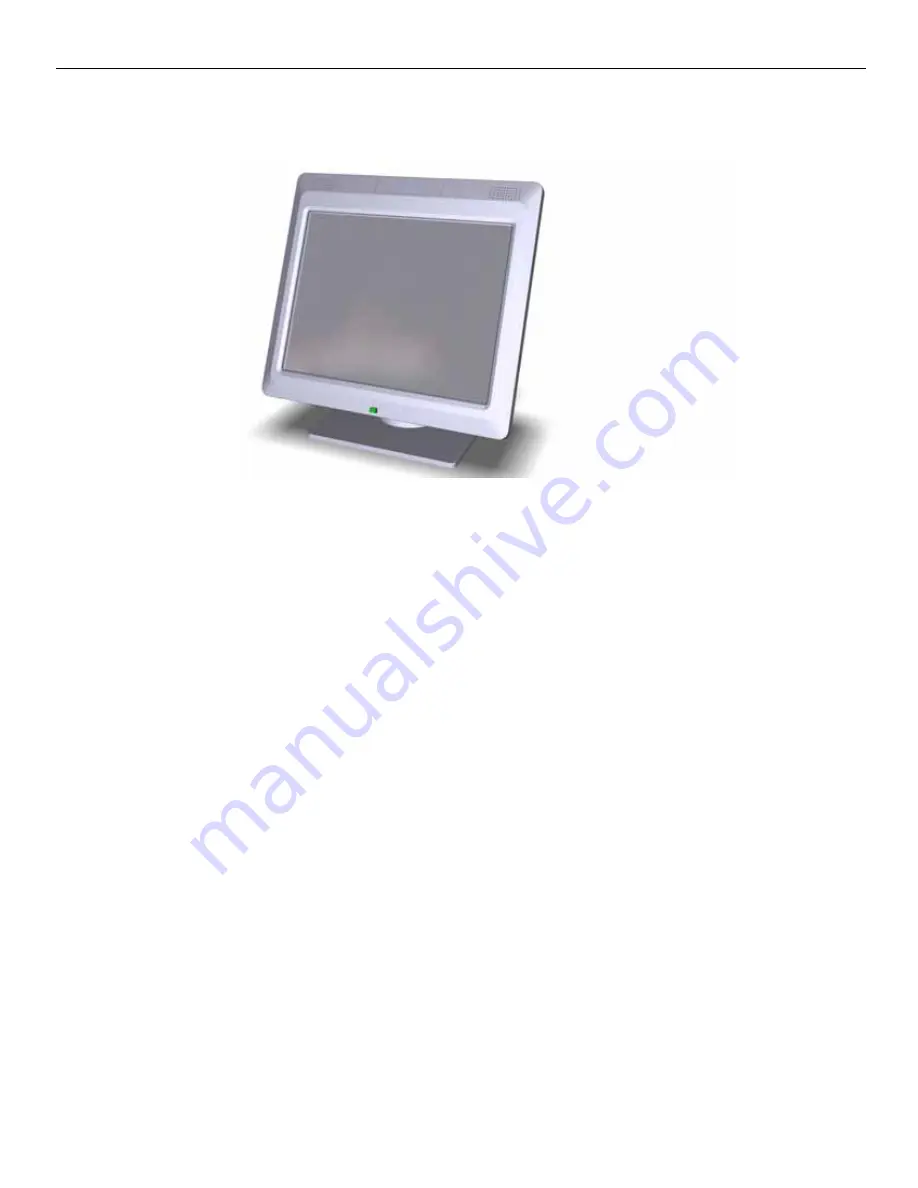
5965 15-Inch Touch Screen


The


NCR


5965


is


a


15

inch


TFT


Liquid


Crystal


Display


with


a


capacitive


Touch


Screen.


The


display


accepts


industry

standard


RGB


video


images


from


a


PC


motherboard


and


dynamically


resizes


VGA


(640


480),


SVGA


(800


600),


XGA


(1024


768)


&


SXGA


(1280


x


1024)


@


60Hz


images


to


fill


the


entire


viewable


area.

Display


size

 ‐ 

15

ʺ 

(diagonal)

LCD


Technology

 ‐ 

TFT

Native


Format

 ‐ 

XGA


(1024


768)


resolution

Pixel


Configuration

 ‐ 

RGB


vertical


stripe

Supported


Colors

 ‐ 

16.2


Million


(6


bits


+


FRC)

Display


text


modes


supported

 ‐ 

SVGA


(800


600


pixel),


XGA


(1024


768


pixel),


VGA


(640


480


pixel)


&


SXGA


(1280


x


1024)


images


to


full


screen


size.

Moisture


&


dust


sealed


display


(between


touchscreen


&


display)


OSD


controls


to


allow


display


adjustments

Auto


selection


DC


voltage


input


to


allow


connection


of


12V


or


24v


option.

VGA


Interface

DVI


Interface

Three


standard


USB

A


ports


(downstream)

USB


PlusPower


+12


VDC


port

Magnetic


Stripe


Reader

‐ 

field


installable,


USB


interface

Integrated


and


remote


mount


options

Integrated


Stereo


Speakers

Summary of Contents for RealPOS 50

Page 1: ...NCR RealPOS 50 7611 Release 1 1 User Guide B005 0000 2017 Issue C...

Page 2: ...ducts as new technology components software and firmware become available NCR therefore reserves the right to change specifications without prior notice All features functions and operations described...

Page 3: ...service technician Fuse Replacement Warning For continued protection against risk of fire replace only with the same type and ratings of fuse Attention Pour pr venir et vous prot ger contre un risque...

Page 4: ...odify the plug provided if it will not fit the outlet have the proper outlet installed by a qualified electrician Improper connection of the equipment grounding conductor can result in a risk of elect...

Page 5: ...ols 1 8 Power Switch 1 8 Power and Disk Activity LEDs 1 8 LED Diagnostic Indicators 1 9 Label Locations 1 13 Power Management 1 14 G3 Mechanical Off 1 14 G2 S5 Soft Off 1 14 G1 Sleeping 1 14 G0 Workin...

Page 6: ...2 3 Cable Routing 2 5 Customer Display Configuration 2 7 Installing a Keyboard and Mouse 2 8 Connecting AC Power 2 10 Power Supply Bracket 2 10 Disconnecting the Power Cable 2 11 Installing a Transac...

Page 7: ...lling and Calibrating the Touch Screen 3 1 Installing the Driver 3 1 Calibrating the Touch Screen 3 3 Calibration Procedures 3 7 Verifying the Calibration 3 11 Optional Settings 3 12 Verifying the Cal...

Page 8: ...a Scheduled Intel SSD Optimizer Session 7 11 Additional Information 7 11 Known Limitations 7 12 Known Issues 7 13 Chapter 8 Maintenance Cabinet Cleaning Procedures 8 1 Touch Screen Cleaning Procedure...

Page 9: ...roduction 10 1 Touch Mode of Operation 10 1 Changing the Touch Mode 10 2 Turning Off the Mouse Pointer 10 3 Terminal Placement 10 5 Appendix A Powered Serial Port Settings Appendix B Disabling USB Por...

Page 10: ...x...

Page 11: ...s conserve valuable space at the Checkstand To complete your POS solution choose from NCR s extensive line of peripherals including printers displays keyboards and scanners The NCR RealPOS 50 enables...

Page 12: ...ax High speed 10 100 1000Mb Ethernet Four USB Ports 2 USB 5V 1 Powered USB 24V printer 1 Powered USB 12V Four Serial ports DB9 3 Powered RS 232 selectable 0 5 12V 1 Optional available if there is no 2...

Page 13: ...er Storage Media Primary 2 5 SATA Hard Drive Solid State Drive SATA interface Power Supply 150W Output power Switching Power Supply External 24V Adapter MEPS Level V mark efficiency 87 minimum Energy...

Page 14: ...ERGY STAR compliant computers can save even more energy by using ENERGY STAR power management features which allow the computer to enter a very low power mode when not in use for a specified period of...

Page 15: ...Product Overview 1 5 b Select Device Manager in the System Tools section c Expand Mice and other pointing devices and then right mouse click on USB Touch Screen Controller...

Page 16: ...can be reduced significantly by changing disabling the Allow this device to bring the computer out of standby option as discussed in Step 1 above 4 If wake from standby via Touch is required the Touch...

Page 17: ...ion and mounting options Choose from NCR s extensive line of peripherals including printers displays keyboards and scanners The RealPOS 50 provides flexible connectivity options to power peripherals a...

Page 18: ...or Controls Power Switch The power switch is located behind the Cable Cover Power and Disk Activity LEDs The Power and Disk Activity LEDs are located on the front of the unit 29236 Power Switch 29237...

Page 19: ...A System ON ON OFF N A Normal Opera tion N A System ON with HDD Activity ON Flashing HDD Access N A Normal Opera tion N A Unit in Sus pend S3 Blinking 1 Sec ON N A OFF AC Present N A OFF Not in Standb...

Page 20: ...Motherboard POST Memory Memory Issue ON Flashing 1 Sec 4 Check for properly installed memory 5 Replace memory 6 Replace Motherboard POST Motherboard No Display ON Flashing 1 4 Sec Replace Motherboard...

Page 21: ...Check connections between HDD and Motherboard 3 Replace or re image HDD 4 Replace Motherboard LAN is Boot Device 1 Check for LAN link and activity LEDs on the Back Panel 2 Check LAN cable 3 Replace Mo...

Page 22: ...rosoft Operating System There are two types of Microsoft COA stickers Depending on the Microsoft Operating System ordered the label is located on either the Back Cover for XP Professional and Windows...

Page 23: ...arge latency in order to return to the Working state The system s context will not be preserved by the hardware The system must be restarted to return to the Working state It is not safe to disassembl...

Page 24: ...e When the terminal resumes from an S3 state all the USB devices re enumerate This causes speaker tones as if they were disconnected and then reconnected This does not present a problem and the USB de...

Page 25: ...Y Y PS 2 Keyboard N A Y Y Y N PS 2 Mouse N A Y Y Y N USB Keyboard N A Y Y Y N USB Mouse N A Y Y Y N LAN magic packet N A Y Y Y Y RTC Alarm N A Y Y Y Y Serial Port RI N A Y Y N N Note Power consumptio...

Page 26: ...on LAN to function the Network driver must be enabled factory default The procedure for enabling the driver depends on which operating system you are using Windows 7 1 Select Start Computer System Pro...

Page 27: ...3 Right mouse click the Realtek PCIe FE Family Controller driver and then select Properties 4 Under the Advanced tab both Wake on Magic Packet and Wake on Pattern Match should be Enabled Select OK aft...

Page 28: ...1 18 Product Overview 5 Under the Power Management tab all option boxes should be checked Select OK after making any changes...

Page 29: ...rview 1 19 Windows XP 1 Select Start Control Panel Hardware Tab Device Manager button 2 Select Network adapters and then 3 Right mouse click the Realtek PCIe FE Family Controller driver and the select...

Page 30: ...4 Under the Advanced tab the Wake on Magic Packet should be Enabled Select OK after making any changes 5 Under the Power Management tab the option boxes as shown below should be checked Select OK aft...

Page 31: ...ping state the processor does not execute any instructions Each processor sleeping state has a latency associated with entering and exiting that corresponds to the power savings In general the longer...

Page 32: ...y The displays can be integrated with the terminal or connected remotely Below are examples of how the customer displays can be integrated with the terminal Table Top Stand 7610 K320 and Integrated 2x...

Page 33: ...7610 K452 and LCD Customer Display Tilt Mount 7610 K453 Note Touch Customer Displays are NOT supported via 7610 K452 and 7610 K453 2189 Cash Drawer Integration Tray 7610 K304 5964 K027 Inhanced Integr...

Page 34: ...n operator display or a customer information display CID The 5942 Display features a 12 1 Inch Active Matrix Color LCD with support for SVGA and XGA resolution 5942 15 Inch Color LCD The 5942 15 Inch...

Page 35: ...resolution Pixel Configuration RGB vertical stripe Supported Colors 16 2 Million 6 bits FRC Display text modes supported SVGA 800 600 pixel XGA 1024 768 pixel VGA 640 480 pixel SXGA 1280 x 1024 image...

Page 36: ...lso supports VGA SVGA Resolutions 5 Wire Resistive Touch USB Interface Video VGA Standard 15 Pin Female Integrated Stereo Speakers Power Supplied via AC Line Input or 12 DC Power Brick VGA Touch Speak...

Page 37: ...Product Overview 1 27 NCR 5982 6 5 Inch LCD Display The 5982 LCD Display is a terminal powered color 6 5 Inch VGA LCD...

Page 38: ...S 50 supports the following NCR 5932 Keyboards NCR 5932 5xxx USB Alphanumeric Big Ticket Keyboard NCR 5932 65xx PS 2 Compact Keyboard NCR 5932 66xx 104 Key Programmable POS Keyboard Keyboard Power The...

Page 39: ...other POS specific functions such as keylock speaker system status indicator and magnetic stripe reader MSR This 5932 keyboard also has a USB port to connect a Scanner or other USB device Features The...

Page 40: ...nctional keyboard that is two keyboards built into one The keyboard consists of two major sections 32 key Point Of Sale Keyboard PC type Alphanumeric Keyboard The keyboard includes the following featu...

Page 41: ...d is a multifunctional keyboard that is two keyboards built into one The keyboard consists of two major sections 32 key Point Of Sale Keyboard PC type Alphanumeric Keyboard The keyboard includes the f...

Page 42: ...a display for any industry standard PC It is a Vacuum Fluorescent Display VFD 5975 1000 2x20 VFD G11 5975 1001 2X20 VFD CG1 There are four post options available in 4 inch increments Features Display...

Page 43: ...2 0 I F support The components for both interfaces are populated on a single printed circuit board Both interfaces are active though only one interface can be physically connected at a time The displ...

Page 44: ...um Fluorescent Display VFD 2 Rows x 20 Characters 5X8 Characters RS 232 Interface Character Height 8 86 mm Character Width 3 90 mm Character Pitch 5 15 mm Line Pitch 9 64 mm Peak Wavelength of Illumin...

Page 45: ...nction printer It prints receipts validates and prints checks and prints on a variety of single or multiple part forms There is not journal as it is kept electronically by the host terminal The printe...

Page 46: ...e allows the 7168 to be connected to any host computer that uses RS 232C or USB communication interface The receipt station uses thermal printing technology Therefore there is no ribbon cassette to ch...

Page 47: ...t or a serial port It receives power from the 24V connector on the terminal or from an external power supply NCR 7198 Printer The NCR 7198 printer is a fast quiet relatively small and very reliable pr...

Page 48: ...1 38 Product Overview...

Page 49: ...RealPOS 50 near an electrical outlet that is easily accessible Use the power cord as a power disconnect device Do not permit any object to rest on the power cord Do not locate the RealPOS 50 where th...

Page 50: ...es how to install the terminal on the Table Top Stand For the other mounting options see the associated kit instructions 1 Unpack the terminal in the desired location 2 Lay the terminal face down on a...

Page 51: ...Stand a Install the mushroom studs 2 on the back of the terminal b Align the Mounting Studs on back of the terminal with the Mounting Slots in the Table Top Stand c Insert the studs into the slots an...

Page 52: ...Installation d Secure the stand with the captive thumbscrews 2 2 Open the Terminal Cable Cover Press the tabs 2 that latch the cover closed and pivot the cover open 29263 Captive Thumbscrews 29242 Cab...

Page 53: ...minal Cable Cover on the bottom of the unit Note The RS232 D port is used by the Integrated 2x20 Customer Display if present Otherwise this port can be added to the I O Panel with the 7610 K412 Port k...

Page 54: ...2 6 Hardware Installation Cable Routing Cables are routed out the opening in the Terminal Cable Cover and down through the Terminal Stand 29183 Terminal Cable Cover...

Page 55: ...Hardware Installation 2 7 1 Remove the Stand Cable Cover by pressing the button detents on the sides of the cover and then pivoting the top away from the stand 29187 Stand Cable Cover...

Page 56: ...f and over the Cable Guide as shown below 3 Replace the Stand Cable Cover Customer Display Configuration If configured with a Customer Display the cables are routed from the bottom of the Stand up thr...

Page 57: ...USB and PS 2 type keyboards Only USB mice are supported See the following examples of supported configurations USB Mouse and USB Keyboard PS 2 Keyboard w Glide Pad and USB Mouse Note PS 2 Extension C...

Page 58: ...2 10 Hardware Installation USB Keyboard w Glide Pad 29246...

Page 59: ...on the terminal 2 Connect the AC Power Cord to the Power Supply and to an AC outlet Caution Do not connect or disconnect the 24V Power Cable from the terminal with the AC Power Cord connected to an A...

Page 60: ...Power Supply Enclosure Kit Instructions 7610 K321 Disconnecting the Power Cable The Power Cable connector locks into position when connected to the terminal and cannot be removed by simply pulling on...

Page 61: ...connector or an RS 232 connector USB Installation Connect the Powered USB Printer Interface Cable to the USB Connector and Power Connector on the printer and to the 24 V Powered USB Connector on the t...

Page 62: ...or on the terminal Note The factory default setting for the RS 232 ports is powered See the Appendix Powered Serial Port Settings 2 Connect the Powered USB Printer Interface Cable to the Power Connect...

Page 63: ...apter 1 For installation information about integrating the displays see the associated kit instructions for the configuration being installed Using the Peripheral Integration Tray Peripheral Integrati...

Page 64: ...eived from the terminal using a powered USB cable 1 Connect the Video Cable to the VGA connectors on the 5942 monitor and RealPOS 50 terminal 2 Connect the Powered USB Cable to the 5942 and to the Pow...

Page 65: ...ch LCD Touch Monitor Cable Connections There are two cables required to configure a 5964 12 1 Inch Touch LCD DVI Cable provides the video interface to the 5964 LCD RS 232 Y Cable provides a serial int...

Page 66: ...18 Hardware Installation DVI Cable Connections Connect the cable to the DVI Connectors on the 5964 LCD and host terminal 29226 DVI DVI 497 0446721 1 0 m 1432 C191 0010 497 0446722 4 0 m 1432 C191 004...

Page 67: ...ble to one of the Powered RS 232 ports and to the PS 2 connector on the host terminal 2 Connect the other end of the Y Cable to the RS 232 connector on the 5964 LCD 29227 PS 2 RS 232 Powered RS 232 Po...

Page 68: ...onnections 1 Connect the DVI Cable to the DVI connectors on both the 5965 LCD and host terminal 2 Connect the Powered USB Cable to the 5965 LCD and to the Powered 12V USB connector on the host termina...

Page 69: ...both the 5965 LCD and host terminal 2 Connect the Powered USB Cable to the 5965 LCD and to the Powered 12V USB connector on the host terminal 29230 497 0435044 1m 1416 C972 0009 497 0435045 4m 1416 C9...

Page 70: ...ctors on both the 5966 Touch LCD and host terminal 2 Connect the Powered USB Cable to the 5966 and to the Powered 12V USB connector on the host terminal 29230 497 0435044 1m 1416 C972 0009 497 0435045...

Page 71: ...D 1 Remove the Base from the Display 2 screws 2 Route the VGA and Power cables up through the bottom of the Base and connect them to the Display Note The power cable can be either an External Power Su...

Page 72: ...2 24 Hardware Installation 3 Install the Base to the Display 2 screws 4 Route the cables out the rear of the Base 5 Connect the Power Cable 23435 Power VGA...

Page 73: ...port on the host terminal b Connect the AC Cord to the Power Supply c Connect the power cable to an AC source Terminal Powered a Connect the Power Cable to the Powered 12V USB port on the host termin...

Page 74: ...2 26 Hardware Installation 29228 Power USB 497 0435044 1m 1416 C972 0009 497 0435045 4m 1416 C972 0040 VGA VGA 497 0471265 1 m 1416 C851 0010 497 0428512 4 m 1416 C851 0040...

Page 75: ...the NCR 5975 Remote Customer Display 5975 1xxx 2x20 VFD 5975 2xxx Graphical Remote Customer Display There are four different length posts available in four inch increments 22926 5975 1xxx 2x20 VFD 59...

Page 76: ...with a post greater than 215 mm 8 5 in secure the Base Plate with screws 4 that are provided 4 Connect the Interface Cable to the Display Module a Remove the screws 2 from the Display Back b Remove t...

Page 77: ...e I F cable to a powered RS 232 connector on the terminal Note The factory default settings for the COM1 and COM2 ports are powered by default To change a port to non powered see the Powered Serial Po...

Page 78: ...2 30 Hardware Installation USB Interface Powered Connect the I F cable to a powered 12V Powered USB connector on the terminal 29232 USB RS232...

Page 79: ...a clone same video data displayed on both displays or an extended desktop the desktop spans across both displays The dual mode is configured using the Intel Graphics Media Accelerator control panel 1...

Page 80: ...ing Mode drop down menu select Intel R Dual Display Clone 2 Select the Primary Device Notebook 3 Select the Secondary Device Digital Display or Monitor 4 Select Apply 5 Select OK within 15 seconds to...

Page 81: ...has the Start button and Taskbar 3 Select the Secondary Device Digital Display or Monitor This display is the desktop extension You can re position the displays as desired by dragging the 1 or 2 icon...

Page 82: ...2 34 Hardware Installation Single Display Mode 1 Select Notebook 2 Select Apply 3 Select OK within 15 seconds to accept the new settings 4 Select OK to close the Control Panel...

Page 83: ...rol Panel under the Hot Keys tab The most useful Hot Keys are CTRL ALT F3 Monitor in single display mode CTRL ALT F4 Digital Display in single display mode Note The Hot Keys can be used to recover fro...

Page 84: ...2 36 Hardware Installation Installing a Cash Drawer The Cash Drawer can be connected to the Cash Drawer connector or to the transaction printer 29233 Cash Drawer 20440 Cash Drawer Connector...

Page 85: ...on 2 37 Second Cash Drawer Cable Connection The terminal supports a 2 drawer configuration with a Y cable 1416 C372 0006 Connect the Y cable to the terminal or transaction printer cash drawer connecto...

Page 86: ...k Drive The Hard Disk Drive HDD is mounted on the inside of the Cable Cover and is easily accessed 1 Tilt the terminal to 90 degrees 2 Open the Cable Cover Press the tabs 2 that latch the cover closed...

Page 87: ...ion Exercise care in handling the HDD Do not drop or stack it 5 Remove the HDD from the HDD Bracket 4 screws 6 Install the new HDD in the HDD Bracket Caution Do not over tighten the screws 7 Insert th...

Page 88: ...2 40 Hardware Installation...

Page 89: ...bration if the screen is too much out of calibration However most of the time you can reach the Start button or Touch icon with your fingertip stylus The latest calibration software can be downloaded...

Page 90: ...ibration 5 Use the USB Controller Interface Select Next 6 Setup is ready to install Select Next Finish At the completion of the install program the driver is loaded and functioning You do not have to...

Page 91: ...r standing that you normally expect to use the touch screen Touch the calibration target firmly and precisely with your fingertip During calibration be careful to keep your fingernails and other finge...

Page 92: ...3 4 Touch Screen Calibration Do NOT touch the display or bezel with your other hand Do NOT get your body too close to the display 27733 27734...

Page 93: ...Touch Screen Calibration 3 5 Do NOT touch the bezel with your other fingers Do NOT spread your other fingers near the touch screen surface 27735 27736...

Page 94: ...3 6 Touch Screen Calibration Do NOT get your hand and other fingers too close to the bezel 27737...

Page 95: ...e terminal 45 degrees can be assumed if this not known If this was NOT done properly then begin with Step 1 Otherwise skip to Step 2 1 Select Start Programs Microchip TSHARC Control Panel Note The Cal...

Page 96: ...Touch Screen Calibration 5 Touch the center of the target Pull your finger a few inches away from the screen when you see the Release message 6 Repeat the process for each target location as they app...

Page 97: ...e been touched a test screen displays Touch the screen in various locations to verify the calibration results Select Accept if you are satisfied with the results If not select Cancel and repeat the pr...

Page 98: ...t touch the screen Caution Touching the screen during this time can cause the application to hang This screen automatically closes after the touch controller has completed communicating When complete...

Page 99: ...sely follow the underlying pattern Pay close attention to the edges of the display and the corners since this is where an incorrect calibration is most noticeable If a line or point appears to be outs...

Page 100: ...he other features to meet your personal preferences Double Click Option Right Mouse Click Touch Modes Touch Sounds 1 Touch the center of the target Pull your finger a few inches away from the screen w...

Page 101: ...e been touched a test screen displays Touch the screen in various locations to verify the calibration results Select Accept if you are satisfied with the results If not select Cancel and repeat the pr...

Page 102: ...t touch the screen Caution Touching the screen during this time can cause the application to hang This screen automatically closes after the touch controller has completed communicating When complete...

Page 103: ...sely follow the underlying pattern Pay close attention to the edges of the display and the corners since this is where an incorrect calibration is most noticeable If a line or point appears to be outs...

Page 104: ...Touch Screen Calibration Optional Settings After the touch screen is calibrated adjust the other features to meet your personal preferences Double Click Option Right Mouse Click Touch Modes Touch Sou...

Page 105: ...move the cursor to the Exit Menu select either Save Changes Exit or Save Changes and press Enter Restoring Factory Settings To reset all values to their default settings for the current screen press...

Page 106: ...Disabled Execute Disable Bit Compatibility Enabled Intel R SpeedStep tm tech Enabled Intel R C STATE tech Enabled Enhanced C States Enabled IDE Configuration ATA IDE Configuration Enhanced Configure S...

Page 107: ...al Port D 4 IRQ 10 System Hardware Health Monitoring Typical Acceptable Range CPU Temperature 43 C 109 F less than 60 C GMCH Temperature 36 C 96 F less than 60 C VRM Temperature 47 C 116 F less than 6...

Page 108: ...S4 Enabled Power Button Mode On Off Restore on AC Power Loss Last State Advanced Resume Event Controls LAN Wake Up From S5 Enabled Resume On Ring Disabled Resume On RTC Alarm Disabled Configure ASF Pa...

Page 109: ...o Interrupt 19 Capture Disabled BBS Menu Enabled Boot Order Defaults LAN First Boot Device Priority 1st Boot Device Network IBA GE Slo 2nd Boot Device HDD P0 INTEL SSDSA Hard Disk Drives 1st Drive HDD...

Page 110: ...y PEG PCI Internal Graphics Mode Select Enabled 32MB Video Function Configuration DUMT Mode Select DUMT Mode DUMT FIXED Memory 128MB PAVP Mode Disabled Boot Display Device Auto Detect South Bridge Con...

Page 111: ...M drive internal or external Keyboard OS Recovery Procedures for Windows XP 1 Insert the NCR Partition Image Application CD D370 0605 0100 into the CD DVD drive 2 Connect a keyboard to the terminal 3...

Page 112: ...irectory path is Images 4 Filename is nnnnnaaa 5 Reboot after operation complete yes 6 Resize last data partition if possible no 7 Resize last data partition to Full Disk A Accept these arguments V Vi...

Page 113: ...611 1 Insert the NCR WIM Image Deployment Capture DVD D370 0893 0100 into the DVD drive 2 Connect a keyboard to the terminal 3 Apply power to the terminal 4 Press F8 during boot when you see the NCR l...

Page 114: ...d be deployed Select the drop down box and then the location for the image Also select either the radio button to reboot the terminal after the image has been installed or you can select Pause to view...

Page 115: ...n deploys the NCR Official image on to the terminal The following displays while the terminal is loading 10 After the image has been put on to your terminal you are given the message Press OK to Reboo...

Page 116: ...overy 12 Complete the Windows 7 setup enter the time zone computer name accept the license etc Uncheck all the Security Warning messages about Always ask before opening this file as they appear and cl...

Page 117: ...about this procedure Prerequisites The following are required to perform a SPI BIOS update USB Keyboard BIOS Software Download from the NCR website http www ncr com 1 At this site select the Support...

Page 118: ...files 3 Copy the files to the root directory of the USB drive 4 Open a DOS command window 5 Change directory to the USB Memory Drive 6 Execute the following command Syslinux fma USB drive letter Exam...

Page 119: ...e processor board which has no Class Model Serial information in the BIOS DMI information is mandatory Interactive Method This method permits you to input replace the Class Model Serial information th...

Page 120: ...tion at the beginning of the program and then updates the BIOS only 1 Highlight Option 5 and press ENTER 2 At the prompt press ENTER to enter the Class Model Serial Number information DMI Follow the o...

Page 121: ...Serial Model Class For Service Personnel Only 4 Update of BIOS Reset to Default Serial Model Class information 3 When prompted for the DMI information enter Ctrl c to exit the utility 4 At the DOS pro...

Page 122: ...6 6 BIOS Updating Procedure...

Page 123: ...n allows the SSD to clean up internal management space thus eliminating the need to manage the deleted files You can schedule the Intel SSD Optimizer to run automatically on a weekly daily or monthly...

Page 124: ...on 8 x or Intel Rapid Storage Technology Intel RST Driver Version 9 5 or Earlier If your computer uses this configuration which can be used in place of the Microsoft AHCI driver Trim functionality is...

Page 125: ...intel com go ssdtoolbox 2 Save the Intel SSD Toolbox application exe file to your computer 3 Double click the downloaded exe file to start the Intel SSD Toolbox setup wizard 4 Select a language from t...

Page 126: ...d The Intel SSD Toolbox home screen shows all Intel Solid State Drives and hard disk drives installed in your system Click on the drive you want to manage If your system contains multiple drives use t...

Page 127: ...er Note the following before manually running the Intel SSD Optimizer Do not run the Intel SSD Optimizer when a backup is in progress Do not run the Intel SSD Optimizer if the Intel SSDs are in a RAID...

Page 128: ...7 6 Solid State Drive Optimization 4 Click Run 5 Review the text describing the Intel SSD Optimizer requirements and then click Start...

Page 129: ...in a RAID configuration but is encrypted click Accept to continue running the Intel SSD Optimizer on the selected SSD If the Intel SSD is in a RAID configuration click Decline to stop running the Inte...

Page 130: ...run a scheduled session Do not schedule the Intel SSD Optimizer to run when a backup is in session Do not run the Intel SSD Optimizer if the Intel SSDs are in a RAID configuration To schedule the Int...

Page 131: ...n 7 9 4 Click Schedule If your computer contains more than one Intel SSD you can apply the schedule to all supported Intel SSDs by clicking All Supported Intel SSDs 5 Set the schedule including day ti...

Page 132: ...detected the presence of either RAID or encryption on the selected Intel SSD If the Intel SSD is not in a RAID configuration but is encrypted click Accept to continue running the Intel SSD Optimizer o...

Page 133: ...etion the icon disappears Removing a Scheduled Intel SSD Optimizer Session To remove a scheduled Intel SSD Optimizer session 1 Click Intel SSD Optimizer 2 Click Schedule 3 Click Remove next to the sch...

Page 134: ...atted with the FAT32 file system New Technology File System NTFS is required to run Intel SSD Optimizer NTFS allocation sizes of 32K and 64K are not supported Systems in IDE mode Intel SSD Toolbox 3 0...

Page 135: ...es on some systems On some systems Intel SSD Toolbox does communicate with drives and all functionality is disabled There is no workaround for this issue RAID volume may display extended serial number...

Page 136: ...7 14 Solid State Drive Optimization...

Page 137: ...n 5 Remove external dust around the cooling vents Touch Screen Cleaning Procedures 1 Using a soft cloth dampened with isopropyl alcohol or a mild non abrasive soap water solution gently wipe the touch...

Page 138: ...ed due to the possibility of spreading contaminants from machine to machine and or reducing ESD protection Note If all six up down swipes are not used on a fresh card it should be placed in a sealed Z...

Page 139: ...nerator General Specifications Serial Communication Interface The display receives commands and data from the host using an RS 232 serial interface framed at 9600 baud 8 data bits no parity and one st...

Page 140: ...the character D1 through D40 represent the character dots A 1 indicates the dot is on and 0 indicates the dot is off in the following format 5 x 8 Dot Matrix Character D1 D2 D3 D4 D5 D6 D7 D8 D9 D10 D...

Page 141: ...s the display luminance The LUMINANCE byte sets the display luminance level as defined in the table below This command is ignored if the LUMINANCE byte is 00h Cursor Position 10h POSITION This command...

Page 142: ...to the display one byte at a time If the byte received is greater than 1Fh it is considered as 5x8 dot matrix character data This character is written to the current cursor position and the cursor pos...

Page 143: ...2x20 Customer Display Interface 9 5 CP437...

Page 144: ...9 6 2x20 Customer Display Interface CP858...

Page 145: ...2x20 Customer Display Interface 9 7 CP866...

Page 146: ...9 8 2x20 Customer Display Interface CP932...

Page 147: ...2x20 Customer Display Interface 9 9...

Page 148: ...9 10 2x20 Customer Display Interface...

Page 149: ...is made when the item on the screen is touched and activated when double touched Multiple items can be selected by touching and dragging your finger to another location forming a rectangular box to en...

Page 150: ...e Touch Mode The default touch mode setting is Normal You can switch modes in the Windows Control Panel 1 Select Start Programs Microchip TSHARC Control Panel 2 Select the Touch Settings tab 3 Select...

Page 151: ...tab 3 Select Drivers and Patches Retail Support Files NCR RealPOS and SelfServ Terminal and Operating Systems NCR RealPOS 70xrt 7403 Windows Windows XP Pro Windows EP Embedded and WEPOS 4 Download po...

Page 152: ...Screen Operation 10 Navigate to the empty cur file 11 Select Open Apply The pointer should now be changed to None in the Mouse Properties Note To change back to the original settings select Use Defaul...

Page 153: ...d within 254 mm 10 in of each other it may be necessary to change the touch operating frequency on one or more of the units to prevent interference when they are operated simultaneously Please contact...

Page 154: ...10 6 Touch Screen Operation...

Page 155: ...iver technology Use the following procedure to change the colors The procedures are the same for Windows XP and Windows 7 except for the screens Both screens are shown 1 Apply power to the system 2 Ri...

Page 156: ...A 2 Windows 7...

Page 157: ...A 3 4 Adjust the Gamma Brightness and Contrast controls according to your preferences The colors can be adjusted together or individually Windows XP...

Page 158: ...A 4 Windows 7 5 Select Apply Windows XP or OK Windows 7 to accept the new settings Note The default settings can be restored by clicking the Restore Defaults button...

Reviews: