background image

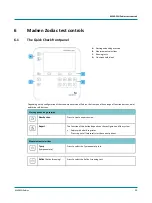
6 MADSEN Zodiac test controls 

29 

MADSEN Zodiac 


Sequence testing 


Seq. 

(automatic sequence 

testing) 

This function allows you to combine multiple measurements and run them 
in an automated sequence. 
Press this button to select automatic sequence testing. The buttons 
corresponding to the tests and test functions included in the sequence light 
up on the device, e.g., Tympan Ipsi and Contra Reflex Thresholds at 
several frequencies. 
When you press the 

Start/Stop 

button, all functions that have been 

selected for the sequence are performed. 
You can adjust any settings related to the tests included in the sequence. 


Diagnostic sequence 

Tympan Reflex Threshold (+ Reflex Decay, if selected from the 

Set- 

tings 

menu). 


Screening sequence 

Tympan Reflex Screening. 


Running tests 


Start/Stop 

This button is placed both on the device and on the diagnostic probe 
shoulder strap. 
This button is lit while a test is running. 


Press this button to perform a tympanometric measurement, to start 
reflex tests, and to present stimuli for manual reflex testing. 


During a test, press this button to stop the test. 


Auto-start 

Press this button to activate 

Auto start on seal 

before you place the probe 

in the patient's ear. 
This button is disabled when you use the Quick Check probe, which always 
uses 

Auto start on seal


Dial 

Turn the dial to adjust pump pressure and to control the stimulus level. 


Ear 

This button is located both on the device and on the probes. 
Press this button to toggle the ear selection associated with the current 
measurement. The button lights up in the color of the selected ear. 


Delete 

Press this button to delete the selected measurement curve. 

Summary of Contents for Madsen Zodiac

Page 1: ...Madsen Zodiac Reference Manual Doc No 7 50 1610 EN 08A Part No 7 50 16100 EN...

Page 2: ...rkApS All rights reserved Otometrics the Otometrics Icon Aurical Madsen HI PRO2 Oto scan ICSand HORTMANNare registered trademarks of Natus MedicalDenmarkApSin the U S A and orothercountries Version re...

Page 3: ...The built in printer 15 4 Views of Zodiac 17 4 1 Front view 17 4 2 Bottom view 18 5 The Zodiac probes 19 5 1 The Quick Check probe 19 5 2 Thediagnostic probes 21 5 2 1 The diagnostic probe and shoulde...

Page 4: ...Leakageand other probeproblems 76 11 Testing with Zodiac Quick Check PC based 78 11 1 Startingameasurement 78 11 2 TheQuick Check measurementscreen 80 12 Testing with Zodiac Diagnostic or Clinical PC...

Page 5: ...turer 126 19 Disposal instructions 126 20 Technical specifications 127 21 Accessories 134 22 Notes on EMC Electromagnetic Compatibility 135 App 1 Madsen Zodiac immittance methodology andfeatures 140 A...

Page 6: ...figuration Zodiac supports the following tests and functionalities Tympanometry Quick Check Diagnostic Clinical Reflex Screening Quick Check Diagnostic Clinical Reflex Threshold Diagnostic Clinical Re...

Page 7: ...t results and full test control of MADSEN Zodiac directly from a PC Stand alone versions of Zodiac which have integrated user interfaces can be operated independently of the Immittance module although...

Page 8: ...e the mechanical response of the middle ear and form a basis for evaluating whether the related physiological structures are functioning correctly or not Clinical Benefit Madsen Zodiac is used to cond...

Page 9: ...c 10 To install Otosuite see the Otosuite User Guide Configuring the Otosuite Immittance module See Configuring the Immittance module 13 Basic Otosuite functions Basic Otosuite functions are described...

Page 10: ...packing material will protect against damage during transport 2 Visually inspect the equipment for possible damage If the device is damaged do not use it Contact the Natus representative for assistan...

Page 11: ...ected directly to the mains outlet Connecting the external power supply to Zodiac 1 Connect the plug end of the external power supply cable to the external power supply socket on the back of the devic...

Page 12: ...ct the USB cable from the USB socket on the back of the device to a USB socket on the PC The Otosuite Immittance software module automatically detects the device 2 3 4 Reconnecting to the device If co...

Page 13: ...wish to be reminded about the annual calibration Protocol saving Choose this item if you wish to permanently save changes made to a protocol Language Choose the language of your choice About device C...

Page 14: ...ighlight the device you wish to use 2 Click Next to continue or Close to exit Immittance configuration 2 4 2 Test device information In Otosuite To see information relating to the test device select H...

Page 15: ...nal built in printer is located and controlled from the back of the Zodiac device 1 To open the printer cover press the printer cover button 2 To close the printer cover press the printer cover into p...

Page 16: ...e compartment When you pull the paper upward before closing the cover you will see the Otometrics watermark 6 Tear off the part of the paper where glue has held the roll together 7 Make sure that the...

Page 17: ...h views of Madsen Zodiac Front view 17 Bottom view 18 Zodiac Stand alone A description of the front panel controls is in Madsen Zodiac test controls 25 4 1 Front view Stand alone PC based A Display B...

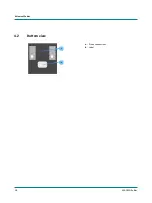
Page 18: ...4 Views of Zodiac 18 MADSEN Zodiac 4 2 Bottom view A Probe connections B Label...

Page 19: ...e immittance probes The immittance probes are calibrated at delivery and should be re calibrated on a regular basis Probe check 32 Probeadmittancecalibration 112 5 1 The Quick Check probe Depending on...

Page 20: ...Light indicator showing the color of the selected test ear and leakage status Using the probe Fitting the eartip on the probe 34 Cleaning the probe and probe tip 115 Holding the probe Underhand grip O...

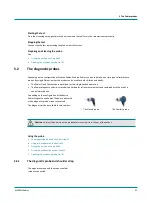
Page 21: ...timized for fast single handed operation The Zodiac diagnostic and clinical probe is optimized for reflex measurements and combined with the use of a contralateral phone Depending on the configuration...

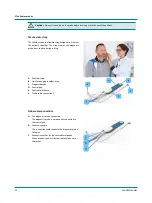
Page 22: ...ic probe D Control pad E Contralateral phone F Probe cable connections Probe cable connections A The diagnostic probe connection The diagnostic probe is permanently connected to the control pad B Conn...

Page 23: ...gnostic probe you can easily switch between using the two probes If the probe you wish to use is not activated press any one of the buttons on the probe to activate it 5 2 3 The contralateral phone To...

Page 24: ...Supra aural phone 1 Fit the supra aural phone on the patient s head so that the center of the phone is directed towards the entrance of the ear canal Caution Never insert the contralateral phone into...

Page 25: ...Zodiac the front panel has a range of function buttons a dial and three soft buttons Starting and ending a session New Session Press to create a new session Report The function of this button depends...

Page 26: ...s up in the color of the selected ear Delete Press this button to delete individual measurements Probe check Probe check Place the probe in the probe check cavity and press this button to carry out a...

Page 27: ...Starting and ending a session B Measurement selections C Running tests D On screen selections Depending on the configuration of the stand alone version of Zodiac the front panel has a range of functi...

Page 28: ...You can choose between the following frequencies 0 5 kHz 1 kHz 2 kHz 4 kHz Noise stimulus Press this button to select Broadband noise as a reflex stimulus P pressure offset Press this button to selec...

Page 29: ...quence Tympanometry Reflex Screening Running tests Start Stop This button is placed both on the device and on the diagnostic probe shoulder strap This button is lit while a test is running Press this...

Page 30: ...ion Press this button until you highlight the desired area on the screen Dial In addition to the various measurement functions you can use the dial to scroll between menu items on the screen 6 3 The Z...

Page 31: ...Select Device Settings Protocol Settings and set to Allowed If you turn off Zodiac after changing and saving the test settings the protocol locks again To save the changed protocol settings permanent...

Page 32: ...disinfectant between ears If one ear is infected test the healthy ear first and change eartips between ears To prevent cross infection use a clean eartip when you test the next patient 7 3 Probe check...

Page 33: ...ient create a new session to clear the device memory of old data When Zodiac is not connected to Otosuite When you have finished testing a patient and will start testing a new patient press the New Se...

Page 34: ...ently pull the pinna down and back For older infants pull the pinna up and back 3 Look into the ear canal Perform an otoscopy to assess the status of the outer ear before you insert the probe 4 If the...

Page 35: ...With a hand held probe you can use a slightly over sized eartip to achieve a seal when used with a wider range of ear canal sizes The oversized eartip is not intended to enter the ear canal 2 Fit the...

Page 36: ...ient s head For adults pull the pinna upward and back For infants and children pull the pinna downward and back 7 Insert the probe in the patient s ear canal while twisting the probe gently When the p...

Page 37: ...n on the Otosuite screen If you are using the Quick Check probe the leakage indication will remain until you remove the probe from the ear and try again Probe blocked Stand alone If the probe is block...

Page 38: ...tart testing see Preparing for testing32 1 Look into the ear canal Perform an otoscopy to assess the status of the outer ear before you insert the probe 2 If the ear canal is blocked a test may not be...

Page 39: ...ren pull the pinna down wards and back 6 A flat tympanogram together with an abnormally small ear canal volume ECV indicates that the probe is blocked 7 Any leakage will interrupt the test The probe w...

Page 40: ...ased If there is a probe leak during testing this icon appears on the Otosuite screen If you are using the Quick Check probe the leakage indication will remain until you remove the probe from the ear...

Page 41: ...olume bar The ear canal volume is shown to the right of the graph Norm area B Tympanometry graph The detected reflex is shown in the results area Stimulus type level Progress indicator during measurem...

Page 42: ...Deleting a curve Select the curve to delete and press the Delete button To replace a single measurement delete a curve and adjust the measurement selections to redo the single measurement The results...

Page 43: ...tly against the ear the test starts with tympanometry testing and continues automatically from tympanometry to reflex screening The safety intensity level cannot be exceeded in screening mode Use eith...

Page 44: ...probe and to avoid blocking the probe against the ear canal of the patient grasp the pinna and gently pull the pinna back and slightly away from the patient s head For adults pull the pinna upwards an...

Page 45: ...volume ECV indicates that the probe is blocked A measurement will not auto start if the ear canalvolume reading is less than 0 1 9 Any leakage will interrupt the test The probe will indicate if there...

Page 46: ...Check probe the leakage indication will remain until you remove the probe from the ear and try again Probe blocked Stand alone If the probe is blocked during testing this icon appears on the Madsen Zo...

Page 47: ...he shape of the 226 Hz curve You can set the type to be determined automatically and you can subsequently change it manually if necessary D Tympanometry results E On screen selections Curve selection...

Page 48: ...2 The measurements that are included in the current test sequence light up on the measurement settings buttons e g Tymp Ipsi Contra 0 5k 1k 2k etc You can make any changes needed by pressing these bu...

Page 49: ...he description for performing tympanometry as a single test This means that the sequence function is not enabled The default setup available in the tympanometry test is designed for any of the tympano...

Page 50: ...pressure to the set value and the sweep starts The admittance for each pressure point is plotted out on the screen and forms the tympanogram curve Stopping the test 1 If the patient shows discomfort d...

Page 51: ...The ear canal volume is shown to the right of the graph Norm area B Tympanometry graph The detected reflex is shown in the results area Stimulus type level Progress indicator during measurements Defl...

Page 52: ...eleting a curve Select the curve you wish to delete and press the Delete button To replace a single measurement delete a curve and adjust the measurement selections to redo the single measurement The...

Page 53: ...plies to the currently selected measurement setting and may not reflect the probe tone setting that was used for the curve shown The actual probe tone applying to the curve shown is shown the results...

Page 54: ...a warning message will be shown and you will be prompted to decide whether to continue or to move on to the next stimulus type 9 6 Reflex Threshold testing This test is supported by Madsen Zodiac Dia...

Page 55: ...reflex or the Contra reflex button 7 Select the frequency that you wish to test press the applicable Frequency button 8 Use the dial to set the desired stimulus level 9 Prepare the patient for the hig...

Page 56: ...rt Stop button on the probe control pad on the shoulder strap The test stops and the pump pressure is relieved immediately Already measured results are stored when a measurement is stopped When you ha...

Page 57: ...ns that are in synchrony with the patient s breathing This is a sign of Eustachian tube dysfunction and may prevent further reflex testing Variations due to a very steep tympanogram for example seen i...

Page 58: ...e making any acoustic reflex measurement and determine the acoustic reflex threshold before making a reflex decay measurement If Reflex Decay is performed as part of a sequence the following applies T...

Page 59: ...sting Starting the test 1 Press the Special button 2 Select Reflex Decay 3 The Reflex Decay view is shown and the preselected settings for reflex decay will light up on the buttons e g Contra 0 5 k Hz...

Page 60: ...est press the Start Stop button on the device or the Start Stop button on the probe control pad on the shoulder strap The test is stops and the pump pressure is relieved immediately Already measured r...

Page 61: ...button The results table is updated with the selected value 9 8 Manual Tympanometry In Manual Tympanometry you can control the pump pressure manually The default setup available in the tympanometry te...

Page 62: ...rement data in the tympanometric results table are calculated from the baseline reference data at 200 daPa The results table accordingly remains empty and the curve remains non baseline compensated un...

Page 63: ...m type is shown Deleting a curve Select the curve you wish to delete and press the Delete button To replace a single measurement delete a curve and adjust the measurement selections to redo the single...

Page 64: ...xample seen in excessively flaccid tympanic membranes This problem can usually be remedied by slightly offsetting the air pressure from the tympanometric peak pressure TPP In case of a negative TPP it...

Page 65: ...ause soft button to pause the test This can be usefulfor instance when recording acoustic reflexes using external stimuli for example electric stimulus during cochlear implant surgery 9 The measuremen...

Page 66: ...which the tube opens and closes are reported as test results Typically an initial build up of positive pressure will cause the Eustachian tube to open spontaneously To avoid premature spontaneous pre...

Page 67: ...he Eustachian tube briefly opens and closes You can adjust the time pressure markers manually if needed B ETF P graph The results table shows the Eustachian tube openings in daPa The pressure values d...

Page 68: ...pressure markers by using the dial Next Marker Press this soft button to cycle through the markers that can be shown per ear maximum eight markers Hide Marker Show Marker You can hide a half life tim...

Page 69: ...xamples Tympanometry and Reflex Screening Quick Check version A Starting and ending a session B Measurement selections and carrying out tests C Viewing test data D Editing results E Selecting other te...

Page 70: ...ctivate test functions Activate test functions Click to activate the test or test setting you wish to use The button turns yellow to indicate that the function is active Deactivate test functions Clic...

Page 71: ...bilize the tympanic membrane This may facilitate reflex recordings from ears that have steeply sloped tympanograms Set stimulus type Click the desired arrow to set the stimulus type Set stimulus level...

Page 72: ...uencies You can adjust any settings related to the tests included in the sequence You can choose if you want to start sequences or individual tests on the shoulder pad Screening sequence Tympanometry...

Page 73: ...ometric measurement and to start reflex tests additionally to present stimuli for manual reflex testing During a test click or press this button to stop the test Present stimulus manually Click to mak...

Page 74: ...nogram to display the entire curve When you change the ear or the patient the scale will revert to the default scale Selecting other test types 10 2 Shortcut keys General Function Shortcut Sequence pa...

Page 75: ...tralateral C Adjust pressure positive Shift Arrow up Adjust pressure negative Shift Arrow down 500 Hz 5 1000 Hz 1 2000 Hz 2 4000 Hz 4 Noise N Reflex Decay Function Shortcut Start measurement F5 Spaceb...

Page 76: ...g may be complicated by several factors which can result in leakage or probe problems Leakage possible causes The eartip does not fit well The eartip is not inserted properly in the ear canal The prob...

Page 77: ...ws a green background to the online values Probe leakage Stand alone If there is a probe leak during testing this will be shown on the Madsen Zodiac and Otosuite screens PC based If there is a probe l...

Page 78: ...37 1 Look into the ear canal Perform an otoscopy to assess the status of the outer ear before you insert the probe 2 If the ear canal is blocked this may affect the result of the test Clean the ear ca...

Page 79: ...the probe tip against theear canal wall A flat tympanogram together with an abnormally small ear canal volume ECV indicates that the probe is blocked A measurement will not auto start if the ear canal...

Page 80: ...on will remain until you remove the probe from the ear and try again Probe blocked Stand alone If the probe is blocked during testing this will be shown on the Madsen Zodiac and Otosuite screens PC ba...

Page 81: ...ar Canal Volume SA Static Admittance or SC Static Compliance when volume equivalent units are used TW Ratio Tympanometric Width Tympanometric Ratio Describes the steepness of the curve Type Jerger typ...

Page 82: ...screen descriptions You will find descriptions of the tests and screens and how to use and view them in Quick Check testing 89 Tympanometry testing 90 Reflex Threshold testing 95 Reflex Decay testing...

Page 83: ...op the sequence manually 2 If needed perform supplementary measurements You can supplement an interrupted sequence by deselecting the successful part and then restart the sequence testing 12 2 Quick C...

Page 84: ...ull the pinna upwards and back For infants and children pull the pinna down wards and back 6 Insert the probe in the patient s ear canal while twisting the probe gently When the probe is in place remo...

Page 85: ...ghts up in the ear color to indicate that it is activated Starting the test 1 Click the Tymp and Reflex Scr tab on the screen 1 Click the Tymp button on the control panel 2 Place the probe in the pati...

Page 86: ...new tympanometry sweep 1 To make a new sweep click the Start button If you wish to overwrite a tympanogram in the results table click to highlight the curve you wish to overwrite When you have finishe...

Page 87: ...measurement delete a curve and adjust the measurement selections to redo the single measurement Probe check the probe tone in Hz TPP Tympanometric Peak Pressure ECV Equivalent Ear Canal Volume SA Stat...

Page 88: ...eaching the warning limits it is recommended that you set the max intensity to 100 dB HL You can always supplement automatic reflex measurements with manual testing if needed Procedure Three result ro...

Page 89: ...ex Threshold testing see Manual Reflex Threshold testing 89 Automated Reflex Threshold testing see Automated Reflex Threshold testing91 Preparing for testing 1 Do as described in Preparing for testing...

Page 90: ...lick the Present button to present a single stimulus The deflection curve is plotted in real time 9 If needed repeat these steps until you have collected the desired measurements The baseline indicato...

Page 91: ...ements Click the applicable arrow button 7 Make sure that the settings options for the automated reflex sequence have been selected They include starting level increment size verification procedure an...

Page 92: ...onal setting The dashed horizontal line in the reflex graph indicates the predefined reflex criterion A Reflex Threshold deflection curves When you have finished testing one ear switch ears if needed...

Page 93: ...r move the jaws The patient must breathe calmly Physiological conditions Variations that are in synchrony with the patient s pulse In some patients superficial blood vessels may influence the measurem...

Page 94: ...ally suggests the stimulus level which is the reflex threshold level 10 dB In the following you will find the description for performing reflex decay testing as a single test This means that the seque...

Page 95: ...nd report such variations Zodiac Clinical only B Live baseline graph The primary tympanogram is shown in this view C Tympanogram Stopping the test The test stops automatically but can be stopped manua...

Page 96: ...settings and measurement results Probe tone in Hz Stimulus side Stimulus frequency Stimulus on stimulus off markers Decay data table Editing results If needed click and drag to adjust The stimulus on...

Page 97: ...Tymp tab on the screen 2 Place the probe in the patient s ear 3 Before you start the measurement adjust the starting pressure by using the slider below the graph 4 If needed click the checkbox to rese...

Page 98: ...The ear canal volume is shown to the right of the graph B Tympanometry graph 12 8 1 The Manual Tympanometry screen Manual Tymp Start recording of manual tympanometry Click to start recording Then use...

Page 99: ...he patient s pulse This phenomenon can be observed in some cases involving superficial blood vessels that influence the probe or the tympanic membrane The condition is sometimes observed as a pulsatil...

Page 100: ...aw 5 Click the Start Stop button to start recording 6 If needed press the P pressure offset button and simultaneously use thedial to adjust the pressure 7 If needed press the Pause soft button to paus...

Page 101: ...Admittance Recorder graph The live baseline graph shown in the right graph area C Live baseline graph The results table shows the results related to the currently selected curve Stimulus side Duratio...

Page 102: ...water which typically causes a functioning Eustachian tube to open Any pressure equalization through the tube will show as a sudden pressure drop toward but not necessarily reaching atmospheric pressu...

Page 103: ...how the pressure changes throughout the measurement as the Eustachian tube briefly opens and closes 12 10 1 The ETF P screen ETF P Set positive pressure daPa Click to set the positive target pressure...

Page 104: ...the graph You can drag the marker to adjust the position If needed click and drag to adjust 12 11 Tympanogram History Use the Tympanogram History functionality to combine tympanograms from previous an...

Page 105: ...screen Tymp History Select tympanograms from different sessions Drag and drop tympanograms from different test dates for display in the central view area The tympanograms illustrate changes over time...

Page 106: ...12 Testing with Zodiac Diagnostic or Clinical PC based 106 MADSEN Zodiac The Tympanogram History screen showing tympanograms selected for comparison...

Page 107: ...ng test results in Madsen Zodiac If you wish to perform these actions in Otosuite see the Otosuite User Guide or Otosuite Reference Manual Deleting measurements 1 You can delete a single measurement c...

Page 108: ...is equipped with a built in printer Printing from the built in printer 1 If the device is configured to print directly from the built in printer press the Report button to print the test results You...

Page 109: ...You can transfer data from Zodiac to Otosuite Report You can transfer data from Zodiac to a PC with Otosuite installed Transferring data to Otosuite If you need to change the patient in Otosuite while...

Page 110: ...diac 16 Printing test results from Otosuite Use the Otosuite print function to print a test report See the Otosuite User Guide Tympanometry Click the checkboxes in the View column to select or deselec...

Page 111: ...pment manufacturer or by service personnel at authorized workshops In case of any defects make a detailed description of the defect s and contact your Natus representative Do not use a defective devic...

Page 112: ...114 and Calibration 112 17 3 1 Calibration The device and the probes are delivered fully calibrated The device is calibrated from the factory in dB SPL or dB HL using the stated reference equivalent t...

Page 113: ...al Calibration Probe Admittance 3 Select the probe type you wish to calibrate Quick Check or Diagnostic 4 When the probe light indicator shows that the probe is active place the probe in the 0 5 cc te...

Page 114: ...t If needed use a screwdriver torque IP6 to carefully unscrew the screw fastening the dial Procedure 1 Clean the external surfaces of the device Remove dust using a soft brush Use a soft slightly damp...

Page 115: ...th a small amount of cleaning agent to clean the shoulder strap and control pad You can remove the shoulder strap from the control pad if you need to clean the shoulder strap more thoroughly 17 4 3 Cl...

Page 116: ...es Wipe the probe home with a disinfectant wipe such as Audio wipes Or use a damp lint free cloth with a small amount of the recommended cleaning agent Cleaning or replacing the probe tip If the probe...

Page 117: ...probe tip on the probe and twist the probe ring clockwise to lock the probe tip in place on the probe Probe check If you have fitted a new probe tip do a probe check See Probe check 32 17 4 4 Fitting...

Page 118: ...ationafter changing the probe tip See Probeadmittancecalibration 112 Probe check If you have fitted a new probe tip do a probe check See Probe check 32 17 4 5 Cleaning the test cavities If a test cavi...

Page 119: ...to prevent passing infection from one patient to another Disposable accessories should not be cleaned or re used Always throw away disposable accessories after use on a patient Eartips To prevent cro...

Page 120: ...y or on the order of a licensed healthcare practitioner N A N A Quantity Number of parts in a package Directive 2012 19 EU Waste Electrical and Electronic Equipment WEEE Disposal at end of operating l...

Page 121: ...es Symbols to be used with medical device labels labeling and information to be supplied Consult Instructions for Use Indicates the need for the user to consult the instructions for use IEC 60601 1 Re...

Page 122: ...ly exposed ISO 15223 1 2016 Reference no 5 3 9 ISO 7000 2621 Medical devices Symbols to be used with medical device labels labeling and information to be supplied Atmospheric pressure limitation To in...

Page 123: ...Do not disassemble the device Any service or repair must be completed by authorized personnel at an authorized repair site Use only the specified power supply Use only the specified USB cable Keep Mad...

Page 124: ...e patient Use suitable size eartips to avoid excessive force or unnecessary patient discomfort Clean the probe tip and probe ring and changing the eartip after testing an infected ear canal Use a clea...

Page 125: ...ions for performing Probe Admittance Calibration See the Zodiac Reference Manual The first time you power on the device leave it turned on for at least one hour to let the internal clock battery charg...

Page 126: ...ese regulations state that electrical and electronic waste must be separately collected for the proper treatment and recovery to ensure that WEEE is reused or recycled safely In line with that commitm...

Page 127: ...0 ml 15 The accuracy stated requires that calibration has been performed at the altitude where the device is to be put into operation Acoustic reflex Sensitivity Reflex Threshold and Reflex Decay 0 0...

Page 128: ...0 to 105 dB HL 3 dB 4000 Hz at 70 to 105 dB HL 3 dB For probe tones above 226 Hz artifacts may start to occur at levels above 105 dB HL THD 5 for levels below 110 dB HL 10 for levels above 110 dB HL R...

Page 129: ...aPa Min SA 5 error daPa Min SA 10 error daPa 50 daPa s 9 7 6 4 100 daPa s 17 14 11 8 200 daPa s 24 20 18 14 400 daPa s 38 31 31 23 600 daPa s 53 43 42 32 Broadband noise Contralateral TDH 39 headphone...

Page 130: ...level is indicated in dB HL Tolerance 5 dB Highpass noise Contralateral TDH 39 headphone Band limit 1600 Hz nominal 3 dB point Slope The slope is between 12 and 18 dB octave below 1600 Hz with an addi...

Page 131: ...ressure accuracy 10 or 10 daPa whichever is greatest For probe tones above 226 Hz and volumes below 0 7 cc additional 10 daPa can occur Pump measure direction Positive to negative or negative to posit...

Page 132: ...mho and ml changes The following table can be used to calculate the difference Altitude m Increase in mmho 0 0 500 6 1000 13 1500 20 2000 27 2500 36 3000 45 Storage and handling Temperature 20 C to 60...

Page 133: ...2015 Impedance Admittance EN 60645 5 2005 except clause 5 1 1 5 1 6 5 3 3 2 5 3 4 3 9 1 10 1 4 2 10 1 5 ANSI S3 39 1987 R2020 except clause 7 4 4 1 7 5 5 3 7 5 7 1 7 5 7 2 9 1 9 2 3 9 2 2 Clinical an...

Page 134: ...rlink 3B small bag of 50 pcs 80A4821100 Eartip Earlink 3C jumbo bag of 24 pcs 1 25 13903 1078 Foam Tips Mixed Bag Headset Insert earphone 8 75 85400 1096 Insert Phone 8 75 85300 TDH 39 Contra Phone Gr...

Page 135: ...pplies buildings used for domestic purposes Harmonic emissionsIEC 61000 3 2 Not applicable Voltage fluctuations flicker emissionsIEC 61000 3 3 Not applicable Guidanceand manufacturer sdeclaration elec...

Page 136: ...er sdeclaration electromagnetic immunity for equipment and systemswithin Professional Healthcareuseenvironment Madsen Zodiac is intended for use in the electromagnetic environment specified below The...

Page 137: ...tromagnetic environment guidance Electrostatic discharge ESD IEC 61000 4 2 6kV contact 8kV air 6kV contact 8kV air Floorsshould be wood concrete or ceramic tile If floors are covered with synthetic ma...

Page 138: ...for 80MHzto 800MHz d 2 3 for 80MHzto 2 5GHz where P is the maximum output power rating of the transmitter in watts W according to the transmitter manufacturer and d is the recommended separation dista...

Page 139: ...at a maximum output power not listed above the recommended separation distance d in meters m can be estimated using the equation applicable to the frequency of the transmitter where P is the maximum o...

Page 140: ...ning acoustic energy can be measured at the probe depending on the amount of air pressure or muscle activity applied The maximum acoustic energy admittance the point at which the most acoustic energy...

Page 141: ...e infant s middle ear and influence tympanometry e g size increase of the external ear middle ear cavity and mastoid a change in the orientation of the tympanic membrane fusion of the tympanic ring a...

Page 142: ...half the height of the curve SA 2 TW is measured in daPa in accordance with the illustration Y Admittance X Pressure Equivalent Ear Canal Volume ECV Equivalent Ear Canal Volume ECV is measured as the...

Page 143: ...uite normal even with a fully functioning Eustachian tube A successful equalization of negative pressure will displace the tympanometric peak in a positive direction in the tympanogram It is less comm...

Page 144: ...mpanometric peak data is available The tympanometric peak data is probe tone specific In case of baseline instability due to a hyper flaccid eardrum a pressure offset of 20 30 daPa in the same directi...

Page 145: ...ed by 50 of the initial magnitude The point in time after stimulus onset when the 50 criterion is reached is referred to as half life time and is reported as the test result A half life time less than...

Page 146: ...speed should be kept at a maximum of 50 daPa s The pressure range available for positive and negative pressures including 400 daPa and 600 daPa is commonly used in ETF P testing App 1 5 Susceptance an...

Page 147: ...probe tone is admitted into the middle ear At high pressures we only measure the Susceptance of the air that is enclosed between the probe tip and the tympanic membrane resulting in the ear canal Susc...

Page 148: ...ng the extreme point where the ear canal admittance is determined Using higher frequency probe tones The covariation between Susceptance and Conductance is no longer true when the probe tone frequency...

Page 149: ...149 MADSEN Zodiac...

Reviews: