background image

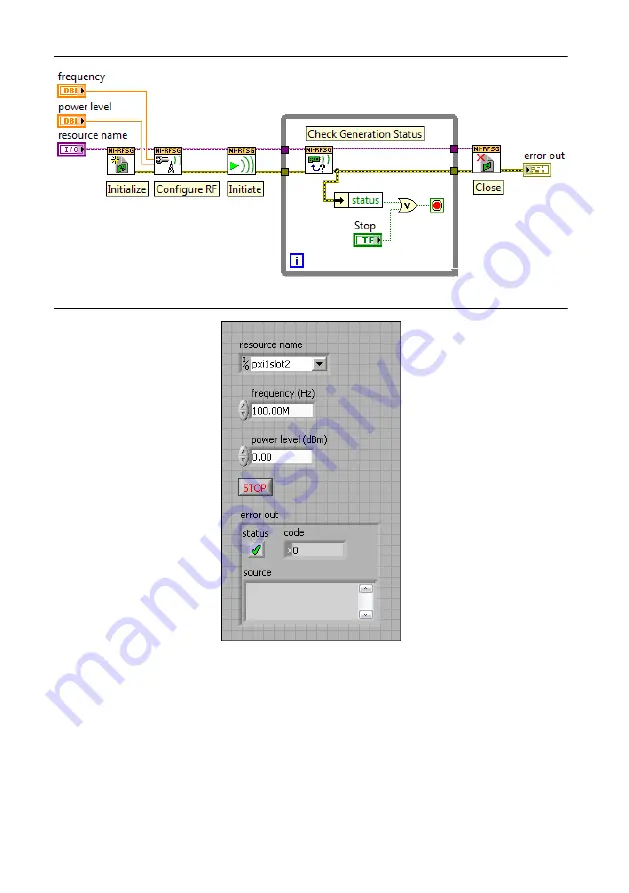
Figure 9.

 Basic Sine Wave Generation VI Block Diagram

Figure 10.

 Basic Sine Wave Generation VI Front Panel

3.

Open the VI front panel, and select the NI 5650/5651/5652 module name specified in
MAX in the 

resource name

 control.

4.

Click the 

Run

 button on the toolbar to initiate sine wave generation.

5.

Click the VI front panel 

STOP

 button to stop sine wave generation.

You have successfully generated a continuous sine wave signal using the NI-RFSG instrument
driver and the NI 5650/5651/5652.

NI PXIe-5650/5651/5652 Getting Started Guide

  | 

© National Instruments

  | 

15

Summary of Contents for PXIe-5650

Page 1: ...ation The specifications document for your device is installed with the driver software Refer to ni com manuals for the most recent specifications for your device Caution The protection provided by th...

Page 2: ...terference with radio and television reception and prevent unacceptable performance degradation install and use this product in strict accordance with the instructions in the product documentation Fur...

Page 3: ...NI PXIe 5650 5651 5652 RF Signal Generator Module 2 Screwdriver Part Number 772006 01 3 Driver Software DVD 4 NI PXIe 5650 5651 5652 Getting Started Guide this document 5 Read Me First Safety and Ele...

Page 4: ...it to service Note Refer to the NI PXIe 5650 5651 5652 Specifications at ni com manuals for complete specifications Installing the Software You must be an Administrator to install NI software on your...

Page 5: ...ll a module if the backplane is damaged 4 Remove the black plastic connectors from all the captive screws on the module front panel 5 Identify a supported slot in the chassis The following figure show...

Page 6: ...the Software on page 4 Installing the SMA Cables To use the NI 5650 5651 5652 with other devices you must make connections using SMA cables For best results when connecting signals to the NI 5650 5651...

Page 7: ...5651 5652 is a precision RF instrument that is sensitive to ESD and transients Ensure you take the following precautions when making direct connections to the NI 5650 5651 5652 to avoid damaging the d...

Page 8: ...S ACTIVE Table 1 Device Front Panel Icon Definitions Refer to the user documentation for required maintenance measures to ensure user safety and or preserve the specified EMC performance If this devic...

Page 9: ...ower rail AMBER The module is being accessed Accessed means that the device setup registers are being written to in order to control the device GREEN The module is ready to be programmed by NI RFSG AC...

Page 10: ...ce is still not listed power off the system ensure the device is correctly installed and restart 4 Record the device identifier MAX assigns to the hardware Use this identifier when programming the NI...

Page 11: ...n in Microsoft Visual C C Related Information For detailed instructions about how to generate signals in a specific ADE refer to the Getting Started section of the NI RF Signal Generators Help Refer t...

Page 12: ...RFSG SFP generates an error During signal generation the ACTIVE LED on the NI 5650 5651 5652 hardware module illuminates 5 Click RF On Off to stop signal generation Building a Basic NI RFSG Applicati...

Page 13: ...VI front panel power level dBm control enter 0 In the frequency Hz control enter 100M 100 MHz 12 In the VI front panel resource name control enter the NI 5650 5651 5652 device name that you specified...

Page 14: ...t of the status element to an input of the Or function 9 Right click the unused input of the Or function and select Create Control to create a Boolean control 10 In the VI front panel right click the...

Page 15: ...pecified in MAX in the resource name control 4 Click the Run button on the toolbar to initiate sine wave generation 5 Click the VI front panel STOP button to stop sine wave generation You have success...

Page 16: ...not reinstall a damaged device 4 Reinstall the module in a different chassis slot 5 Power on the chassis 6 Verify that the device appears in MAX 7 Reset the device in MAX and perform a self test What...

Page 17: ...ht click PCI to PCI Bridge and select Properties from the shortcut menu to verify that the bridge is enabled What Should I Do if the Module Fails the Self Test 1 Restart the system 2 Launch MAX and pe...

Page 18: ...software EXPLORE LEARN CREATE DISCOVER RF Solutions ni com rf Services ni com services NI Community ni com community Located at ni com gettingstarted Located at ni com manuals Located using the NI Exa...

Page 19: ...product supports calibration you can obtain the calibration certificate for your product at ni com calibration National Instruments corporate headquarters is located at 11500 North Mopac Expressway A...

Page 20: ...and third party legal notices in the readme file for your NI product Refer to the Export Compliance Information at ni com legal export compliance for the National Instruments global trade compliance p...

Reviews: