


04
19
19
DVD/VCD/MP4
04
22
DVD/VCD/MP4
ANGLE 1
ANGLE 2
ANGLE 3......
Changing the viewing angle
(Multi-angle)
With DVDs featuring multi-angle (scenes
shot from multiple angles) recordings, you
can press
ANGLE
to switch among vie-
wing angles during playback.
Selection options switch as follows:
* This function is operated by using
remote
control.
the
* This function only operates with DVDs featu-
ring multi-angle recordings.
* The
mark on a DVD's package indic-
ates it features multi-angle scenes.
The number in the
mark indicates the
number of angles from which scenes were shot.
* It is invalid to pressing ANGLE during fast
forward/fast reverse or pause.
3
7
Notes:
3
Selecting Channel
During VCD status, repeatedly press
AUDIO button to select the following
channel:
6
Stereo
Mono Left
Mono Right
Selecting the corresponding channel to set
the different sound characters.
This function is operated by using the remote
control only.
Note:
*
Program Playing
During VCD mode, press
PROG
, the
TFT displays the program menu. Press
NUMBER BUTTONS
to select the track
Number and then press to move the cursor
to
START
, press
ENTER
to start program
playing; move the cursor to EXIT and press
ENTER to exit the program playing. Move
the cursor to and press ENTER to the
previous page; move the cursor to and
press ENTER to the next page.
During this process, press to cancel
the program playing.
13
18
The function is only valid on remote control.
Note:
*
27
* Press CLEAR to clear the mistake input.
22
*
Playing PBC (Menu)
During
VCD status, first press
TITLE
,
PBC playback starts and
the menu of entire
disc
appears on the monitor, and then you
can select your favorite track by using
Number Buttons
. When a track is playing,
you can
to return to
if you would like to end the track and
select others. To cancel PBC playing, press
button again.
press
MENU
the
menu
TITLE
4
23
3
This function is operated by using the remote
control.
Note:
*
PBC
playing confirms to version 2.0 of VCD
and SVCD disc only.
3
--General Setup Page--
SPDIF
Example showing how to set captions on/off:
(Press
(Press , or , then press ENTER)
--General Setup Page--
Tv Display
Angle Mark
Osd Lang
Spdif Output
Screen Saver
Wide
On
Eng
On
Go To General Setup Page
--General Setup Page--
Tv Display
Angle Mark
Osd Lang
Spdif Output
Wide
On
Eng
Screen Saver
On
SPDIF
Spdif/Raw
Spdif Off
Logo Type
Def
Screen Saver
Example showing how to set Screen Saver on/off:
(Press
(Press , or , then press ENTER)
--General Setup Page--
Tv Display
Angle Mark
Osd Lang
Spdif Output
Screen Saver
Wide
On
Eng
On
Go To General Setup Page
--General Setup Page--
Tv Display
Angle Mark
Osd Lang
Spdif Output
Screen Saver
Wide
On
Eng
On
Screen Saver
On
Off
Logo Type
Def
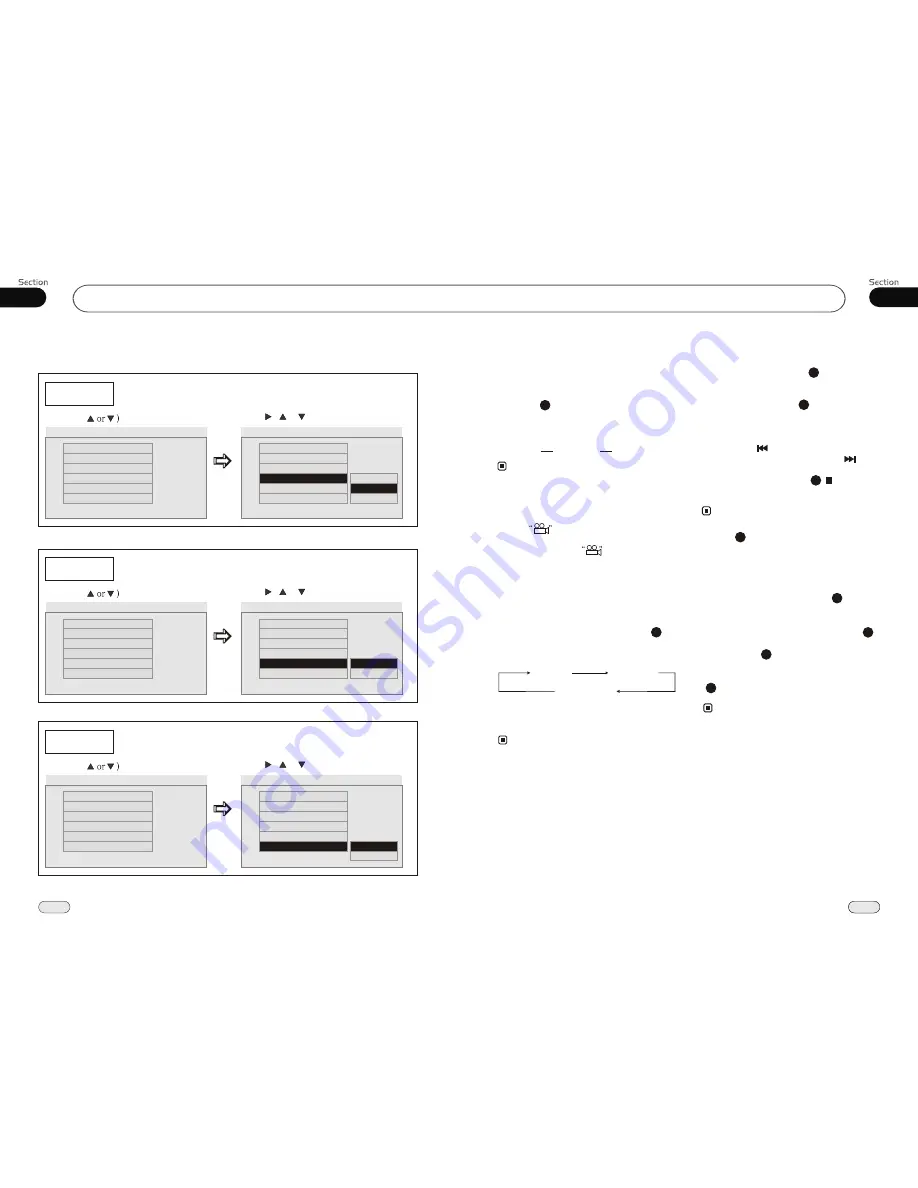
Logo Type
Example showing how to set Logo Type:
(Press
(Press , or , then press ENTER)
--General Setup Page--
Tv Display
Angle Mark
Osd Lang
Spdif Output
Screen Saver
Wide
On
Eng
On
Go To General Setup Page
--General Setup Page--
Tv Display
Angle Mark
Osd Lang
Spdif Output
Screen Saver
Wide
On
Eng
On
Logo Type
Default
Captured
Logo Type
Def
Logo Type
Def
Logo Type
Def
Logo Type
Def
Spdif/Pcm


