background image

04

20

DVD/VCD/MP4

04

21

DVD/VCD/MP4

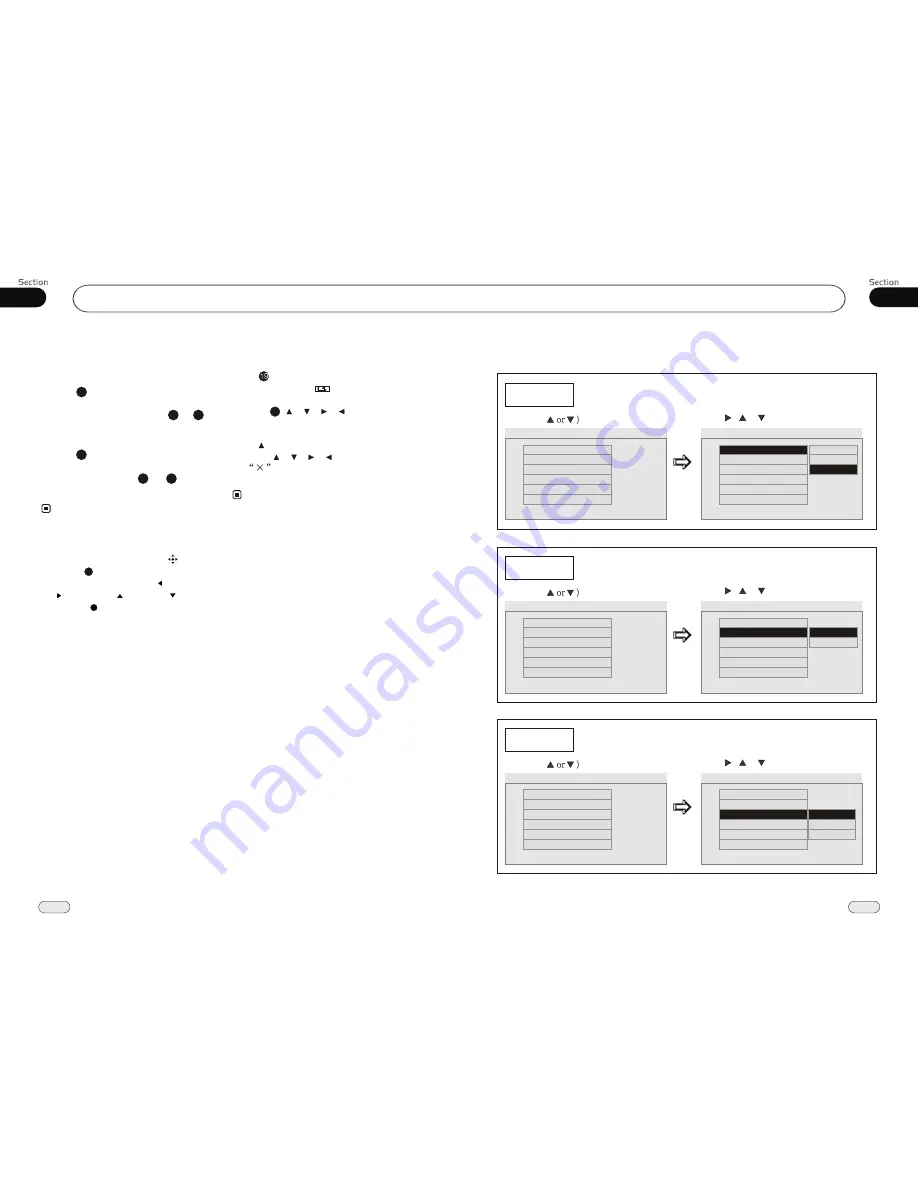
Example showing how to set picture mode:

(Press

(Press      ,      or     , then press ENTER)

Captions 

OSD Lang

Osd  Lang

Angle Mark

Tv Display

--General Setup Page--

(Press      ,      or     , then press ENTER)

(Press

Example showing how to set TV Display mode:

Tv Display

--General Setup Page--

--General Setup Page--

TV Display

Example showing how to set language mode:

(Press

(Press      ,      or     , then press ENTER)

Screen Saver

Captions 

TV Display
Angle Mark

OSD Lang

On 

Eng 

Off 
On 

Set OSD Language

Angle Mark

Osd  Lang
Spdif Output
Screen Saver

Wide 
On 
Eng 

On 

Logo Type

Def 

Tv Display

Spdif Output
Screen Saver

Wide 

On 
Eng 

On 
Def 

Logo Type

Normal/PS
Normal/LB

Wide 

--General Setup Page--

Angle Mark

Tv Display
Angle Mark

Osd  Lang
Spdif Output
Screen Saver

Wide 
On 
Eng 

On 

Logo Type

Def 

--General Setup Page--

Angle Mark

Screen Saver

Wide 

On 

Eng 

On 

Logo Type

Def 

--General Setup Page--

Tv Display

Osd  Lang
Spdif Output 

On 

Off 

OSD Lang

Tv Display

Wide 

Angle Mark

On 

Osd  Lang

Eng 

Spdif Output
Screen Saver

On 

Logo Type

Def 

--General Setup Page--

--General Setup Page--

Wide 

Tv Display

Logo Type

Def 

Go To General Setup Page

Set TV Display mode

Go To General Setup Page

Set Angle Mark

Go To General Setup Page

Set OSD Language

Logo Type

Def 

Angle Mark

On 

Osd  Lang

Eng 

Spdif Output
Screen Saver

On 

English  

English

Spanish
Portuguese

27

Press      SETUP on remote control or MENU 
on the main unit or        in the monitor, main 
menu and sub-menu will appear on TFT,
pressing     [    ][    ][    ][    ] on the remote 
control to select your desired items, then 
press ENTER.

*   The selections are the preferred options that 
     will be chosen if they are available on a disc. 
     If the disc that is inserted does not have the 
     preferred option then the discs own prefer-
     ence will be used.       
*   Regarding 

SETUP MENU

, please refer to 

     the following pages for more details. 
*   Some functions varies depending on the types 
     of models or formats of the disc. 

DVD SETUP MENU

      Notes:

Press    to the pervious one, press SETUP 
or press [    ][    ][    ][    ] to move the cursor
on

, then press ENTER to exit the 

menu setup.

*   To touch the screen to select menu, touch it
     again to select the item.

Selecting MENU

Selecting Menu: 

During DVD status, 

press      

MENU 

to return to the root 

menu, all of the chapters will appear 
on monitor. You can press      or     
button to select your desired chapter.

4

27

23

Selecting Title: 

During DVD status, 

press     

TITLE 

to return the title menu, 

all of the titles will appear on monitor. 
You also can press        or       button to 
select your desired chapter.

3

1

2

Under DVD menu, touch the screen to select
items.

Note:

*

27

23

If the touch menu options invalid or the disc
does not support touch-TITLE,      that is the
same as     bottons on the remote control will
display on the screen. Press      to left, press 
     to right, press     to up, press     to down 
and press     to ENTER.

*

27

Summary of Contents for NPL-TV 7874 DIGITAL

Page 1: ...serial number RES AV IN NAVI RADIO SRC MUTE PWR NPL TV 7874 DIGITAL...

Page 2: ...ting Tracks Fast 16 Number Buttons 16 Pause the Playback 16 Stop the Playback 16 Play tracks at Random 17 Repeat Playing 17 Skip backward forward F F F REW the Playback 17 System Switch 17 Slow Motion...

Page 3: ...nu 37 TV 10 IPOD Play Selecting Tracks Fast Playing Track F F F REW Repeat Playing Playing Tracks at Random Pause the Playback 35 35 35 35 35 35 File Selector 36 Eject IPOD 36 9 IPOD 11 38 Additional...

Page 4: ...buttons provided for the main unit To nstall the unit in an apt pl ace lest the driver distrack his attention from please i Using the unit after starting the engine otherwise the electric energy of b...

Page 5: ...ave a sticky residue while beginning to peel off Shown as the picture Clean the discs with an optional clean ing cloth Wipe each disc from the center out Shown as the picture PRECAUTIONS This unit can...

Page 6: ...ward or fast rewind Press it again or press ENTER to resume to play normally Playing Track F F F REW 20 Repeat Playing During playback press Press it again to cancel this function RPT to track repeat...

Page 7: ...lay To select music fast press to play the previous track press to play the next one Pause play press to pause play Stop play press to stop play and press the PLAYto play the current track again 21 17...

Page 8: ...th Connection and Disconnection When established bluetooth connection between this unit and the cellphone bluetooth icon on the display appears in red Press PAIR to turn off bluetooth con nection and...

Page 9: ...ace 28 2 Dail lastphone answeraphone 3 Hangup refuseaphone 4 NumberShow PAIR 5 6 ACH audiochange C clear 8 POWER 7 Press it to turn on or turn off the bluetooth function 1 To input the phone number Nu...

Page 10: ...ull screen Click it to enter front AUX IN Click it to enter VIDEO setup menu Display Click it to enter SOURCE menu Click it to enter rear AUX IN AUX IN IPOD USB MAIN SOCKET Wiring Connection FAN A B 1...

Page 11: ...up to 6 stations for each band 4 23 Clicking AMS on the screen performs the same function Reset the Unit Operating the unit for the first time or after replacing the car battery you must reset the un...

Page 12: ...MHz 87 50 MHz 107 12 MHz 3 FM2 AM2 AM1 FM3 FM1 FM4 Russia Mode Selector Briefly pressing SRC on the main unit also performs the same function Note Repeatedly briefly press SOURCE button to select the...

Page 13: ...to the default setting Click to go back to the SOURCE menu to go back to the previous menu click During CD status press OSD button the display shows Single elapsed Single remain Note This function is...

Page 14: ...ng navigate mode when set OFF heard during any mode when set ON If GPS voice reported incomplete please adjust the volume of the map Note Selecting Track 2 This function is operated by using the remot...

Page 15: ...e below Click VERSION to display the information of current version different models show different data at different times Pressing RESET will be prompted to reset pressing CONFIRM can be reset to fa...

Page 16: ...9 9 7 7 8 8 3 3 4 4 5 5 6 6 2 2 1 1 7 7 8 8 9 9 10 10 10 10 Full screen Number keys Click it to go back to root menu Click it to enter DVD setup menu Click it to enter VIDEO setup menu Fast reverse Fa...

Page 17: ...to PAL or NTSC or AUTO system System Switch NTSC PAL AUTO Note On Screen Display During DVD status press OSD button the display shows 8 Title Elapsed Chapter Elapsed Chapter Remain Title Remain Displ...

Page 18: ...io recordings The number in the mark on a DVD s package indicates the number of recorded languages audio systems 2 Note 6 Changing the subtitle language Multi subtitle With DVDs featuring multi subtit...

Page 19: ...ion is only valid on remote control Note 27 Press CLEAR to clear the mistake input 22 Playing PBC Menu During VCD status first press TITLE PBC playback starts and the menu of entire disc appears on th...

Page 20: ...Press SETUP on remote control or MENU on the main unit or in the monitor main menu and sub menu will appear on TFT pressing on the remote control to select your desired items then press ENTER The sel...

Reviews: