


02
12
Common Operations
29
06
Tuner
Listening to the radio
LOC
pears on the display and only
local
tion is available. when it disappears
b
ap
sta
oth distance and local stations can be
received.
DX/LOC Selector
During radio status, press LOC button
to select
or weak station reception.
strong
5
The function is only valid on remote control.
The function is invalid in AM tuning.
Note:
*
*
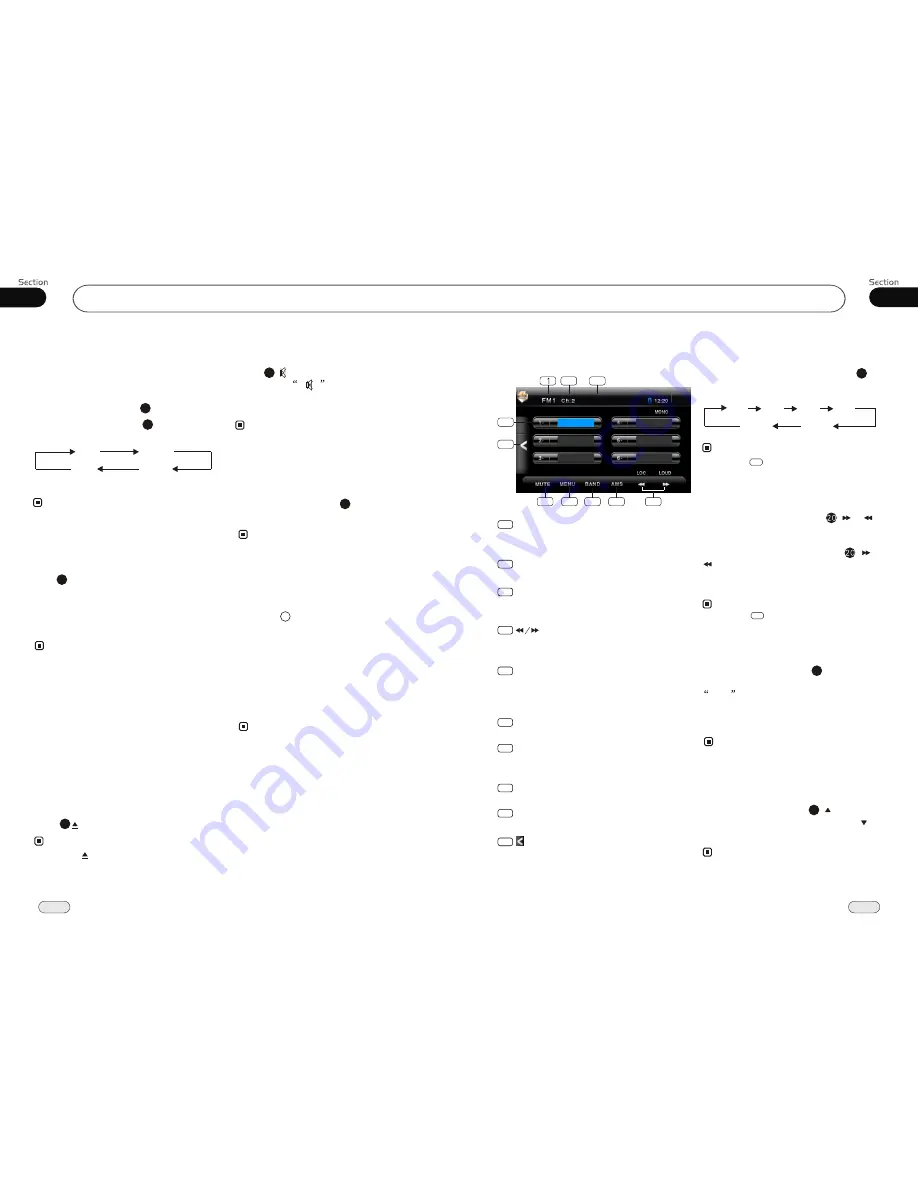
Band Indicator
Shows which band the radio is tuned
to.
1
Preset Number Indicator
Shows what preset has been selected.
2
Shows which frequency the tuner is
tuned.
Frequency Indicator
3
Briefly press to tune by the presettable
range, press and hold to tune automatically.
4
5
6
BAND
To select the bands.
7
AMS
Briefly press to scan the current station,
press and hold to tune automatically.
8
MENU
Press it to enter the MAIN MENU.
9
MUTE
Press this button to be silent.
The 6 stations of the current band.
Briefly press to select station, press and
hold to save the current station to one
of the 6 stations.
Selecting the Stored Station
During radio status, press button to
select the stored station upward, press to
select downward.
the stored station
27
Note:
The function is only valid on remote control.
*
Note:
* Clicking on the screen performs the
same function.
During radio status, repeatedly press
BAND button to select bands in
lowing order:
the
fol
Band Selector
3
(For Two Bands)
6
Manual/Automatic Tuning
Manual Tuning:
Briefly press
(
button on the remote control to select the
different bands.
or
)
Automatic Tuning:
ress
and
)
button the radio
a station
or
respectively
and plays when it finds a station.
P
hold (
or
automatically searches
downward
upward
Note:
10
Press this button to go back to the
SOURCE menu.
* Clicking on the screen performs the
same function.
4
2
4
6
7
8
9
5
10
106.10 MHz
107.90 MHz
87.50 MHz
98.10 MHz
90.10 MHz
87.50 MHz
107.12 MHz
3
FM2
AM2
AM1
FM3
FM1
FM4
(Russia)
Mode Selector
* Briefly pressing SRC on the main unit also
performs the same function.
Note:
Repeatedly briefly press
SOURCE
button to select the different modes available.
1
Receptor on the main unit for the card
remote control.
Infrared Sensor:
2
Press
button to shut off
sound
output. And
appears on the LCD.
Press it again to resume to previous volume
level.
the
Mute Function
Pressing MUTE on the main unit also performs
the same function.
12
Note:
*
EQ Setting
Repeatedly press and hold
button to
choose the following modes
turn:
EQ
in
While listening to the popular music, classic
music or rock music, you
select the
corresponding modes to adjust the sound
quality
ing
EQ
button.
can
perfectly by us
3
Note:
26
The default setting is OFF.
26
ROCK
CLASS
POP
OFF
* Setting EQ on the AUDIO SETUP menu also
performs the same function.
Turning Loudness On/Off
Press
activate loud func-
tion. You can
this button to increase
the low
quency, which can improve sen-
si
ty for
ears. Press it again to quit
this function.
LOUD
button
press
fre
tivi
your
25
Note:
Eject a Disc
Press button to eject or insert a disc.
Note:
* Pressing on the main unit also performs the
same function.
* This function is only valid on remote control
.
Briefly press DISP to enter the screen
protection, do it again to back to previous
status.
Screen Display:
* When the unit is in black screen, touching the
screen also performs the same function.
Note:
Insert an SD Card
Common SD Card: insert a common SD
card into SD CARD slot and the programs
in the card will be played.
24
Except for navigation, press NAVI on the
main unit to activate the double function,
means that the current radio or playing is on,
press NAVI to switch to navigation status.
Press it again to shut this function, back to
the previous status.
Double Function
Navigation SD Card: insert a navigation
SD card (is loaded with the navigation map
into the SD card ) into GPS CARD slot,
otherwise this unit's NAVI does not work.


