background image

© by N&W GLOBAL VENDING SpA

26

02-2007 266 00

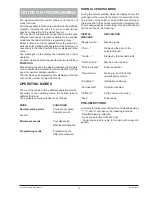
The integrity of the machine and compliance with the
standards of the relevant systems must be checked at
least once a year by qualified personnel.

Before starting any maintenance operations requiring
parts of the unit to be removed, the machine must
always be switched off.

The operations described below must be carried out
only by personnel who have the specific knowledge of
the machine functioning from a point of view of elec-
trical safety and health regulations.

INTRODUCTION

To ensure correct operation for a long period, the machine
must be subjected to regular maintenance.
The following sections contain the procedures and the
maintenance schedule, which are only a general indica-
tion, as they greatly depend on the operating conditions
(e.g. water hardness, environmental humidity and tem-
perature, type of product used, etc.).
The procedures described in this chapter are not exhaus-
tive of all maintenance operations to be carried out.
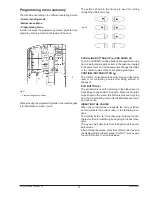
More complex operations (e.g. boiler descaling) should be
carried out by qualified technicians only having specific
knowledge of the machine.
To prevent oxidation or the action of chemical agents, the
stainless steel and varnished surfaces should be kept
clean by using mild detergents (solvents must not be
used).

Under no circumstances should water jets be used to
clean the machine.

ESPRESSO UNIT MAINTENANCE

Every 10,000 selections or every 6 months some mainte-
nance of the coffee unit must be carried out.
Maintenance is carried out as follows:
- remove the boiler Teflon hose connection from the upper

piston, paying attention not to lose the seal (see fig. 23);

- undo the knob securing the unit to the bracket;

- remove the coffee unit.

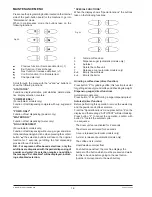
Removing the upper filter

- Take the snap ring out of its seat
- Remove the piston from the crosspiece
- Remove the filter and the piston seal

Chapter 3

MAINTENANCE

Removing the lower filter

- Open the two half-shells to access the internal brewing

chamber

- Extract the brewing chamber and remove the lower piston

snap ring.

- Take the piston out of brewing chamber and remove the

filter.

Soak all components removed from the unit in a solution of
boiling hot water and coffee machine detergent for approx.
20 minutes.
Thoroughly rinse and dry all parts, then reinstall them in the
reverse order of disassembly, taking particular care in:
- matching the two reference notches and inserting the

coffee unit;

- checking the efficiency of the seals, lubricating them with

food-safe grease.

Important notice!!!

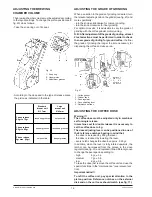
During reassembly, check that the handle pin of the
ratiomotor is correctly engaged in its seat.

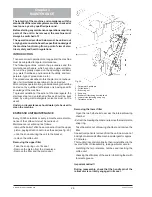
Fig. 26

1 - Ratiomotor handle pin
2 - Coffee funnel
3 - Brass ring nut
4 - Snap ring
5 - Brewer unit fastening knurled knob
6 - Lower piston fastening snap ring
7 - Reference notches

Summary of Contents for Colibri UL 120V

Page 1: ...USE AND INSTALLATION MANUAL DOC NO H 266U00 EDITION 1 02 2007 EN English Colibr Espresso semi automatic automatic UL 120V...

Page 2: ......

Page 3: ...e identificaci n resulta conforme a las disposiciones legislativas de las directivas 98 37 CE 89 336 73 23 CEE y modificaciones y integraciones sucesivas Declara que o distribuidor descrita na chapa d...

Page 4: ......

Page 5: ...ROL PAGE 15 IDENTIFICATION OF THE BREWER UNIT PAGE 15 ADJUSTING THE BREWING CHAMBER VOLUME PAGE 16 ADJUSTING THE GRADE OF GRINDING PAGE 16 ADJUSTING THE COFFEE DOSE PAGE 16 NOTES ON PROGRAMMING PAGE 1...

Page 6: ...tarting installation and using the machine it is first necessary to carefully read and understand the instruc tions contained in this manual as they offer important information on installation safety...

Page 7: ...andards in force The machine is sold without payment system therefore the installer of such system has sole responsibility for any damagetothemachineortothingsandpersonscausedby faulty installation Th...

Page 8: ...only with water supply from the mains Overflow solenoid valve only with water supply from the mains Timer protection for Pump Coffee unit ratiomotor Coffee grinder Overheating protection for Doser un...

Page 9: ...rotation lightly lubricate the inside of the lock with a spray insert the current change key black and rotate to the change position reference notch at 120 remove the current change key and insert th...

Page 10: ...remove any bacteria which might have formed during storage It is advisable that specific sanitising products are used for cleaning also the surfaces which are not directly in contact with foodstuff So...

Page 11: ...lay 6 Selection button 7 Prearrangement for front validator 8 Prearrangement for cashless payment systems NOISE LEVEL The continuous weighted equivalent acoustic pressure level is below 70 dB LOADING...

Page 12: ...machine and the quality of the inlet water the mixers and the dispensing conduits must be thoroughly sanitised cleaned and disinfected to guarantee proper hygiene of the dispensed products The parts t...

Page 13: ...h a water tank inside the base cabinet such tank must be sanitised at least once a week with the sanitising products used for the mixers PERIODIC CLEANING OF THE COFFEE UNIT Every time coffee is refil...

Page 14: ...ay removed the machine is still available for instant drink selections but indicating the message Insert waste tray on the display The selection counters are reset with the door closed doing as follow...

Page 15: ...the only parts that stay energised are those protected by covers and carrying aplatewiththewarning Disconnectthepowerbefore removing the protective cover Beforeremovingsuchcoversdisconnectthemachine...

Page 16: ...e machine on WATER SOFTENER UNIT The machine is sold without water softener Shouldthewaterbeveryhard awatersoftenerunitcanbe installed The water softener available as accessory must be replaced or reg...

Page 17: ...e housed inside the base cabinet FILLING THE WATER SYSTEM When the machine is switched on the conditions of the following are checked air break full or empty pump priming and boiler When pressing twic...

Page 18: ...operatesuntilfillingthecoffeedoserchamber When the doser is full the ground coffee dose is released into the coffee brewer unit The grinder starts for a second grinding cycle and the dose is released...

Page 19: ...ndard settings assign the same price expressed in number of basic coins to all selections WATER TEMPERATURE CONTROL The boiler temperature is controlled by the software 92 C by default and can be adju...

Page 20: ...single release In machines set for double release it is necessary to set the coffee dose to 6 g The dose adjusting lever can be positioned in one of the 6 reference notches bearing in mind that the do...

Page 21: ...de the buttons take on different functions The available operating modes are as follows MODE FUNCTIONS Normal vending mode Coins are accepted Products are dis pensed Maintenance mode Test dispensing M...

Page 22: ...a selection requires no addition themessage Sel disabled willbedisplayed indicat ing a disabled selection SPECIAL FUNCTIONS When the display shows Special functions the buttons take on the following...

Page 23: ...DISPLAYING THE STATISTICS Press button when the display indicates the Display statistics function then the stored data will be shown on the screen and more precisely counter by single selection counte...

Page 24: ...se for heating Pre grinding Setting the option of pre grinding Set Temperature Setting the boiler temperature Display pre sel Setting the pre selection on the display semiautomatic models only Syrup p...

Page 25: ...in the tank falls to below approximately 300 cc CUP FAILURE for automatic models only When the empty cup column micro switch opens the column shift motor is activated If after one full turn the micro...

Page 26: ...abled ON to disabled OFF Press again the confirm button to display the price number referred to in the 8 programmed prices When pressing the change button this value will start blinking and can be mod...

Page 27: ...among the coins recognised by the validator are to be accepted when the machine is in the exact amount condition Check the coin mechanism configuration for the correct coin to value matching Accepted...

Page 28: ...lock counter N B The counters are set to zero by default Withthecounterssettozero thisfunctionisdisabled SETTING THE PROMOTIONAL MESSAGE When this menu is displayed press the confirm button todisplay...

Page 29: ...in the time band for vending at differentiated prices Thefunctionisactiveifthestarttimeandtheendtimewere set for the time band CONSECUTIVE SELECTIONS It is possible to set the number of consecutive se...

Page 30: ...s must not be used Under no circumstances should water jets be used to clean the machine ESPRESSO UNIT MAINTENANCE Every 10 000 selections or every 6 months some mainte nance of the coffee unit must b...

Page 31: ...uld be repeated CLEANING THE PRODUCT CONTAINERS Remove the containers from the machine undotheproductportsandslideouttheaugersfromback of the container clean all parts in a solution of hot water and c...

Page 32: ...s that the microprocessor is working correctly the red LED indicates the operating status of the boiler heating element RELAY CARDS The 2 relay card is controlled by the actuation board and controls s...

Page 33: ...TON BOARD This board controls the alphanumeric display the selec tion buttons and the programming button see fig 30 It supports the coin mechanism connectors as well as the printer port Fig 29 1 Power...

Page 34: ...SEMI AUTOMATIC MODEL HYDRAULIC SYSTEM AUTOMATIC MODEL 1 Water inlet solenoid valve 2 Air break 3 Volumetric counter 4 Pump 5 By pass 6 Boiler 7 Espresso unit 1 Water inlet solenoid valve 2 Air break 3...

Page 35: ...lue of the corresponding functions CONFIRM ENTER BUTTON The confirm enter button is used for moving to the lower level or for confirming a value after being entered or changed EXIT BUTTON The exit but...

Page 36: ...ic N 2 Sel 1 P XXXXX Sel 1 F XXXXX Sel 1 T XXXXX Sel 1 D XXXXX Sel 8 P XXXXX Statistic N 3 Failure 1 XXX Failure 15 XXX Statistic N 4 Price 1 XXX Price 8 XXX Print statistics P paid dispensing F free...

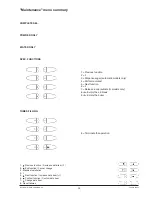
Page 37: ...em 1 6 Confirm function Confirm data item 7 Change data item 8 Reset failures Maintenance menu summary COMPLETE SEL POWDER ONLY WATER ONLY SPEC FUNCTIONS 1 Previous function 2 3 Dispense sugar automat...

Page 38: ...r leak or Cup failure automatic models only 7 Impeller failure 8 Coffee unit 9 Coffee failure 10 Coffee release 11 Waste container 12 Water failure 13 Changer MDB 14 Bill validator MDB 15 Cashless MDB...

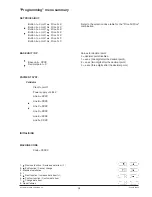
Page 39: ...N X Button 4 on off Price N X Button 5 on off Price N X Button 7 on off Price N X Button 8 on off Price N X BASE UNIT DP Base unit XXXX Decimal point X PAYMENT SYST Validator Credit on off Power suppl...

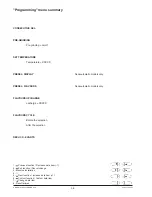
Page 40: ...data item 1 6 Confirm function Confirm data item 7 Change data item 8 Reset failures Programming menu summary MACHINE CONFIG Tank on off Equipped cabinet on off Fast cycles on off Coffee grounds tray...

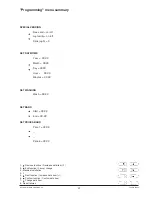
Page 41: ...tion Increase data item 1 6 Confirm function Confirm data item 7 Change data item 8 Reset failures Programming menu summary SPECIAL VENDING Free vend on off Jug facility on off Drink jug N X SET DATE...

Page 42: ...tem 1 6 Confirm function Confirm data item 7 Change data item 8 Reset failures CONSECUTIVE SEL PRE GRINDING Pre grinding on off SET TEMPERATURE Temperature XXXXX PRESEL DISPLAY PRESEL FLAVOURS FLAVOUR...

Page 43: ...VERFLOW SWITCH IVA EMPTY BOILER MICRO SWITCH IVB EMPTY CUP DISPENSER MICRO SWITCH KC1 COFFEE BOILER CUTOUT KS1 SAFETY CUTOUT LCD LIQUID CRYSTAL DISPLAY M COFFEE UNIT MOTOR MAC GRINDER MD1 INGREDIENT M...

Page 44: ...N W GLOBAL VENDING S P A Sx39701...

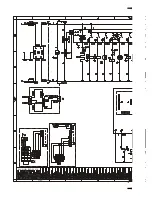
Page 45: ...Colibr UL 120V Schema elettrico funzionale espresso semiautomatico...

Page 46: ...N W GLOBAL VENDING S P A Sx44700...

Page 47: ...Colibr UL 120V Schema elettrico funzionale espresso automatico...

Page 48: ...by N W GLOBAL VENDING SpA NOTE...

Page 49: ...by N W GLOBAL VENDING SpA NOTE...

Page 50: ...by N W GLOBAL VENDING SpA NOTE...

Page 51: ...ept any responsibility for any inaccuracies contained in this publication which can be ascribed to printing and or transcription errors All instructions drawings tables and information contained in th...

Page 52: ......
Reviews: