background image

15

15

EN

WARNING: CARBON MONOXIDE HAZARD. BURNING 

WOOD EMITS CARBON MONOXIDE. THIS CAN CAUSE

DEATH.

Warnings & Safety Concerns:

Carefully read and follow the warnings and instructions 

in this manual before and during the use of the smoker.

IMPORTANT SAFETY INSTRUCTIONS AND

WARNINGS

Read all the instructions thoroughly before use:

This manual contains important information that is nec-

essary for the safe and proper use of this appliance.

• Read and follow the warnings and instructions careful-

ly before and during the use of the smoker.

• Keep this manual for future reference.

• Using the smoker leads to the presence of life-threat-

ening carbon monoxide. Carbon monoxide is a volatile 

gas, which is why the ventilation apertures must be 

open when the smoker is being used.

• Never burn wood chips inside your home, vehicle, 

tent, garage, or any other enclosed areas.

• This appliance is for outdoor use only. Never operate 

indoors.

• The unit must be on the ground. Never place the unit 

on tables or counters.

• Do not plug in the electric smoker until it is complete-

ly assembled and ready to use.

• Only use a grounded electrical outlet.

• Never use during a thunderstorm.

• Never expose the electric smoker to rain or water.

• Do not immerse the cord, plug or control panel in 

water or any liquid. This could cause electric shock.

• Always keep children and pets away from electric 

smoker. Never allow children to operate the electric 

smoker. When children and pets are in the area of an 

electric smoker, close supervision is an absolute neces-

sity.

• Never operate this appliance after it has malfunc-

tioned or the unit has been damaged.

• Never allow any other activities to take place in the 

vicinity of the electric smoker during or after use. Make 

sure the unit has cooled before storing or cleaning.

• Always keep a fire extinguisher handy when operating 

the electric smoker.

• Use caution when using an extension cord as this in-

creases the risk of entanglement and tripping. A faulty 

or weak extension cord may cause a loss of heating 

efficiency or electric shock.

• Do not allow the electrical cord to hang carelessly or 

touch hot surfaces.

• Never put this appliance on or near a gas or electric 

burner, or in a heated oven.

• Never operate any electrical appliance with a dam-

aged plug or cord.

• Never use this electric smoker as a heater (Refer to the 

Carbon Monoxide Warning).

• Electric smoker should only be used on a level, stable 

surface. This will prevent tipping over, which can cause 

potential personal injury or property damage.

• The electric smoker is hot while in use and for a period 

of time afterwards. Always use caution near hot surfac-

es.

• Use of alcohol, prescription or non-prescription drugs 

may impair one’s ability to assemble or operate the 

electric smoker properly.

• Do not bump or impact the electric smoker.

• Do not move the appliance when in use. Always allow 

the electric smoker to cool completely before storing or 

moving.

• Carefully remove food from the electric smoker. All of 

the surfaces are hot and could cause burns. Always use 

protective gloves along with long, sturdy cooking tools.

• Never cover the cooking grates with metal foil. The foil 

will trap heat, causing severe damage to the electric 

smoker.

• The drip tray is only for the bottom of the electric 

smoker. Never put a drip tray on cooking grates. This 

could cause damage to the electric smoker.

• Always use caution when adding wood chips when 

the smoker is in operation. The chip box is always hot 

when electric smoker is in use.

• To disconnect the electric smoker remove the plug 

from the outlet.

• Unplug from the outlet when not in use and prior to 

cleaning. Allow the unit to cool completely before add-

ing or removing grates or trays.

• Dispose of cold ashes by placing them in aluminium 

foil.

• Do not store the electric smoker with hot ashes inside 

the unit. Store only when all the surfaces are cold, 

cleaned and the ashes have been removed.

• Never use the electric smoker for anything other than 

its intended purpose.

• Always use the electric smoker in accordance with all 

applicable local and national fire codes.

• If the power cable is damaged, it must be replaced by 

the manufacturer or its maintenance agent or a similar-

ly qualified person to avoid hazards.

• This product can be used by children aged 8 years and 

above and persons with reduced physical, sensory or 

mental capabilities or lack of experience and knowl-

edge if they have been given supervision or instruc-

tions concerning the safe use of the product and they 

understand the hazards involved.

• The device must be connected through a residual-cur-

rent circuit breaker whose electric current value does 

not exceed 30 mA.

Summary of Contents for 305671

Page 1: ...LLAHJU KOKKUPANEMIST LUGEGE JUHEND HOOLIKALT LÄBI HOIDKE SEE JUHEND EDASPIDISEKS KASUTAMISEKS ALLES LV Elektriskais grils 1100 W LIETOŠANAI ĀRA APSTĀKĻOS PIRMS MONTĀŽAS UZMANĪGI IZLASIET INSTRUKCIJU SAGLABĀJIET ŠO INSTRUKCIJU TURPMĀKAI ATSAUCEI ko0919 230 V 50 Hz 1100W IPX4 Info Tootja Ražotājs Gamintojas Изготовитель Tammer Brands Oy Viinikankatu 36 33800 Tampere Finland Тампере Финляндия www mus...

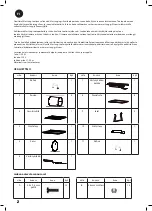
Page 2: ...toja löydät osoitteesta www mustang grill com Savustaa kalat vihannekset ja makkarat helposti ja nopeasti Sisältää ritilän ja rasvapellin Teho 1100 W Jännite 230 V Johdon pituus 1 80 m Materiaali ruostumaton teräs viite kuvaus kuva kpl B 4 5mm mutteri 13 viite kuvaus kuva kpl A 4 5 x 9 5 mm pultti 12 viite kuvaus kuva kpl 1 Kahva 1 2 Runko 4 3 Savustinritilä 1 4 Alustalevy 1 5 Kansi 1 6 Vastusyksi...

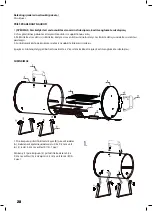
Page 3: ...on kaikki yläpuolella mainitut osat Jos osia puuttuu ota yhteyttä paikalliseen jälleenmyyjään 1 Kiinnitä kaksi jalkaa 9 runkoon 2 käyttämällä kuhunkin jalkaan 2 kpl 4 5x9 5mm pulttia A ja 2 kpl 4 5mm mutteria B katso kuva 1 Kiinnitä kahva 1 runkoon 2 käyttämällä 2 kpl 4 5x9 5mm pulttia A ja 2 kpl 4 5mm mutteria B katso kuva 1 1 4 Varaa riittävästi tilaa ja oikeat työvälineet kokoamista varten Varo...

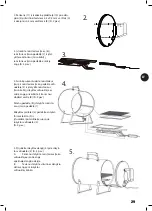
Page 4: ...la B ulkopuolelta katso kuva 4 Aseta purualusta 8 vastusyksikön kelkkaan 7 Aseta savustusritilä 3 alustalevyyn 4 ja yhdistä ne savustimen runkoon 2 liuttamalla katso kuva 4 5 Kiinnitä savustimen kansi 5 savustimen runkoon 2 katso kuva 5 A Aseta ensin kannen alareunassa oleva kolo vastusyksikön runkoon B Aseta sitten kannen yläreunassa oleva reikä savustimen rungossa olevaan hakaan 2 Kiinnitä kahva...

Page 5: ...imen tai kuu man uunin päälle tai lähelle Älä käytä sähkölaitetta jos sen pistoke tai johto on vaurioitunut Älä käytä sähkösavustinta lämmittimenä ks häkäva roitus Sähkösavustinta saa käyttää vain tasaisella ja vakaal la alustalla Tämä vähentää kaatumisen aiheuttamien mahdollisten henkilövahinkojen tai aineellisten vahin kojen riskiä Sähkösavustin on kuuma käytön aikana ja jonkin aikaa sen jälkeen...

Page 6: ... kevyesti painamaan takaisin pyöreään muotoonsa jotta pyöreämuotoinen ruostu mattomasta teräksestä valmistettu kansi asettuu tiiviisti paikalleen Savustin on hyvä kuumentaa kertaalleen ennen ensim mäistä varsinaista käyttökertaa SAVUSTAMINEN Sirottele aluspellille ohut kerros savustukseen sopi vaa savustuslastua savustushaketta Työnnä aluspelti vastuksen yläpuolella olevien kannattimien varaan älä...

Page 7: ...information finns på adressen www mustang grill com Röker fisk grönsaker och korv enkelt och snabbt Innehåller galler och uppsamlingstråg för fett Effekt 1100 W Spänning 230 V Sladdens längd 1 80 m Material Rostfritt stål ref beskrivning bild st B 4 5mm mutter 13 ref beskrivning bild st A 4 5 x 9 5 mm bult 12 DELFÖRTECKNING Medföljande monteringsdelar ref beskrivning bild st 1 Handtag 1 2 Stomme 4...

Page 8: ...nämnda delar Kontakta den lokala återförsäljaren om det fattas delar 4 Se till att ha tillräckligt mycket utrymme och rätt verktyg för monteringen VARNING Grilldelarna kan ha vassa kanter Hantera alla delar försiktigt för att undvika skador 1 Fäst de två benen 9 på stommen 2 med hjälp av 2 st 4 5 x 9 5 mm bultar A och 2 st 4 5 mm muttrar B på vart och ett av benen Se bild 1 Fäst handtaget 1 på sto...

Page 9: ... mutter B Se bild 4 Placera sågspånsunderlägget 8 i värmeelementets släde 7 Placera rökgallret 3 i underlagsskivan 4 och koppla dem till rökens stomme 2 genom att låta dem glida in Se bild 4 5 Fäst rökens lock 5 i rökens stomme 2 Se bild 5 A Placera först hålet i lockets under kant i värmeelementets stomme B Placera sedan hålet i lockets övre kant lockets öppning i haken på rökens stomme 2 Fäst ha...

Page 10: ...ed skadad kontakt eller sladd Använd aldrig denna elektriska rök som värmare Se koloxidvarning Den elektriska röken ska endast användas på en plan och stabil yta Detta förhindrar att den välter och orsa kar potentiella personskador eller skador på egendom Den elektriska röken är varm under användning och en stund efter användning Iaktta alltid försiktighet i närheten av heta ytor Användning av alk...

Page 11: ...ansporten Man kan behöva trycka tillbaka stommen lätt till sin runda form så att det runda locket som är tillverkat av rostfritt stål sätter sig tätt på plats Det är bra att värma upp röken en gång innan den verk ligen används för första gången RÖKNING Strö ut ett tunt lager rökspån rökflis som passar för rökning på spånplåten Tryck in spånplåten på stöden ovanför resistorn placera inte spånplåten...

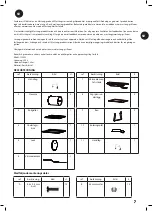
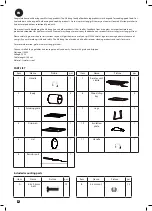
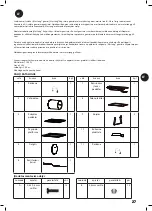
Page 12: ... care For more information go to www mustang grill com You can smoke fish vegetables and sausages quickly and easily Comes with grate and drip pan Wattage 1100W Voltage 230V Cable length 180 cm Material Stainless steel Item Name Picture pcs B 4 5 mm nut 13 Item Name Picture pcs A 4 5 x 9 5 mm bolt 12 PART LIST Included mounting parts Item Name Picture pcs 1 Handle 1 2 Body 4 3 Smoking grate 1 4 Dr...

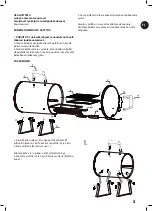
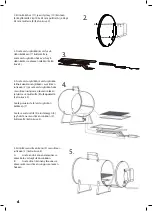
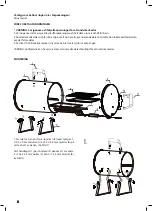
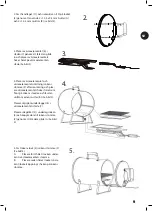
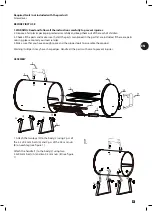
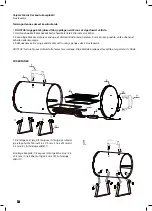
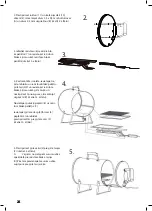
Page 13: ...d in the part list are included If there are parts missing please contact your local retailer 4 Make sure that you have enough space and the proper tools to assemble the product Warning Grill parts may have sharp edges Handle all the parts with care to prevent injuries 1 Attach the two legs 9 to the body 2 using 2 pcs of the 4 5 x 9 5 mm bolts A and 2 pcs of the 4 5 mm nuts B on each leg see figur...

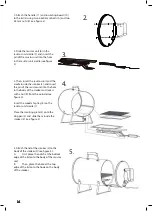
Page 14: ...see figure 4 Insert the wood chip tray 8 on the resistor unit cradle 7 Place the smoking grate 3 onto the drip pan 4 and slide them inside the smoker 2 see figure 4 5 Attach the lid of the smoker 5 to the body of the smoker 2 see figure 5 A First place the notch at the bottom edge of the lid onto the body of the resistor unit B Then place the hole at the top edge of the lid onto the hook on the bo...

Page 15: ...electrical appliance with a dam aged plug or cord Never use this electric smoker as a heater Refer to the Carbon Monoxide Warning Electric smoker should only be used on a level stable surface This will prevent tipping over which can cause potential personal injury or property damage The electric smoker is hot while in use and for a period of time afterwards Always use caution near hot surfac es Us...

Page 16: ...ansport You can gently bend the body back into shape so that the circular stainless steel lid can be set tightly in place It s a good idea to heat up the smoker once before the first full use SMOKING Scatter a fine layer of smoking chips shavings on the wood chip tray Slide the tray onto the unit cradle above the resistor do not place the tray directly onto the resis tor You can add chips shavings...

Page 17: ...g grill com Saate suitsutada kala juurvilja ja vorsti hõlpsalt ja kiiresti Komplektis on restid ja rasvavann Võimsus 1100 W Pinge 230 V Juhtme pikkus 1 80 m Materjal roostevaba teras Posit sioon Nimetus Kujutis tk B 4 5mm mutter 13 Posit sioon Nimetus Kujutis tk A 4 5 x 9 5 mm kruvi 12 OSADE LOETELU Komplektis olevad paigaldusosad Posit sioon Nimetus Kujutis tk 1 Käepide 1 2 Korpus 4 3 Suitsutusre...

Page 18: ...as Kui mõni osa puudub võtke ühendust kohaliku edasimüüjaga 4 Kokkupanemiseks varuge endale piisavalt ruumi ja pange valmis kruvikeeraja HOIATUS Suitsuahju osad võivad olla teravate servadega Olge kõikide osadega ettevaatlik et vigastamist vältida 1 Kinnitage kaks jalga B korpuse A külge kasutades iga jala puhul kaht kruvi 4 5 x 9 5 mm J ja kaht mutrit 4 5 mm K Juhinduge pildist 1 Kinnitage käepid...

Page 19: ...duge pildist 4 Pange puruvann 8 küttekeha alusele 7 Pange suitsutusrest 3 alusplaadile 4 ja lükake see suitsuahju korpusesse 2 Juhinduge pildist 4 5 Kinnitage suitsuahju kaas 5 suitsuahju korpusele 2 Juhinduge pildist 5 A Esmalt ühitage kaane alaosas olev väljalõige küttekeha raamiga B Seejärel pange kaane ülaserva ava suitsuahju korpusel oleva konksu otsa 2 Kinnitage käepide 11 ja isoleerplaat 10...

Page 20: ...id Ärge kasutage käesolevat suitsuahju küttekehana Vt ka vingugaasihoiatust Ahju tohib kasutada ainult tasasel kindlal pinnal See väldib ahju ümberkukkumist mis võib põhjustada vigastusi või materiaalset kahju Elektrisuitsuahi on kuum kasutamisel ning teatud aja jooksul pärast seda Kuumade pindade läheduses töö tamisel olge ettevaatlik Alkoholi retsepti või vabamüügiravimite kasutami ne võib mõjut...

Page 21: ...ks täpselt kere peale kuna kere võib muutuda transportimise käigus ovaalseks Kereosa tohib kergelt oma ümarasse vormi tagasi painutada et ümmargu ne roostevaba terasest kaas asetuks korralikult oma kohale Suitsutusahju on soovitatav enne esimest kasutuskorda üks kord läbi kuumutada KÜPSETAMINE SUITSUGA Riputa alusplaadile õhuke kiht suitsutamiseks sobivat lepalaastu lepahakkpuitu Lükka alusplaat t...

Page 22: ...ederumus Plašāka informācija pieejama www mustang grill com Zivs dārzeņu un desiņu ātrai un vienkāršai pagatavošanai Komplektā ir iekļautas grila restes un paplāte Jauda 1100 W Spriegums 230 V Vada garums 1 80 m Materiāls nerūsoрais tērauds atsauce apraksts attēls sk B 4 5 mm uzgrieznis 13 atsauce apraksts attēls pcs A 4 5 x 9 5 mm skrūve 12 DAĻU KATALOGS iekļautas montāžas daļas atsauce apraksts ...

Page 23: ... kādas daļas nav iekļautas sazinieties ar vietējo mazumtirgotāju 4 Nodrošiniet montāžai pietiekamu platību un pareizos darbarīkus Brīdinājums Grila daļu malas var būt asas Rīkojieties ar visām daļām uzmanīgi lai izvairītos no ievainojumiem 1 Piestipriniet abus balstus korpusam B pie šasijas A izmantojot divas 4 5 x 9 5 mm skrūves J un divus 4 5 mm uzgriežņus K katrai kājiņai skatiet 1 attēlu Piest...

Page 24: ...iet 4 attēlu Novietojiet putekļu paplāti 8 uz rezis tora bloka paliktņa 7 Ievietojiet grila restes platformas 4 paplātē 3 un iebīdot piestipriniet tās pie grila šasijas 2 skatiet 4 attēlu 5 Piestipriniet grila vāku 5 pie grila šasijas 2 skatiet 5 attēlu A Vispirms novietojiet caurumu vāka apakšdaļā pie rezistora bloka šasijas B Pēc tam pievienojiet caurumu vāka augšpusē pie grila šasijas āķa 2 Pie...

Page 25: ...umā vai sakarsētā cepeškrāsnī Nelietojiet elektrisko ierīci ja ir bojāta tās kontaktdak ša vai elektrības vads Nelietojiet šo elektrisko kūpinātavu kā sildītāju Ska tiet brīdinājumu par oglekļa monoksīdu Lietojiet elektrisko kūpinātavu tikai uz līdzenas stabilas virsmas Tādējādi jūs novērsīsiet tās apgāšanās risku un no tā izrietošas personu traumas vai materiālos zaudējumus Elektriskā kūpinātava ...

Page 26: ...cieši pieguļ korpusam jo transportēšanas laikā korpuss var nedaudz deformēties Korpusu var uzmanīgi saliekt lai tas atgūtu apaļu formu un ieapaļais nerūsošā tērauda vāks pareizi iegultos savā vietā Pirms pirmās lietošanas reizes kūpinātavu vēlams vienu reizi izkarsēt KŪPINĀŠANA Plānā kārtā uzberiet uz paliktņa kūpināšanai piemēro tas alkšņa šķeldas vai skaidas Novietojiet paliktni uz balstiem virs...

Page 27: ...ormacijos eikite adresu www mustang grill com Greitas ir paprastas žuvies daržovių ir dešrelių rūkymas Yra kepimui skirtos grotelės ir lakštas riebalams Maitinimas 1 100 W Srovė 230 V Laido ilgis 1 80 m Medžiaga nerūdijantis plienas nuoroda aprašas paveikslėlis pcs B 4 5 mm veržlė 13 nuoroda aprašas paveikslėlis vnt A 4 5 x 9 5 mm varžtas 12 DALIŲ KATALOGAS įtrauktos montavimo dalys viite kuvaus k...

Page 28: ...dalys Jei trūksta dalių susisiekite su vietiniu pardavėju 4 Surinkimui skirkite pakankamai vietos ir naudokite tinkamus įrankius Įspėjimas Grotelių dalys gali būti aštriais kraštais Visas dalis imkite atsargiai kad išvengtumėte sužalojimų 1 Prie korpuso pritvirtinkite dvi kojas B prie važiuoklės A kiekvienai kojelei naudodami du 4 5 x 9 5 mm varž tus J ir dvi 4 5 mm veržles K žr 1 pav Rankeną 1 pr...

Page 29: ...4 pav Pelenų padėklą 8 įstatykite į rezisto riaus įtaiso padėklą 7 Rūkyklos groteles 3 padėkite ant plat formos lakšto 4 ir įstumdami pritvirtinkite juos prie rūkyklos važiuoklės 2 žr 4 pav 5 Prijunkite rūkyklos dangtį 5 prie rūkyk los važiuoklės 2 žr 5 pav A Pirma nustatykite rezistoriaus įtaiso važiuoklėje esančią angą apatinėje dangčio dalyje B Tada nustatykite viršutinės dangčio dalies angą an...

Page 30: ...viryklės ar ant jos arba į įjungtą orkaitę Niekuomet nenaudokite jokių elektros prietaisų jei jų laidas ar kištukas pažeistas Niekuomet nenaudokite elektrinės rūkyklos kaip šildy tuvo Žr įspėjimą dėl anglies monoksido Elektrinę rūkyklą galima naudoti tik ant lygaus stabi laus paviršiaus Tai neleis jai apvirsti ir sužaloti žmonių ar sugadinti turto Naudojant ir kurį laiką po to elektrinė rūkykla bū...

Page 31: ...korpusas gali šiek tiek deformuotis Korpusą galima atsargiai sulenkti kad jis vėl įgautų apvalią formą ir kad apvalus nerūdijančiojo plieno dangtis tinkamai laikytųsi savo vietoje Prieš naudojant pirmą kartą rūkyklą pageidautina vieną kartą įkaitinti RŪKYMAS Ant padėklo plonu sluoksniu priberkite rūkymui tin kamų alksnio skiedrų ar drožlių Pastatykite padėklą ant atramų virš kaitintuvo nestatykite...

Page 32: ...олее подробную информацию можно получить на сайте www mustang grill com Для копчения рыбы овощей и сосисок быстро и легко Включает решетку гриля и поддон для масла Мощность 1100 Вт ток 230 В Длина провода 1 80 м Материал нержавеющая сталь обозначение описание изображение шт B 4 5 мм гайка 13 обозначение описание изображение шт A 4 5 x 9 5 мм болт 12 ПЕРЕЧЕНЬ ЧАСТЕЙ поставляемые части для сборки об...

Page 33: ...и убедитесь в полной комплектности поставки Если каких то частей не хватает обратитесь к 4 Подготовьте необходимое для сборки пространство и требующиеся инструменты Предупреждение Части гриля могут иметь острые края Обращайтесь со всеми частями осторожно чтобы избежать травмы 1 Присоедините две ножки 9 к корпусу A используя два 4 5x9 5 мм болта J и две 4 5 мм гайки K на каждую ножку см рис 1 Присо...

Page 34: ...для пепла 8 на подставке нагревательного элемента 7 Установите решетку 3 на основание 4 и поместите в корпусу коптильни 2 задвинув их внутрь см рис 4 5 Присоедините крышку коптильни 5 к корпусу 2 см рис 5 А Сначала поместите отверстие в нижней части крышки в основание где размещен нагревательный элемент В Затем поместите отверстие в верхней части крышки на крюк корпуса коптильни 2 Присоедините рук...

Page 35: ... сле дует всегда иметь при себе огнетушитель Будьте осторожны при использовании удлинителей в них можно запутаться и споткнуться Неисправ ный или недостаточно мощный удлинитель может привести к менее эффективному нагреву или к пора жению электрическим током Не позволяйте электрическому кабелю прикасать ся к нагретым поверхностям и висеть на проходе Никогда не ставьте коптильню на газовую или элек ...

Page 36: ...мые в вашем регионе правила противопо жарной безопасности Если кабель питания повреждён его должен за менить производитель сервисный представитель производителя или иные лица с соответствующей квалификацией во избежание опасности Это устройство могут использовать дети от 8 лет и старше лица с ограниченными физическими и умственными возможностями а также лица с отсут ствием опыта если им как следуе...

Reviews: