TalkAnytime Quick Start Instructions
Phone/IP
Starter
Config.
31
Phone/IP Starter Configuration
Full details here:
Technical Configuration
chapter in User Guide
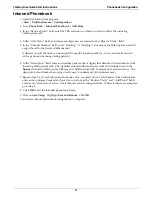
1. Open the TalkAnytime program:
Start
|
TalkAnytime
xxx
|
Configuration
.
Note
: If you used the “Work-Around” on page 27 to operate using the TalkAnytime web GUI only, skip to step 4E.
2. Go to
Configuration
|
Ethernet/IP
. Enter the IP parameters for your TalkAnytime unit. Activate Packet
Prioritization (802.1p) if desired. For details, see the “Technical Configuration” chapter of the
User Guide
.
3. Do you want to configure and operate the TalkAnytime unit using the web browser GUI? (It has the
same functionality as the local Windows GUI, but offers remote access.)
If NO, skip to step 5. If YES, continue with step 4.
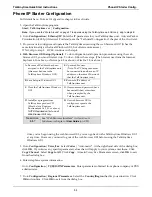
4.
Web Browser GUI Setup (Optional)
. To do configuration and operation procedures using the web
browser GUI, you must first set it up. To do so, follow these steps. (The browser used must be Internet
Explorer 6.0 or above; or Netscape 6.0 or above; or FireFox 1.0 or above.)
A
. Be sure an IP address has been
assigned to the TalkAnytime unit
(this must be done in the
TalkAnytime Windows GUI).
E
. Open web browser.
(Note: The PC being used must
be connected to and have an IP
address on the same IP network
that the TalkAnytime is on.)
B
. Save Setup in Windows GUI.
F
. Browse to IP address of
TalkAnytime unit.
C
. Close the TalkAnytime Windows
GUI.
G
. If username and password have
been established, enter them
when prompted by the
TalkAnytime unit.
D
. Install Java program from
TalkAnytime product CD.
(Must be Java Runtime
Environment 1.4.2_01 or above.)
NOTE: Required on first use of
Web Browser GUI only.
H
. Use web browser GUI to
configure or operate the
TalkAnytime unit.
Need more
info?
See “Web Browser Interface” in
Operation &
Maintenance
chapter of
User Guide
(on CD).
Once you’ve begun using the web browser GUI, you can go back to the TalkAnytime Windows GUI
at any time. However, you must log out of the web browser GUI before using the TalkAnytime
Windows GUI.
5. Go to
Configuration
|
Voice/Fax
. Select
Coder
| “Automatic.” At the right-hand side of the dialog box,
click
OK
. If you know any specific parameter values that will apply to your system, enter them. Click
Copy Channel
. Select
Copy to All
. Click
Copy
. At main Voice/Fax Parameters screen, click
OK
to exit
from the dialog box.
6. Enter telephone system information.
Go
to
Configuration
|
T1/E1/ISDN Parameters
. Enter parameters obtained from phone company or PBX
administrator.
7. Go to
Configuration
|
Regional Parameters
. Select the
Country/Region
that fits your situation. Click
OK
and confirm. Click
OK
to exit from the dialog box.
Summary of Contents for TalkAnytime TA2410
Page 6: ...6 Chapter 1 Overview ...
Page 20: ...20 Chapter 2 Quick Start Instructions ...
Page 48: ...48 Chapter 3 Mechanical Installation and Cabling ...
Page 56: ...56 Chapter 4 Software Installation ...
Page 65: ...65 Chapter 5 Technical Configuration ...
Page 116: ...Technical Configuration TalkAnytime User Guide 116 ...
Page 123: ...123 Chapter 6 Phonebook and URL Configuration ...
Page 143: ...143 ...
Page 144: ...144 Chapter 7 Operation and Maintenance ...
Page 205: ...205 Chapter 8 Warranty Service and Tech Support ...
Page 208: ...208 Chapter 9 Regulatory Information ...
Page 213: ...213 Appendix A Cable Pinouts ...
Page 217: ...217 Appendix B TCP UDP Port Assignments ...
Page 219: ...219 Appendix C Expansion Card Installation TA24 48 TA30 60 ...
Page 234: ......
Page 235: ...235 S000424A ...


