background image

25

24

www.

multilaser

.com.br

HD

play


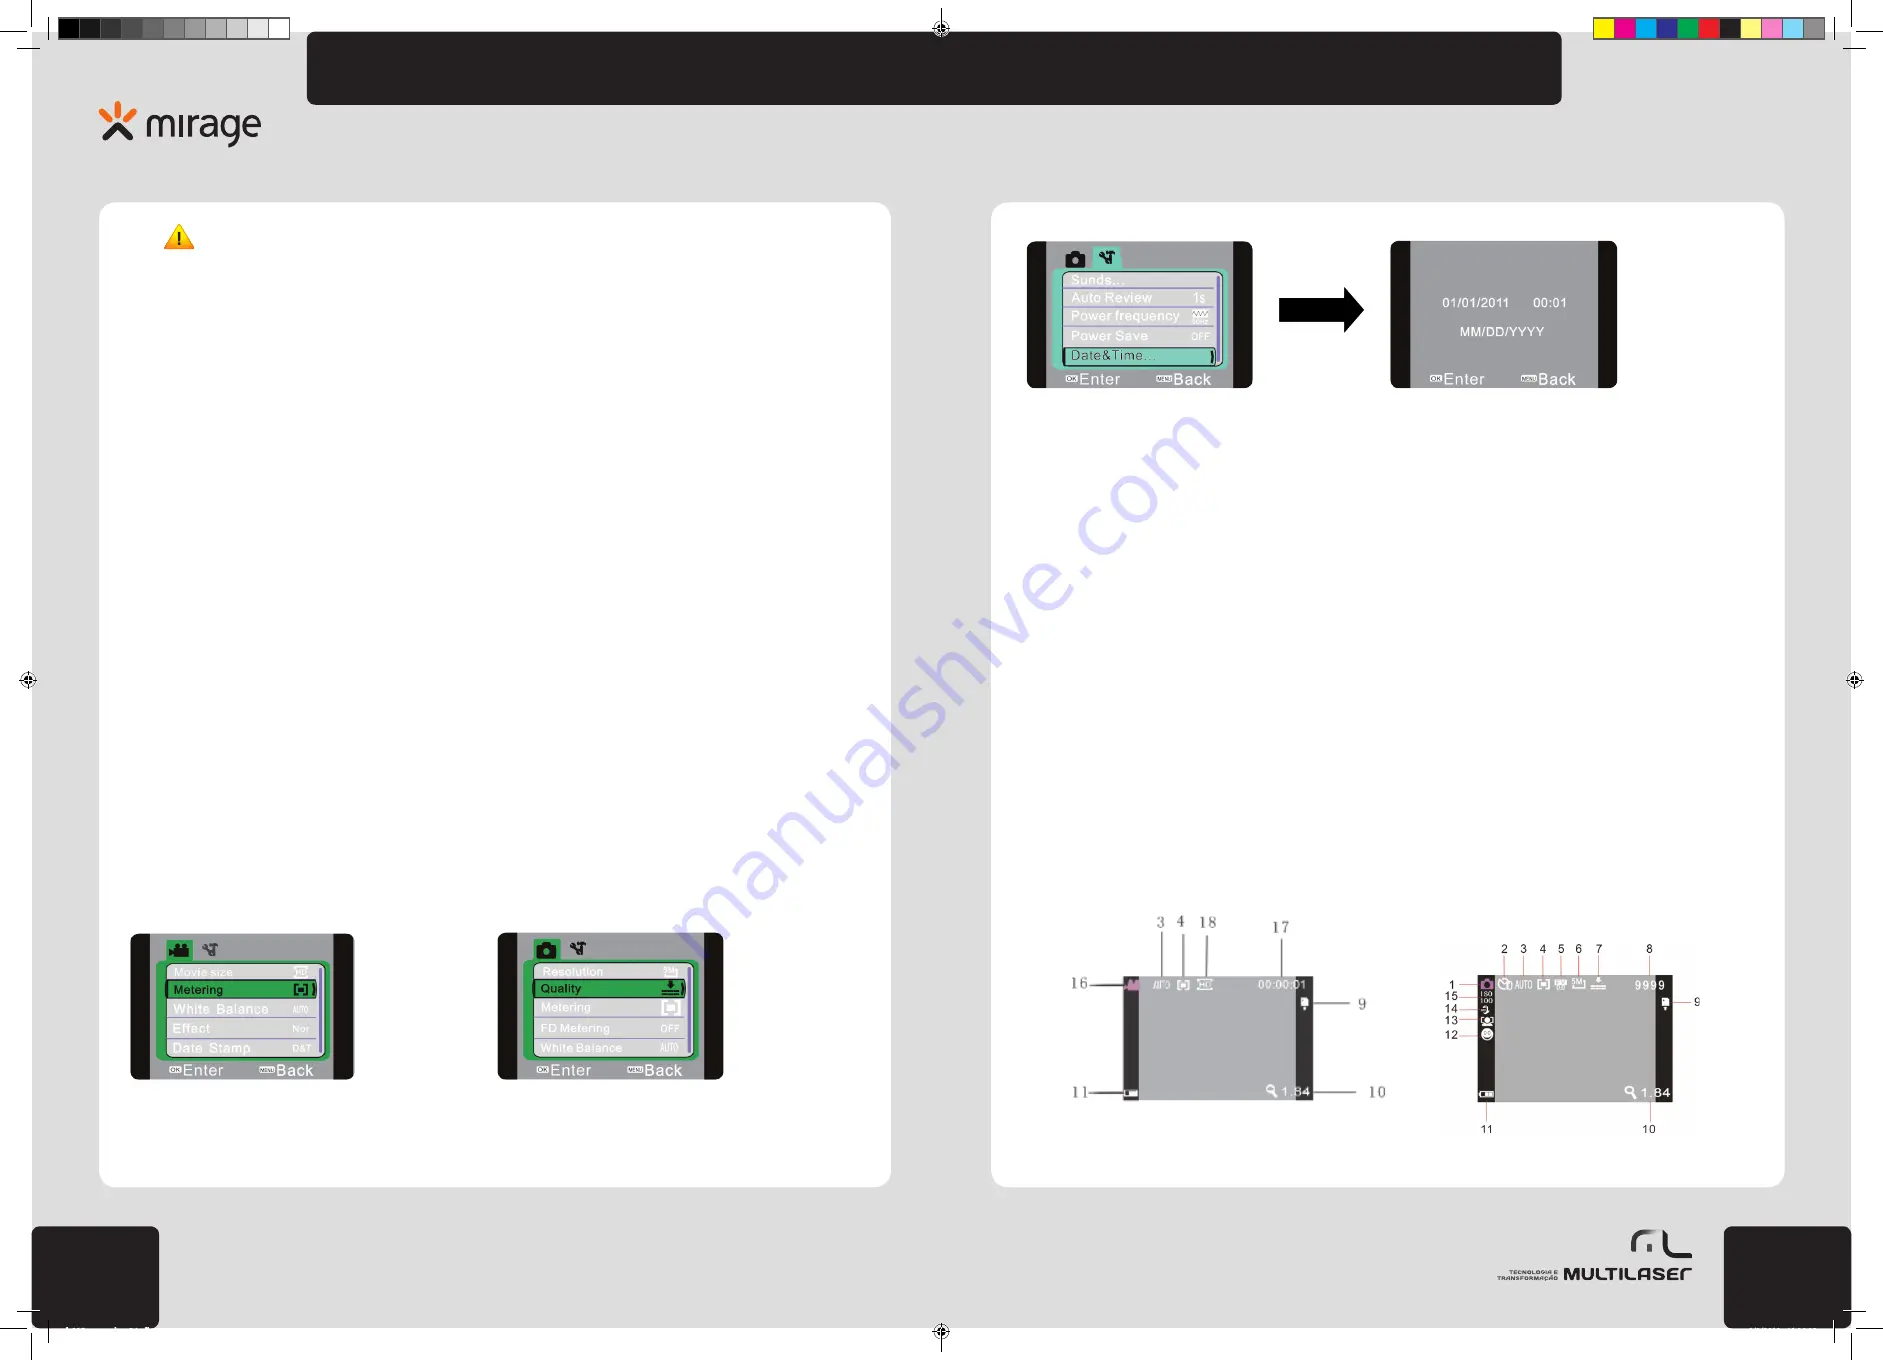
In setting window, press Left and Right key to select items (date, time) to be adjusted. The background of the selected item will be 

displayed in green color. And then press Up and Down key to make adjustment. At completion of adjustment, press OK key for confir

-

mation, or press Menu key cancel the setting and turn back. Finally, press Menu key to exit from setting mode. 

Connect computer

Before connecting the computer, please install the video camera driver with CD. Please firstly power on the video camera, and then 

connect the video camera to usable USB port of the computer with USB cable as accessory. USB mode is portable HD or camera. The 
video camera automatically enters portable HD mode. Click MODE key to enter webcam.

Advanced Options

Photo/Video Mode

Automatically enter photo/Video mode after power-on.
• Press shutter key for direct taking photo.
• Press shutter key to start video recording and stop recording to press it again. 
• Press T key or W key for changing digital zoom. 
• Press Right key to open or close LED supplement light lamp (after entering replay mode, supplement light lamp is invalid) 
• In idle state, press DISP key to switchover among three screen display states including icon-off, screen-off and normal display.

Information displayed on screen in photo/Video mode 


Exibição da tela no modo gravação 


Exibição da tela no modo foto

 Attention:

• Power off the video camera before replacing memory card; 
• Plug the card in following correct direction. Please gently plug the card in to prevent the card or video camera components 

from being damaged. In case of fail, please check if the direction is correct. 

• Please firstly format the memory card for the first time of using a new card or using a used card on other video cameras. 

• Open screen: Turn LCD outward to have LCD facing you. 
• Power-on: Click battery key and then release it to power on the video camera.
• Mode switch-over: In mode of photo/video, if to press replay key, photo/video mode can be switched to replay mode. In replay 

mode, press replay key to exit from replay mode.

• Video recording: In recording mode, click shutter key to start recording, and press this key again to stop recording. 
• Photo: In photo mode, press shutter key to take photo. 
• Replay: Press replay key to enter replay mode to browse through photo ands play video recorded with this camera. 
• Browse through photo: Select photo by using left or right key, zoom out the photo with zoom key. Press Up/Down/Left/Right key to 

move the photo after zoom out.  

• Play video: Select the video to play by using left or right key, click OK key to start playing, click menu key to stop playing. During 

playing, press OK key to pause. After pause, press OK key to continue playing. 

• HDMI output:  When output of video and audio data of the video camera to high-definition TV is needed, please plug the common 

port of HDMI cable into HDMI interface of the video camera, connect the input port of HDMI to the input high-definition interface of the 

high-definition TV. Please note to stop recording/playing before plugging in/out HDMI cable.

• TV output: When output of video and audio data of the video camera to high-definition TV is needed, please plug the common port 

of TV cable into the TV interface of the video camera. The yellow port is connected with video interface of the audio-video device, and 
the red/white port is connected with audio interface of the audio-video device. Note: Before connecting TV or plugging out TV cable, 
stopping video recording/audio recording or playing is required.

• Power-off: In power-on state, click power key to power it off.
If the video camera is idle and no operation is performed beyond time set for automatic power-off (1 minute/3 minutes/5 minutes), 

the video camera will automatically power off to save power. 


Menu settings 

In mode of photo/video and replay, press menu key to open the menu, and then press Up/Down/Left/Right key for menu option. After 

that, press OK key to enter sub-menu. During menu option, the background of the selected menu will be highlighted. 


 Video menu 


 Photo menu

Set date and time

Press menu key to open the menu, and then press Left/Right key to enter menu setting. Press Down key to select “date and time” 

option, and then press OK key to enter setting window.  


dc115_manual_rv0.indb   24-25

1/2/2012   11:19:20

Summary of Contents for Mirage HD Play

Page 1: ...1 HDplay manual do usu rio hardware HDplay dc115_manual_rv0 indb 1 1 2 2012 11 18 56...

Page 2: ...a fun o webcam 17 Instalando o driver e o software 17 Interface de Instala o 17 Instala o do driver 17 Especifica es 18 P R 19 Index Preface 20 Instructions 20 Notice to users 20 Instructions for Usi...

Page 3: ...mpurre a chave do cart o de mem ria SD para cima Instru es para Utilizar o Cart o de Mem ria No caso de utilizar o cart o de mem ria pela primeira vez ou falha em reconhecer os dados no cart o de mem...

Page 4: ...os ticos Se necess rio por favor utilize um limpador de lentes Solu es org nicas s o estritamente proibidas para a limpeza da c mera de v deo N o toque a superf cie das lentes com os dedos Requisitos...

Page 5: ...do cart o ou da c mera de v deo Em caso de falha por favor verifique se a dire o est correta Por favor em primeiro lugar formate o cart o de mem ria para utilizar um cart o novo pela primeira vez ou u...

Page 6: ...s de entrar no modo repeti o a l mpada de luz suplementar flash fica invalida Em estado inativo pressione a tecla DISP para a transi o entre os tr s estados de tela incluindo cone off cone off screen...

Page 7: ...Op es no menu de foto Menu Principal Sub menu Indica es Resolu o de imagem 4416 x 3312 14 0 mega resolu o 3264 x 2448 8 0 mega resolu o 2592 x 1944 5 0 mega resolu o 2048 x 1536 3 1 mega resolu o Qua...

Page 8: ...os Modo disparo cont nuo Selecione o modo disparo cont nuo clique no obturador para ter tr s disparos de fotos cont nuos Usar a l mpada de luz suplementar FLASH Pressione a tecla para direita para lig...

Page 9: ...do disco port til haver um novo disco port til adicionado janela de meu computador As fotos ou v deo tiradas est o adicionadas no catalogo DCIM 100MEDIA no disco port til Voc pode entrar neste catalog...

Page 10: ...nseguir remover o material de embalagem da bateria Instala o inadequada da bateria Certifique se que as baterias pilhas est o instaladas correta mente Falha de inicializa o ap s a instala o da bateria...

Page 11: ...you can use SD memory cards and MMC multimedia memory card There is a write protection switch on the SD memory card to avoid deleting or formatting image document Metal Pin of memory card Write protec...

Page 12: ...sk CD etc Video camera maintenance In case of idle use keep it in a dry and dark place and it is a must to take the battery out Keep wearing wrist strap on while using to prevent dropping down Use a p...

Page 13: ...le taking photo recording video Lights once when starting up Charge indicator In power off state of it constantly lights after entering charging mode when connecting to charger Start operation Install...

Page 14: ...xit from replay mode Video recording In recording mode click shutter key to start recording and press this key again to stop recording Photo In photo mode press shutter key to take photo Replay Press...

Page 15: ...ates the present metering mode 5 Exposure Indicates present exposure value selected 6 Image resolution indicates resolution of the present photo 7 Image quality Indicates the image quality presently s...

Page 16: ...light lamp is invalid While idle press DISP key can switch among three screen display states including icon off screen off and normal display Attention While using the video camera please securely ho...

Page 17: ...e screen shows the installation wizard window as below Menu settings Press Menu key to open main menu of Video Photo press Up or Down key to select menu press OK key to enter sub menu In sub menu pres...

Page 18: ...4 pieces of AAA alkali battery one piece of 3 7V rechargeable lithium battery Menu language Portuguese English Spanish Focus f 7 5mm Aperture F 2 5 Automatic power off 1 minute 3 minutes 5 minutes Op...

Page 19: ...ble with two hands or to stabilize the main unit of the video camera with other objects like a tripod and keep the video camera stable while shot Dim photo or video taken Insufficient light for the en...

Page 20: ...abaci n en la tarjeta de memoria SD para evitar apagar o formatear documento de imagen Perno de metal de la tarjeta de memoria Clave de protecci n contra grabaci no Empuje la clave en la tarjeta de me...

Page 21: ...o papel adecuado para limpieza de dispositivos pticos De ser necesario utilice un limpiador de lentes Soluciones org nicas est n estricta mente prohibidas para la limpieza de la c mara de video No to...

Page 22: ...minutos 5 minutos la c mara de video se apagar autom ticamente para ahorrar energ a Configuraci n del Men En el modo foto video e replay pulse la tecla men para abrir o men y entonces pulse la tecla h...

Page 23: ...men para abrir el men entonces pulse la tecla hacia la izquierda hacia la derecha para entrar en la configu raci n del men Pulse la tecla hacia abajo para seleccionar la opci n fecha y hora entonces...

Page 24: ...cumento Medici n de cara On Hay una instrucci n exhibida en la pantalla Off Apaga la detecci n de cara Foto sonrisa en la cara On Foto autom tica si es detectada una sonrisa en la cara Off Apaga la fo...

Page 25: ...modo replay pulse la tecla hacia la izquierda para seleccionar el documento anterior o pulse la tecla hacia la derecha para seleccionar el documento siguiente Tras seleccionar el video pulse la tecla...

Page 26: ...En el sub men pulse la tecla Men o la tecla OK para volver al men principal pulse la tecla hacia arriba o hacia abajo para opci n y pulse la tecla OK para confirmaci n Tras volver al men principal pu...

Page 27: ...n dola con las dos manos o para estabilizar la unidad principal de la c mara de video utilice otros objetos como un tr pode y mantenga la c mara de video estable mientras dispara Foto sacada o video...

Page 28: ...50 www multilaser com br www multilaser com br dc115_manual_rv0 indb 50 1 2 2012 11 19 56...

Reviews: