


7.Communication with PC
(4)
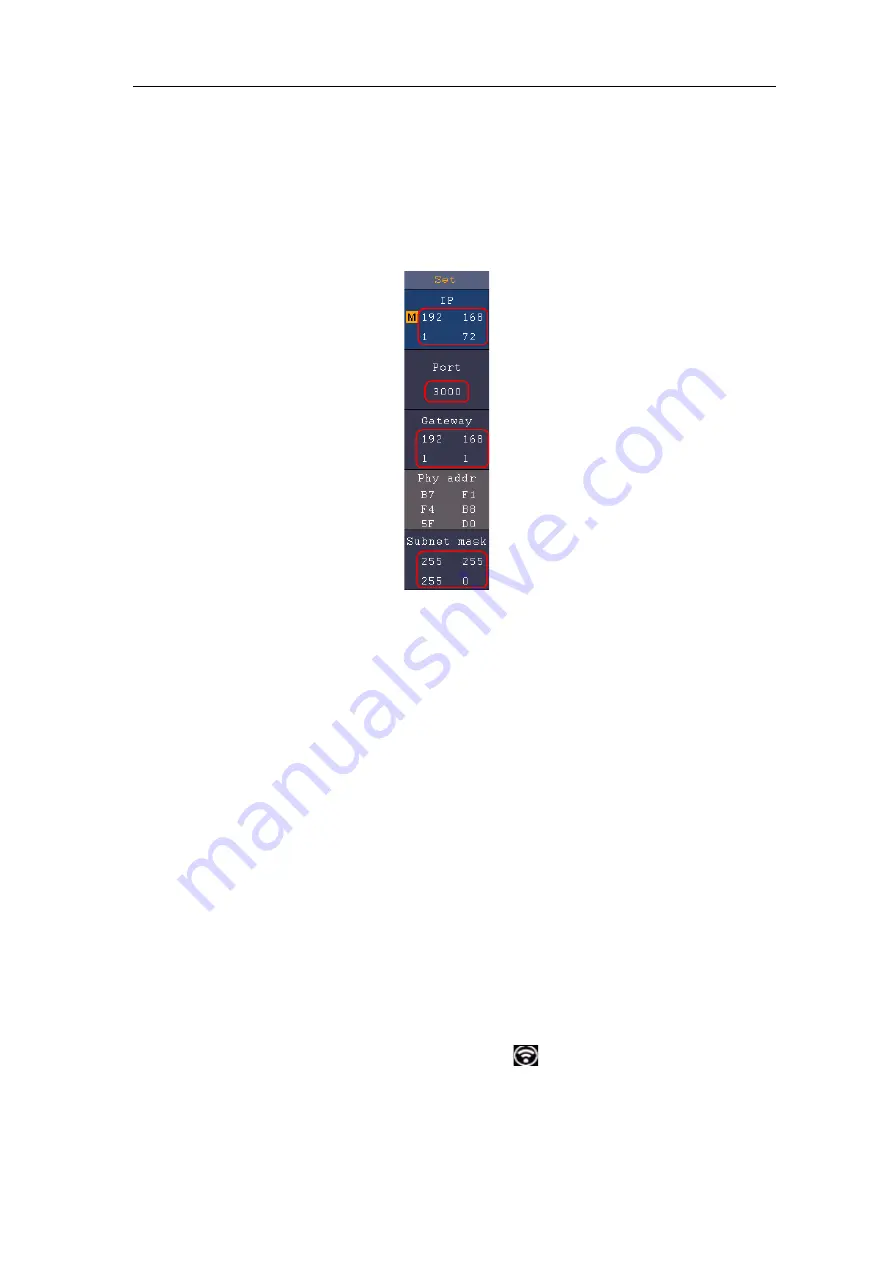
Set the network parameters of the oscilloscope
. In the oscilloscope, push the
Utility
button. Select
Function
in the bottom menu. Select
LAN Set
in the left menu. In the
bottom menu, set the
Type
item
as
LAN
, and select
Set
. In the right menu, set
IP
and
Port
to the same value as the "Ports-settings" in the software in step (3). The Netgate
and Net mask should be set according to the router. Select
Save set
in the bottom
menu, it prompts "Reset to update the config". After resetting the oscilloscope, if you
can get data normally in the oscilloscope software, the connection is successful.
Figure 7-7 Set the network parameters of the oscilloscope
Using Wi-Fi to Connect with PC
(Optional)
Connect with PC as Wi-Fi Access Point
PC should support Wi-Fi.
(1)
Set the oscilloscope.
In the oscilloscope, push the
Utility
button. Select
Function
in
the bottom menu. Select
LAN Set
in the left menu. In the bottom menu, set the
Type
item
as
WIFI-AP
, and select
Set
in the bottom menu.
(2)
In the right menu, select
SSID
, a keyboard will pop up. You can turn and push the
M
knob, or touch the keyboard (if the LCD is touchscreen) to set the access point name.
(3)
In the right menu, select
Encryption
, push again to set the type.
Open
type needs no
password.
WEP
or
WPA
type need to set the password. You can select
WPA
. In the
right menu, select
Password
, use the keyboard to set the Wi-Fi password (8 to 32
characters).
(4)
In the right menu, select
IP:PORT
,
IP
is fixed by the oscilloscope, and can not be
edited. Here IP is 192.168.1.1. Turn the
M
knob to set the
PORT
. Here, we set it to
3000.
(5)
After setting, select
ON
in the
Status
menu. The
icon appears on the top right of
the screen.
118
Summary of Contents for MP720105
Page 1: ...i Digital Storage Oscilloscope Model MP720105 MP72016 MP72107...
Page 40: ...4 Advanced User Guidebook Figure 4 2 Rectangle window Figure 4 3 Blackman window 35...
Page 41: ...4 Advanced User Guidebook Figure 4 4 Hanning window Figure 4 5 Kaiser window 36...
Page 68: ...4 Advanced User Guidebook Sine x x interpolation Linear interpolation 63...


