46
RouteFinder RF500S User Guide
Remote Access - Remote Access Settings
1.
From the General Settings dialog box,
Async Port section, select Remote Access and click
Remote Access Settings.
2.
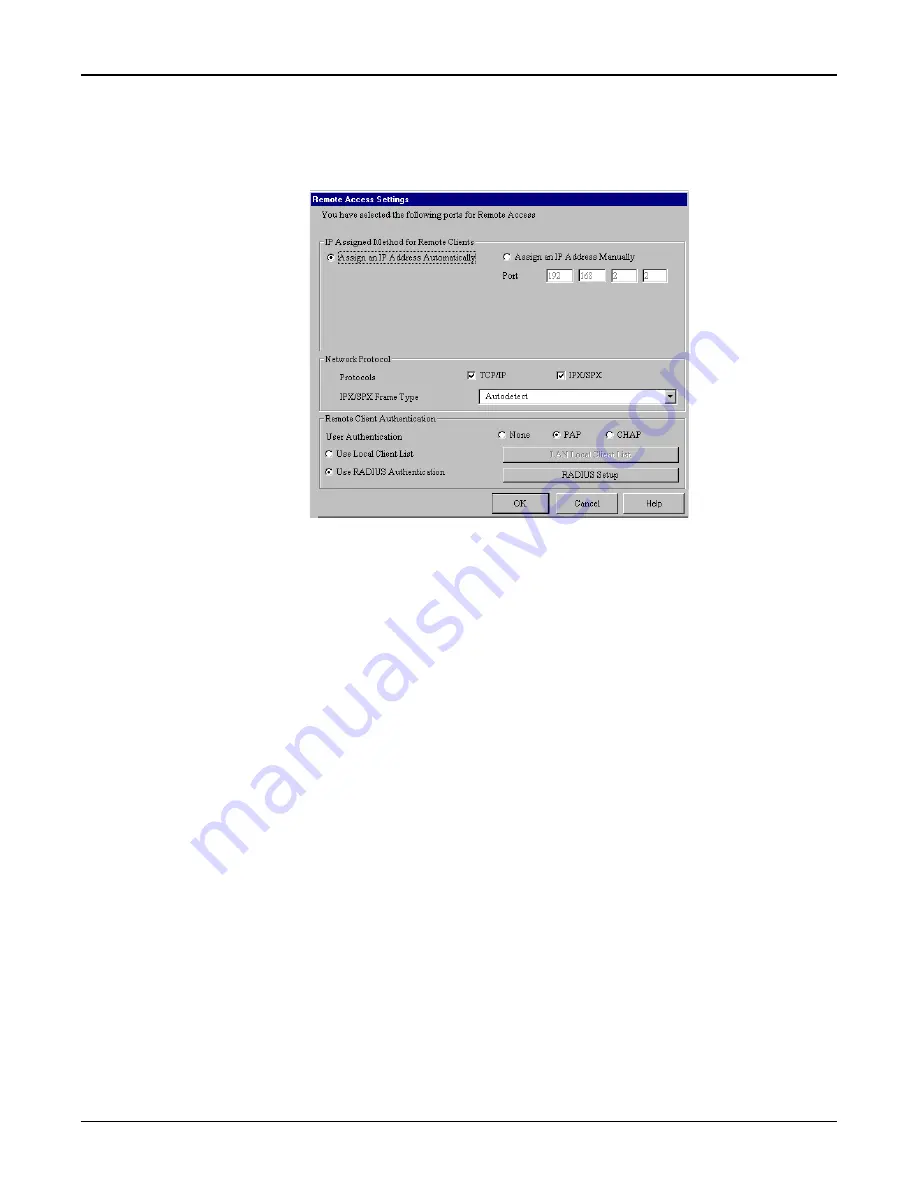
The Remote Access Settings dialog box displays.
Complete the fields as follows:
IP Assigned Method for Remote Clients:
A remote client must have an IP address to connect to the network. IP addresses may be
assigned
automatically from a designated IP address pool using DHCP, or the IP address may be
manually assigned.
Assign an IP Address Automatically:
The RS500S DHCP feature will issue the remote site user an IP address automatically if the
DHCP function is enabled. If DHCP is disabled, the device will automatically search for a DHCP
server and request an IP address for the remote client.
Assign an IP address manually:
Enter an IP address for the remote client.
Network Protocols:
You must select the network protocols you would like to enable for the dial-in service. The default
enables both TCP/IP and IPS/SPX. If you do not need both protocols, you may disable one of
them. If you are connecting to a Netware Server, IPX/SPX must be enabled.
IPX/SPX Frame Type:
The RouteFinder RF500S can automatically detect what kind of IPX/SPX frame type you are
using. You may manually select a frame type by using the list box.
Remote Client Authentication:
Remote authentication settings allow you to specify how you would like to authenticate remote
users. You may select
Use Local Client List or Use RADIUS Authentication (refer to Remote
Connection Authentication Settings in this chapter for more information). Choosing RADIUS
configuration allows you to use the user information (user name, password, IP address, etc.)
stored on a separate RADIUS server on the network.
3.
Click OK when complete.
Summary of Contents for RoteFinder RF500S
Page 1: ...Model RF500S DSL Cable Router with Built in 4 port 10 100 Switch User Guide ...
Page 6: ...Chapter 1 Introduction ...
Page 13: ...Chapter 2 Hardware Installation ...
Page 16: ...Chapter 3 Software Installation and Configuration ...
Page 31: ...Chapter 4 Telnet ...
Page 38: ...Chapter 5 RouteFinder Manager ...
Page 67: ...Chapter 6 RouteFinder Monitor ...
Page 79: ...Chapter 7 LAN Client Settings ...
Page 108: ...Chapter 8 LAN to LAN Settings ...
Page 112: ...Chapter 9 Troubleshooting ...
Page 116: ...Chapter 10 Service Warranty and Technical Support ...
Page 123: ...Appendix ...
Page 128: ...Glossary ...


