background image

Page 508

P31 SERIES

4.

Maintenance

CLOSE COUPLED PUMPS

A.

 Seals

B.

 Flushing Lines 

C.

 Lubrication 

4A Seals

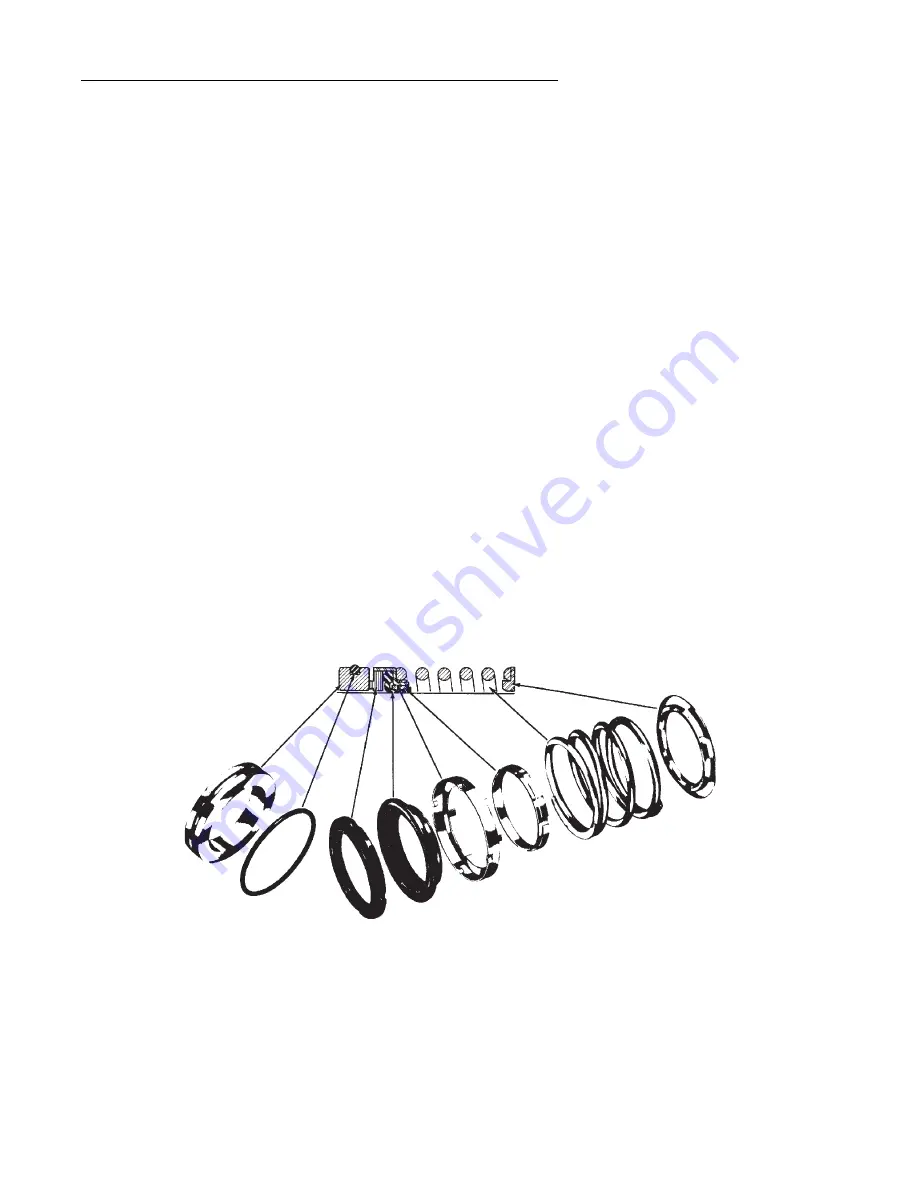
Mechanical seals are used in MTH 

Pumps to eliminate the maintenance 

that is normally associated with pack-

ing boxes.  This does not, however, 

mean they can totally be ignored. 

Check a new installation for seal 

leakage.

Maintenance of seals consists 

primarily of periodic observation, 

looking for the first signs of failure.  

An occasional drip that continues to 

worsen is an indication that the seal 

has failed and must be replaced.  

Follow the appropriate Disassem-

bly/Assembly instructions. Always 

shut down a pump with failed seals 

as soon as possible. Leaky seals 

are usually followed by motor bear-

ing failures and then possible pump 

damage as rotating parts become 

mis-aligned.  

Where seal failures or minor fluid 

leaks are not tolerable, consideration 

should be given to switching to a 

sealless leak-free design.  Most MTH 

pumps are available in a sealless 

canned motor design.  See the SP31. 

4B Flushing Lines

External Flushing lines are not 

an option on P31 pumps with 

mechanical seals. There is an 

external line available on the canned 

motor SP31.

Figure 4-1

Seat

“O” Ring

Primary Ring or 

Rotating Element

Flexible 

Elastomer 

Diaphragm

Retainer

Drive Ring

Spring

Spring 

Holder

4C Lubrication

Sealed ball bearings are standard 

in all MTH pumps and motors. The 

maximum continuous operating 

temperature for bearings is 375°F. 

While it is not advisable to routinely 

disassemble sealed bearings, it 

is possible to removes the seals 

during disassembly and determine 

their condition. Use new bearings 

for reassembly.  While the pump is 

in service, listen for unusual sounds 

or changes in bearing noise. A 

screwdriver held between the bearing 

housing and your ear while the pump 

is rotated by hand is sometimes 

helpful if there is too much ambient 

noise when the system is operating.

Summary of Contents for P31 Series

Page 1: ...P31 SERIES Section P31 Page 501 Dated October 2010 97 5006 01 588 Pump Manual HORIZONTAL CLOSE COUPLED ADJUSTABLE PERFORMANCE INTEGRAL RELIEF VALVE OPTION...

Page 2: ...the shaft Apply ing torque to the motor fan blades is not recommended If the impeller does not break loose immediately fill the pump with a process compatible fluid and try again in a few hours If thi...

Page 3: ...in feet of pumped liquid The NPSH is actually a measurement of the amount of energy available in the pumped liquid to produce the required absolute entrance velocity in the pump If a pump requires mo...

Page 4: ...l the components required for servic ing plus shaft sleeve and drive keys should be obtained A factory re build should be considered whenever your disassembly indicates rebuilding is necessary as this...

Page 5: ...foundation until it has been properly aligned The foundation must be a perma nent rigid installation of concrete or other material of sufficient mass to absorb all normal vibrations Locate the founda...

Page 6: ...ant to be aware of and follow the appropriate local and na tional electrical codes Do not make wiring alterations that can affect motor rotation without reconfirming correct rotation Select starters a...

Page 7: ...uction lines are desirable to minimize priming time Usingtheself primingequipment itis only necessary to 1 Open the plugs in both the inlet and discharge chambers 2 Pour fluid in one until both are fu...

Page 8: ...able consideration should be given to switching to a sealless leak free design Most MTH pumps are available in a sealless canned motor design See the SP31 4B Flushing Lines External Flushing lines are...

Page 9: ...x 6 long 8 Thin blade screwdriver 9 Cealube G P 80 or glycol base lubricant compatible with the pro cess fluid and O ring elastomers DO NOT use petroleum prod ucts To disassemble the pump Refer to Fig...

Page 10: ...rances between the casing and impeller probably exceed the maximum allow able The P31 features an adjustable casing that may allow return to like new performance See Section 5D for more information If...

Page 11: ...ng careful not to damage the seat or the rotating element 4 Compress and hold the seal spring slightly below the snap ring groove and install the snap ring 4 Make sure the snap ring is locked firmly i...

Page 12: ...al attention should be given to the seal area where the motor shaft enters the motor bracket 6 Under pressure the impeller will find its hydraulic balance 7 Using an amprobe or similar de vice check f...

Page 13: ...onents 6 Air pockets in the suction piping Operating the system at maximum flow conditions will usually clear the lines Evacuate the system with a vacuum pump if necessary 7 Suction lines strainer or...

Page 14: ...clear ances rusty Follow installation instructions for loosening the pump Foreign material in pump Flush out Disassemble if flushing is not successful 3 Pump leaks Seal or O rings are usually the pro...

Page 15: ...ump was purchased or supplied Complete details on what is wrong with the pump must be provided along with information on the system in which it is installed Refer to the MTH Pumps Limited Warranty sta...

Page 16: ...marked with the Return Goods Authorization RGA number provided by MTH and shipped freight prepaid and allowed F O B the MTH factory at Plano Illinois USA MTH may in its sole discretion deny any warra...

Reviews: