background image

P31 PUMP ENDS

A. Preliminary

B. Disassembly 

C. Inspection of Components

D. Reassembly 

E. Testing and Final Adjustments

5A Preliminary

Before attempting any service on the 

pump or motor, disconnect the elec-

trical power to the pump motor.  If the 

pump and motor are to be removed 

as a unit, note the wiring configura

-

tion.  Use colored or numbered tape 

to mark the wire connections of the 

motor and power source, for recon-

nection.  If the pump is being used to 

pump hot liquid, let the pump and liq-

uid cool before starting disassembly.

1.  Disconnect the inlet and outlet pip-

ing before unbolting the pump and 

motor.  If the pipes are corroded, 

use penetrating oil on the threads 

to aid in removal.

2.  Unbolt the motor from the base 

and remove the unit.  All work on 

the unit should be performed on 

an elevated workbench whenever 

possible.

5B Disassembly

The following tools and equipment 

are needed for disassembly/reas-

sembly of P31 Series Pumps:

1.  Soft plastic or wooden mallet.

2.  Small Punch.

3.  5mm hex wrench.

4.  3/16” hex wrench.

5.  Snap ring pliers.

6.  Penetrating oil.

7.  11/16” wood dowel (Approx. 6” 

long.)

8.  Thin blade screwdriver.

9.  Cealube G, P-80, or glycol base 

lubricant compatible with the pro-

cess fluid and O-ring elastomers.  

(DO NOT use petroleum prod-

ucts.)

To disassemble the pump:

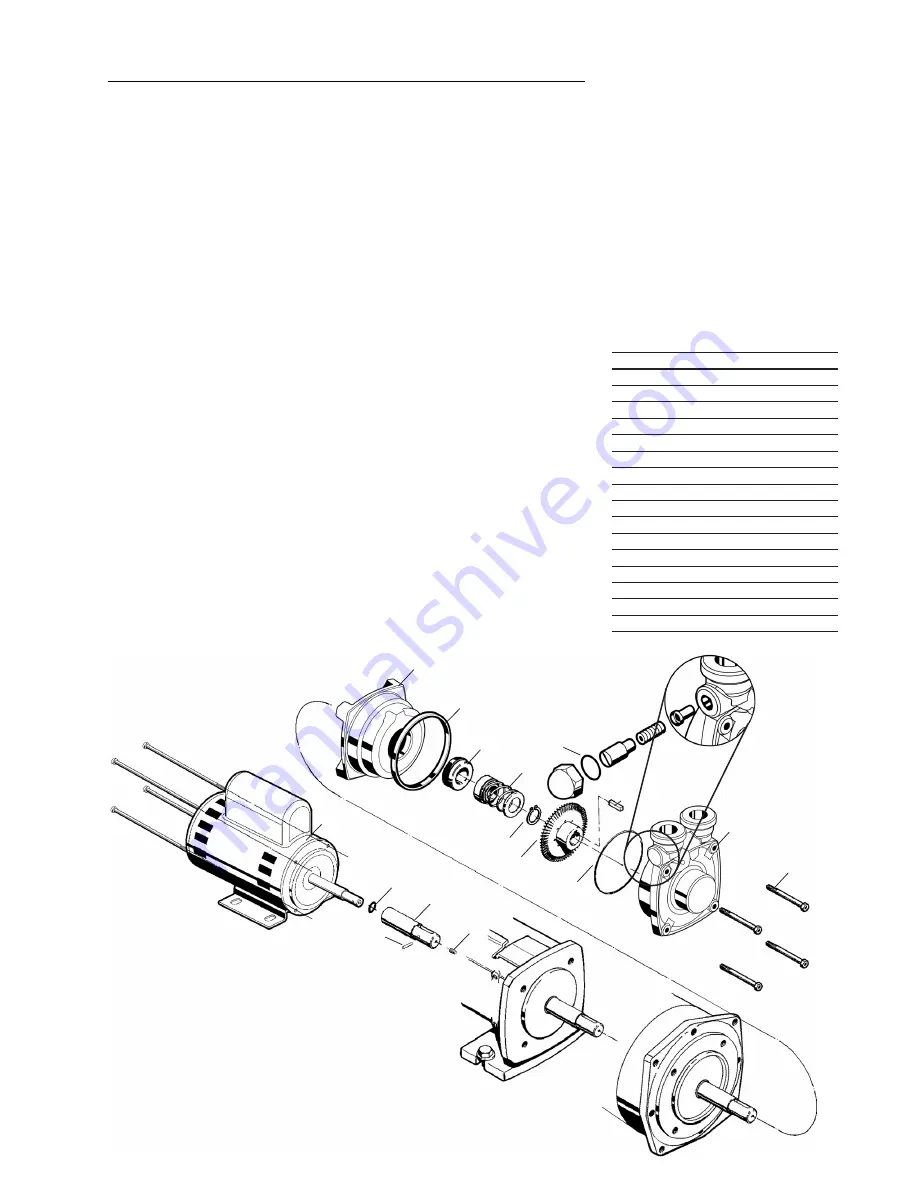
Refer to Figure 5-1 for reference to 

the numbered parts in the procedures 

below.  Please note that the P31 is 

an adjustable performance pump.  It 

has been preset at the factory for 

your particular performance needs.  

If you are disassembling for inspec-

tion or seal replacement only, you 

may wish to mark or otherwise lock 

the adjusting nut (#110) into place 

(before disassembly) especially if you 

are uncomfortable with the readjust-

ment procedures found in Section 5D 

Step 10.  

1.  Remove all liquid from the pump.  

Air blown through the pump will 

remove fluid quickly.

2.  Remove the four (4) M6-1 X 

60mm bolts (#33) from the casing 

(#108).

Page 509

Figure 5-1  

125

84

12

4

11

23

7

108

33

8

88

19

72

NAME/DESCRIPTION

PART NO. QTY.

Motor Bracket

84

1

Casing

108

1

Adjusting Nut

110

1

“O” Ring/Casing

7

1

“O” Ring/ Relief Valve

7A

1

“O” Ring/Shaft Sleeve

8

1

Snap Ring

4

1

Impeller

11

1

Seal Rotating Element

12

1

Seal Stationary Seat

125

1

Setscrew

15

1

Thru Bolt/Casing

33

4

Thru Bolt/Motor

19

4

Shaft Sleeve

88

1

Shaft Sleeve Pin

72

1

Key/Impeller Drive

23

1

P31 CLOSE-COUPLED PUMP

110

P31 SERIES

5.

Service

15

7A

Summary of Contents for P31 Series

Page 1: ...P31 SERIES Section P31 Page 501 Dated October 2010 97 5006 01 588 Pump Manual HORIZONTAL CLOSE COUPLED ADJUSTABLE PERFORMANCE INTEGRAL RELIEF VALVE OPTION...

Page 2: ...the shaft Apply ing torque to the motor fan blades is not recommended If the impeller does not break loose immediately fill the pump with a process compatible fluid and try again in a few hours If thi...

Page 3: ...in feet of pumped liquid The NPSH is actually a measurement of the amount of energy available in the pumped liquid to produce the required absolute entrance velocity in the pump If a pump requires mo...

Page 4: ...l the components required for servic ing plus shaft sleeve and drive keys should be obtained A factory re build should be considered whenever your disassembly indicates rebuilding is necessary as this...

Page 5: ...foundation until it has been properly aligned The foundation must be a perma nent rigid installation of concrete or other material of sufficient mass to absorb all normal vibrations Locate the founda...

Page 6: ...ant to be aware of and follow the appropriate local and na tional electrical codes Do not make wiring alterations that can affect motor rotation without reconfirming correct rotation Select starters a...

Page 7: ...uction lines are desirable to minimize priming time Usingtheself primingequipment itis only necessary to 1 Open the plugs in both the inlet and discharge chambers 2 Pour fluid in one until both are fu...

Page 8: ...able consideration should be given to switching to a sealless leak free design Most MTH pumps are available in a sealless canned motor design See the SP31 4B Flushing Lines External Flushing lines are...

Page 9: ...x 6 long 8 Thin blade screwdriver 9 Cealube G P 80 or glycol base lubricant compatible with the pro cess fluid and O ring elastomers DO NOT use petroleum prod ucts To disassemble the pump Refer to Fig...

Page 10: ...rances between the casing and impeller probably exceed the maximum allow able The P31 features an adjustable casing that may allow return to like new performance See Section 5D for more information If...

Page 11: ...ng careful not to damage the seat or the rotating element 4 Compress and hold the seal spring slightly below the snap ring groove and install the snap ring 4 Make sure the snap ring is locked firmly i...

Page 12: ...al attention should be given to the seal area where the motor shaft enters the motor bracket 6 Under pressure the impeller will find its hydraulic balance 7 Using an amprobe or similar de vice check f...

Page 13: ...onents 6 Air pockets in the suction piping Operating the system at maximum flow conditions will usually clear the lines Evacuate the system with a vacuum pump if necessary 7 Suction lines strainer or...

Page 14: ...clear ances rusty Follow installation instructions for loosening the pump Foreign material in pump Flush out Disassemble if flushing is not successful 3 Pump leaks Seal or O rings are usually the pro...

Page 15: ...ump was purchased or supplied Complete details on what is wrong with the pump must be provided along with information on the system in which it is installed Refer to the MTH Pumps Limited Warranty sta...

Page 16: ...marked with the Return Goods Authorization RGA number provided by MTH and shipped freight prepaid and allowed F O B the MTH factory at Plano Illinois USA MTH may in its sole discretion deny any warra...

Reviews: