background image


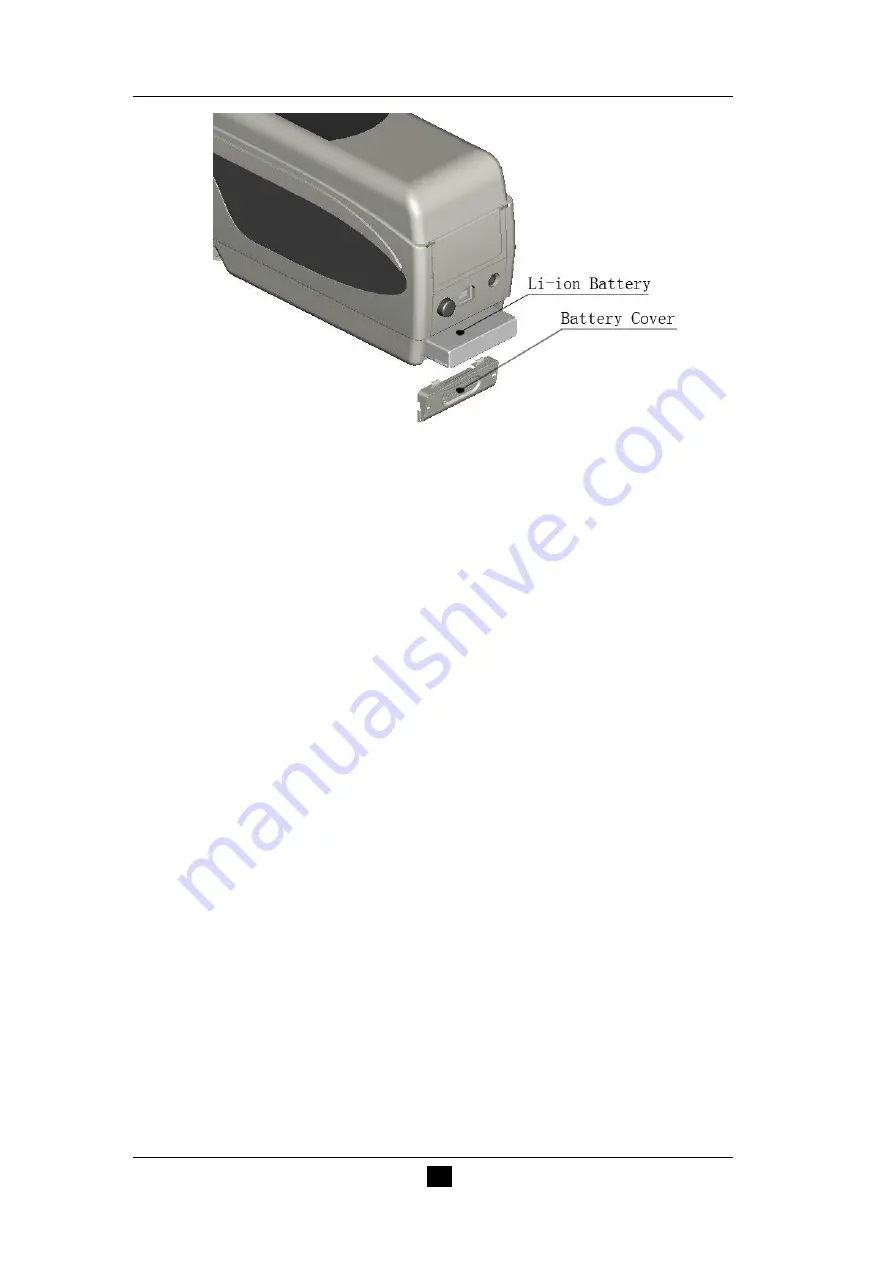
Figure 4 Battery Installation 

Installing Battery 


When  installing  battery,  be  sure  the  power  switch  is  popped  out  (The  power  source  of 

colorimeter is cut off). Then remove the battery cover. 


Insert the Li-ion battery into battery compartment and push it gently in right direction.   


Put the battery cover on Li-ion battery, and then push it up. 


Battery Specification

Li-ion 3.7V==0.5A. 


Summary of Contents for CLRM-200

Page 1: ...CAREFULLY BEFORE OPERATION 3 Hagavish st Israel 58817 Tel 972 3 5595252 Fax 972 3 5594529 mrc mrclab com MRC VER 01 10 13 O Op pe er ra at ti io on n M Ma an nu ua al l C CL LR RM M 2 20 00 0 High Quality Portable Colorimeter ...

Page 2: ...such as coffee etc I Component Structure The structure of universal test components is shown in Figure 1 Base Baffle Square Integrator 31 Measuring Port of the Square Integrator Cuvette Cover Plate Push Plate Screw Figure 1 The Structure of Universal Test Components II Usage The usage of universal test components is shown in Figure 2 ...

Page 3: ... two matte surfaces in the cuvette Please only touch these two matte surfaces when hold the cuvette In addition there are two transparent surfaces which engraved with MAX and MIN Please put one surface against the measuring port of the square integrator as shown in Figure 3 iii Put the Cuvette into the Square Integrator Cover the cover plate There is an arrow icon in the cover plate Meanwhile squa...

Page 4: ...eter and Universal Test Components III Notes i Keep the square integrator clean After finishing the measurement please cover the cover plate and keep the square integrator closed ii Protect those two transparent surfaces of the cuvette from scratching and soiling iii The amount of the object in cuvette must be between MAX and MIN ...

Page 5: ...ethod 7 2 Standard Measurement 7 3 Sample Measurement 8 III Save Data 9 1 Auto Save 9 2 Manual Save 10 IV Connect 200 Colorimeter to the PC 10 Ⅴ print 11 V System Function Description 12 1 Record and Standard Entering 12 2 Calibration 13 3 Tolerance Setting 14 4 USB Communication 15 5 Delete Records 16 6 Language Selection 17 7 Display Mode 18 8 Average Measurement 18 9 Function Setting 19 Ⅵ Produ...

Page 6: ...of external environment when measuring These changes including the flicker of surrounding light the rapid change of temperature will affect the measuring accuracy Keep the instrument balanceable make sure the measuring aperture cling to the test sample and no shaking or shifting when measuring Please prevent the colorimeter from fierce collision or crash This instrument is not waterproof Do not us...

Page 7: ...ng is a brief introduction of the buttons We will give more detailed information about its function separately in next chapters Figure 1 Button Function Button Function Introduction 1 Testing 2 Menu 3 Up Print 4 Down Save 5 Enter 6 Back ...

Page 8: ...ernal power source The specification of external power source is 5V 2A 3 USB Interface RS 232 Interface This interface is a common interface The instrument automatically judges the connection status USB interface is used to transfer data to PC Its baud rate is 115200bps RS 232 interface is used to connect to the printer its baud rate is 19200bps Note When connecting to external power source please...

Page 9: ...urce or connecting USB interface to PC if you press the power switch it will charge the Li ion battery If you don t want to charge the battery please take out the battery When charging the battery dynamic battery icon will display on the top right corner of Standard Measurement and Sample Measurement interfaces In figure 3 the charging icon displays in Standard Measurement interface if no charging...

Page 10: ... power switch is popped out The power source of colorimeter is cut off Then remove the battery cover Insert the Li ion battery into battery compartment and push it gently in right direction Put the battery cover on Li ion battery and then push it up Battery Specification Li ion 3 7V 0 5A ...

Page 11: ...gh manual calibration is needed After turning on 200 colorimeter press Menu to enter the main menu as shown in Figure 5 Select Calibrate to enter White and Black Calibration interface as shown in Figure 6 Be sure the white calibration cover is well installed Selecting White Calibration and press Enter button the instrument will prompt you to place the white calibration plate Then press Enter or Te...

Page 12: ...e the matching status between the facula and the measured sample At the same time hold the measuring aperture close to the measured sample and adjust it Then the alignment is achieved After the locating release Testing button The instrument will finish sample testing in approx 1 sec and display color parameters of the measured sample 2 Standard Measurement There are two conditions about standard m...

Page 13: ...andard Measurement Interface b Standard Measurement after Completing Sample Measurement or Other Operations After completing sample measurement or other operations the instrument may display an interface At this moment press Back button repeatedly until the interface back to Standard Measurement interface as shown in Figure 7 Then perform standard measurement according to step a 3 Sample Measureme...

Page 14: ... Auto Save Press MENU button to enter the main menu as shown in Figure 5 Select Settings to enter an interface shown in Figure 9 Select Auto Save to enter status setting interface as shown in Figure 10 Select On and press Enter button to save the setting After completing this setting the measurement data will be saved automatically Figure 9 Settings Interface ...

Page 15: ...Connect 200 Colorimeter to the PC Press MENU button to enter the main menu as shown in Figure 5 Then select Comm to enter an interface shown in Figure 11 Follow the instruction information mentioned in the interface to connect 200 colorimeter to the PC with USB cable When the communication is successful the instrument will enter Communicating interface as shown in Figure 12 Figure 11 USB Communica...

Page 16: ...eter is in Standard Measurement Sample Measurement or Record interfaces you can print data through the printer Connect colorimeter to the printer When the colorimeter is in one of the above interfaces press and hold about 5 second Up Print button to start the printer ...

Page 17: ...Record in main menu to enter Standard Record as shown in Figure 14 The figure shows the standard parameters You can check different standard data through Up and Down In figure 15 T002 is a standard number After selecting a standard you can press Enter to check sample parameters and color difference parameters as shown in Figure 15 You can check different data through Up and Down No 001 in Figure 1...

Page 18: ...sample data through Up and Down After finding it press Menu button and then the sample record is entered to the measurement interface as a standard press Enter you can perform the color measurement under this standard 2 Calibration After turning on 200 colorimeter press MENU to enter the main menu as shown in Figure 13 Select Calibrate to enter manual white calibration and black calibration interf...

Page 19: ...alibration Interface 3 Tolerance Setting Select Tolerance in main menu to enter tolerance setting interface as shown in Figure 17 You can add or subtract the number in which the cursor is positioned through Up and Down button After setting the number to the needed one press Enter button the cursor will jump to the last number When the cursor is in the last number press Enter button to save the set...

Page 20: ... main menu to enter an interface shown in Figure 18 According to the prompt connect 200 colorimeter to the PC with USB cable When the communication is successful the instrument will enter Communicating interface as shown in Figure 19 Figure 18 USB Communication Interface ...

Page 21: ...e instrument and save the standard records Then the instrument will display a warning interface as shown in Figure 20 Press Enter all sample data will be deleted but the standard records are still retained b Delete All Records When select All Records Delete all records in the instrument will be deleted including all standard records and all sample records Then the instrument will display a warning...

Page 22: ...All Records Warning Interface 6 Language Selection Select Language in the main menu to enter an interface shown in Figure 22 You can select the language according to your need by pressing Up and Down buttons Press Enter to save the settings and return to the main menu ...

Page 23: ...tings and return to the main menu Figure 23 Display Mode Interface 8 Average Measurement Select Average in the main menu to enter an interface shown in Figure 24 You can set the number of average measurements according to your need You can add or subtract the times by pressing Up and Down buttons Press Enter to save the settings and return to the main menu When the number is set to 01 the instrume...

Page 24: ...ss Enter button to save the settings and return to the previous menu Figure 25 Other Settings Interface a Select Settings Auto Save to enter an interface shown in Figure 26 This interface enables you to set measured data automatically or not Select Open each sample data and standard data will be saved automatically Select OFF data will not be saved automatically Figure 26 Auto Save Interface b Sel...

Page 25: ...29 Figure 30 and Figure 31 In Figure 28 and Figure 29 you can set display format of time and date by pressing Up and Down Press Enter to save the settings and return to the previous menu If you don t want to set or modify time and date you can press Back button to return to the main menu Figure 27 Time Setting Interface Figure 28 Set Time ...

Page 26: ...elect Settings Print Setting to enter an interface shown in Figure 32 This interface is used for selecting print mode After connecting the instrument to the printer if select Open and save it the printer will print the measured data automatically after each measurement If select Off and ...

Page 27: ...enter an interface shown in Figure 33 When the instrument is in idle state you can set the backlight time to save electricity consumption Figure 33 Backlight Time Setting Interface e Select Settings Brightness Setting to enter an interface shown in Figure 34 This interface is used to set the backlight brightness to help users to use this instrument in different environments ...

Page 28: ...terface shown in Figure 35 You can check battery capacity through this interface Figure 35 Battery Capacity Interface g Select Settings Restore Factory Set to enter an interface shown in Figure 36 Press Enter button The instrument will restore to factory default setting and clear all records ...

Page 29: ...24 Figure 36 Restore Factory Set ...

Page 30: ...sion of this instrument and it eliminates complex manual white and black calibration which greatly improves the convenient use of the colorimeter You only need to turn on the colorimeter before performing measurements The standard deviation of this colorimeter is E ab 0 08 Average of 30 measurements of standard white calibration plate The colorimeter adopts international standard illuminate D65 Th...

Page 31: ...0 pcs standard samples 20000 pcs test samples Minimum Interval Between Measurement Approx 1 sec Battery Life More than 3000 measurements Lamp Life more than 1 6 million times in 5 years Display TFT True color 2 8 inch 16 9 Interface Model B USB RS 232 Baud rate 19200bps Operating Temperature Range 10 to 40 32 to 104 Storage Temperature 20 to 50 4 to 122 Humidity Range less than 85 relative humidit...

Page 32: ...bserver s color perception Objects can affect the final color perception because the reflectance spectra transmittance spectra of the object have modulated the light source spectrum Different objects have different reflectance spectra transmittance spectra The light source spectrum modulates the reflectance spectra transmittance spectra of different objects to obtain different results The observer...

Page 33: ...ce units calculated by other color difference formulas are all NBS In national standards GB7705 87 lithograph GB7706 87 letterpress GB7707 87 gravure which promulgated by the National Bureau of Standards the color printings rating in the same batch and same color according to color difference are defined as follows General Product ΔE ab 5 00 6 00 Fine Product ΔE ab 4 00 5 00 Meanwhile this quality...

Reviews: