background image

48

Using Calling Cards

Storing Calling Card Numbers

Number Characters are another way your phone can save you 
time in dialing. The Number Character saves a place in the 
memory sequence for the number you will be calling when you 
use your calling card. For best results, you may use the Number 
Character along with Pause Dialing.

1.

Enter 
Access 
Number

Enter the phone number you use to access 
the calling card system, usually a 1-800 
phone number. Skip this step if you only 
dial 0.

2.

Insert 
Pause

Press


ƒ


then press 

æ

 (or 

ª

). You will 

see: 

Insert Pause o

. Press 

a

a

a

a

.

3.

Insert 
Number 
Character

Press


ƒ 

then press


æ

 (or 

ª

). Press 

q

q

q

q


or 

Z

Z

Z

Z

 to scroll to


Insert Number 

N

.


Press 

a

a

a

a

. You will see the number character


inserted into the sequence.This special char-
acter saves a place for the number you will 
be calling when you use your calling card.

4.

Insert 
Pause

Press


ƒ

 then 

æ

 (or 

ª

)


then 

a

a

a

a

 as in 

step 2.

5.

Enter 
Code

When you use your calling card, the system 
prompts you for an access code, usually a PIN 
code. Enter this number. 

6.

Repeat

Repeat steps 4 and 5 if your card requires 
more access codes.

7.

Store
Sequence

Press

 ¬

. Enter a two-digit location, select 

an icon, press 

Ç

, enter a name if you like, 

and press 

¬ 

or 

a

a

a

a

 when finished. Your 

phone will confirm the entry by displaying the 
information you stored.

Tip:

You can protect 
your calling card 
information with 
your phone’s call 
restriction fea-
tures. See page 
88 for details. 

Summary of Contents for st7868w

Page 1: ...ass quality standards During development our laboratory testing team took the durable digital StarTAC phone through its paces They cooked it steamed it shook it shocked it dusted it and dropped it and the phone still worked We are confident that the one you purchased can meet your own exacting standards Thank you for choosing Motorola and we hope you enjoy your digital StarTAC wireless phone ...

Page 2: ...ted First things first Once the box is open this section will show you where to begin We will explain what came with your new phone and show you how to use the battery Turn to page 10 to get started The Basics What do all those buttons and lights mean How do I make my first phone call In this section we ll answer those questions and teach you everything necessary to start using your new phone Begi...

Page 3: ... with the Minibrowser You can use the phone to retrieve on demand weather reports sports scores stock reports and much more See page 106 With the addition of the Motorola Data Connectivity Kit you can hook your phone up to a compatible computer and send and receive faxes and data See page 114 The Works When you are ready to learn the advanced features of your new phone turn to page 58 for The Work...

Page 4: ...Phone Overview 18 Using the Smart Button 19 The Basics Turning Your Phone On 20 Reading the Indicators 23 Placing and Ending Calls 26 Redialing Numbers 27 Receiving Calls 28 Basic Tone Controls 30 Your Phone Its Shortcuts 32 Using Memory Introduction 34 Making the Most of Memory 35 Storing 36 Entering Names 37 Recalling 38 Editing Memory 40 Pause Dialing 46 Using Calling Cards 48 ...

Page 5: ...ers Using Call Timers 68 Monitor the length of your calls Setting Tone Controls 74 Adjust your phone s tone controls Lock Security Features 82 Control access to your phone Phone Options 90 Personalize your phone s operation Using the Minibrowser 106 Access valuable information with your phone Using Data Features 114 Make your phone a wireless modem Reference Information Accessory Options 122 Troub...

Page 6: ...ardswerebasedoncomprehensiveandperiodicevaluationsof therelevantscientificliterature Forexample over120scientists engineers andphysiciansfromuniversities governmenthealthagencies and industryreviewedtheavailablebodyofresearchtodeveloptheANSI Standard C95 1 ThedesignofyourphonecomplieswiththeFCCguidelines andthose standards Important TomaintaincompliancewithFCCRFexposureguidelines ifyouwearahandset...

Page 7: ...ourbatteryispacked with a protective cover please use this cover for storing your battery when notinuse Driving Checkthelawsandregulationsontheuseofwirelesstelephonesinthe areaswhereyoudrive Alwaysobeythem Observethefollowingguidelines whenusingyourphonewhiledriving Give full attention to driving driving safely is your first responsibility Use hands free operation if available Pull off the road an...

Page 8: ...elyshieldedfromexternalRF energy Yourphysicianmaybeabletoassistyouinobtainingthis information TurnyourphoneOFFinhealthcarefacilitieswhenanyregulationsposted in these areas instruct you to do so Hospitals or health care facilities maybeusingequipmentthatcouldbesensitivetoexternalRFenergy Vehicles RFsignalsmayaffectimproperlyinstalledorinadequatelyshielded electronicsystemsinmotorvehicles Checkwitht...

Page 9: ...uchasgrain dust ormetalpowders andanyotherareawhereyouwouldnormallybe advisedtoturnoffyourvehicleengine Vehicles Equipped with Air Bags Anairbaginflateswithgreatforce DONOTplaceobjects includingboth installedorportablewirelessequipment intheareaovertheairbagorin the air bag deployment area If in vehicle wireless equipment is improperly installedandtheairbaginflates seriousinjurycouldresult Equipme...

Page 10: ...bility This chapter will show you how to get started with your new wireless package In this chapter we will explain how to Attach and charge batteries Use chargers Package Content Options Digital 2 5 1 2 07 07 99 Ready LOCK VIB BATT MENU MUTE TUV JKL MNO WXYZ PQRS GHI DEF OPR ABC 6 9 3 5 8 0 2 1 4 7 RCL STO CLR SEND PWR FCN END Slim LiIon Battery with Battery Cover Extra Capacity LiIon Battery wit...

Page 11: ...11 Getting Started Package Content Options Your phone and accessories may not look exactly as pictured Vehicle Power Adapter AC Adapter Headset Desktop Charger AC adapter required ...

Page 12: ...ot in use The clip prevents objects from touching the battery terminals thereby reducing the risk of injury or damage from a short circuit Removing the Main Battery Clip Attaching the Main Battery Clip 1 Press In Latch Press in the release latch 2 Remove Battery Rotate the battery upward and lift it out of the protective clip 1 Lower Side Lower the side opposite the release latch into the clip 2 C...

Page 13: ...wn 1 Insert Toe Place the side of the battery opposite the release latch into the compartment 2 Snap Heel Press the side with the release latch down until you hear it click into place 1 Turn OFF Phone If necessary press and hold to turn your phone OFF 2 Remove Battery Pull the release latch back toward the battery and lift the battery out 1 ...

Page 14: ...s energy so your phone may not charge while the call is in progress Keep in mind In some cars the ignition must be ON to use the vehicle s accessory power Check with your retailer for availability of the adapters 1 Attach Adapter to Phone Plug the AC or vehicle power adapter into the accessory connector on the bottom of your phone as shown with the release tab facing up 2 Plug In Adapter Plug the ...

Page 15: ...teries in fire Caution To prevent injuries or burns do not allow metal objects to contact or short circuit the battery terminals Expert Performance E P Charging System The E P system enables your phone s built in charger to communicate with installed batteries and tailor its charging cycle to optimize performance If you see Invalid Battery when you power up the phone the built in charger is not ab...

Page 16: ...tteries are loaded in the charger the batteries will charge one at a time 1 Attach Adapter Plug the AC adapter into the back of the charger with the release tab facing up 2 Plug In Adapter Plug the other end of the AC adapter into a wall socket 3 Insert Phone Insert the phone into the front pocket with a battery attached Insert Battery If you like insert a battery into the rear pocket P U S H Fron...

Page 17: ...e it takes for your battery to obtain a full charge is affected by a variety of factors including Temperature Batteries should be at or near room tempera ture when charging To prolong battery life and charge capacity avoid exposing your batteries to temperatures below 10 C 14 F or above 45 C 113 F It is a good idea to take your phone with you when you leave your car Inactivity New batteries or bat...

Page 18: ...ted in the manual by q q q q and Z Z Z Z these keys adjust the volume and scroll up and down through memory locations and menu features Turns the phone ON and OFF ø Opens messaging menus ƒ Acts as a shift key to access the secondary functions of other keys Recalls phone numbers from memoryand acts as the left soft key for Minibrowser navigation Stores phone numbers into memory and acts as the righ...

Page 19: ...ing the Menu System Press ƒ then press A A A A to enter your phone s menu system See page 58 for information on navigating the menu system Selecting Items in the Menu The primary use of the Smart Button is to select Whenever the phone offers you a choice such as setting a ringer style pg 77 press A A A A to select You will see Press to Select Turning Features ON and OFF Press A A A A to toggle ON ...

Page 20: ...how to turn your phone ON read the indicators place receive and end calls adjust ringer and keypad volume use shortcuts and more Turning Your Phone On Follow these steps to turn your phone ON 1 Extend Antenna Extend the antenna completely for best performance 2 Open Phone Open the phone to expose the keypad 3 Turn ON Phone Press oncetoturnthephoneON 4 Turn OFF Phone When finished press again to tu...

Page 21: ...llow the steps above Power Up Display Once activated each time you turn your phone ON your phone performs a short self test to make sure it is operational and then it scans for service While the phone scans the display reads Turn the page to learn more about turning your phone ON 1 Place Call Press æ or ª to place the call or Press and hold A A A A until you hear a high tone 2 Follow Steps Once th...

Page 22: ...hone ON your phone will briefly display Roaming Power Save Mode If you travel outside the range of available networks your phone continues to search for a signal To save power it stops searching every couple of minutes When this is the case you will see Power Save Your phone will automatically begin searching again in a minute or two if you would like it to start searching immediately just press a...

Page 23: ...e vehicle power adapter for example you will see Charging Service Light The Service Light is on top of your phone and lights up when your phone is ON The color it flashes depends on your phone s current state of service Press ƒ then press Red Green alternating Incoming call or message Green flashing In Service home type system Red flashing No Service Yellow flashing slow Roaming home type system Y...

Page 24: ... correct local time You can set your clock for 12 or 24 hour format See page 100 for more information Battery Level 3 The three bar segments on the phone s Battery Level Indicator show the amount of charge remaining in your battery at a glance The more bar segments you see the higher the charge Digital 4 Indicates you are receiving a digital signal Analog 4 Appears when you are on an analog channe...

Page 25: ...r you have viewed the message Voicemail 9 Indicates that you have received a Voicemail message in your Voicemailbox It will disappear after you have checked your Voicemail When you select one of the VibraCall alert combinations see page 76 the following indicators appear in the display VibraCall Alert On 10 Indicates that your phone s ringer is turned OFF and the VibraCall alert is ON Silent Mode ...

Page 26: ...he phone ON 3 Enter Number Enter the number you want to call for example 555 1212 Correct Errors Press Ç to erase one digit at a time if you make a mistake Press and hold Çto erase the entire entry and start again 4 Place Call Press æ or ª to place the call or Press and hold A A A A until you hear a high tone You will see Calling 555 1212 Press to see the rest of the number Close Close the phone t...

Page 27: ...y busy signal Display Last Ten Numbers Dialed Your phone keeps track of the last ten numbers you have dialed Auto Redial Press æ or ª or press and hold A A A A until you hear a high tone You will see Redialing 1 Hang Up Press º to hang up 2 Redial Press æ or ª to redial or press and hold A A A A You will see Calling 1 Enter List Press then press The dis play will show the last number you dialed 2 ...

Page 28: ...ng before you answer The display will show your caller s name if it is in your Phone Book If not the display will show your caller s number If you prefer to always see your caller s number see page 65 to turn Number Preference ON The Caller IDs for your last 16 callers will be saved See page 52 to learn how to view your stored Caller IDs Network and service dependent feature Not available in all a...

Page 29: ...calls If your phone is ON it keeps a count of unanswered calls For example if you miss two calls your display will show 2 Calls Unanswered Call Waiting If you subscribe to Call Waiting through your Service Provider you may hear a tone while on a call indicating that you are receiving a second call Suppress Alert When the phone rings or vibrates press the upper or lower volume key Clear Display Pre...

Page 30: ...while a call is in progress you may mute the microphone you will be able to hear the party on the other end but they will not hear you Toggle Alert Press ƒ then press to switch between the ringer and vibrating alert Activate Silent Mode Press ƒthen press and hold until you see Silent Mode On Turn OFF Press ƒ then press to turn Silent Mode OFF Your phone will return to Ring Only mode Mute Phone Pre...

Page 31: ...justs the volume of these tones To adjust the volume of your conversation the earpiece volume use the volume keys during a call The bar graph in the display represents the volume level The higher the graph the louder the volume is Adjusting Ringer Volume To adjust ringer volume Raise Volume Press q q q q to raise the volume Lower Volume Press Z Z Z Z to lower the volume Raise Volume Press ƒ then p...

Page 32: ... place to find all your personal names and numbers See page 38 Messaging If you subscribe to messaging you can use this shortcut or the one on page 50 Launch Browser If you subscribe to MiniBrowser service use this feature to launch it See page 106 Last 10 Dialed Your phone remembers the last ten numbers you dialed Turn to page 27 to learn more Set System Mode Allows you to choose the type of syst...

Page 33: ... menu system Toggle Analog Press ƒ then press to toggle Analog Only ON or OFF Display Meter Press ƒ then press to display the battery meter Lock Phone Press ƒ then press fi You will see Lock Press to lock Mute Phone Press ƒ then press flto toggle mute ON and OFF during a conversation Silence Ringer Press ƒ then press to toggle your phone s VibraCall alert ON and OFF Silence All Tones Press ƒ then pr...

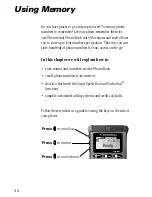
Page 34: ...or easy access on the go In this chapter we will explain how to store names and numbers into the Phone Book recall phone numbers from memory dial in a flash with the Super Speed Dial and Turbo Dial functions simplify automated calling systems and credit card calls Follow these symbols as a guide for using the keys on the side of your phone Press q q q q to scroll up Press a a a a to select Press Z...

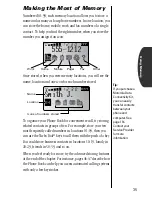
Page 35: ...le store your ten most frequently called numbers in locations 01 09 then you can use the Turbo Dial keys to call them with the push of a key You could store business contacts in locations 10 19 family in 20 29 friends in 30 39 and so on When you feel ready for more try the advanced storing features at the end of the chapter For instance pages 46 47 describe how the Phone Book can help you access a...

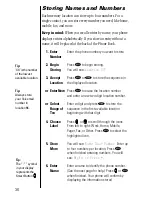
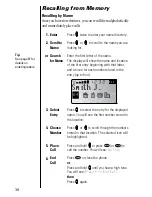
Page 36: ...digit location number or Select Range of Ten Enter a digit and press to store the sequence in the first available location beginning with that digit 4 Choose Label Press q q q q or z z z z to scroll through the icons From left to right Work Home Mobile Pager Fax or Other Press to select the highlighted icon 5 Store More You will see Enter Next Number Enter up to four numbers per location Press whe...

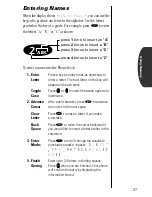
Page 37: ...h between upper and lowercase 2 Advance Cursor After each character press to advance the cursor to the next space Clear Letter Press Ç to erase a letter if you make a mistake Back Space Press to move the cursor backward if you would like to insert a letter earlier in the sequence 3 Enter Marks Press to scroll through the available punctuation marks space 1 _ 4 Finish Storing Enter up to 24 letters...

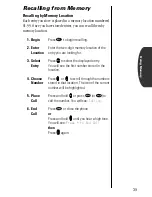
Page 38: ...ter and an icon for each number stored in the entry up to four 3 Select Entry Press a a a a to select the entry for the displayed name You will see the first number stored in the location 4 Choose Number Press q q q q or z z z z to scroll through the numbers stored in that location The selected icon will be highlighted 5 Place Call Press and hold a a a a or press æ or ª to call the number You will...

Page 39: ... looking for 3 Select Entry Press a a a a to select the displayed entry You will see the first number stored in the location 4 Choose Number Press q q q q or z z z z to scroll through the numbers stored in that location The icon of the current number will be highlighted 5 Place Call Press and hold a a a a or press æ or ª to call the number You will see Calling 6 End Call Press º or close the phone...

Page 40: ... the keypad Press Ç to erase one digit at a time or press and hold Ç to erase the entire number 5 Finish Number Press a a a a or when you finish the phone number 6 Select Icon If you would like to change the icon press q q q q or z z z z to scroll through the icons Press a a a a to select the highlighted icon The display will show the current location 7 Keep Location If you would like to keep the ...

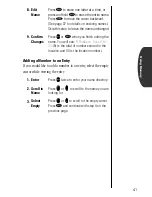
Page 41: ...ring names Skip this step to leave the name unchanged 9 Confirm Changes Press a a a a or when you finish editing the name You will see N Numbers Saved At XX N is the total of numbers stored in the location and XX is the location number 1 Enter Press a a a a twice to enter your name directory 2 Scroll to Name Press q q q q or z z z z to scroll to the name you are looking for 3 Select Empty Press q ...

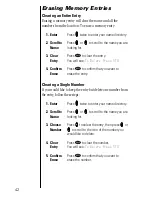
Page 42: ... name you are looking for 3 Clear Entry Press Ç to clear the entry You will see To Delete Press STO 4 Confirm Erase Press to confirm that you want to erase the entry 1 Enter Press a a a a twice to enter your name directory 2 Scroll to Name Press q q q q or z z z z to scroll to the name you are looking for 3 Choose Number Press a a a a to select the entry then press q q q q or z z z z to scroll to ...

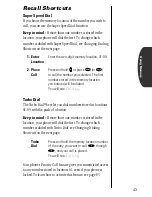
Page 43: ...red in the location your phone will dial the first To change which number is dialed with Turbo Dial see Changing Dialing Shortcuts on the next page Your phone s Priority Call feature gives you unrestricted access to any number stored in location 01 even if your phone is locked To learn how to activate this feature see page 85 1 Enter Location Enter the two digit memory location 01 99 2 Place Call ...

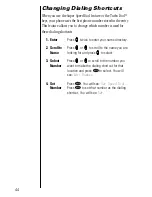
Page 44: ...er Press a a a a twice to enter your name directory 2 Scroll to Name Press q q q q or z z z z to scroll to the name you are looking for and press a a a a to select 3 Select Number Press q q q q or z z z z to scroll to the number you want to make the dialing shortcut for that location and press to select You will see Edit Number 4 Set Number Press Ç You will see Set Speed Dial Press to set that num...

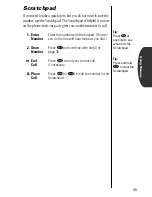
Page 45: ...nother number to call 1 Enter Number Enter the number with the keypad The per son on the line will hear tones as you dial 2 Store Number Press and continue with step 3 on page 36 or End Call Press º to end your current call if necessary Place Call Press æ or ª to call the number in the Scratchpad Tip Press at any time to see what is on the Scratchpad Tip Press and hold Çto clear the Scratchpad ...

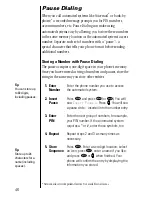
Page 46: ...you store other entries Network and service dependent feature Not available in all areas 1 Enter Number Enter the phone number you use to access the automated system 2 Insert Pause Press ƒ and press æ or ª You will see Insert Pause o Press a a a a You will see a pause circle o inserted into the number entry 3 Enter PIN Enter the next group of numbers for example your PIN number If the automated sy...

Page 47: ...and press and hold a a a a or press æ or ª Your phone will dial the access number and wait for your input when it reaches the first pause 2 Send More Numbers When the automated system prompts you for information press a a a a or æ or ª to send the next group of numbers Repeat this step to send each group of numbers that you have stored 3 End Call Press º close the phone or press hold a a a a until...

Page 48: ...ess q q q q or Z Z Z Z to scroll to Insert Number N Press a a a a You will see the number character N inserted into the sequence This special char acter saves a place for the number you will be calling when you use your calling card 4 Insert Pause Press ƒ then æ or ª then a a a a as in step 2 5 Enter Code When you use your calling card the system prompts you for an access code usually a PIN code E...

Page 49: ... ª You will see Enter Number Enter the phone number you are call ing You may enter the number manually or recall it by location 3 Place Call Press and hold a a a a to place the call Your phone will dial the number to access your calling card service provider then wait for your input when it reaches the first pause 4 Send More Numbers Press a a a a or press æ or ª to send the next group of numbers ...

Page 50: ...n how to view your Caller IDs check your Voicemail read your Messages explore your options with the Function Menus Follow these symbols as a guide for using the keys on your phone Network and service dependent feature Not available in all areas ø Digital 2 5 1 2 0 7 0 7 9 9 Ready LOCK VIB BATT MENU MUTE TUV JKL MNO WXYZ PQRS GHI DEF OPR ABC 6 9 3 5 8 0 2 1 4 7 RCL STO CLR SEND PWR FCN END Press q ...

Page 51: ...n the message memory is completely full and your phone is in idle mode Appears on the bottom line of the display when you receive a Voicemail message It will stay on the display until you have listened to the message Your Service Provider will then signal your phone to turn the indicator OFF Press ø to open the Messaging Menu When you open the Messaging Menu the icon of the message type you receiv...

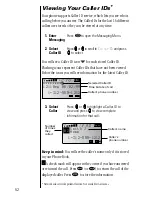
Page 52: ...ck mark will appear in the corner if you have answered or returned the call Press æ or ª to return the call of the displayed caller Press to store the information Network and service dependent feature Not available in all areas 1 Enter Messaging Press øto open the Messaging Menu 2 Select Caller ID Pressq q q qorZ Z Z Ztoscrollto CallerIDandpress a a a a to select 3 Select Caller Press q q q q or Z...

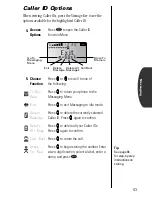
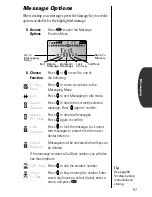
Page 53: ...Press a a a a to exit Messaging to idle mode Delete Message Press a a a a to delete the currently selected Caller ID Press a a a a again to confirm Delete All Msgs Press a a a a to delete all your Caller IDs Press a a a a again to confirm Call Back Press a a a a to return the call Store To Mem Press a a a a to begin storing the number Enter a two digit location select a label enter a name and pres...

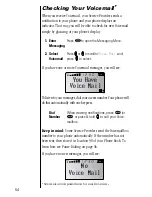
Page 54: ...eep in mind Some Service Providers send the Voicemailbox number to your phone automatically If the number has not been sent then store it in location 98 of your Phone Book To learn how see Pause Dialing on page 46 If you have no new messages you will see Network and service dependent feature Not available in all areas 1 Enter Messaging Press øto open the Messaging Menu 2 Select Voicemail Pressq q ...

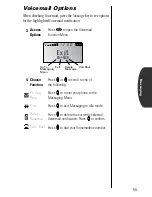
Page 55: ...unction Press q q q q or Z Z Z Z to scroll to one of the following To Msg Menu Press a a a a to return your phone to the Messaging Menu Exit Press a a a a to exit Messaging to idle mode Delete Message Press a a a a to delete the currently selected Voicemail notification Press a a a a to confirm Call Back Press a a a a to dial your Voicemailbox number Exit Call Back Go To Messaging Menu Exit Delete...

Page 56: ...Press a a a a or Z Z Z Z to scroll through the selected message When you reach the end of the message you will automatically go to the next message Previous Press to go to the previous message Next Msg Press to go to the next message If the message includes a Call Back number you can use the following shortcuts Call Back Press æ or ª to dial the Call Back number Store Press to store it in your Pho...

Page 57: ...o confirm Delete All Msgs Press a a a a to delete all messages Press a a a a again to confirm Lock Message Press a a a a to lock the message Lock impor tant messages to protect them from acci dental deletion Unlock Message Messages must be unlocked before they can be deleted If the message contains a Call Back number you will also see these options Call Back Press a a a a to dial the sender s numb...

Page 58: ...avigating the Menu You can navigate through the menu system using the three keys located on the left side of the phone Use the volume keys to scroll up and down through the options available on one level and the Smart Button in the middle to select This manual uses these symbols to instruct you to use the navigation keys Phone Book Lock Secure Timers Phone Options Tone Control Press q q q q to scr...

Page 59: ... keys to scroll through the menu system In the Works In the chapters that follow detailed instructions describe the operation of each feature We will explain everything you need to know about your new phone including how to access and use a feature and what happens when you do 1 Enter Menu Press ƒ then press a a a a 2 Scroll through Menu Press z z z z or q q q q to scroll through the menu s top le...

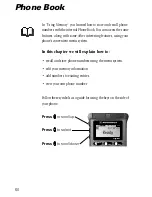
Page 60: ...nt menu system In this chapter we will explain how to recall and store phone numbers using the menu system edit your memory information add numbers to existing entries view your own phone number Follow these symbols as a guide for using the keys on the side of your phone Press q q q q to scroll up Press a a a a to select Press Z Z Z Z to scroll down 1menu 8 7 4 2 abc 5 6 3 def 9 0 Digital 2 5 1 2 ...

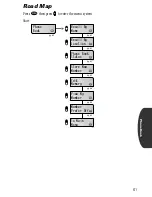
Page 61: ...hen press a a a a to enter the menu system Start Phone Book Recall By Name Recall By Location Phone Book Status Store New Number Edit Memory View My Number Number Prefer Off To Main Menu pg 62 pg 63 pg 63 pg 64 pg 66 pg 65 pg 60 pg 65 ...

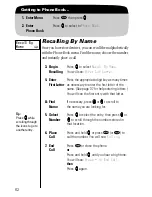
Page 62: ... the first letter of the name See page 37 for help entering letters You will see the first entry with that letter Find Name If necessary press q q q q or Z Z Z Z to scroll to the name you are looking for 5 Select Number Press a a a a to select the entry then press q q q q or z z z z to scroll through the numbers stored in that location 6 Place Call Press and hold a a a a or press æ or ª to call th...

Page 63: ...ber stored in the entry 5 Select Number Press a a a a to select the entry then press q q q q or z z z z to scroll through the numbers stored in that location 6 Place Call Press and hold a a a a or press æ or ª to call the number You will see Calling 7 End Call Press º or close the phone or Press and hold a a a a until you hear a high tone You will see Press to End Call then Press a a a a again 3 S...

Page 64: ...enter a new two digit location or Select Range of Ten Enter the first digit of the memory location and press to store it in the first available location beginning with that digit 6 Choose Label Press q q q q or z z z z to scroll through the icons From left to right Work Home Mobile Pager Fax or Other Press a a a a or to select the highlighted icon 7 Store More You will see Enter Next Number Enter ...

Page 65: ... up callers in your Phone Book and displays the name stored in the entry If you prefer to see the caller s number 555 1212 then turn Number Preference ON 9 Store Number Press or a a a a Your phone will confirm by displaying N Numbers Saved At XX 10 Exit Press º to exit menu 3 View Number Press q q q q or Z Z Z Z to scroll to View My Number and press a a a a to select The display will show the curr...

Page 66: ... or Find by Name Press q q q q or Z Z Z Z to scroll to Edit By Name and press a a a a to select You will see Enter 1st Letter Enter the first letter of the name you want to edit See page 37 for information on entering letters You will see the first entry beginning with that letter Press q q q q or Z Z Z Z to scroll to the name you are looking for Press a a a a or and continue with Step 5 5 Select ...

Page 67: ...th the entry or Change Location If you would like to change the location number press and hold Ç to erase the location number and enter a new two digit number You will see the name associated with the entry 10 Edit Name Press Çto erase one letter at a time or press and hold Çto erase the entire name Press to move the cursor backward See page 37 for details on entering names Skip this step to leave...

Page 68: ...s that you specify In this chapter we will explain how to monitor the length of your calls set and view the resettable timer for long term monitoring program audible timers for your individual needs Follow these symbols as a guide for using the keys on the side of your phone Press q q q q to scroll up Press a a a a to select Press Z Z Z Z to scroll down 1menu 8 7 4 2 abc 5 6 3 def 9 0 Digital 2 5 ...

Page 69: ... menu system Start Phone Book Timers Individual 00 00 00 Cumulative Time 00000 Reset Timer Individual Timer Off One Minute Timer Off Repeating Timer Off Single Timer Off To Main Menu Resettable Time 00000 pg 70 pg 70 pg 71 pg 71 pg 72 pg 72 pg 60 pg 68 pg 73 pg 73 ...

Page 70: ...d you choose For example reset this timer at the beginning of each billing period to know where you stand at any given moment Use this feature to view the time elapsed and follow the instructions on page 71 to reset the timer 3 View Timer When you enter the Call Timers menu you will see Individual XX XX XX 4 Exit Menu Press ºto exit the menu or you may scroll to other features 3 View Timer Press q...

Page 71: ...n 3 View Timer Press q q q q or Z Z Z Z to scroll to Cumulative Time You will see the total air time in minutes 4 Exit Menu Press ºto exit the menu or you may scroll to other features 3 Find Feature Press q q q q or Z Z Z Z to scroll to Reset Timer 4 Reset Timer Press a a a a to reset You will see Resettable Time 00000 5 Exit Menu Press ºto exit the menu or you may scroll to other features Cumulat...

Page 72: ...ore the end of every minute during a call The party on the other end will not hear the beeps 3 Find Feature Press q q q q or Z Z Z Z to scroll to Individual Timer 4 Toggle Display Press a a a a to toggle On or Off the automatic display of the individual timer 5 Exit Menu Press ºto exit the menu or you may scroll to other features 3 Find Feature Press q q q q or Z Z Z Z to scroll to One Minute Time...

Page 73: ...a a to toggle the timer On or Off 5 Enter Seconds If you toggle the timer ON you will see Enter Seconds Enter the number of seconds you would like between beeps and press a a a a to set the timer You will see Set At XXX Secs 6 Exit Menu Press ºto exit the menu or you may scroll to other features 3 Find Feature Press q q q q or Z Z Z Z to scroll to Single Timer 4 Toggle Timer Press a a a a to toggl...

Page 74: ... you of new messages In this chapter we will explain how to choose from nine different ringer styles activate and deactivate the VibraCall alert silence the keypad silence all your phone s tones with one convenient feature set the Message Reminder Follow these symbols as a guide for using the keys on the side of your phone Press q q q q to scroll up Press a a a a to select Press Z Z Z Z to scroll ...

Page 75: ...e dependent feature Not available in all areas Phone Book Timers Tone Control Silent Mode Off Ring Vib Select Ringer Style 1 Roam Ringer Setup Msg Tones Reminder TonesSetup Keypad Tones On DTMF Select Service Tones Off To Main Menu pg 76 pg 76 pg 77 pg 78 pg 79 pg 80 pg 80 pg 60 pg 68 pg 74 pg 81 pg 77 ...

Page 76: ... by vibrating for three ring cycles then ringing 3 Find Feature Press q q q q or Z Z Z Z to scroll to Silent Mode 4 Toggle Feature Press A A A A to toggle the feature On or Off 5 Exit Menu Press ºto exit the menu or you may scroll to other features 3 Enter Feature Press q q q q or Z Z Z Z to scroll to Ring Vib Select and press A A A A to select 4 Select Ringer Vibe Press q q q q or Z Z Z Z to scro...

Page 77: ... dependent feature Not available in all areas 3 Find Feature Press q q q q or Z Z Z Z to scroll to Roam Ringer 4 Toggle Feature Press A A A A to toggle the feature On or Off 5 Exit Menu Press ºto exit the menu or you may scroll to other features 3 Enter Feature Press q q q q or Z Z Z Z to scroll to Ringer Style and press A A A A to select 4 Select Ringer Press q q q q or Z Z Z Z to scroll through ...

Page 78: ...ber of beeps or to turn them OFF use this feature 3 Enter Feature Press q q q q or Z Z Z Z to scroll to Setup Msg Tones and press A A A A to select 4 Select Msg Type Press q q q q or Z Z Z Z to scroll to Text Msg Tone or Voicemail Tone 5 Toggle Tone Press A A A A to toggle between 3Beep 1Beep or Off 6 Exit Menu Press º to exit the menu or you may scroll to other features Setup Msg Tones Tip To mak...

Page 79: ...ot silence the tones your phone sends across the line See Transmit Tones on page 80 for more information 3 Find Feature Press q q q q or Z Z Z Z to scroll to Reminder TonesSetup and press A A A A to select 4 Select Call or Msg Tone Press q q q q or Z Z Z Z to scroll to Call Remind Tone or Msg Remind Tone and press A A A A to select 5 Toggle Feature Press A A A A to toggle the feature On or Off 6 E...

Page 80: ...it the tones for as long as you press and hold the key To silence the tones during conversations turn the tones OFF Note If you turned the DTMF tones OFF but you want to access a tone activated system like Voicemail place your call enter the numbers you need to transmit and Network and service dependent feature Not available in all areas 3 Enter Feature Press q q q q or Z Z Z Z to scroll to DTMF S...

Page 81: ...ing 3 loses service 4 finds service or 5 moves from digital to analog service or vice versa Check the display to find out what changed see page 24 Keep in mind Your phone will always beep if a call is dropped 3 Find Feature Press q q q q or Z Z Z Z to scroll to Service Tones 4 Toggle Feature Press A A A A to toggle the feature On or Off 5 Exit Menu Press ºto exit the menu or you may scroll to othe...

Page 82: ...xplain how to lock and unlock your phone place priority calls view and change your lock code restrict call placement and memory access reset or clear your phone s settings Follow these symbols as a guide for using the keys on the side of your phone Press q q q q to scroll up Press a a a a to select Press Z Z Z Z to scroll down 1menu 8 7 4 2 abc 5 6 3 def 9 0 Digital 2 5 1 2 07 07 99 Ready ...

Page 83: ...ff Priority Call On Secure Options View Lock Code Change Lock Code Change SecureCode Service Level 4 Master Reset Master Clear Secure Code______ To Main Menu To Main Menu Phone Book Timers Lock Secure Tone Control pg 74 pg 82 pg 60 pg 68 pg 86 pg 86 pg 87 pg 89 pg 87 pg 88 pg 89 pg 84 pg 85 pg 86 ...

Page 84: ...k and easy Once your phone is ON just enter your three digit code Your factory programmed lock code is 123 If you have changed this code and cannot remember what it is see Viewing the Lock Code on page 86 Keep in mind You can still receive calls when the phone is locked Follow these steps to answer an incoming call 3 Find Feature Press q q q q or Z Z Z Z to scroll to Auto Lock 4 Toggle Lock Press ...

Page 85: ...ride the restriction and place a priority call press æ or ª See page 88 for information on your phone s service levels 3 Find Feature Press q q q q or Z Z Z Z to scroll to Priority Call 4 Toggle Press A A A A to toggle the feature On or Off 5 Exit Menu Press º to exit the menu or you may scroll to other features 1 Enter Number Enter your priority number 2 Save Number Press and to choose location 0...

Page 86: ...ing to Secure Options Secure Options Submenu For your protection you must enter a six digit secure code in order to access the features in the Secure Options submenu The factory programmed secure code is 000000 Viewing the Lock Code To view the three digit lock code 4 View Code Press A A A A to select View Lock Code You will see Lock Code XXX 5 Exit Menu Press º to exit the menu or you may scroll ...

Page 87: ...de 5 Enter New Code Enter a new three digit lock code You will see New Lock Code XXX 6 Exit Menu Press º to exit the menu or you may scroll to other features 4 Select Feature Press q q q q or Z Z Z Z to scroll to Change Secure Code and press A A A A to select You will see New Code 5 Enter New Code Enter a new six digit Secure Code Your phone will briefly display the new code 6 Exit Menu Press º to...

Page 88: ...ls that allow you to control the types of outgoing calls that can be made from your phone Your phone has two service levels 4 Select Feature Press q q q q or Z Z Z Z to scroll to Service Level and press A A A A to select 5 Choose Level Press q q q q or Z Z Z Z to scroll through service level settings and press A A A A to select the setting See the chart below for descriptions 6 Exit Menu Press º t...

Page 89: ...Z to scroll to Master Reset and press A A A A to select You will see Reset 5 Confirm Reset Press A A A A to confirm You will see Standard Setting or Exit Press º to exit without resetting 6 Exit Menu Press º to exit the menu or you may scroll to other features 4 Clear Settings Press q q q q or Z Z Z Z to scroll to Master Clear and press A A A A to select You will see Clear 5 Confirm Clear Press A ...

Page 90: ...phone s settings and much more In this chapter we will explain how to switch between your active phone numbers review your phone s settings select a variety of system specific settings Follow these symbols as a guide for using the keys on the side of your phone Press q q q q to scroll up Press a a a a to select Press Z Z Z Z to scroll down 1menu 8 7 4 2 abc 5 6 3 def 9 0 Digital 2 5 1 2 07 07 99 R...

Page 91: ... Open To Answer Off PIN Inactive Auto Answer Off Instant Redial Off Display System ID Select SystemMode Analog Only Off To Main Menu Display Options MiniBrowser Options To Main Menu Quick Menu On Change Language Change Banner Backlight Select Auto Hyphen On 24 Hour Clock Off Service Light On Launch MiniBrowse Power Up Mode To Main Menu pg 60 pg 68 pg 74 pg 82 pg 90 pg 93 pg 94 pg 98 pg 102 pg 96 p...

Page 92: ...s you travel to frequently This feature allows you to select an appropriate number Keep in mind Only one number can be active on your phone at a time 3 Begin Change Press a a a a to enter Change Number The display will show your phone s currently active number 4 Choose Number Press q q q q or Z Z Z Z to scroll through the phone numbers programmed into your phone Press a a a a to select the desired...

Page 93: ...one Info then press A A A A to select 4 Scroll through Info Press q q q q or Z Z Z Z to scroll through the information Options vary by phone but the list may include Serial Number Software Version Roam List Version and information regarding Network Minibrowser and Data capabilities 5 Exit Menu Press º to exit the menu or you may scroll to other features 3 Begin Review Press q q q q or Z Z Z Z to s...

Page 94: ...o send your PIN Code with one touch of a button Keep in mind If you enter a service area that does not require a PIN Code make sure PIN Inactive is set Storing PIN Code in Memory Location 07 When PIN Code is active your phone automatically uses the number stored in location 07 as your PIN Code Once you have activated the PIN you should store the PIN Code in location 07 Network and service dependen...

Page 95: ... A A A or any key in the center of the keypad through Keep in mind If there are any digits in your Scratchpad or if your phone is locked this feature will not work 1 Place Call Enter the number to be called or recall it from memory and press æ or ª or press and hold A A A A 2 Send PIN After the call is placed the system will prompt you for your PIN Code Press æ or ª or press and hold A A A A to se...

Page 96: ...his feature allows you to set whether or not your phone automatically answers when opened If you subscribe to Caller ID you will probably want to set this feature OFF so you can open the phone and check who is calling before you answer Note To answer calls with Open to Answer OFF press æ or ª 4 Find Feature Press q q q q or Z Z Z Z to scroll to Open to Answer 5 Toggle Press A A A A to toggle the f...

Page 97: ...our phone will redial for the next four minutes or until the call goes through Keep in mind This feature redials only if the network is busy If you hear a normal busy signal this feature will not work 4 Find Feature Press q q q q or Z Z Z Z to scroll to Auto Answer 5 Toggle Press A A A A to toggle the feature On or Off 6 Exit Menu Press º to exit the menu or you may scroll to other features 4 Find...

Page 98: ...Menu OFF if you would rather use the Smart Button to go straight into the internal Phone Book See page 32 for more information Changing the Language This feature allows you to select the language used in the display 4 Toggle Feature When you enter Display Options you will see Quick Menu Press A A A A to toggle the feature On or Off 5 Exit Menu Press º to exit the menu or you may scroll to other fe...

Page 99: ...ssory 4 Enter Feature Press q q q q or Z Z Z Z to scroll to Change Banner and press a a a a to select You will see the cur rent banner or Alpha or Press 5 Enter Message Enter your message using the alphanumeric keypad Press A A A A when your message is complete 6 Exit Menu Press º to exit the menu or you may scroll to other features 4 Find Feature Press q q q q or Z Z Z Z to scroll to Backlight Se...

Page 100: ...ish between area codes call prefixes and other numbers Displaying the 24 Hour Clock Your phone can display the current time in 12 hour or 24 hour format Use this feature to turn the 24 hour clock ON or OFF 4 Find Feature Press q q q q or Z Z Z Z to scroll to Auto Hyphen 5 Toggle Feature Press A A A A to toggle the feature On or Off 6 Exit Menu Press º to exit the menu or you may scroll to other fe...

Page 101: ...serve standby time you can turn the Service Light OFF with this feature 4 Find Feature Press q q q q or Z Z Z Z to scroll to Service Light 5 Toggle Feature Press A A A A to toggle the feature On or Off 6 Exit Menu Press º to exit the menu or you may scroll to other features Service Light On Tip To learn more about the Service Light see page 23 ...

Page 102: ...ing the way your phone accesses information with the Minibrowser Launching the Minibrowser Select this feature to launch the Minibrowser and access sports scores stock reports weather reports and more Network and service dependent feature Not available in all areas 4 Find Feature Press q q q q or Z Z Z Z to scroll to Launch MiniBrowser 5 Select Press and hold A A A A to select 6 Exit Menu Press º ...

Page 103: ... dependent feature Not available in all areas 4 Find Feature Press q q q q or Z Z Z Z to scroll to Power Up Mode and press A A A A to select 5 Select Option Press q q q q or Z Z Z Zto scroll to Power Up Phone or Power Up MiniBrowse and press A A A A to select 6 Exit Menu Press º to exit the menu or you may scroll to other features Power Up Mode ...

Page 104: ...when you receive your phone This feature allows you to select the type of system your phone will attempt to access See below for a chart of available settings Network and service dependent feature Not available in all areas 4 View SID Press A A A A to select Display System ID You will see the System ID for your phone 5 Exit Menu Press º to exit the menu or you may scroll to other features 4 Begin ...

Page 105: ...type system Home Only Mode Phone will not operate outside its home system Scan A Mode Phone will operate only within non wireline A systems Scan B Mode Phone will operate only within wireline B systems Analog Only Mode Phone will only operate on analog networks Some peripheral devices require analog signals 4 Find Feature Press q q q q or Z Z Z Z to scroll to Analog Only 5 Toggle Feature Press A A...

Page 106: ...vorite sites Follow these symbols as a guide for using the Minibrowser Turn to page 108 for a detailed explanation of all the keys Network and service dependent feature Not available in all areas Digital 2 5 1 2 07 07 99 Ready LOCK VIB BATT MENU MUTE TUV JKL MNO WXYZ PQRS GHI DEF OPR ABC 6 9 3 5 8 0 2 1 4 7 RCL STO CLR SEND PWR FCN END Press for right soft key Press for left soft key Press q q q q...

Page 107: ...et then you are ready to go Just follow these simple steps Turn the page to learn how to navigate with the Minibrowser 1 Open Quick Menu Press a a a a to open the Quick Menu 2 Select Browser Press q q q q or Z Z Z Z to scroll to Launch Browser and press a a a a to select When you launch the Minibrowser you will see the last page you accessed with the Mini browser If this is your first time the pho...

Page 108: ... up and down the page You can also use or Above press z z z z once to scroll to EMail twice to scroll to To Do List Select Press a a a a or the left soft key see the next page to select the highlighted item Above press a a a a to select Web Sites Go Back One Page While navigating press Çto return to the previous page Stop When sending and receiving information press Ç to interrupt transmission Ret...

Page 109: ...ith an icon Display Messages While you navigate the lower line of the display will show you messages to let you know what your phone is doing You will see Sending Receiving or Waiting Left Soft Key Press to choose the option on the left In the above example press to select OK and accept the highlighted option Web Sites Right Soft Key Press to choose the option on the right In the above example pre...

Page 110: ... Press ƒ then press 2 Select Feature Press q q q q or z z z z to scroll to Mark Site and press a a a a to select You will see the name of the site 3 Edit Name See page 37 for details on entering and editing names Press a a a a when finished You will see a message confirming the new bookmark Jump to Site Press and hold the number of the bookmark For instance for the first site you marked press and ...

Page 111: ...mation on the page has not changed your phone may use a version of the page stored in its memory When this is the case and you receive a call your phone s alerts will sound vibrate as usual and the display will show the Caller ID if available 1 Check Message Press ø to open the messaging menu If you received a Minibrowser alert the Minibrowser icon will be flashing 2 Select Alert Pressq q q qorz z...

Page 112: ...of the display A key icon denotes a secure transmission If the key has a slash through it then the transmission is not secure The Minibrowser Menu At any time while you are browsing you can open the Minibrowser Menu for a list of options Through this menu you can set bookmarks get help on selected pages and more Keep in mind This menu is only available while browsing To open the Minibrowser Menu w...

Page 113: ...e To add a page to your bookmark list choose this feature Once bookmarked press and hold the corresponding key when in a Minibrowser session to jump to the bookmarked page Show URL To see the address of the current page choose this option Restart Select to relaunch the Minibrowser Phone com This feature offers information on the company that helps to provide the web browsing service Advanced This ...

Page 114: ...ls Read the data display Set up Pre arrangement Checking for Data Capability To use the cable that came with your Data Connectivity Kit first make sure that your CDMA phone is data capable To do so just use your phone to perform the following simple test Network and service dependent feature Not available in all areas 1 Select Feature Press ƒ then fi You will see Phone Info Press A A A A to select ...

Page 115: ...omputer will automatically activate the port Installing the Software To begin making wireless data calls you will need to install the software from the CD ROM that came with the Data Connectivity Kit The software is designed to take you through the installation process step by step 1 Plug into Phone Plug the smaller end of the data cable with the release tab facing up into the accessory connector ...

Page 116: ...ormation 1 Connect Make sure the cable is connected properly 2 Place Call Open the application on your computer like a fax or dial up application and place the call through the application on your computer The phone will display the number your com puter is calling or the name if in the internal Phone Book You will see Connecting If the call is not connected your phone will return to the idle disp...

Page 117: ...n the pre arranged state when the data call is ended You will see either Fax Ready or Data Ready See page 118 for more information Important The normal ways to end calls like pressing ºor the Smart Button will end a data call but may disrupt your computer Likewise disconnecting the cable or turning OFF your phone will also end a data call but may affect the application on your computer We recommen...

Page 118: ...F the phone Keep in mind Data Setup is only available if your Service Provider requires pre arrangement and the data cable is connected to your phone 1 Enter Menu Press ƒ then A A A A to enter the menu 2 Select Submenu Press q q q q or Z Z Z Z to scroll to Phone Options and press A A A A to select 3 Select Feature Press q q q q or Z Z Z Z to scroll to Data Setup and press A A A A to select 4 Selec...

Page 119: ...atically answer data or fax calls when the data cable is connected Keep in mind All data and fax calls should be answered through the software installed on your computer If you press æ you will probably lose the incoming call 1 Turn ON Your phone and computer must be turned ON and the data cable connected 2 Select Mode Select the pre arrangement mode if needed 3 Auto Answer When the call comes in ...

Page 120: ...fer and synchronize contact information from your phone to your compatible desktop laptop or handheld computer and vice versa That way you only enter contact information once and you can have the information everywhere you want it Keep in mind TrueSync software is designed to synchronize certain basic features of the initial releases of many popular Personal Information Managers PIM hardware and s...

Page 121: ... Phone Book for easy access and quick memory dialing Customize many of your phone s features like ringer styles TurboDial keys and security settings through TrueSync s simple interface Synchronize with select Personal Information Managers PIMs TrueSync software helps provide one step multi point synchronization with most popular PIM managers devices and services Visit http www starfish com for mor...

Page 122: ...achieve maximum life and capacity for your NiMH battery do not leave the battery in the charger for more than 24 hours and use only Motorola approved chargers Vehicle Power Adapter Letsyouplugintoareliablepowersourceontheroad Usesyourcar sbatterytopower yourphoneandrapidchargethephone sbatteryatthesametime Thevehiclepower adapter will not overcharge your battery and contains circuitry to protect a...

Page 123: ...issosmallandlight itispositivelywearable Slipitinto a compatible holster and clip the holster on for the ultimate in high tech fashion Headset The convenient headset provides both an earphone and microphone in one small piece for simple hands free and privatetelephoneconversations Theheadsetplugsdirectlyinto the jack on the top of your phone so that you can wear your phone and move freely See page...

Page 124: ...ds Free Speaker Compact innovative and truly portable the StarTAC clip on hands free speaker offers a hands free solution for use just about anywhere car home office or any place else on the go Powered through your phone s battery a vehicle power adapter or AC adapter you can enjoy the convenience of conference calling wherever your business takes you StarTAC Clip On Organizer The StarTAC clip on ...

Page 125: ...le with the 3 Watt Kit Easy Install Hands Free Car Kit For the quickest and easiest mobile solution use the Easy Install Hands FreeCarKit Justplugitinandyouare ready to go Accessory Limited Warranty We recommend you use genuine Motorola batteries and accessories Under its wireless telephone limited warranty Motorola specifically disclaims any responsibility for damage caused by the use of portable...

Page 126: ...attery did not last as long as I expected What can I do to extend battery life A To get the most from your battery make sure it is fully charged To charge the battery to 100 of its capacity leave it in the charger for an extra hour after the charger s light turns green Exposing your battery to extreme temperatures below 10 C 14 F or above 45 C 113 F can shorten battery life Batteries are especiall...

Page 127: ...s the Motorola Expert Performance E P Charging System The E P system enables the built in charger to communicate with attached batteries and tailor its charging cycle to optimize performance If you see Invalid Battery when you power up the phone the built in charger is not able to communicate with the battery and cannot charge it You could see this message for several reasons The most likely one i...

Page 128: ...n that uses the port like a fax or dial up application and your computer will automatically activate the port Q My phone beeped when I attached the data cable but my fax and data applications don t work at all What s wrong A Keep in mind that you must be in an area with digital coverage Check your phone s display for the Digital Indicator to be sure you re in a digital coverage area Some wireless ...

Page 129: ...a a a ai i i il l l la a a ab b b bl l l le e e e What is wrong A You are in an area without service To see if you have digital service you can always in the display for the Digital Indicator If you see the Digital Indicator and still cannot use the Minibrowser you may be connected to a digital network that does not support wireless Internet access Q I launched the Minibrowser but the display says...

Page 130: ...ller ID A network subscription dependent service that allows you to view information on incoming calls before answering See page 52 CDMA Code Division Multiple Access CDMA takes digitized voice and encodes it in a unique scheme that is sent out over the air CDMA digital reduces the probability of dropped calls Your phone is equipped to handle CDMA digital voice transmission D dedicated Message Key...

Page 131: ...ind Keypad Tones does not refer to the tones sent by your phone to communicate with automated phone systems See Transmit Tones for information on the tones used to access automated phone systems L landline The telephone system used for conventional office and home phones Lithium Ion LiIon A battery technology used in personal wireless telephones Lithium Ion batteries generally provide more energy ...

Page 132: ...one See page 106 N Nickel Cadmium NiCd A battery technology used in personal wireless telephone batteries Nickel Metal Hydride NiMH A battery technology used in personal wireless telephone batteries P pause A special character that tells your phone to wait before sending the next set of numbers stored in one memory location See Pause Dialing Pause DialingAmethodofstoringPhoneBookentriesthatallowsy...

Page 133: ...to access and change certain security features The factory programmed secure code is 000000 Service Tones Two short beeps used to alert you to changes in your wireless service See page 81 Silent Mode Select this feature and all your phone s tones will be silenced and the VibraCall alert activated See page 76 Smart Button The middle key on the side of your phone used to access the Phone Book place ...

Page 134: ...ibraCall alert When activated this feature alerts you silently of incoming calls by vibrating It can be used alone or in conjunction with the ringer See page 76 Voicemail Contact your Service Provider for availability volume keys Located on the side of your phone the upper and lower volume keys are used to adjust ringer and keypad volume They also scroll within the menu system and the Phone Book W...

Page 135: ...saswell Althoughsomeresearchhas beendonetoaddressthesequestions noclearpictureofthebiological effectsofthistypeofradiationhasemergedtodate Thus theavailable sciencedoesnotallowustoconcludethatmobilephonesareabsolutely safe orthattheyareunsafe However theavailablescientificevidencedoes notdemonstrateanyadversehealtheffectsassociatedwiththeuseof mobilephones What kinds of phones are in question Ques...

Page 136: ...reatedwithcancer causingchemicals andotherstudies exposedtheanimalstotheRFvirtuallycontinuously upto22hoursper day ForthepastfiveyearsintheUnitedStates themobilephoneindustryhas supportedresearchintothesafetyofmobilephones Thisresearchhas resultedintwofindingsinparticularthatmeritadditionalstudy 1 Inahospital based case controlstudy researcherslookedforan associationbetweenmobilephoneuseandeitherg...

Page 137: ...e conflicting Thus follow upresearchisnecessary 1 FDAiscurrentlyworkingwithgovernment industry andacademic groupstoensuretheproperfollow uptotheseindustry funded researchfindings CollaborationwiththeCellular TelecommunicationsIndustryAssociation CTIA inparticularis expectedtoleadtoFDAprovidingresearchrecommendationsand scientificoversightofnewCTIA fundedresearchbasedonsuch recommendations Two othe...

Page 138: ...sedtheirphones Thusitis notpossibletotellwhetheranyindividual scancerarosebecauseofthe phone orwhetheritwouldhavehappenedanyway Akeyquestionis whethertheriskofgettingaparticularformofcancerisgreateramong peoplewhousemobilephonesthanamongtherestofthepopulation One waytoanswerthatquestionistocomparetheusageofmobilephones amongpeoplewithbraincancerwiththeuseofmobilephonesamong appropriatelymatchedpeo...

Page 139: ...ional Health and Safety Administration National Telecommunications and Information Administration TheNationalInstitutesofHealthalsoparticipatesinthisgroup In the absence of conclusive information about any possible risk what can concerned individuals do Ifthereisariskfromtheseproducts andatthispointwedonotknowthat thereis itisprobablyverysmall Butifpeopleareconcernedabout avoidingevenpotentialrisk...

Page 140: ...additional information For additional information see the following websites Federal Communications Commission FCC RF Safety Program select Information on Human Exposure to RF Fields from Cellu lar and PCS Radio Transmitters http www fcc gov oet rfsafety World Health Organization WHO International Commission on Non Ionizing Radiation Protection select Qs As http www who int emf United Kingdom Nati...

Page 141: ...3633 5235492 5237257 5239127 5241545 5241548 5241650 5241693 5242767 D339582 5249302 5251331 D340710 5260988 5261119 5262710 5263052 5276707 5278994 D343173 5280637 D344087 5287553 5287555 5287556 D344511 5301365 5321847 D348880 5349588 5359696 5361400 5363071 5365549 D352497 5366826 D353131 D353361 5375143 5375258 5379324 D354055 D354062 5384825 D356084 5402447 5406146 5406562 D357224 D357457 541...

Page 142: ...8 D383749 D383759 D384080 D384662 D384951 D384952 D385271 D385283 D385555 D385873 D385874 D385875 D385877 D385888 D386175 D386494 D386757 D387054 D387055 D387199 D387346 D388078 D388079 D388080 D388081 D388082 D388424 D388429 D388430 D388775 D388783 D388793 D389157 D389476 D389478 D389488 D389641 D390221 D390222 D390509 D391567 D391955 D391966 D393470 D394256 D394423 D394425 D394433 D394438 D39443...

Page 143: ...g the web 106 113 C Call Back messages 56 Call Options 94 97 Call Timers 68 73 road map 69 Caller ID 28 deleting 53 number preference 65 options 53 viewing 52 calling cards storing numbers 48 using 49 car kits 125 changing active number 92 banner 99 lock code 87 secure code 87 chargers 14 17 desktop 16 17 internal 14 charging batteries 14 17 checking your Voice Mail 54 clear key 18 clear master 89...

Page 144: ...24 25 incoming calls 28 29 indicators analog 24 battery level 23 24 digital 24 in use 24 25 no service 25 roam 25 silent mode 25 Unanswered Call 29 VibraCall alert ON 25 Vibrate Then Ring 25 individual call timer 70 auto display 72 installing batteries 13 internal charger 14 Internet 106 113 K keypad tones 79 L last ten numbers dialed 27 letters entering 37 Lithium Ion Batteries 122 lock automatic...

Page 145: ...toring 36 64 phone information 92 phone lock automatically 84 manually 84 phone number changing yours 92 viewing others 65 viewing yours 65 Phone Options 90 105 road map 91 PIN Code activating 94 storing 94 using 95 placing calls 26 data 116 priority call 85 redial 27 power key 18 21 power up mode 103 pre arrangement 118 priority call 85 R reading the indicators 23 25 reading your messages 56 real...

Page 146: ...nute 72 repeating 73 resettable 70 71 single 73 Tone Controls 74 81 Basic 30 31 road map 75 volume 31 tones keypad 79 service 81 storing 46 transmit tones 80 storing 46 Troubleshooting 126 129 TrueSync 120 Turbo Dial Keys 43 priority call 85 turning the phone ON mode 103 turning your phone ON 21 U unanswered call indicator 29 unlock lock 84 Using Data Features 114 121 Using Messaging 50 57 Using t...

Reviews: