background image

34

mobile PhoneTools - mobile PhoneTools features

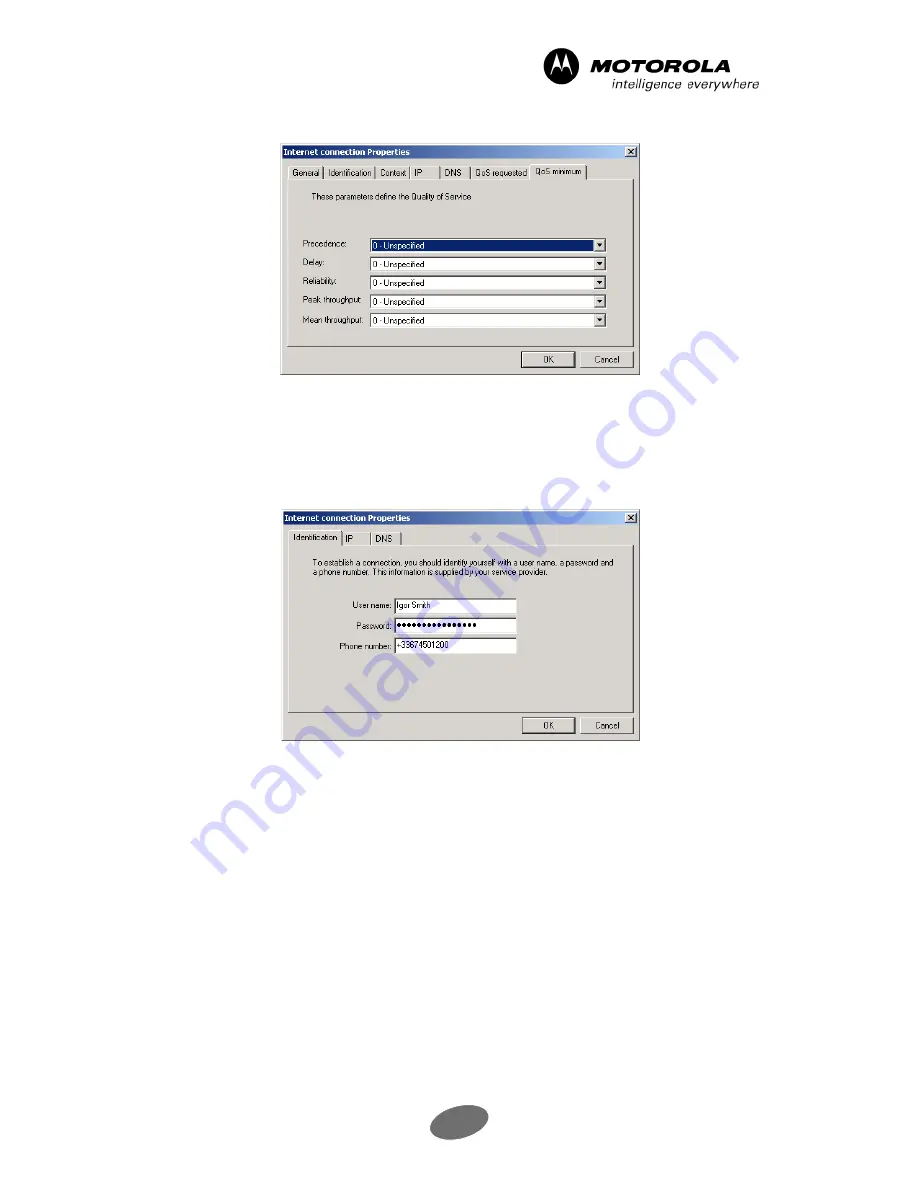
QoS Minimum

See 

QoS Requested, 

page 33 for information on the fields displayed in this tab.

4.3.2.2   Standard connection (GSM-Data and CDMA type)

Identification

Enter 

User name

Password

 and 

Telephone number

 (supplied by your operator) in the

appropriate entry fields.

Summary of Contents for 98741H - Mobile PhoneTools - PC

Page 1: ...1 mobile PhoneTools User Guide ...

Page 2: ...pdates on documentation and comments 10 Live Update 11 Getting started 12 Installing Uninstalling mobile PhoneTools 12 Installing mobile PhoneTools 12 Starting the installation 12 Installation Wizard 12 Online registration 13 Choosing a user profile 14 Installing the mobile phone 14 Mobile Phone Connection Instructions USB Cable and Infrared 15 Bluetooth connection using the Bluetooth Wizard 16 Un...

Page 3: ...lbox management 22 Signature management 23 Synchronization Wizard 23 Backing up Phone data 23 Deleting Phone data 24 Restoring Phone data 24 Synchronizing using the Wizard 25 mobile PhoneTools features 27 mobile PhoneTools interface 27 Making a Call with mobile PhoneTools 27 Using the dialer 27 Calling from the phonebook 27 Redialing a phone number 27 Receiving a Call with mobile PhoneTools 28 Cal...

Page 4: ...iew 38 Creating and managing phonebooks 38 Creating and managing phonebook records 41 Creating Groups of correspondents 43 Setup Phonebook preferences 43 Phonebook Synchronization view 44 Contacts in computer view 45 Contacts in phone view 45 Importing records 46 Importing from an external file 46 Importing text files with delimiters 46 Importing from Outlook Exchange or Lotus Notes 46 Importing f...

Page 5: ...w event 51 Modifying an event 51 Copying an event 51 Searching for an event 52 Deleting an event 52 Synchronizing 52 Limitations 52 Tasks 52 Overview 52 Managing Tasks 53 Creating Tasks 53 Modifying Tasks 53 Deleting Tasks 53 Synchronizing 53 Limitations 54 Synchronization 54 Overview 54 Synchronization Options 54 General Panel 54 Synchronization folder 55 Filter 56 Add Entry 57 Telephone field id...

Page 6: ...mail 65 Replying to an e mail 66 Forwarding an e mail 66 Text messaging SMS and EMS 66 Overview 66 Sending a Text Message 67 Configuration 67 Preparing a Text Message 68 Importing a Text Message 68 Previewing a Text Message 69 Deferring a transmission 69 Receiving an SMS or EMS 69 Multimedia Studio 70 Mobile Explorer 71 Transferring to phone 71 Image Studio module 72 Overview 72 Viewing an image 7...

Page 7: ...7 Inbox Folder 87 Outbox folder 88 Pending e mail folder 88 Finished transmissions folder 88 Failed transmissions folder 88 Managing Sent Received messages 88 Viewing messages 88 Printing messages 89 Saving messages 89 Changing messages status 89 Deleting messages 89 Modifying a pending transmission 89 Reactivating messages 90 Deactivating messages 90 Retrieving SMS or EMS messages 90 Forwarding m...

Page 8: ...Add an e mail account 94 Delete an e mail account 94 Sending account Default account 95 Advanced Setup 95 Mailbox management 98 Signature management 99 Telephone Tab 100 Ringer Ring tone options 100 Number presentation Outgoing Caller ID 101 Internet Tab 101 Miscellaneous Tab 102 ...

Page 9: ...the provisions of the copyright laws of the United States and other countries It is your responsibility not Motorola s to ensure that your use of Mobile Phone Tools software and or Motorola phones to copy edit play or otherwise use any Music Materials does not violate the copyright laws You are responsible for obtaining any necessary permission and paying any necessary licensing fees for the Music...

Page 10: ...ium II 233 MHz computer connected to your mobile phone via a cable or an infrared link Available USB port Sound card Hard disk with 20 MB free disk space High speed network option GPRS CDMA 1X and WCDMA in your subscription with your mobile phone operator for using e mail and a high speed Internet connection over the cell phone network Contact your access provider if you need more information abou...

Page 11: ...al support information for mobile PhoneTools is available on the BVRP Software Web site at the following address http www bvrp com customers motorola 1 6 3 1 Web sites Regularly visit our Web sites to obtain the latest information on our products and on available upgrades http www bvrp fr http www motorola com 1 6 3 2 Telephone number and e mail address You can also contact our Technical Support D...

Page 12: ...launch the Live Update Wizard click Menu Setup Live Update in order to download the latest version from the Internet The Wizard will guide you step by step throughout the procedure Automatic Wizard Mode Select the update frequency you prefer from the Every scrolling list The Wizard will be launched automatically to propose updates Automatic Silent Mode Updates are performed automatically at the fr...

Page 13: ...n Wizard An Installation Wizard will guide you step by step through the installation process prompting for information where needed During the installation procedure the program files are copied to your hard disk and a program group is created This group contains the icons of the mobile PhoneTools application and will be accessible from the Start menu loated on the taskbar 1 After the setup progra...

Page 14: ... the installation the online registration module is launched automatically 2 1 1 3 Online registration Online registration is required to benefit from BVRP Software Inc product guarantees technical assistance and free updates Note A connection to the Internet is required for automatic online registration Verify proper Internet access capability before proceeding 1 You may choose to register immedi...

Page 15: ...For more information see User Profiles page 62 2 1 2 Installing the mobile phone Important Depending on the mobile phone capacities all connection options may not be available The Welcome window of the Phone Setup Wizard is displayed automatically Three connection methods are displayed for connecting your mobile phone to your computer Warning Do not connect the mobile phone to the computer at this...

Page 16: ...e Phone Connection Instructions USB Cable and Infrared For Bluetooth connection instructions see Bluetooth connection using the Bluetooth Wizard page 16 1 Select the option that corresponds to the appropriate connection method for your mobile phone then click the Next button The Phone Setup window is displayed 2 Connect the mobile phone to your computer as instructed in the Phone Setup window A ti...

Page 17: ... Dongle with the Bluetooth Dongle utility CD 1 Select the Bluetooth option The Welcome window of the Bluetooth Wizard is displayed 2 Select your phone from the list displayed then click the Next button The Instructions window of the Bluetooth Wizard is displayed Note If you want to manually delete the modems that you will not need in the Control Panel Phone and Modem Options Modems restart the com...

Page 18: ...tions window is displayed 7 Click the Finish button The connection between the mobile phone and the computer is opened 2 1 3 Uninstalling mobile PhoneTools 1 In the Windows taskbar click the Start menu and select Settings Control Panel The Control Panel window is displayed 2 In the list double click the Add Remove Programs option 3 Highlight the mobile PhoneTools program group and depending on you...

Page 19: ...PhoneTools Click here to view online help Double click here to have mobile PhoneTools displayed Network signal strength indicator Battery strength indicator When the indicator is blue it means the battery has been charged Indicatesnewmessage s when blinking When connected your service provider s name appears here Click here to open the mobile PhoneTools function panel see next page Click again to ...

Page 20: ...ges Opens the Synchronization Wizard to synchronize Contacts and calendars Opens the Phonebook window to manage Contacts Opens the E mail Options window to select whether to Send an e mail or Retrieve e mail messages When sending the Send e mail window opens Opens the Send Short Message window to compose SMS or EMS messages Function panel icons Opens the Calendar window to manage tasks and appoint...

Page 21: ...ity is dependent upon your wireless service provider Networks supported by mobile PhoneTools are GPRS 1xRTT GSM Data CDMA UMTS W CDMA TDMA Note If a high speed network is not available mobile PhoneTools will use a standard GSM Data or CDMA connection type 3 1 1 Connection wizard The Connection wizard helps you through the various stages of creating and managing connections 1 From the mobile PhoneT...

Page 22: ...e steps for each connection that you wish the program to launch the Internet browser 3 2 Setting up e mail The E mail module allows you to exchange e mail messages over the Internet using SMTP Simple Mail Transfer Protocol to send mail and the POP3 protocol Post Office Protocol version 3 to receive mail For more information see E mail page 63 3 2 1 Importing an existing e mail account 1 Click the ...

Page 23: ...your correspondent s message list The Return Address is the e mail address associated with the account 4 You can also configure the advanced setup options for the e mail module mailboxes and signatures from the General Setup dialog box These options are described below 5 Click the OK button when you have finished setting up your e mail account 3 2 2 1 Advanced Setup You may customize e mail transm...

Page 24: ...K button The signature you just created is added automatically to the Signature scrolling list You can then use this signature when you write an e mail message From the Send e mail window choose the created signature When selected it will be added to the end of your e mail message For more information see Signature management page 99 3 3 Synchronization Wizard Synchronization enables you to update...

Page 25: ...one Backup Restore The Backup Restore Wizard window is displayed 2 Select the Delete data from a mobile phone option and click Next 3 Select the item s to delete then click Next The Backup Restore Wizard then deletes the contents of your mobile phone and presents you with a summary once the operation has been completed correctly 4 Click Finish to close the Backup Restore Wizard or New action to pe...

Page 26: ...h the Synchronization Wizard 3 Select the I would like to launch the Sync Wizard option and click OK The Synchronization Wizard is displayed a clock indicates that the Wizard is initializing The Welcome screen of the Wizard is displayed 4 Choose to Backup Phone data or Delete Phone data if not done so previously 5 If already done so click Next The Select data source window of the Wizard is display...

Page 27: ...atulations window of the Wizard is displayed 10 Click Finish to complete the Wizard The Synchronization dialog box is displayed 11 In the window displayed you can select deselect the Contacts Calendar or Tasks options to confirm those items that you want to synchronize When you have made your selections click the Synchronize button 12 The system starts reading data Track the synchronization progre...

Page 28: ...or the green handset icon 3 Click the red handset icon when the call is over 4 1 1 2 Calling from the phonebook 1 In the application main window click Menu Send Call a correspondent The Choose Correspondent window is displayed 2 Search for the correspondent you want to call 3 Select his record then click OK The name of the correspondent is displayed in the application display 4 Click the red hands...

Page 29: ...ick up a call in the application main window click the green handset icon 4 1 2 3 Hang up a call To hang up a call in the application main window click the red handset icon 4 2 Transmission and Reception logs 4 2 1 Viewing the logbook You can view either of two logbooks documents sent or documents received 1 From mobile PhoneTools main window click the Menu button select the Send option then Logbo...

Page 30: ...able the Delete cancelled transmissions option then click OK or enable the Delete bad receptions option then click OK 4 To delete all the transmissions that are older than a specified number of days enable the Delete option and specify the desired number of days in the box records older than n days then click OK If you enter 10 all the transmissions that were performed more than ten days ago will ...

Page 31: ...der you are subscribed to 5 Select connection type Check the Use default parameters box if you would like the wizard to use the preset data for the operator you have chosen recommended and click Next Note If you have chosen a high speed network the wizard will prompt you to create a fallback connection to be used in the event the high speed network is not available 6 Click Yes or No to create a fa...

Page 32: ...yed 2 Select a connection then click the File menu and select Properties The Properties dialog box is displayed 4 3 2 1 High speed connection GPRS and 1xRTT type General Select here the fallback connection you want to use for the selected connection Identification Enter User name Password and APN address information requested for a GPRS connection only and provided by your operator in the appropri...

Page 33: ...tures Context Specify in this screen the appropriate Context ID IP Select Dynamic IP address assigned automatically when the connection starts or Fixed IP address which you enter yourself DNS Select Dynamic DNS addresses or Fixed DNS addresses ...

Page 34: ...properties in terms of transmission errors required for the application to operate properly The values range from 1 to 5 Choice 1 Deferred traffic applications sensitive to transmission errors and not capable of handling lost data Choice 2 Deferred traffic applications sensitive to transmission errors and capable of handling occasional lost data Choice 3 Deferred traffic applications sensitive to ...

Page 35: ...inimum See QoS Requested page 33 for information on the fields displayed in this tab 4 3 2 2 Standard connection GSM Data and CDMA type Identification Enter User name Password and Telephone number supplied by your operator in the appropriate entry fields ...

Page 36: ... you to check your call charges It lists details of all connections which have taken place For each one it shows you the name of the connection the service provider date and time duration the number of bytes sent received total and status 4 3 3 1 Accessing the Connection logs 1 Click Menu and select Setup then Internet connections The Internet connections window is displayed 2 Click the File menu ...

Page 37: ... Deleting logs 1 Select the connection s to be deleted from the Connections log window 2 Click the Delete button 4 3 3 4 Exporting logs You can either save all connections on your computer or those you have previously selected The program saves them in Excel CSV or text TXT format depending on your choice which will enable you for example to place a value on units consumed in your subscription s T...

Page 38: ... your keyboard click the Phonebook button from the side panel click the Menu button select the Organizer option then select the Phonebook option When you access Phonebook for the first time the application opens an empty file named Contacts DBF 4 4 3 Phonebook Supported Formats The following formats are supported by the Phonebook Text file with delimiters DBASE III or DBASE IV BVRP Phonebook DBF a...

Page 39: ...he File menu then select the New option 2 Enter the phonebook name in the New Phonebook window and specify the drive and folder you want to save it in Application phonebook files are automatically given the DBF extension 3 Enter a name in the Description field that will allow you to easily identify this phonebook from among others This description will appear in the Phonebook window status bar and...

Page 40: ...of the application s phonebook See Match fields between an external phonebook and the application phonebook page 40 If some fields in the phonebook are not listed in the structure of the file you have opened they will appear grayed out 4 4 4 1 3 Delete a phonebook Each phonebook is made up of the following three files the DBF file saves correspondent record data the PKX file saves Phonebook index ...

Page 41: ... option The Match table window is displayed Note You can also access this window via the Phonebook exchange settings window 2 The application suggests a default match table The names of fields common to both phonebooks are displayed in red If no match has been found None the first word in the External phonebook field list is displayed in red 3 To accept the default match table click the Default bu...

Page 42: ... 4 4 4 2 2 Changing an existing record 1 From the phonebook select the record you want to change in the phonebook record list The contents of the selected record are displayed in the lower part of the window 2 Place the cursor in the field you want to edit and make your changes 3 Click the Save button 4 4 4 2 3 Deleting a record 1 From the phonebook select the record you want to delete from the li...

Page 43: ...arch if you want to search all records in the current phonebook click the root folder 2 In the list of records click the column title of the field you want to search Last Name First Name Company etc For example if you click the heading of the Last name column the Fast search field becomes Fast search on Last name 3 Enter the first characters of the word or number being searched for in the Fast sea...

Page 44: ...want to rename 2 Select the Rename option The group label can now be edited 3 Enter the new name you want to give to the selected group 4 Press the Enter key on your keyboard to confirm the changes 4 4 4 3 3 Deleting a Group 1 From the phonebook right click the group you wish to delete 2 Select the Delete option then confirm this deletion 3 Click OK to confirm 4 4 4 4 Setup Phonebook preferences 1...

Page 45: ...ay the phonebook press the F5 key on your keyboard while in the main application window If your phone is connected to your PC and switched on the phonebook synchronization view is displayed If your phone is not connected and or not switched on the phonebook standard view is displayed Connect your phone and or switched it on then click on the View button or click the View menu then select the Synch...

Page 46: ... details will be displayed in red until you click Apply changes or start a synchronization 4 4 5 2 Contacts in phone view Important The information available in this section depends on the capabilities of your phone This section displays the list of contact records saved in your mobile phone s memory and that of your SIM card As with the Computer Contacts section the details of each file selected ...

Page 47: ...iters being used have a couple tries and check the results in the Preview zone If you do not select the appropriate parameters the records contained in your phonebook will not be displayed correctly 4 If necessary specify the Text identifier used 5 If the first record of your file contains field titles select the Display field names on first line option These titles are then recognized as such and...

Page 48: ...7 If you are importing files that already exist in the target file select one of these options Add to existing files Keep existing files Update existing files 8 Click Next 9 In the following screen click Finish Files are automatically imported 4 4 2 Exporting records 4 4 2 1 Exporting to an external file 1 From the phonebook click the File menu 2 Select the Export option A wizard will guide you th...

Page 49: ...out in any record If this is so in the Preview section the column for this field will be empty 4 4 2 3 Exporting to Outlook Exchange or Lotus Notes 1 From the phonebook click the File menu 2 Select the Export option The Export wizard is displayed 3 Select in the list the file where you want to export your current phonebook then click Next 4 Select the folder in which are stored the contacts you ar...

Page 50: ...he side panel click the Menu button select the Organizer option then select the Calendar option Warning If during the installation process Outlook or Lotus Notes were detected on your computer when you access the Calendar this will either open Outlook or Lotus Notes Calendar 4 5 2 Calendar supported formats The following formats are supported by the Calendar Outlook PST Lotus Notes NSF BVRP MDB 4 ...

Page 51: ... window of the calendar 4 5 5 Modifying the calendar display 4 5 5 1 Changing the period displayed in the Calendar Click one of the buttons shown below to modify the Schedule window Day View to display a single day Week View to display seven days Month View to display an entire month 4 5 5 2 Showing and hiding windows From the View menu select or deselect the following options to show or hide the ...

Page 52: ...u want an alarm to remind you when the event is about to occur 7 Check the Recurrence option to define the frequency with which the event takes place The Appointment Recurrence window appears 8 In the Description field you can enter unlimited additional comments about the event 9 Click OK to save the event The New calendar event window closes and the event appears in the schedule The day of the ev...

Page 53: ...vious search 7 To close the Search window click the Close button 4 5 6 5 Deleting an event 1 From the Calendar interface in the Schedule window central display area select the event you want to delete and then right click and select the Delete option from the popup menu in the Edit menu select the Delete option click on the Delete icon 2 Confirm the event deletion The selected event or task no lon...

Page 54: ...he Recurrence option to define the frequency with which the task takes place The Appointment Recurrence window appears 7 In the Description field you can enter unlimited additional comments about the task 8 Click OK to save the task The Add task window closes and the task is added to the Tasks window The day of the task appears in bold in the Calendar window 4 6 2 2 Modifying Tasks 1 From the Cale...

Page 55: ...d in your mobile phone calendar to those saved in the application calendar 4 7 2 Synchronization Options Important Depending on which mobile phone you have the tabs available in the Synchronization Options window may vary or not all be available or visible To access the Synchronization Options window 1 Click the Menu button from the application main window 2 Select Setup in the drop down menu that...

Page 56: ...n if you wish to confirm the permanent deletion of records during synchronization 2 Move to another tab if necessary or click OK to confirm and close the Synchronization options window 4 7 2 2 Synchronization folder 1 Select the item for which you wish to change the synchronization folder 2 Click on Modify The Synchronization folder window appears 3 Select the folder you wish to use for synchroniz...

Page 57: ...l or Cancel all unchecked entries will be ignored during synchronization Calendar Choose Synchronize all events or Synchronize only In the latter case indicate the number of weeks before or after the current date you wish to synchronize events Tasks Choose Synchronize all tasks or Synchronize only In the latter case indicate the number of weeks before or after the current date you wish to synchron...

Page 58: ...on options window 4 7 2 5 Telephone field identification 1 To better identify the phone number type when a phone number appears in synchronization view select one of the following three options Ask the question The application will ask if appropriate which identification method to use By default use the type Scroll down the list to determine the default phone number type This information appears i...

Page 59: ...book and your mobile phone during synchronization this tab enables you to specify the phonebook which is to prevail or ask at each conflict 1 Select one of these three options Computer If you enable this option the application data will be taken as the basis and will if applicable overwrite the mobile phone data Mobile phone If you enable this option the mobile phone data will be taken as the basi...

Page 60: ... 3 Select a mobile phone field and the application phonebook field you wish to link it to and then click Link 4 Links created in this way are displayed in the Established links section If you select a field you can also click Clear to delete the link between the two entries The Default button restores predefined links between fields in the program It clears any changes you have made 5 Move to anot...

Page 61: ...ever if synchronization will not run automatically Every launch if you wish synchronization to run automatically each time you connect Every x day of the week if you wish synchronization to occur regularly on a specific day of the week Every month if you wish synchronization to run automatically once a month 2 Move to another tab if necessary or click OK to confirm and close the Synchronization op...

Page 62: ...change or check synchronization settings Synchronization Now This option enables synchronizing to start immediately It displays a Synchronizing window in which you will be able to choose whether to synchronize one or more items I would like to launch the Sync Wizard This option launches the Synchronization Wizard which will help you choose various synchronization options before synchronizing 3 Che...

Page 63: ...e mobile phone page 14 4 8 3 Associate a phone with an existing profile If you discarded the previous mobile phone installation you still can associate an existing profile with a phone 1 Launch mobile PhoneTools 2 In the Choose a profile dialog box select the profile you want to use then click OK The Phone Setup wizard is displayed and will take you through the steps of the mobile phone installati...

Page 64: ... mail option The Send e mail window appears 2 Fill in the recipient s Name and e mail Address or click the button in order to copy the information from the phonebook 3 Type the Subject and in the text field below the Subject enter the e mail text The e mail edit field can be enlarged To do so point the mouse cursor to the lower edge of the window the cursor takes an up down arrow shape and while h...

Page 65: ...General Setup window see E Mail Tab page 94 the transmission is carried out immediately on demand or at the end of a specified time interval 4 9 2 3 Defining a priority mobile PhoneTools can manage five priority levels ranking from Lowest to Highest The default priority level is Normal Priority levels other than Normal are marked with an icon in your correspondent s list of received documents From...

Page 66: ... messages stored on your POP server every 15 minutes On demand retrieval of e mail From the main application window you can either In the side function panel click the E mail button In the E mail options window that shows select Retrieve e mails then click OK The application launches an e mail retrieval and the Inbox window displays From the Menu button select the Receive option and then the Check...

Page 67: ...ine of text in the e mail message as does the abbreviation Fw indicated beside the Subject Further the message will contain the notice Message from Igor Smith BVRP Software ISmith bvrp com 26 08 98 13 01 1 From the Menu button choose Receive then click the Inbox option to view the contents of the Inbox folder 2 Choose an e mail message then click the Forward button A window similar to the Send E m...

Page 68: ...e the validity period you want to assign to the messages you send After this date the message will be deleted from the operator server even if it could not be delivered to the recipient Callback number Check this box then in the field underneath enter the phone number where your correspondent can reach you 3 Select a method for deleting messages from the mobile phone When deleting from the Inbox S...

Page 69: ...umber box if you wish to modify and or transfer the callback number with the message 6 Click Send to start the transmission 4 10 2 2 2 EMS To send an EMS message proceed as you would to send an SMS In the Message zone select from the scrolling list the type of message you want to send B W EMS or Color EMS Type your text Then you can format the text increase or reduce the font size add color to the...

Page 70: ...lendar of the current month is displayed Use the arrows to display a different month 4 Click the date you want your e mail to be sent on 5 To change the transmission time select the hours or the minutes and use the arrows to adjust the time 6 Click OK When sent the text message is placed in the Outbox folder and will be delivered only when the scheduled transmission date and time are reached Impor...

Page 71: ...des five components in addition to the Welcome menu Mobile Explorer Image Studio Melody Studio MMS Studio and Video Studio The file selection screen This screen located in the central part of the application displays your local explorer giving you direct access to locate and select the file containing the image photo sound video clip or melody that you want to use This screen is similar in the fou...

Page 72: ... is displayed 4 11 1 1 Transferring to phone 1 Click the Mobile Explorer button to display the Mobile Explorer window 2 In the My Computer zone click on one of the tabs and specify the local path to the file to be transferred and select the file to be transferred 3 In the Mobile Phone zone click on one of the tabs and specify the location on the phone where you want the file placed 4 Click the Cop...

Page 73: ...bile phone Use the toolbar buttons to modify its appearance The browser The Image Studio browser located in the center of the window lets you select files stored on your computer in order to view edit and or copy them to your mobile phone You can also attach them to your MMS messages The cropping screen The cropping screen is located in the lower part of the window To activate the cropping screen ...

Page 74: ... Preview screen and Selection screen 4 11 2 3 Editing an image 1 In the browser select the image file to edit It is displayed in the preview screen as well as in the cropping screen 2 Click and move the cropping zone to reach the part of the image you want to keep 3 Use the cropping screen toolbar to rotate and or flip the selected zone 4 In the Preview screen you can Display the image in its orig...

Page 75: ...formation screen located to the right of the window displays information about the selected melody to be copied to your mobile phone The browser The Melody Files browser located in the center of the window lets you select sound files stored on your computer in order to play and or copy them to your mobile phone Click on the desired sound file to display related information about it in the Informat...

Page 76: ...e selection 3 Click and hold down the selection and drag the cursor to the right 4 Release the mouse button at the location where you want to stop the selection The selected zone is displayed in black Note You can modify the start or the end of the selection To do this in the ruler place the cursor on one of the sides of the black part the selection where a bi directional arrow appears Then click ...

Page 77: ...ou can attach to these messages may be in various formats JPEG GIF text etc The approximate size of an MMS message is 64 Kbytes depending on the type of phone used and the mobile phone operator You access the MMS module by clicking on the MMS Studio button 4 11 4 2 Preparing an MMS 1 Access the MMS module 2 From the File menu select New 3 In the file selection zone click on the My MMS My Images My...

Page 78: ...ge and insert customized text or a sound recording for each image In this example the MMS includes three photographs each with a different text and sound file The display time for each photograph is 1 second Click to increase the size of the MMS display Click to reduce the size of the MMS display Click to delete the selected item image text or sound Modify the display time of an image a text and o...

Page 79: ...cipient 1 Access the MMS module and from the file selection screen click the My MMS tab 2 Select the MMS to be sent it must have the mpr extension 3 Double click on the MMS to display it in the Composer Screen 4 Click Send to Recipient The Send MMS window is displayed Send MMS window 1 Click on the Name and Number columns to enter the recipient s data You can also select a recipient from the Phone...

Page 80: ...u in easily and quickly adding texts and sound tracks to your video clips and movies and then in transferring your final movie from your PC to your mobile phone or in saving it on your hard disk You access the Video Studio module by clicking on the Video Studio button The Media Files selection screen This screen located in the center part of the main window displays the local explorer It lets you ...

Page 81: ...ement window Lets you record a voice track for the selected video clip or for all of them The time scale bar In Edit View see paragraph just below a timeline bar indicates the duration of the video clips sound tracks and texts thanks to the trim points which delimit them By maintaining the click on a trim point and moving it backward or forward you can shorten or increase the duration of the selec...

Page 82: ...gle one for all of them You can also apply your own previously recorded voice track To do so see Adding editing sound page 84 The Preview screen The preview screen located in the right part of the main window appears as shown below This view displays the selected item as it will appear on the screen of the mobile phone To watch your movie use the player buttons Play Stop Forward and Rewind To adju...

Page 83: ... video clip To change video clips and or images order 1 In the storyboard timeline view of the Composer screen select the video or image you wish to move 2 Drag and drop it to a different location where you want it to appear in your final movie To change the duration of a video clip or image 1 In the Composer screen click on the button to have the Edit View timeline mode displayed 2 Select the vid...

Page 84: ...lect the Delete option from the Edit menu or press the Del key The video clip or image disappears from the storyboard timeline 4 11 5 4 Adding editing text To import a text 1 In the storyboard timeline select the video clip or image to which you want to apply a text 2 In the File selection screen click on My Titles tab 3 Specify the local path for the tit file containing the text you want to inser...

Page 85: ...ton to have the timeline mode displayed 2 In the text insertion zone select the text file you wish to edit 3 Use the trim points toward the left or toward the right to reduce or increase the duration of the selected text file To cut copy paste texts 1 In the text insertion zone of the storyboard timeline select the text file you want to cut or copy To cut or copy several text files click on them w...

Page 86: ...sing the trim points toward the left or toward the right to reduce or increase its duration and apply it to one or more video clips or images To adjust audio balance When the imported video clip displayed in the Composer screen already contains sound it is possible to adjust its sound level with the one you have recorded or imported To do so Click on the button The Audio Levels screen displays For...

Page 87: ... pops up 2 Select also the directory where you want to save the movie 3 Type a name for the movie to be saved 4 Select the file type you want to save The default file type is 3GP H 263 If you select a MPEG file type then the Presets scrolling list is accessible In the Presets scrolling list if you select the User defined option then the following options can be accessed and modified Video settings...

Page 88: ...unctions available on the toolbar will vary according to the folder and the item you select 4 12 2 Inbox and Outbox folder 4 12 2 1 Inbox Folder The Inbox lists all received documents It allows you to create mailboxes for the same computer and thus separate personal mail from business mail and the various users mail 4 12 2 1 1 Creating a new Mailbox Important Mailboxes can only be created under th...

Page 89: ...inished transmissions folder Failed transmissions are automatically placed in the Failed transmissions folder 4 12 2 4 Finished transmissions folder This folder lists all transmissions that have completed successfully if the Keep finished trans missions box is checked in the Communications tab of the General Setup window Menu but ton Setup option 4 12 2 5 Failed transmissions folder This folder sh...

Page 90: ... to the document the status is changed as indicated by the icons There are three possibilities for the icons Empty box not viewed neither printer nor forwarded Box checked viewed printed and or forwarded Grayed box will not be modified 4 12 3 5 Deleting messages 1 Select the document you wish to delete 2 Click the button on the toolbar Confirm the document deletion 4 12 3 6 Modifying a pending tra...

Page 91: ...the document you wish to deactivate 2 Click Tools Deactivate 4 12 3 9 Retrieving SMS or EMS messages From the Inbox folder click then select Retrieve SMS to check whether you have received new SMS or EMS messages 4 12 3 10 Forwarding messages 1 Click the Inbox folder to display the list of your documents 2 Select the document you want to forward 3 Click A Transmission window is displayed 4 Enter t...

Page 92: ...up To access the General Setup dialog box 1 From the application main window click the Menu button 2 Select the Setup option then General Setup The General Setup dialog box is displayed You can also press the F6 key to open the General Setup dialog box 5 1 1 Customize Tab User Settings User Enter user information Name Company Address City Zip code Country Phone and Fax num bers ...

Page 93: ...her applications when running 5 1 2 2 Communication functions Send is active Reception is active These two checkboxes determine whether the configured line is allowed to transmit and receive documents This can be useful to set the operating mode of certain extensions Keep finished transmissions Saves transmitted documents in the transmission queue even if the document has reached its recipient Thi...

Page 94: ...u want to use Windows dialing proper ties mobile PhoneTools dialing properties Note Make sure to enter numbers the exact same way you enter them into your phone no dashes or spaces example 3035551212 Check the Use mobile Phone Tools dialing properties option if you want to use the applica tion s dialing properties Numbers will be dialed as displayed in phonebook ...

Page 95: ...lable accounts field 2 Enter the Reception information in the POP Server POP Account and Password fields so that your Internet access provider can identify your account 3 Enter the Transmission information the SMTP Server field must be filled in The Real name field contains the name that will be displayed in your correspondent s message list 4 You can also configure the advanced setup options for ...

Page 96: ...wing options Send now Your e mail messages are sent when you click the Send button from the Send e mail window Send on demand When you click the Send button in the Send E mail window your e mail messages are stored in the Pending e mail folder To actually send the messages you must click the Send Email Receive E mail button Send waiting messages every n minutes In the minutes text field type in th...

Page 97: ...net at the defined interval increasing the possibility of consuming valuable mobile phone contract minutes 5 1 4 4 1 4 Enabling disabling default retrieval of e mail headers The E mail module of the application allows you to configure default retrieval of e mail headers 1 From the Advanced Options window select the General tab 2 In the Reception section select Check only e mail headers 3 To disabl...

Page 98: ...heck the Log on using the following settings option If you choose the second option you will be prompted for a user name and password Enter those you received from your Internet service provider 5 1 4 4 3 Reception tab From this tab you can configure the following settings 5 1 4 4 3 1 Choosing the server type for incoming e mail Choose the server type from the scrolling list POP or APOP APOP avoid...

Page 99: ...n KB option 3 In the maximum e mail size field type a number For instance if you type 100 all incoming e mail messages larger than 100 KB will be ignored 5 1 4 5 Mailbox management See also Inbox Folder page 87 5 1 4 5 1 Overview You can create several mailboxes for the same computer and thus separate personal mail from business mail and the various users mail Important Mailboxes can only be creat...

Page 100: ... existing signatures and two other options No signature which gives you the possibility of not adding a signature at the end of your e mail message or of typing one directly in the text edit box of the e mail message New which gives access to a window where you can create signatures When the software is run for the first time the scrolling list only includes these two possibilities 5 1 4 6 2 Creat...

Page 101: ...Deleting or modifying a signature 1 From the E mail tab in the Default signature scrolling list choose the signature you wish to delete or modify 2 Click the Signature Management button 3 In the Signature window click Delete to delete the selected signature or enter your changes then click OK Contrary to the Clear all command that only deletes the text included in the signature Delete removes the ...

Page 102: ...your phone number to be displayed to your correspondents 5 1 6 Internet Tab Click this tab to select the Internet connection method You can use Dial up networking to dial to a GPRS provider the connection to a GPRS mobile network is mandatory or you can use the LAN if you are connected to this type of network Note Technically you can have a connection for GSM CDMA or 1x ...

Page 103: ...honeTools Advanced Configuration 5 1 7 Miscellaneous Tab At start time Select here how you want the application to manage profiles Always use this profile Request which profile to use See also User Profiles page 62 ...

Page 104: ... mail server 97 Maximum size for received e mail 98 Reception tab 97 Retrieve full messages 96 Save password 97 Sound notification 95 Transmission tab 97 Advanced Setup 22 95 APN address 31 Archive logbook 29 Associate a phone with an exist ing profile 62 Authentication 97 Automatic download of received e mail 96 Automatic retrieval 65 B Back up Phone data 23 Backup Restore Wizard 23 24 61 Basic C...

Page 105: ...n event 51 Copyrights 8 Create a calendar 49 Create a Group 43 Create a mailbox 87 Create a phonebook 38 Create a record 41 Create a task 53 Cropping screen 72 Cropping zone 73 Cropping zone 73 Customize tab 91 User settings 91 D Deactivating messages 90 Default account 95 Deferring a transmission 64 69 Define a default user profile 62 Delay 33 Delete a Group 43 Delete a Mailbox 88 99 Delete a mes...

Page 106: ...ail headers 96 Event 51 Event Management 51 Add an event 51 Copy an event 51 Delete an event 52 Modify an event 51 Search for an event 52 Export logs 36 Export wizard 48 Exportation 47 Text files with delimiters 47 To an external file 47 To Outlook Exchange or Lo tus Notes 48 Exporting records 47 Exporting text files with delimiters 47 Exporting to an external file 47 Exporting to Outlook Exchange...

Page 107: ... or Lotus Notes 46 Text files with delimiters 46 Importing a Text Message 68 Importing a video clip 82 Importing from a vCard file 47 Importing from an external file 46 Importing from Outlook Ex change or Lotus Notes 46 Importing records 46 Importing text files with delimiters 46 Inbox 65 87 Create a mailbox 87 Delete a mailbox 88 Rename a mailbox 87 Information screen 74 Infrared connection 14 In...

Page 108: ...n logs 36 Display by entries 36 Export connection logs 36 Filtering logs 36 Print 29 Reception log 28 Transmission log 28 View 28 M Mailbox 22 Create 87 Delete 88 Rename 87 Mailbox management 22 98 Create a mailbox 87 Delete a mailbox 99 New mailbox 98 Rename a mailbox 98 Making a Call 27 Dialer 27 Phonebook 27 Readial a number 27 Managing events 51 Managing messages 88 Change status 89 Deactivate...

Page 109: ...dify a signature 100 Modify a task 53 Modify an event 51 Modify the calendar display 50 Modify the display 77 Modify the period displayed 50 Move images and associated sound and text 77 Multimedia Center 19 Transfer a file to the phone 71 Multimedia Studio 70 Editor screen 70 File selection screen 70 Function Panel 70 Image Studio 72 Melody Studio 74 MMS Studio 76 Mobile Explorer 71 Preview screen...

Page 110: ...aring a Text Message 68 Defer a transmission 69 Import a text 68 Preview 69 Preparing an MMS 76 Insert a sound 77 Insert a text 77 Insert an image 76 Modify the display 77 Move images and associated sound and text 77 Preview an MMS 78 Save an MMS 78 Use the Composer 77 Preview an MMS 78 Preview screen 70 72 81 Previewing a Text Message 69 Print a message 89 Print a record 41 Print logbook 29 Prior...

Page 111: ...ria 42 Search for a record 42 Search for an event 52 Select a musical extract 75 Selection screen 75 Send an e mail 63 Send an MMS 78 Send e mail window 19 Send is active 92 Send Message 19 Sending account 95 Show toolbars 50 Show windows 50 Side panel 18 19 Signature management 23 99 Add a signature 100 Delete a signature 100 Modify a signature 100 New signature 99 SMS 66 SMS Configuration 67 Sou...

Page 112: ...og 28 Transmission tab 97 Type of connection 1xRTT 31 Bluetooth 15 GPRS 31 33 High speed connection 31 Infrared 14 15 Standard connection 34 USB Cable 14 15 U UMTS 30 Uninstalling mobile PhoneTools 17 USB cable connection 14 15 Use the Composer 77 Modify the display 77 Move images and associated sound and text 77 Use the dialer 27 User Profiles 62 Associate a phone with a profile 62 Choose a user ...

Page 113: ...n e mail 65 W W CDMA 30 Wizard Backup Restore Wizard 23 24 61 Bluetooth Wizard 16 Export Wizard 48 Import Wizard 46 Installation Wizard 12 Internet Connection Wizard 19 20 30 Phone Setup Wizard 14 Synchronization Wizard 19 23 25 61 ...

Reviews: