Use the button
or
to select
Normal
standard adjustment for the monitor
Warm
warmer colour presentation
Cool
cooler colour presentation
sRGB
usual standard for computer applica-
tions
User
individual adjustment
If
User
has been selected, select the
lines
R
(red component),
G
(green
component) and
B
(blue component)
successively with the button
or
and adjust the value with the button
or
. When changing the value, the
menu is deactivated and only the scale
is displayed at the bottom of the pic-
ture. After adjusting the value, press
the button EXIT to return to the menu.
To exit the submenu, press the button EXIT.
Auto
Automatic adjustment of the picture position
After activating the menu item with the button
,
an automatic adjustment of the picture position
is made. Then values adjusted manually for
H-Position
and
V-Position
on the menu page
FUNCTION
are corrected.
Color Auto
without function for this model
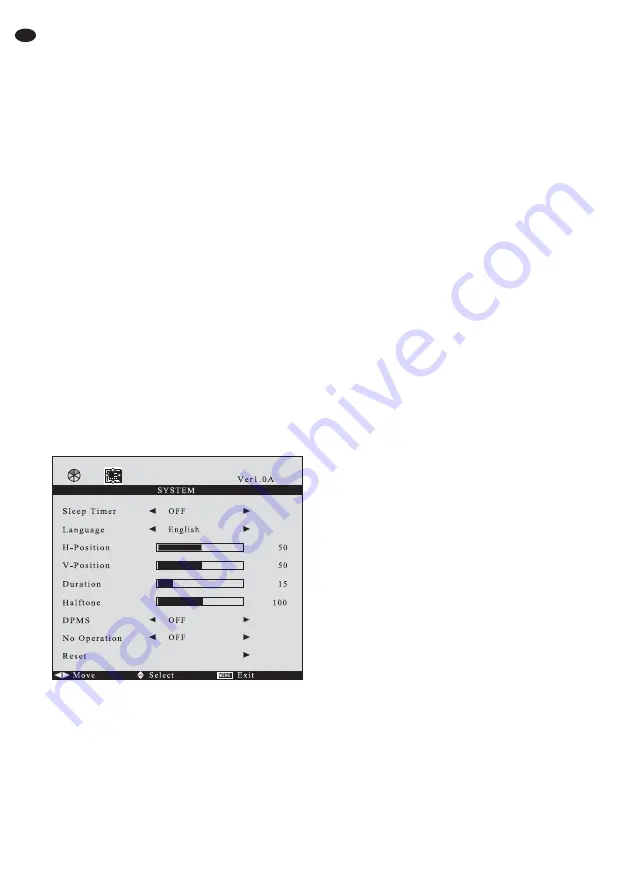
7.5.2 Page SYSTEM
Sleep Timer
timer-controlled change to stand-by
Via this menu item a duration can be defined.
After it has elapsed, the monitor will automati-
cally go to stand-by mode. Select the duration
(15 min. … 60 min.) or
OFF
(function deacti-
vated) with the button
or
.
One minute before changing to stand-by, the
time is counted down (display
Sleep Time Left
).
It is not possible to call the on-screen menu, the
source list and the volume scale during this
countdown.
Language
menu language
Select English, French, Spanish, Italian or Ger-
man with the button
or
.
H-Position
horizontal position of the menu
Move the menu to the left with the button
or to
the right with the button
.
V-Position
vertical position of the menu
Move the menu upwards with the button
or
downwards with the button
.
Duration
time of insertion
This menu item defines the time the menu
remains inserted after the last button has been
pressed. The adjusted duration also applies to
the insertion of the source list and the volume
scale. Reduce the duration with the button
or
increase it with the button
(adjusting range
5 – 60 seconds).
Halftone
transparency of the menu
Via this menu item the transparency of the menu
and the source list and volume scale inserted
can be adjusted. Increase the transparency with
the button
or reduce it with the button
.
DPMS
power saving mode for the use as a
computer monitor
(not for the sources
AV1
,
AV2
,
SVIDEO
)
The function can be activated (
ON
) or deacti-
vated (
OFF
) with the button
or
. If the graph-
ics card of the computer supports the VESA
power saving standard DPMS (Display Power
Management Signaling), it is possible to define
the time in the computer adjustments after
which, in case of inactivity, the system will send
a signal to the monitor to go to the power saving
mode. If the monitor receives the corresponding
signal from the computer, it goes to the power
saving mode after approx. 1 minute: the screen
becomes dark and the power indication (7)
shows yellow. Even in the power saving mode, it
is possible to switch over to another source or to
call the on-screen menu.
No Operation
change to stand-by in case of
inactivity
The monitor can be adjusted so that it is auto-
matically switched to stand-by mode when no
button has been actuated for a defined time.
Select the duration (1
S
= 1 hour without actuat-
ing a button …
4S
= 4 hours without actuating a
button) or
OFF
(function deactivated) with the
button
or
.
One minute before going to stand-by the time
is counted down (indication
Power Time Left
).
Switching over to stand-by can still be stopped if
14
GB


