background image

15

Adding safety camera

NOTE:

 You can add a custom safety camera only when a GPS fix is established.

Your recorder allows you to customise the safety camera database. You can add up to 100 
custom safety cameras in your recorder. 
Follow the steps to configure a custom safety camera:

1.  To add a custom safety camera in the current location, press 

 on the recording 

screen.

2.  The next time when you pass by the location, you will receive alerts by the recorder.

The screen will display the visual alert (the custom safety camera will be shown as the 

 icon), and you will also receive audio warnings (

Beep

 or 

Mute

).

3.  To view the information of the user-added safety camera, go to 

Settings Menu > 

SafetyCam > Custom SafetyCam

 and then select the safety camera that you want to 

check. The 

Location

 and 

Created Time

 of the safety camera will be displayed on the 

screen.

4.  To delete the custom safety camera, select 

Delete

Updating safety camera data

MiTAC does not warrant that all types and locations of safety camera data are available, as 
cameras may be removed, relocated or new cameras installed.
Occasionally MiTAC may offer you updates of safety camera data. Visit the MiTAC website 
for available downloads, and follow the instructions to complete the update.

Summary of Contents for MiVue 5 series

Page 1: ...User Manual Series ...

Page 2: ...corder ON and OFF 10 Setting the date and time 10 Recording in driving mode 11 Recording in Parking mode 12 Camera mode 13 Playback mode 13 Safety camera alerts 14 Adding safety camera 15 Updating safety camera data 15 System settings 16 Settings Menu 16 MiVue Manager 19 Installing MiVue Manager 19 Playing the recording files 19 For more information 22 Precautions and notices 22 Safety precautions...

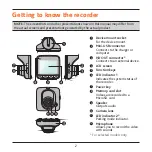
Page 3: ... Mini USB connector Connects to the charger or computer 3 HD OUT connector Connects to an external device 4 LCD screen 5 Function keys 6 LED indicator 1 Indicates the system status of the recorder 7 Power key 8 Memory card slot Videos are recorded to a MicroSD card 9 Speaker Outputs audio 10 Camera lens 11 LED indicator 2 Parking mode indicator 12 Microphone Allows you to record the video with sou...

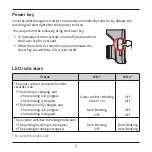
Page 4: ... Power key to switch the LCD screen on off LED indicators Status LED 1 LED 2 The power cable is connected and the recorder is on The battery is charging and the recording is in progress the recording is stopped The battery is fully charged and the recording is in progress the recording is stopped Green Amber Blinking Green On Red Blinking OFF OFF OFF OFF OFF The recorder switches to Parking mode a...

Page 5: ...reens For example the device will display four icons as shown below while continuous recording is in progress Example 1 2 3 4 Icon Description 1 Press to enter the Settings Menu 2 Press to manually activate Parking mode Press to add a custom safety camera in the current location 3 Press to take a photo 4 Press to manually start an emergency recording For selected models only ...

Page 6: ...ons displayed will vary depending on your device model and state Example Icon Description The REC icon blinks while recording is in progress Displays the current time Recording with sound is disabled enabled The GPS signal icon indicates the GPS status The Battery icon indicates the remaining battery power For selected models only ...

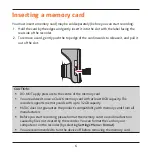
Page 7: ...essure to the centre of the memory card You are advised to use a Class 6 memory card with at least 8GB capacity The recorder supports memory cards with up to 32GB capacity MiTAC does not guarantee the product s compatibility with memory cards from all manufacturers Before you start recording please format the memory card to avoid malfunction caused by files not created by the recorder You can form...

Page 8: ...uction below to mount your recorder in a vehicle securely 3 Connect the car charger to the cigarette lighter Route the cables through the top ceiling and the A pillar so that it does not interfere with driving Ensure the cable installation does not interfere with the vehicles airbags or other safety features ...

Page 9: ... the rear view mirror Select an appropriate location for mounting the device in a vehicle Never place the device where the driver s field of vision is blocked For selected models only If the car s windscreen is tinted with a reflective coating it may be athermic and impact the GPS reception In this instance please mount your device where there is a clear area The system will automatically calibrat...

Page 10: ...w to connect the rcorder to the computer via the USB cable not supplied Connecting to a High Definition HD device For a better viewing experience you can connect the recorder to an external viewing device that supports the High Definition HD feature via a HD cable not supplied The HD OUT connector is located on the right side of the device Follow the instruction below to connect the recorder to th...

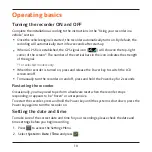
Page 11: ...odels only When the recorder is turned on press and release the Power key to switch the LCD screen on off To manually turn the recorder on and off press and hold the Power key for 2 seconds Restarting the recorder Occasionally you may need to perform a hardware reset when the recorder stops responding or appears to be frozen or unresponsive To restart the recorder press and hold the Power key unti...

Page 12: ...cording If the recording is ongoing but there is not enough space on your memory card the system will display a warning message on the screen Once confirmed the new video clips will replace the old ones Continuous recording When you connect the car charger to the cigarette lighter in the car the recorder will start continuous recording automatically The recording may be divided into several video ...

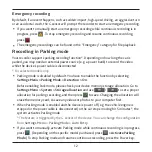
Page 13: ...You have to enable the function by selecting Settings Menu Parking Mode Detection On Before enabling Park mode please check your device memory storage allocation Go to Settings Menu System Storage allocation and use to set a proper allocation for parking recording and then press to save Changing the allocation will erase the memory card so save any videos or photos to your computer first When Park...

Page 14: ... the Photo category for file playback Playback mode To select a video or photo for playback 1 Press to access the Settings Menu 2 Select File Playback and press 3 Select the desired type and press The types include Video continuous recordings Emergency Parking parking recordings and Photo 4 Use the key to select the desired file from the list and then press to start playback 5 During playback you ...

Page 15: ...splayed icon may vary depending on the type of the safety camera fixed camera red light camera mobile camera average speed camera traffic light camera traffic violation camera When the alert sound setting is set to Beep When your car approaches a safety camera you will receive a normal beep alert When your car approaches a safety camera at a speed over the set threshold you will receive a persiste...

Page 16: ...a will be shown as the icon and you will also receive audio warnings Beep or Mute 3 To view the information of the user added safety camera go to Settings Menu SafetyCam Custom SafetyCam and then select the safety camera that you want to check The Location and Created Time of the safety camera will be displayed on the screen 4 To delete the custom safety camera select Delete Updating safety camera...

Page 17: ...s if you want to include sounds in the recordings The default setting is On SafetyCam for selected models only Sets how you want to be notified of safety cameras The available settings include Alert Sound Select Beep Voice or Mute Alert Distance Select Short Medium or Long Alert Method Select By Driving Speed or By Speed Limit Threshold For example select At Speed Limit Speed Limit 5 km h or Speed...

Page 18: ...ings of recording including Video Clip Length Sets the length of each video clip for a continuous recording 1 min 3 min or 5 min EV Sets the proper exposure level 1 1 to adjust the brightness of the image The default setting is 0 HDR Select On or Off to enable or disable High Dynamic Range function of the device GPS Stamp for selected models only Sets if and how you want to record the GPS informat...

Page 19: ... signal reception Date Time Sets the system date and time For more information see the Setting the date and time section Beep Alert Enables or disables system notification sounds Volume Adjusts the volume level LCD Standby Select Always On or select how long 10 sec 1 min or 3 min the screen remains lit after you press any key Language Sets the language Distance Unit for selected models only Sets t...

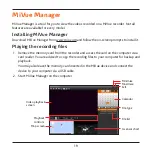
Page 20: ...cording files 1 Remove the memory card from the recorder and access the card on the computer via a card reader You are advised to copy the recording files to your computer for backup and playback You may also leave the memory card inserted in the MiVue device and connect the device to your computer via a USB cable 2 Start MiVue Manager on the computer G sensor chart Exit Maximise Minimise Calendar...

Page 21: ...to display the files that were recorded on that date You can choose the file type to display Event emergency recordings or and Normal continuous recordings or and Parking parking recordings To display all files in the current folder click All To return to the calendar view click Calendar You can also click on the upper left corner to select the folder that stores the recording files 4 Double click...

Page 22: ...ed location on your computer Click to capture and save the current video image to the specified location on your computer Click to upload the selected file to YouTube Facebook Click to export the GPS information of the selected file in the KML format to the specified location on your computer Click to open the Settings Menu The Settings items are described as follows Change Language Sets the displ...

Page 23: ...ith your device Use of another type of charger may result in malfunction and or danger This product is intended to be supplied by a LISTED Power Unit marked with LPS Limited Power Source and output rated 5 V dc 1 0 A Use a specified battery in the equipment About the charger Do not use the charger in a high moisture environment Never touch the charger when your hands or feet are wet Allow adequate...

Page 24: ...e Dispose of used batteries according to the instructions Replace only with the same or equivalent type recommended by the manufacturer The battery must be recycled or disposed of properly Use the battery only in the specified equipment About GPS GPS is operated by the United States government which is solely responsible for the performance of GPS Any change to the GPS system can affect the accura...

Page 25: ... can easily be scratched Avoid touching it with sharp objects Non adhesive generic screen protectors designed specifically for use on portable devices with LCD panels may be used to help protect the screen from minor scratches Never clean your device with it powered on Use a soft lint free cloth to wipe the screen and the exterior of your device Do not use paper towels to clean the screen Never at...

Page 26: ...637 2 2008 EN 300 440 1 V1 6 1 2010 EN 300 440 2 V1 4 1 2010 IEC 60950 1 2005 A1 2009 The manufacturer cannot be held responsible for modifications made by the User and the consequences thereof which may alter the conformity of the product with the CE Marking Declaration of conformity Hereby MiTAC Europe Ltd declares that this N467 is in compliance with the essential requirements and other relevan...

Page 27: ... models are available in all regions Depending upon the specific model purchased the color and look of your device and accessories may not exactly match the graphics shown in this document Do not operate the device while driving Using this product does not change the requirement for a driver to take full responsibility for his or her behavior This responsibility includes observing all traffic rule...

Reviews: