background image

3

Device installation

3.1

Mechanical preparation

3.1.1

Ambient conditions

-

Only use within buildings.

-

Operating temperature: -10°C to +40°C

-

Storage temperature: -20°C to +50°C

-

Relative humidity: 20% to 85%, non-condensing

-

Altitude: up to 3,575 m

3.1.2

Installation location

-

Place the device on a stable, flat surface.

-

Position the device so that the power plug is freely accessible and the power cord
does not present an obstacle or trip hazard.

Avoid unsuitable influences at the installation location:

-

Extreme temperatures and excessive temperature fluctuations

-

Heat due to proximity to heaters or due to direct sunlight

-

Aggressive chemical vapors

-

Extreme moisture

-

Extreme vibrations

3.1.2.1

Shock resistance

NOTICE

Falling objects, side impacts, and shock loads may affect the performance and the
accuracy of the scale and damage the platform.

Avoid shock loads!

3.1.3

Unpacking

3.1.4

Checking the equipment supplied

-

1 scale

-

1 load plate

-

1 USB power supply with cable

-

Safety instructions and QR code for access to the complete documentation

.

Unpack the device and check it for visible external damage.

If there is damage, follow the instructions in the chapter "Safety check".

.

Keep the original packaging in case the device needs to be returned. Remove all
cables before sending.

3 Device installation

Compact scale Puro® - Basic

Minebea Intec

EN-7

Summary of Contents for Compact scale Puro Basic EF-P1

Page 1: ...ustin Ft Worth NicolScales com 800 225 8181 Contact Us Nicol Scales Measurement is an ISO Accredited Calibration Company that has provided calibration repair and sales of all types of weighing and mea...

Page 2: ...Compact scale Puro Basic Operating Instructions 98628 000 61 Edition 1 0 1 6 22 2020 Minebea Intec Bovenden GmbH Co KG Leinetal 2 37120 Bovenden Germany Phone 49 551 309 83 0 Fax 49 551 309 83 190...

Page 3: ...fied personnel In correspondence concerning this product the type name and release number serial number as well as all license numbers relating to the product have to be cited Note This document is pa...

Page 4: ...Device installation 7 3 1 Mechanical preparation 7 3 1 1 Ambient conditions 7 3 1 2 Installation location 7 3 1 3 Unpacking 7 3 1 4 Checking the equipment supplied 7 3 1 5 Leveling the weighing platf...

Page 5: ...n 31 5 4 3 GEO geographic data calibration location 34 5 4 4 GEO code table 35 5 5 SBI interface 37 6 Maintenance repairs cleaning 39 6 1 Repairs 39 6 2 Cleaning 39 6 2 1 Instructions for cleaning 39...

Page 6: ...lved when measures for preventing hazards are not followed DANGER Warning of personal injury DANGER indicates death or severe irreversible personal injury which will occur if the corresponding safety...

Page 7: ...ICE indicates that damage to property and or the environment may occur if appropriate safety measures are not observed Take the corresponding safety precautions Note User tips useful information and n...

Page 8: ...ts of the consignment for integrity Check the contents visually to determine whether any damage has occurred during transport If there are grounds for rejection of the goods a claim must be filed with...

Page 9: ...and excessive stresses If the device or the power cord display visible damage Disconnect the power supply and secure the device to prevent it being used further Do not unnecessarily subject the devic...

Page 10: ...roximity to heaters or due to direct sunlight Aggressive chemical vapors Extreme moisture Extreme vibrations 3 1 2 1 Shock resistance NOTICE Falling objects side impacts and shock loads may affect the...

Page 11: ...he power cord is disconnected the scale switches into battery operation automatically In the event of supply via a power supply the battery is constantly charged meaning that the battery charging disp...

Page 12: ...then there is around 30 minutes of working time left When lo bat is displayed the scale switches off WARNING Danger of explosion If the rechargeable battery is replaced with a battery of the wrong ty...

Page 13: ...ements LCD display 1 2 11 10 3 4 5 7 8 12 9 6 Item Description Item Description 1 Busy 7 Scale tares automatically 2 Plus sign 8 Active data transmission 3 Minus sign 9 Selected weight unit 4 1 4 d ra...

Page 14: ...it ched off Zero scale if the scale is switched on Set tare Totalizing Display weight or totalized values Call up applica tions Send the current value to the selected COM ports if the Out option is sp...

Page 15: ...iscard current set ting in the display and switch to the next available set ting Go to the next menu item Increase digit value 4 1 4 Display on the reverse The LargeTall LT and SmallTall ST models hav...

Page 16: ...ersion number is briefly displayed If the scale is switched on for the first time the weighing and totalizing manual applications are active Whenever it is switched on the device performs a self test...

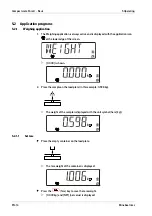
Page 17: ...creen 0 000 is shown 2 Place the sample on the load plate in this example 0 598 kg The weight of the sample is displayed with the unit symbol here kg Place the empty container on the load plate The ta...

Page 18: ...t unit key See Chapter 5 3 2 3 5 2 1 3 Stable weight value A stable weight value is displayed with the unit symbols e g kg Stable weight value A non stable weight value is displayed without the unit s...

Page 19: ...he number of items totalized is also saved Statistics data total value minimum maximum weight and total weighed objects are saved for testing and printing The totalizing function is available in every...

Page 20: ...y to access the sub menu item 5 Repeat until TOT SET Totalizing is displayed 6 Press the Off Yes key to access the sub menu then use the Unit key to select one of the options OFF AUTO MAN off automati...

Page 21: ...must not be a load on the scale The statistics information is displayed in the display in the following order Number of weighings carried out N 7 4 Place another weight on the scale and repeat the pr...

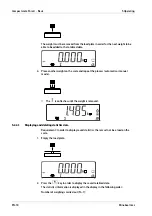
Page 22: ...kg Maximum value max 1 485 kg Deleting the totalizing memory 3 Press and hold the T key while there is no load on the load plate and the totalized data are displayed The message CLR TOT is displayed 5...

Page 23: ...f the first weight is a net weight the following weights must also be net weights 5 3 Menu The scale settings can be adjusted in the user menu menu mode Note If appropriate interface options are insta...

Page 24: ...n the display 4 When the setting is displayed in this example METRO STAB RA value 0 5 d press the Off Yes key in order to adopt the setting or the Unit No key in order to change the setting The curren...

Page 25: ...STAB RA Stability range 0 5d 1 2 d 1d 1 d 2d 2 d 4d 4 d FILTER Adjustment filter LOW Lower accuracy short stabilization time MED Normal accuracy average stabilization time HI High accuracy long stabil...

Page 26: ...actory settings NO not reset YES activated END Exit menu level kg Kilogram OFF deactivated ON activated g Gram OFF deactivated ON activated lb Pound OFF deactivated ON activated oz Ounce OFF deactivat...

Page 27: ...the background lighting after 8 seconds with no activity D LIGHT Background lighting of the display OFF deactivated ON activated AUTO Switches on when a key is pressed or the displayed weight changes...

Page 28: ...ON activated INFO No effect in this device OFF deactivated ON activated TOTAL Totalizing memory statistics data OFF deactivated RESULT Totalizing memory is printed ALL Totalizing memory statistics da...

Page 29: ...data are stable INTERV Specify output interval if INT OUT is selected 1 CYC Every display cycle 2 CYC After 2 display cycles 5 CYC After 5 display cycles 10 CYC After 10 display cycles 20 CYC After 20...

Page 30: ...f weighing range and max load GEO The adjustment of the calibration based on the current location is carried out using the geographic adjustment factor GEO Settings from 0 31 default value 12 END Exit...

Page 31: ...o half weighing range and max load GEO The adjustment of the calibration based on the current location is carried out using the geographic adjustment factor GEO Settings from 0 31 default value 12 END...

Page 32: ...menu item until CAL ADJ is displayed 4 Press the Off Yes key to go to the sub menu item The sub menu item CAL calibration is displayed 5 Press the Off Yes key to start a calibration 0 kg is shown 0 fl...

Page 33: ...next digit The second digit flashes 0_15 000 kg 10 Press the Unit key to increase the value or the Mode F key to decrease the value 11 Repeat until all digits are correct The value of the calibration...

Page 34: ...tion weight is being saved 14 Remove the weight The scale is ready for operation 1 Press and hold Menu M until M E N U is displayed The first menu item APPLIC application is shown in the display 2 Pre...

Page 35: ...the display the value of the 1st linearization weight 50 of the capacity of the scale is displayed with flashing digits 00075 0 in this example 75 kg This value cannot be changed C is displayed while...

Page 36: ...example 150 kg 11 Place the 2st linearization weight on the load plate 12 Press the Off Yes key to start the linearization at 100 of the capacity of the scale In the display the value of the lineariz...

Page 37: ...PLIC application is shown in the display 2 Press the Unit key in order to access the next menu item or press the Mode F key to access the previous menu item 3 Repeat until CAL ADJ is shown in the disp...

Page 38: ...20 45 22 22 8 8 7 7 6 6 5 5 4 4 3 22 22 23 54 9 8 8 7 7 6 6 5 5 4 4 23 54 25 21 9 9 8 8 7 7 6 6 5 5 4 25 21 26 45 10 9 9 8 8 7 7 6 6 5 5 26 45 28 06 10 10 9 9 8 8 7 7 6 6 5 28 06 29 25 11 10 10 9 9 8...

Page 39: ...11 11 41 12 42 19 16 16 15 15 14 14 13 13 12 12 11 42 19 43 26 17 16 16 15 15 14 14 13 13 12 12 43 26 44 32 17 17 16 16 15 15 14 14 13 13 12 44 32 45 38 18 17 17 16 16 15 15 14 14 13 13 45 38 46 45 18...

Page 40: ...24 77 55 80 56 30 29 29 28 28 27 27 26 26 25 25 80 56 85 45 30 30 29 29 28 28 27 27 26 26 25 85 45 90 00 31 30 30 29 29 28 28 27 27 26 26 5 5 SBI interface A computer connected via the PC interface SB...

Page 41: ...l response telegrams There are some special responses which are used as standard responses Example Error or confirmation Special response telegrams are always 5 bytes OK confirmed 1 2 3 4 5 O K CR LF...

Page 42: ...o liquid must get into the scale The device must not be cleaned using a high pressure or steam cleaner Observe the IP protection grade If the device is cleaned with water that is too hot or too cold d...

Page 43: ...points run by local public waste disposal companies EU legislation requires its Member States to collect electrical and electronic equipment and dispose of it separately from other unsorted municipal...

Page 44: ...itching on Read weight falls below start up ze roing limit Err 8 3 Overload range error Read weight exceeds overload limit Err 8 4 Underload range error Read weight falls below overload limit Err 8 5...

Page 45: ...if a problem cannot be rectified with the aid of the troubleshooting information or is not described there Our website http www puroscales com provides information about your closest service partner...

Page 46: ...pad 5 mechanical keys Zero range 2 or 10 of the max load of the scale Tare range Max load via subtraction Stabilization time 1 second Automatic zero point correction Off increments of 0 5 1 or 3 Safe...

Page 47: ...ons in mm W x D x H 365 x 365 x 210 Net weight kg 2 8 Shipping weight kg ST 3 2 Product dimensions in mm W x D x H 246 x 302 x 90 Platform size in mm W L 218 x 180 Shipping dimensions in mm W x D x H...

Page 48: ...Option Order no Weighing hooks YP H1 9 3 Dimensions LargeTall LT 9 Technical data Compact scale Puro Basic Minebea Intec EN 45...

Page 49: ...All dimensions in mm inch All dimensions in mm inch Compact scale Puro Basic 9 Technical data EN 46 Minebea Intec...

Page 50: ...All dimensions in mm inch LargeFlat LF 9 Technical data Compact scale Puro Basic Minebea Intec EN 47...

Page 51: ...All dimensions in mm inch All dimensions in mm inch Compact scale Puro Basic 9 Technical data EN 48 Minebea Intec...

Page 52: ...All dimensions in mm inch 9 Technical data Compact scale Puro Basic Minebea Intec EN 49...

Page 53: ...SmallTall ST Compact scale Puro Basic 9 Technical data EN 50 Minebea Intec...

Page 54: ...All dimensions in mm inch All dimensions in mm inch 9 Technical data Compact scale Puro Basic Minebea Intec EN 51...

Page 55: ...All dimensions in mm inch SmallFlat SF All dimensions in mm inch Compact scale Puro Basic 9 Technical data EN 52 Minebea Intec...

Page 56: ...All dimensions in mm inch All dimensions in mm inch 9 Technical data Compact scale Puro Basic Minebea Intec EN 53...

Page 57: ...All dimensions in mm inch Compact scale Puro Basic 9 Technical data EN 54 Minebea Intec...

Page 58: ...de ON If Printx Content Total All If Printx Content Total All or Result If Printx Content Total All If Printx Content Total All 10 2 FCC notice Note This device has been tested and found to comply wit...

Page 59: ...Published by Minebea Intec Bovenden GmbH Co KG Leinetal 2 37120 Bovenden Germany Phone 49 551 309 83 0 Email info minebea intec com www minebea intec com...

Reviews: