background image

Chapter 1 Before Use

1-13

1

2

2

2

2

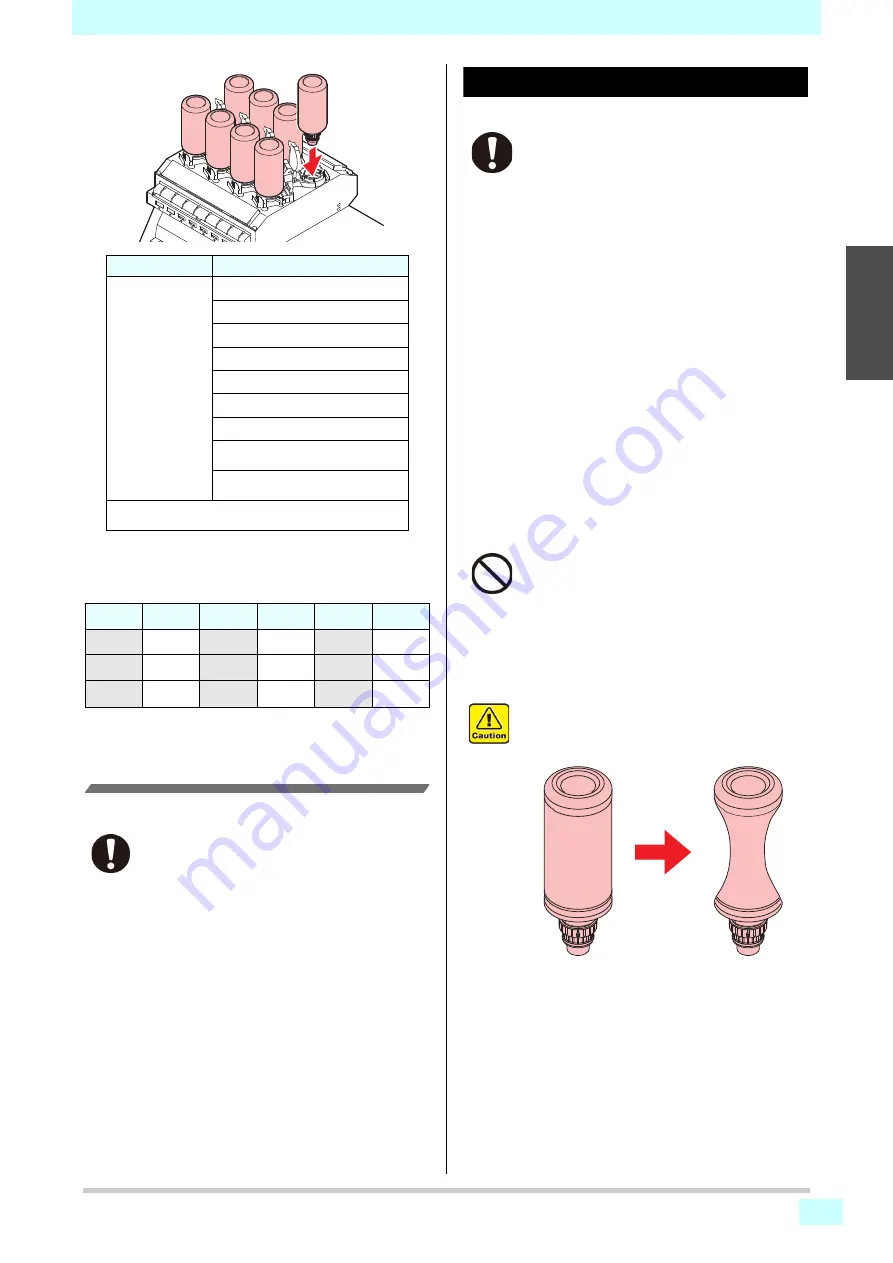
Each color is displayed on the LCD as follows:

Precautions at the time of setting the 
ink bottle

When setting the ink bottle, pay attention to the followings:

Caution in handling of ink bottles

Ink Type

Color

UV Ink

Magenta

Cyan

Yellow

Black

White

Clear

Primer

Light cyan (only for 3042MkII EX/

6042MkII/)

Light magenta (only for 3042MkII 

EX/6042MkII)

Cleaning bottle 

*1

*1. To be used when the head is cleaned.

Display

Color

Display

Color

Display

Color

M

Magenta

K

Black

P

Primer

C

Cyan

W

White

Lc

Light cyan

Y

Yellow

CL

Clear

Lm

Light 

magenta

• Confirm the ink slot number and insert the ink 

bottle of the correct color. 

• Insert the ink bottle securely all the way in the slot. 

Moreover, do not insert or pull out the bottle 
roughly.

• Insert the IC chip into the insertion hole on the ink 

supply unit.

• If you get ink in your eyes, immediately wash your 

eyes with a lot of clean running water for at least 
15 minutes. In doing so, also wash the eyess to 
rinse ink away completely. Then, consult a doctor 
as soon as possible.

• Use genuine ink bottles for this machine. This 

machine functions by recognizing the genuine ink 
bottles. In case of troubles caused by modified ink 
bottles or the like, it shall be out of the warranty 
even within the warranty period.

• Store the ink bottle in a place not more than 1 m 

off the ground. If you store it in a place higher than 
1 m, should the ink bottle fall, the cap may come 
off, spilling the ink.

• If the ink bottle is moved from a cold place to a 

warm place, leave it in the room temperature for 
three hours or more before using it.

• Make sure to store ink bottles in a cool and dark 

place.

• Store ink bottles and waste ink tank in a place that 

is out of the reach of children.

• Some component (photoinitiator) of the ink is toxic 

against aquatic organisms. Avoid leakage of it to 
natural water system or domestic waste water.

• Before using an ink bottle, be sure to read the 

Safety Data Sheet (SDS).

• Request an industrial waste processor for 

processing of empty ink bottles.

• Do not shake ink bottles violently. This may result 

in ink leakage from the ink bottles.

• Never refill the ink bottles with ink. This may result 

in troubles.
MIMAKI will not bear any responsibility for any 
damage caused by the use of the ink bottles 
refilled with ink.

• Do not touch or stain the contacts of the IC chip. 

This may cause damages on printed circuit 
boards.

• The shape of an ink bottle installed in the machine 

might collapse as shown in the figure on the right. 
This is normal, and does not affect the use or 
operation of the machine.

Summary of Contents for 3042 MkII EX

Page 1: ...MIMAKI ENGINEERING CO LTD https mimaki com D203043 42 Original instructions ...

Page 2: ...3 Rear 1 4 Carriage 1 4 EMERGENCY SWITCH 1 4 Indicator light unit 1 5 Operation Panel 1 6 About table 1 9 About tap position 1 9 Instructions for using the table 1 11 Connecting the cables 1 11 Connecting the USB2 0 interface cable 1 11 Connecting the LAN cable 1 12 Connecting the power cable 1 12 About ink bottle 1 13 Kinds of ink that can be used 1 13 Caution in handling of ink bottles 1 13 Sett...

Page 3: ... Thickness 3 3 Setting the HEAD GAP 3 3 Gap check 3 3 Table spacer 3 4 About ORIGIN SETUP MENU 3 5 ORIGIN SETUP MENU table 3 5 Setting the X offset REM 3 6 Setting the Y offset REM 3 6 Setting the X offset LOC 3 6 Setting the Y offset LOC 3 6 Setting the Z origin 3 7 Changing the origin using the JOG keys 3 7 About SETUP MENU 3 8 SETUP MENU table 3 9 Setting of Media Correction 3 10 Setting of LOG...

Page 4: ...splaying the Information 3 30 Chapter 4 Maintenance Routine maintenance 4 2 When this machine is left unused for a long time 4 2 Precautions in cleaning 4 2 Cleaning exterior surfaces 4 2 Cleaning the table 4 2 About MAINTENANCE MENU 4 4 MAINTENANCE MENUs at a glance 4 5 Maintaining the Capping Station 4 6 Cleaning the Wiper and Cap 4 6 Cleaning the mist filter 4 8 Nozzle Wash 4 9 Nozzle Wash When...

Page 5: ... Warning Appears UJF 3042MkII 6042MkII only 4 23 Replacing the waste ink tank before the Check wiper waste inktank warning is displayed 4 24 Supplying antifreeze liquid 4 25 Supplying antifreeze liquid 4 26 Chapter 5 Troubleshooting Troubleshooting 5 2 Power does not turn on 5 2 The machine does not start printing 5 2 Image quality is poor 5 2 Nozzle is clogged 5 3 Ink bottle warning appears 5 3 W...

Page 6: ...orrect the interference at his own expense Interference to televisions and radios The product described in this manual generates low radio waves while it is in operation The product can interfere with radios and televisions if set up or commissioned under improper conditions The product is not guaranteed against any damage to specific purpose radios and televisions The product s interference with ...

Page 7: ...al describes the operation and maintenance of Model UJF 3042MkII 3042MkII EX 3042MkII e 3042MkII EX e 6042MkII 6042MkII e Color Ink Jet Printer hereinafter referred to as the machine The illustration of UJF 3042MkII is used in the explanation of this manual Please read and fully understand this Operation Manual before putting the machine into service It is also necessary to keep this Operation Man...

Page 8: ...outlet Please observe the following cautions to avoid breakdown of this machine 1 The opening area of the exhaust outlet requires more than half of the duct entrance area 2 If mounting a valve on the exhaust outlet be sure to open the valve when using the machine The included power cable set can be used with this machine only This power cable set cannot be used with any other electrical devices To...

Page 9: ...lar foreign material enters the device turn the power supply off immediately make sure to disconnect the power plug and contact the service center Using the device without addressing the issue can result in a fire or electric shock In case of ink leakage please turn off the main power unplug the power cable and contact your local distributor our sales office or service center Keep children away fr...

Page 10: ...b in a sawdust or waste cloth then incinerate it Entrust to an industrial waste disposal contractor clarifying their contents Avoid causing ignition with static electricity impact spark and so on Be sure to wear safety glasses and gloves for handling the antifreeze liquid WARNING Circulating water If you find any water leaks on the maintenance parts turn the power switch off immediately and remove...

Page 11: ...isorders pain in eyes tearing chronic disorders cataract etc When using this machine protect your body such as gloves long sleeve cloth light resistant mask attached light resistant glasses etc CAUTION Notes on LED UV When handling the glass on the bottom of the LED UV unit be sure to wear the gloves attached and never touch them with bare hands Or the UV ink curing level may significantly lower I...

Page 12: ...tighten the screws This machine is not an explosion proof type Do not use the machine in a flammable atmosphere There is a danger of explosion If abnormalities such as a strange odor a smoking or a spark burn occurred turn the power off and call our office immediately CAUTION A place exposed to direct sunlight On an inclined surface A place that vibrates A place exposed to direct air flow from an ...

Page 13: ...achine is equipped with interlocks to terminate the operation for your safety when the cover opens during printing etc red circle parts in the figure below 1 Although the carriage stops when you open the front cover the interlock is not activated Front cover 1 ...

Page 14: ... on this machine Be sure to fully understand the warnings given on the labels In the case where any of the warning label has become so soiled that the warning message is illegible or has come off purchase a new one from your local distributor or our office 2 3 6 4 7 5 6 1 4 8 1 4 1 8 11 10 9 ...

Page 15: ... 2 2 2 2 Order No Label Order No Label 1 M903330 6 M913425 2 M913563 UJF 6042MkII UJF 6042MkIe 7 M913706 3 M913565 UJF 3042MkII UJF 3042MkII EX UJF 3042MkII e UJF 3042MkII EX e 8 M903239 4 M907935 9 M913610 5 M913423 10 M913419 11 M915076 ...

Page 16: ...Position of the warning label xv ...

Page 17: ...4 Indicator light unit 1 5 Operation Panel 1 6 About table 1 9 About tap position 1 9 Instructions for using the table 1 11 Connecting the cables 1 11 Connecting the USB2 0 interface cable 1 11 Connecting the LAN cable 1 12 Connecting the power cable 1 12 About ink bottle 1 13 Kinds of ink that can be used 1 13 Caution in handling of ink bottles 1 13 Setting ink bottles 1 14 About Media 1 18 The s...

Page 18: ...room ink adhering to the head hardens and it may cause image quality defect that cannot be improved even if you perform head cleaning many times and may cause nozzle clogging Besides photographic fixer if you leave this machine in an environment where acidic vapor acetic acid muriatic acid etc is generated the same phenomenon occurs Do not use this machine in environments where cutting fluid or ot...

Page 19: ... 4 Set media on it Operation Panel P 1 6 Operation keys for setting the machine and a display to display operation items are placed Power button Turn ON OFF the power of this machine instead of the power switch of main body P 2 3 Carriage P 1 4 The carriage is provided with the print head Waste ink tank A tank collects waste ink Maintenance Cover Open the cover during maintenance Front cover Open ...

Page 20: ...he printing conditions Use the accompanying light shielding glasses Main power switch Turn ON OFF the power of the machine USB socket Connect USB interface cable LAN connector This is Ethernet interface connector UV light Front cover The emergency switch on 3042MkII 3042MkII e is optional To your use this option you will need a mounting work by our service engineers Please note that the optional a...

Page 21: ...ntenance Blinking Specific warning error occurred and printing in the remote Blinking Blinking A specific warning error occurred and not printing in the remote Lighting Blinking Errors to cause system down or the occurrence of error such as cover open Lighting Never disassemble or remodel the main unit of the printer and the optional indicator Disassembling remodeling any of them will result in el...

Page 22: ...s to set various functions or to do test printing The function keys functions are changed each time SEL key is pressed JOG key Use these keys to shift the carriage or the media in LOCAL Also use them to select an item of printing conditions key Cancels the last input value or returns the setting menu to the immediate higher level of the hierarchy Also press this to turn the power on or off Give it...

Page 23: ...decreases moving to the right Indicates that the ink cannot be used due to ink end or ink error Indicates that ink has expired or that one month has passed after the expiration date Please use quickly Ink can no longer be used if two months have passed after the expiration date ink full Approximately 1 8 consumed Approximately 1 4 consumed Approximately 3 8 consumed Approximately 1 2 consumed Appr...

Page 24: ...are multiple items on the MENU screen or other screens it moves to the previous page Used for completing confirmation when warning message has been displayed and so on Used for turning functions OFF or cancelling them Some kind of setting or function is assigned Operate according to the description of each function Switches between enable disable when selecting multiple items for example when sele...

Page 25: ... 6042 for 18 positions of the size below respectively Table UJF 3042MkII UJF 3042MkII e UJF 3042MkII EX UJF 3042MkII EX e UJF 6042MkII UJF 6042MkII e Acceptable media weight 1 1 If you place a heavier object than specified the table will deform and the image quality will deteriorate 5kg and less 5kg and less 8kg and less Vacuum function No Option Yes Yes Table movable area 0 to 53mm Media thicknes...

Page 26: ...0 Chapter 1 Before Use Tap hole can be used with jig The position of other holes might be changed without notice Do not protrude the jig from the edge of the table Vacuum Table UJF 6042MkII UJF 6042MkII e ...

Page 27: ... machine is not recognized by the newly connected USB port use USB 2 0 repeater cables available on the market Notes on peripheral devices in USB high speed mode When a peripheral device USB memory or USB HDD to be operated in USB high speed mode is connected to the same personal computer that a this machine is connected to the USB device may not be recognized When this machine is connected to the...

Page 28: ...al times to display the information screen 2 Check the green light of the LAN connector After turning on the machine the lamp for the LAN connector will light up as follows Connecting the power cable About ink bottle There are 8 ink bottles 6 bottles for 3042 MkII 3042 MkII e on the left side of the machine Kinds of ink that can be used Surely insert LAN cable until clicking noise sounds Do not pl...

Page 29: ... modified ink bottles or the like it shall be out of the warranty even within the warranty period Store the ink bottle in a place not more than 1 m off the ground If you store it in a place higher than 1 m should the ink bottle fall the cap may come off spilling the ink If the ink bottle is moved from a cold place to a warm place leave it in the room temperature for three hours or more before usin...

Page 30: ...re perform this carefully If the remaining amount of ink is less ink in the bottle cannot be beaten enough Tilt the ink bottle until it becomes vertical Cover with paper towel firmly and shake ink slowly Repeat this If the mouth of the ink bottle is fitted with a seal 1 Use a cutter or similar tool to cut out a circle from the seal at the mouth of the bottle If there is any leftover cut it may cau...

Page 31: ... to the special cap Continuing to use it when it is dirty may result in foreign matter blocking the ink path causing ink leakage Do not overtighten the special cap Disregarding this precaution may result in damage idling or ink leakage If the arrow moves beyond the above range loosen the special cap and repeat the steps again Do not leave ink bottles with special caps fitted for extended periods D...

Page 32: ... cover If you set the IC chip not being the pair of the ink bottle image quality defect etc may occur The mark indicating color information is pasted on the IC chip IC chip IC chip Mark indication position Ink color and indication mark Ink color Indication mark Black one black circle Cyan one blue circle Magenta one red circle Yellow one yellow circle White one white circle Clear two white circles...

Page 33: ...LOCAL mode you can check the bottle to be replaced in the local guidance P 3 30 If the light blocking cover comes off If the light blocking cover comes off light striking the inside of the tank can result in the ink curing Perform the following procedures if the light blocking cover comes off 1 Insert the nub on one side of the light blocking cover into the hole on the tank 2 While pressing toward...

Page 34: ... blinks to yellow One of the following errors occurs Ink near end Expiration of a term of ink validity one month Blinks to red Expiration of a term of ink validity two months Lit to red One of the following errors occurs Ink end No ink IC chip inserted Other ink errors P 5 7 Ink bottles lamps 3042MkII 3042MkII EX 3042MkII e 3042MkII EX e 6042MkII 6042MkII e Maximum width 300 mm 610 mm Maximum leng...

Page 35: ... printing by pressing the FUNC2 TEST PRINT CLEANING key 3 Executing head cleaning by pressing the FUNC2 TEST PRING CLEANING key 4 Execute setting of each function by pressing the FUNC1 MENU key Menu Mode Press the FUNC1 MENU key during the Local Mode to call the Function Mode In this mode you can configure various settings or carry out the maintenance process Remote Remote is a mode in printing re...

Page 36: ...Chapter 1 Before Use 1 20 ...

Page 37: ...ting 2 7 Perform test printing with the test pattern for checking white ink 2 8 Head Cleaning 2 8 About head cleaning 2 8 Perform head cleaning depending on the test printing result 2 8 Printing an image from source data 2 9 Starting the printing operation 2 9 Interruption of printing 2 9 Checking printing data that is being received or has been received 2 10 When WORK High is displayed 2 10 If yo...

Page 38: ... media 3 Test printing 4 Head Cleaning 5 Printing an image from source data 6 Turning the Power OFF See Turning the Power ON P 2 3 See Setting the media P 2 4 See Test printing P 2 7 See Head Cleaning P 2 8 See Printing an image from source data P 2 9 See Turning the Power OFF P 2 3 ...

Page 39: ...in press the END POWER key Cautions about Turning the Power OFF Do not turn the main power switch OFF When the main power switch is ON the power periodically turns ON and the operation for preventing ink sedimentation is carried out When the main power switch has been turned OFF the function for preventing ink sedimentation will not work and this may cause nozzle clogging Keep the front cover and ...

Page 40: ...ble Height If the table height is changed Media Thickness is also changed 1 Press the MENU key in LOCAL mode HEAD HEIGHT MENU will be displayed 2 Press to serect TABLE HEIGHT and press the key 3 Press to set the table height and press the key Set value 0 0 to 153 0mm 4 Press the key several times to end the setting The peripheral parts of the media could roll up due to heat Fix the media supplemen...

Page 41: ...ise the table and remove it 4 Attach the table spacer 5 Attach the assembled table on the main body 1 Attach the table on the original position 2 Insert the connector for the vacuum fan only UJF 3042MkII EX UJF 3042MkII EX e UJF 6042MkII UJF 6042MkII e 3 Turn on the power supply 6 Press the MENU in LOCAL mode 7 Press to select HEAD HEIGHT and press the key 8 Press to select TABLE SPACER and press ...

Page 42: ...the table 3 Press the key The table moves up to the table height for drawing About switching vacuum fan The vacuum function to fix the media at printing automatically starts Only for UJF 3042MkII EX UJF 3042MkII EX e UJF 6042MkII UJF 6042MkII e or when using an absorption table The origin can also be changed from ORIGIN SETUP MENU P 3 5 The height of the table is also fixed at the same time Adjust...

Page 43: ...peration P 2 9 When the result is abnormal execute head cleaning P 2 8 When you use white or clear ink print on the clear film to check Check before starting test printing Is media set P 2 4 Is origin point set P 2 6 Is the table height appropriate P 2 4 When nozzle recovery is set press to set ON OFF and then press the ENTER key ON Draws with nozzle recovery ON OFF Draws with nozzle recover OFF I...

Page 44: ...hen poor image quality cannot be improved even by NORMAL or SOFT cleaning ULTRA When poor image quality cannot be improved even by HARD cleaning or when the color does not improve Perform head cleaning depending on the test printing result There are four types of head cleaning Use one by checking the test pattern 1 Press the TEST PRINT CLEANING key in LOCAL mode CLEANING MENU will be displayed 2 P...

Page 45: ...the computer the computer stops transmission of data 2 Press the key onece DATA CLEAR appears on the lower line of the display 3 Press DATACLEAR 4 Press the key Received data is erased and the machine returns to the local mode The tabel moves to the evacuation position If the temperature of the head has not reached the predetermined value a message is displayed Printing is not allowed in such case...

Page 46: ...media setting status and press the REMOTE The machine restarts printing If you do not wish to restart printing refer to the P 2 9 Interruption of printing and interrupt printing If you open the cover during printing If you open the cover during printing the warning message Reset a switch is displayed on the screen 1 Close the cover and press the key to suspend printing Machine starts initializatio...

Page 47: ...T FLUSHING LEVEL 3 12 Setting of MAPS4 3 13 Setting of the Misregistration adjust 3 14 Setting of LT mode 3 15 Setting of SUCTION WIPER 3 15 About MACHINE SETUP MENU 3 16 MACHINE SETUP MENU table 3 17 Setting a AUTO Power off 3 18 Setting Time 3 18 Setting Unit Length 3 18 Setting a KEY BUZZER 3 18 Setting the network 3 19 Setting event mail function 3 19 Setting of Remote control 3 24 Setting a L...

Page 48: ...REMOTE MENU 1 3 VACUUM WORK SET HEAD HEIGHT SET ORIGIN SET UP MAINTENANCE HEAD HEIGHT VACUUM MEDIA THICKNESS 0 1mm 1 5mm 53mm OFF HEAD GAP TABLE HEIGHT GAP CHECK 100mm TABLE SPACER HEAD HEIGHT VACUUM MEDIA THICKNESS 0 1mm 1 5mm 53mm OFF HEAD GAP TABLE HEIGHT GAP CHECK 100mm TABLE SPACER HEAD HEIGHT VACUUM MEDIA THICKNESS 0 1mm 1 5mm 53mm OFF HEAD GAP TABLE HEIGHT GAP CHECK 100mm TABLE SPACER HEAD ...

Page 49: ...s shielded the table is lowered until it is unshielded to change the table height If the work sensor is shielded when the table is lowered to the bottom a message of WORK High appears and the operation stops MANUAL You can manually set the height of the work Gap Set It does not check the work height before and during printing STOP Before drawing the work height is checked with the specified table ...

Page 50: ...cer you are using 1 Press the MENU key in LOCAL mode HEAD HEIGHT MENU will be displayed 2 Press to select Table spacer and press the key 3 Press to select the table spacer and press the key Set value 0 mm 50 mm 100 mm 4 Press the key several times to end the setting ...

Page 51: ...0mm Setting the Z origin table height LOCAL 10 22 0 0mm 0 0mm 53 0mm MENU TEST PRINT CLEANING REMOTE Lc Lm Y C M K W CL 2回 LOCAL 10 22 0 0mm 0 0mm 53 0mm MENU TEST PRINT CLEANING REMOTE Lc Lm Y C M K W CL MENU 1 3 VACUUM WORK SET HEAD HEIGHT SET ORIGIN SET UP MAINTENANCE SET ORIGIN X offset REM 0 0mm 0 0mm 53 0mm Y offset REM X offset LOC 0 0mm 0 0mm Y offset LOC Z origin SET ORIGIN X offset REM 0...

Page 52: ...e origin to the maximum effective area 5 Press the key several times to end the setting Setting the X offset LOC Use the following steps to accurately set the X origin of the built in pattern such as test print 1 Press the MENU in LOCAL mode 2 Press to select SET ORIGIN and press the key 3 Press to select X offset LOC and press the key 4 Press to set the X axis origin position and press the key Th...

Page 53: ...ting mode starts A red light pointer mark is projected on the table or the media 2 Press to move the light pointer mark Move the light pointer mark to the position to set a new origin 3 Press the key to set the print origin The origin is changed Changing with the ORIGIN in the FUNCTION menu The height of the table is also fixed at the same time Adjust the height of the table by pressing the TABLE ...

Page 54: ...H LEVEL UV MODE VACUUM LOCAL 10 22 0 0mm 0 0mm 53 0mm MENU TEST PRINT CLEANING REMOTE Lc Lm Y C M K W CL LT mode OFF SET UP Misregistration Adjust LT mode OFF VACUUM SET UP VACUUM SET UP Misregistration Adjust LT mode OFF VACUUM SET UP SUCTION WIPER VACUUM 3回 AUTO MAPS Scan Speed STANDARD WORK CHANGE OFF Auto ON 0 FAN MODE AUTO CLEANING PRINT FLUSHING LEVEL 0 UV AdjVal WORK CHANGE OFF Auto ON 0 FA...

Page 55: ...ting UV AdjVal P 3 11 50 0 50 0 The pre set UV lamp light intensity can be changed FW supported from UJF MkII Ver5 2 or later UJF MkIIe Ver2 0 or later WORK CHANGE P 3 11 ON OFF OFF Set whether to return to the local mode or keep the remote mode after online drawing FAN MODE P 3 12 AUTOMATIC MANUAL AUTO Sets the vacuum function AUTO CLEANING P 3 12 ON OFF ON Sets the automatic cleaning operation f...

Page 56: ...ern again and check it When media correction is needed perform the operation in Step 5 to make correction 8 Press the key several times to end the setting Setting of LOGICAL SEEK The head s operation varies depending on the LOGICAL SEEK settings as shown in the figure below 1 Press the MENU key in the local mode 2 Press to select Setting then press the key The setting menu is displayed 3 Press to ...

Page 57: ...made in which the lighting of the LED UV is not desired 1 Press the MENU key in the local mode 2 Press to select Setting then press the key The setting menu is displayed 3 Press to select UV MODE and press the key 4 Press to select a set value and press the key Set value ON OFF NO PRINT 5 Press the key several times to end the setting Setting of UV AdjVal The pre set UV lamp light intensity can be...

Page 58: ... table 1 Press the MENU key in the local mode 2 Press to select Setting then press the key The setting menu is displayed 3 Press the 4 Press to select FAN MODE and press the key 5 Press to select a set value and press the key Set value AUTOMATIC MANUAL 6 Press the key several times to end the setting Setting of AUTO CLEANING Set whether auto head cleaning is executed or not at the following interv...

Page 59: ...n the local mode Press the key 2 Press to select Setting 1 to 4 then press the key The setting menu is displayed 3 Press the 2 times 4 Press to select MAPS4 and press the key 5 Press the key Set value Auto Manual If you select MANUAL in Step 6 proceed to Step 8 6 Press and select Smoothing Level then press the key 7 Press to change the smoothing level and press the key Set value 0 100 set in units...

Page 60: ...d print enter the plus value Printing Print the adjustment pattern Use transparent media with the A4 landscape size or more in Y direction Set Adjust back to Step6 7 Press to select the resolution to adjust and press the key Feed direction 600dpi 900dpi 1200dpi Scan direction 600dpi 1200dpi 8 Press to select Print or Set Adjust and press the key print print the adjustment pattern Use transparent m...

Page 61: ...XEC INTERVAL and press the key 10 Press the key EXEC INTERVAL setting menu is displayed 11 Press to select the set value and press the key Set value FILE WORK CHANGE When set value is set to FILE proceed to Step 12 Otherwise proceed to Step 14 12 Press to select Interval and press the key 13 Press to change interval and press the key Set value 1 to 5 14 Press the key several times to end the setti...

Page 62: ...izer SET OPTION JIG VACUUM MACHINE SETUP HEAD TEMP STANDBY TIME VACUUM MACHINE SETUP EVENT MAIL LANGUAGE Ionizer VACUUM MACHINE SETUP EVENT MAIL LANGUAGE Ionizer VACUUM MACHINE SETUP EVENT MAIL LANGUAGE Ionizer SET OPTION JIG VACUUM MACHINE SETUP EVENT MAIL LANGUAGE Ionizer SET OPTION JIG VACUUM MACHINE SETUP AUTO Power off 30min mm ON SET TIME mm inch KEY BUZZER NETWORK VACUUM MACHINE SETUP AUTO ...

Page 63: ...ccurs Other Event ON OFF OFF Set whether you send do not send the e mail when an event other than the above occurs Mail Address P 3 20 Set the e mail address to which you send the event mail Alphanumeric characters and symbols within 96 characters Message Subject P 3 20 Set the characters to write in the subject of the event mail Alphanumeric characters and symbols within 8 characters Server Setup...

Page 64: ... to select a set value and press the key Set value of length mm inch 3 Press the key several times to end the setting Setting a KEY BUZZER You can turn off the buzzer sound when pressing the key 1 Press the MENU key in LOCAL mode MACHINE SETUP MENU will be displayed 2 Press to select KEY BUZZER and press the key 3 Press to select a set value and press the key Set value ON OFF 4 Press the key sever...

Page 65: ...mes to end the setting Setting event mail function Set the function to send e mails to the set e mail address when events such as cutting start end and stop due to an error Enable the event mail function 1 Press the MENU key in LOCAL mode MACHINE SETUP MENU will be displayed 2 Press to select EVENT MAIL and press the key 3 Press to select MAIL DELIVERY and press the key 4 Press to select ON and pr...

Page 66: ...Set the e mail address to which you send the event mail Set it with alphanumeric characters and symbols within 96 characters 5 Press the key several times to end the setting Set the subject 1 Press the MENU key local mode MACHINE SETUP MENU will be displayed 2 Press to select EVENT MAIL and press the key 3 Press to select MASSAGE SUBJECT and press the key 4 Press to set subject and press the key S...

Page 67: ...f the SMTP server When you select OFF proceed to the Step 20 12 Press to select USER NAME and press the key 13 Press to set User Name and press the key Press to set the user name to use for the authentication Set it with alphanumeric characters and symbols within 30 characters 14 Press to select PASSWORD and press the key 15 Press to set Pass Word and press the key Press to set the password to use...

Page 68: ...IL and press the key 3 Press the key TRANSMIT TEST EXECUTE will be displayed 4 Press the key The sent result is displayed If sending test e mail has failed an error code is displayed Refer to the next page to solve the problem 5 Press the key several times to end the setting T R A N SM I T T E S T F A I L E D 1 2 3 4 5 e n t Error code ...

Page 69: ...the firewall setting 12010 An error returns from the POP server Check the POP server setting 13000 The POP authentication has failed Check the user name and the password Check the APOP setting Confirm the authentication method 10013 10014 The SMTP server cannot be found Or cannot access DNS server Check the SMTP server address Check that the machine is in the environment where DNS is available 100...

Page 70: ...eration during remote control Set value 5 to 120 minutes 9 Press the key several times to end the setting Setting a LANGUAGE You can change the displayed language 1 Press the MENU key local mode 2 Press to select LANGUAGE and press the key 3 Press to select language and press the key Set Value 日本語 English Deutsch Español Italiano 中文 Turkish 4 Press the key several times to end the setting Setting ...

Page 71: ... MACHINE SETUP to the status before shipment 1 Press the MENU key in LOCAL mode 2 Press to select MACHINE SETUP and press the key MACHINE SETUP MENU will be displayed 3 Press to select SETUP RESET and press the key 4 Press the key The already configured settings are initialized 5 Press the key several times to end the setting Setting the time of the head temperature to standby Change the transitio...

Page 72: ...onduct automatic nozzle recovery Judgement Condition P 3 28 1 to 100 1 Sets how many missing nozzles are detected for Nozzle Missing judgment to be made according to each color Maximum 10 per 1 nozzle line 2 2 Depending on the print conditions nozzle recovery is not applied in some cases MENU 2 3 VACUUM MACHINE SETUP NOZZLE CHECK INFORMATION LOCAL 10 22 0 0mm 0 0mm 53 0mm MENU TEST PRINT CLEANING ...

Page 73: ...hen the settings are enabled 1 nozzle check Judgment 2 3 Recovery operation nozzle check Judgment 4 Retry Judgment Printing Check Judgment Detects missing nozzles If more missing nozzles than Judgement Condition are detected after the nozzle check cleaning is performed and nozzle check is conducted again 5 Nozzle Missing judgment If more missing nozzles than A are eventually detected continued pri...

Page 74: ...retry count and then press the key Setting value 0 to 3 12 Press the key several times to end the setting Setting the NOZZLE RECOVERY set this if you want to conduct automatic nozzle recovery when nozzle missing is detected 1 Press the MENU key in the local mode 2 Press to select Nozzle Check then press the key The nozzle Check menu is displayed 3 Press to select NOZZLE RECOVERY and then press the...

Page 75: ...and warnings to date When you press the date of occurrence year month day hour minute and the error warning information are displayed alternately in the order of occurrence LIST This allows you to print the settings of this machine LOCAL 10 22 0 0mm 0 0mm 53 0mm MENU TEST PRINT CLEANING REMOTE Lc Lm Y C M K W CL MENU 2 3 VACUUM MACHINE SETUP NOZZLE CHECK INFORMATION LOCAL 10 22 0 0mm 0 0mm 53 0mm ...

Page 76: ...ORMATION then press the key The information menu is displayed 3 Press to select the information you want to see Refer to Information menu list and select the information to display 4 Press the key If you selected LIST in step 3 the machine s settings will be printed 5 Press the key several times to end the setting ...

Page 77: ...nd the Area around It4 14 Clean the bottom of the LED lamp and the bot tom of the mist filter 4 14 Nozzle Recovery Function 4 15 Reset the set value 4 16 Checking the UV Lamp Usage 4 16 Solving the Ink Overflow Problem 4 17 Automatic Maintenance Function 4 17 Setting the Refreshing Intervals 4 18 Setting the Cleaning Intervals and Type 4 18 Replacing consumables 4 18 When using rubber wiper Replac...

Page 78: ...or alcohol not only on the nozzle and also near the head Never disassemble this machine Disassembling this machine can result in electric shock hazards or damage to this machine Prevent moisture from entering this machine Moisture inside the machine can result in electric shock hazards or damage to this machine Before starting maintenance work be sure to turn off the main power switch and unplug t...

Page 79: ...4 3 1 2 2 4 5 6 Chapter 4 Maintenance ...

Page 80: ...rflow AUTO MAINT VACUUM MAINTENANCE Water FillUp SUB TANK MAINTENANCE VACUUM MAINTENANCE Water FillUp VACUUM SUB TANK MAINTENANCE MAINTENANCE Water FillUp VACUUM SUB TANK MAINTENANCE WHITE MAINTAIN WHITE MAINTAIN WHITE MAINTAIN MAINTENANCE STATION NOZZLE RECOVERY UV LAMP Overflow AUTO MAINT VACUUM MAINTENANCE STATION NOZZLE RECOVERY UV LAMP Overflow AUTO MAINT VACUUM MAINTENANCE STATION NOZZLE REC...

Page 81: ...isplayed only when the suction wiper is in use The suction wiper waste fluid counter managed by the machine is reset when the wiper waste ink tank is replaced NOZZLE RECOVERY P 4 16 For using another nozzle for printing when any nozzle cannot be recovered PRINT Prints a pattern to identify the nozzle that is clogged ENTRY Registers the faulty nozzle identified by PRINT RESET Resets a registered fa...

Page 82: ...per 6 When using rubber wiper Pull out the wiper Pull out the wiper by holding the protrusions at its both ends 7 When using rubber wiper Clean the wiper and bracket Wipe off the ink sticking to the wiper and bracket with a cleaning swab dipped in cleaning solution for maintenance Wipe off so that cleaning solution for maintenance will not remain 8 When using rubber wiper Reattach the wiper at its...

Page 83: ...d 10 Clean the cap rubber Wipe off the ink sticking to the cap rubber with a cleaning swab dipped in maintenance solution for maintenance Wipe off so that maintenance solution for maintenance will not remain 11 Press the key after the cleaning 12 Close the maintenance cover then press the key After its initial operation the machine returns to step1 Suction wipe Suction wipe Area around wiper Area ...

Page 84: ...places To remove the mist filter pull the knob to the front while pushing the hook in the direction indicated by the arrow 7 Clean the filter Remove the filter and remove the stain by holding paper towel or the like Wipe off any stain adhering to the filter case 8 Set the mist filter at the original position 9 Close the maintenance cover and press the key After its initial operation the machine re...

Page 85: ...enance will not remain Clean the tube once a week to prevent wiper tube clogging 1 Fill the dropper with 3 cc cleaning solution Use the dropper scale for the liquid measure 2 Fill the suction wiper with the cleaning solution from its mouth Speed to fill with cleaning solution 1 cc second 8 Fill up the cap with cleaning solution for maintenance Suck maintenance solution into a dropper and fill up t...

Page 86: ...ance liquid remains 3 Insert it in the original position by holding the protrusions at both ends of the wiper 7 When using suction wiper Clean the suction wiper and around the wiper Include F 200 LF 200 in the clean stick and clean Wipe off F 200 LF 200 maintenance liquid so that no maintenance liquid remains On models equipped with the PR 200 ink may clog the nozzle Please check the Ver on the la...

Page 87: ...r and press the key 11 Press to set the time for the maintenance Maintenance liquid to be left as it is and press the key Set value 1 minute Unit minute Do not change the leaving time The maintenance Maintenance liquid filled in the cap is absorbed Please Wait will be displayed in the display until the time you set has elapsed 12 Perform the head cleaning hard of the PR 200 head once 13 Check the ...

Page 88: ... keep the machine in custody 1 Press the MENU in LOCAL mode 2 Press to select MAINTENANCE and press the key MAINTENANCE MENU will be displayed 3 Press the key STATION will be selected 4 Press 3 times and press the key CUSTODY WASH will be selected and the carriage will move onto the platen 5 When using rubber wiper Clean the wiper and bracket Perform Step 6 when using the suction wiper 1 Open the ...

Page 89: ...over and press the key 10 Press to set the time for the cleaning solution to be left as it is Set Value 1 to 10 min by the unit of 1 min 11 Press the key The nozzles are washed When the nozzles have been completely washed the head moves to the maintenance position 12 Open the maintenance cover 13 Fill up the cap with cleaning solution for maintenance Suck maintenance solution into a dropper and fi...

Page 90: ...ess the key MAINTENANCE MENU will be displayed 3 Press to select WHITE MAINTAIN and press the key WHITE MAINTAIN will be selected 4 Press the key Executes WHITE MAINTAIN Cleaning the Ink Head and the Area around It Because the ink head employs a very precise mechanism due care needs to be taken when it is cleaned Using a cleaning swab etc rub off gelatinous ink or dust that may stick to the lower ...

Page 91: ...e cover 6 Cleaning the bottom of the LED lamp and the bottom of the mist filter When it is very dirty 1 Soak the cleaning stick in the maintenance liquid 2 Clean the ink which is adhered to the bottom of the LED lamp and the bottom of the mist filter with the image of gently tapping When there is dust on it 1 Place the tape with weak adhesive strength drafting tape etc on the relevant part 2 Light...

Page 92: ...13 120 129 136 145 152 161 168 177 184 193 200 209 216 225 232 241 248 257 264 273 280 289 296 305 312 1 8 17 24 33 40 49 56 65 72 81 88 97 104 113 120 129 136 145 152 161 168 177 184 193 200 209 216 225 232 241 248 257 264 273 280 289 296 305 312 1 8 17 24 33 40 49 56 65 72 81 88 97 104 113 120 129 136 145 152 161 168 177 184 193 200 209 216 225 232 241 248 257 264 273 280 289 296 305 312 1 8 17 ...

Page 93: ...ect MAINTENANCE and press the key MAINTENANCE MENU will be displayed 3 Select UV USED TIME and press the key The use time is displayed for each of the UV lamps 4 Press the key several times to end the setting Solving the Ink Overflow Problem 1 Press the MENU in LOCAL mode 2 Press to select MAINTENANCE and press the key MAINTENANCE MENU will be displayed 3 Press the 4 Press to select Overflow and p...

Page 94: ... Intervals and Type The cleaning type and the interval between each cleaning operation are set 1 Press the MENU in LOCAL mode 2 Press to select MAINTENANCE and press the key MAINTENANCE MENU will be displayed 3 Press to select Auto Maint and press the key 4 Press to select Cleaning and press the key 5 Press to select the cleaning intervals and press the key Set value OFF 1 to 168h 6 Press to selec...

Page 95: ...es to the front 6 Open the right maintenance cover 7 Remove the wiper Pull out the wiper by holding the protrusions at its both ends 8 Insert a new wiper Insert the wiper by holding the protrusions at its both ends 9 Remove the wiper absorber To remove the absorber push the hook down and pull out the absorber 10 Install the new wiper absorber 11 Close the maintenance cover and press the key After ...

Page 96: ...ke out the nozzle cap Hold the nozzle cap and pull it out 7 Insert the new wiper Insert the nozzle cap so that its protrusion is in the nozzle opening 8 Close the maintenance cover and press the key After its initial operation the machine returns to LOCAL Insert it all the way in so that there are no gaps Maintenance cover nozzle cap protrusion nozzle opening No Good OK If the nozzle opening sinks...

Page 97: ...lter 9 Close the maintenance cover and press the key After its initial operation the machine returns to LOCAL Replacing the mist filter box Replace it if it is badly scratched or dirty 1 Press the MENU in LOCAL mode 2 Press to select MAINTENANCE and press the key MAINTENANCE MENU will be displayed 3 Press the key STATION will be selected 4 Press the key CARRIGE OUT will be selected and the carriag...

Page 98: ...the tabs Disregarding this precaution may break the tabs 7 Mount a new LED glass UInsert until it clicks into place and confirm that the tabs are engaged 8 Once replacement is complete close the cover then press the key If a Waste Ink Tank Confirmation Message Appears Ink used in head cleaning etc is stored in the waste ink tank on the lower right side of the machine This machine counts the accumu...

Page 99: ...holding the waste ink tank pull the tank to remove 6 Replace the waste ink tank 1 Prepare a new waste ink tank SPA 0173 2 Insert the waste ink tank by holding a handle of the tank 7 Press the key The ink discharging amount that is controlled by the machine is reset and the message is cancelled Replacing the waste ink tank before the waste ink tank confirmation message is displayed To replace the w...

Page 100: ...discard the waste ink as follows 1 Press MENU in the local mode 2 Press to select Maintenance then press the key Maintenance menu is displayed 3 Press the key STATION will be selected 4 Press to select REPLACE WIPER WASTETANK then press the key REPLACE WIPER WASTETANK will be selected 5 Remove the wiper waste ink tank 1 Open the door of the wiper waste ink tank box 2 Hold the waste ink tank and sl...

Page 101: ...efit the rubber seal When only water is supplied to the cooling water tank without antifreeze liquid the water heating unit or head may be damaged due to freezing When only antifreeze liquid is supplied to the cooling water tank without water the machine does not work properly and may cause an error If water in the cooling water tank frequently becomes insufficient contact your local distributor o...

Page 102: ...x 2 bottles Do not touch the antifreeze liquid directly If the antifreeze liquid settles on your skin or clothes immediately wash it off with soap and water If you get antifreeze liquid in your eyes immediately wash your eyes with a lot of clean water Then consult a doctor as soon as possible Store antifreeze liquid in a dark and cold place Store antifreeze liquid in a place that is out of the rea...

Page 103: ...p refilling and press the key To 200cc filling will be displayed 10 Supply 200cc of the liquid Tie an infusion mouth will be displayed 11 Connect the tube to the feed water inlet 12 Press the key If using a 100 cc syringe use the tube detached in Step 6 Water FillUp To 200cc filling ENT Water FillUp Tie an infusion mouth ENT If press the Enter key without connecting the tube to the feed water inlet...

Page 104: ...Chapter 4 Maintenance 4 28 ...

Page 105: ... the error number displayed on the LCD Troubleshooting 5 2 Power does not turn on 5 2 The machine does not start printing 5 2 Image quality is poor 5 2 Nozzle is clogged 5 3 Ink bottle warning appears 5 3 When the ink leakage occurs 5 3 Warning Error Messages 5 4 Warning messages 5 4 Error messages 5 6 Chapter 5 Troubleshooting ...

Page 106: ...achine and a power plug socket Securely connect the power cable Is the main switch ON Turn on the main switch P 2 3 Is the power button located on the front of machine ON Turn on the power button on the front of the machine P 2 3 Is the correct interface cable used Use the cable exclusive for the machine Is the interface cable properly connected Securely connect the interface cable Yes Is the mess...

Page 107: ...er operations that use ink is available If an abnormality occurs perform the following procedures Check the ink amount in the ink bottle and if the ink amount is not enough add ink When the ink leakage occurs In case of ink leakage please turn off the main power unplug the power cable and contact your local distributor our sales office or service center Once ink tank trouble is displayed do not le...

Page 108: ...urn off the power on the machine and turn it on after a while When displaying again contact your local distributor our sales office or service center INK TYPE The types of the installed ink bottle and the IC chip are different Set the correct ink type of IC chip INK COLOR A wrong color of IC chip is mounted Set the correct ink color of IC chip NO INK IC No IC chip IC chip is not mounted Set an IC ...

Page 109: ...too low to correctly judge nozzle missing The nozzle check function cannot be used NCU replacement is necessary Contact your local distributor our sales office or service center NCU NZK CHK HW Nozzle check OFF Check the nozzle condition If there is plenty of deflection and or nozzle missing clean and restore the affected nozzles NCU NZK CHK MARK Nozzle check OFF NCU CENTER POS Nozzle check OFF NCU...

Page 110: ...le check printing was stopped and the nozzle check function was turned OFF Contact your local distributor our sales office or service center Can t PRINT HEAD ERROR Print head is defective CHECK LED UV LEVEL The irradiation time of the LED UV lamp exceeded the specified time Message Cause Solution ...

Page 111: ...ER ERROR 129 BATTERY EXCHANGE The battery life end of the main PCB is detected ERROR 12a HDC SPEED A head control error occurred ERROR 12e P HEAD INIT 12345678 Printhead connection error ERROR 130 HD DATA SEQ A head control error occurred ERROR 148 E LOG SEQ An error occurred in the control log ERROR 151 Main PCB V1R2 An error occurred in the power supply system of the main PCB ERROR 152 Main PCB ...

Page 112: ...ine and turn it on after a while When displaying again contact your local distributor our sales office or service center ERROR 402 MOTOR Y An excessive load was applied to the Y motor ERROR 403 X CURRENT An error due to an excessive current of the X motor was detected ERROR 404 Y CURRENT An error due to an excessive current of the Y motor was detected ERROR 50a Y ORIGIN Y Origin was not detected c...

Page 113: ... P OVER The negative pressure cannot be kept properly On the negative side ERROR 620 POSITIVE P NotEnough The positive pressure cannot be kept properly On the negative side ERROR 621 POSITIVE P OVER The positive pressure cannot be kept properly On the positive side ERROR 650 NCU CONECT The NCU unit is not connected The nozzle check function cannot be used ERROR 651 REPLACE NCU The NCU sensor sensi...

Page 114: ...TER THERM BRK The water heater thermistor failed Turn off the power on the machine and turn it on after a while When displaying again contact your local distributor our sales office or service center ERROR 729 HHEATER HIGH TEMP The heater temperature exceeded the high temperature threshold ERROR 72B WATER HEATER LACK Water shortage in the hot water tank Please execute the MAINTENANCE Water FillUp ...

Page 115: ...ng 5 11 1 2 2 2 5 SYSTEM HALT Message Solution SYSTEM HALT 000 MESSAGE Turn off the power on the machine and turn it on after a while Check the number and contact your local distributor to call for service 000 is the error No ...

Page 116: ...5 12 Chapter 5 Troubleshooting ...

Page 117: ...he lists of the specifications and functions of this machine Specifications 6 2 Machine specifications 6 2 Ink specifications 6 4 Setting orders of ink bottles 6 5 Sheet for inquiry 6 6 LICENSE Library 6 7 Chapter 6 Appendix ...

Page 118: ...nism by key Head anticollision device Head anticollision by obstacle sensor UV unit Air cooling LED UV device x 1 equipped with the head slider Waste ink tank Bottle type 1600 cc Interface USB 2 0 Ethernet 10 BASE 100 BASE 1000 BASE E mail function only 1000 BASE connection is applicable for drawing Command MRL V Noise during standby Less than 55 dB A FAST A Front Rear Left Right 1 m during contin...

Page 119: ... F is permitted within a month Be sure to keep a vessel in the airtight condition Be sure to keep a vessel in a dry well ventilated cool and dark location Transporta tion 1 to 60 C 33 8 to 140 F Storage at temperature of 60 C 140 F is only permitted within 120 hours and at temperature of 40 C 104 F is permitted within a month Avoid the condition lower than 0 C 32 F and higher than 40 C 104 F Do no...

Page 120: ...LC LM Y C M K W W 6 color White Primer LC LM Y C M K W Pr 6 color Whiter Clear LC LM Y C M K W CL 6 color Clear Primer LC LM Y C M K CL Pr 4 color Primer Clear White White Pr CL Y C M K W W Ink set Ink arrangement 1 2 3 4 5 6 7 8 4 color White White Y C M K W W 4 color White Primer Y C M K W Pr 4 color Whiter Clear Y C M K W CL 4 color Clear Primer Y C M K CL Pr 1 2 3 4 5 6 7 8 1 2 3 4 7 8 5 6 UJF...

Page 121: ... Fill in the following necessary items and then fax the sheet to our sales office Company name Person in charge Telephone number machine model Operating OS Machine information 1 1 Refer to Confirming Machine information of Convenient using then fill in necessary information P 3 30 Error message Contents of inquiry ...

Page 122: ...Chapter6 Appendix 6 6 ...

Page 123: ...ed with the distribution 3 Neither the name of Texas Instruments Incorporated nor the names of its contributors may be used to endorse or promote products derived from this software without specific prior written permission THIS SOFTWARE IS PROVIDED BY THE COPYRIGHT HOLDERS AND CONTRIBUTORS AS IS AND ANY EXPRESS OR IMPLIED WARRANTIES INCLUDING BUT NOT LIMITED TO THE IMPLIED WARRANTIES OF MERCHANTA...

Page 124: ...Chapter6 Appendix 6 8 ...

Page 125: ...UJF 3042MkIISeries UJF 6042MkIISeries Operation Manual May 2022 MIMAKI ENGINEERING CO LTD 2182 3 Shigeno otsu Tomi shi Nagano 389 0512 JAPAN D203043 42 1005022 ...

Page 126: ... MIMAKI ENGINEERING CO LTD 2016 KW ...

Reviews: