


2
3
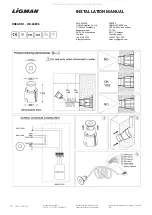
De onderwaterschijnwerper UWL 12 100 is bedoeld voor gebruik in fonteininstallaties en tuinvijvers.
Hij wordt gebruikt met een beveiligingslaagspanning 12 V.
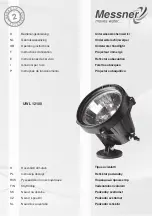
Gebruik en installatie (zie afb 1)
Transformator uitsluitend in waterbestendig bereik gebruiken!
De aansluitstekkerdoos dient minimaal 2 m van de rand van de tuinvijver te zijn verwijderd.
Attentie! Transformator wordt tijdens het gebruik warm.
Om te waarborgen dat er voldoende koeling is mag de transformator niet in een slecht geventileerde
behuizing worden gemonteerd. Gebruik uitsluitend met veilig heidstransformator i.o.m. VDE 0570.
Bevestig de twee uiteinden van de kabel (21) op het kroonsteentje (25) van de transformator (20).
Temperatuurbeveiliging
De ingebouwde temperatuurbeveiliging schakelt de transformator uit bij oververhitting. De transformator
moet afkoelen. Na afkoeling wordt de transformator automatisch opnieuw ingeschakeld.
Controleer in dit geval de gebruiksomstandigheden.
Netaansluitspanning volgens typeplaatje van de transformator.
Schijnwerper niet aan de aansluitleiding dragen, hangen of trekken.
De schijnwerper, met 100 Watt, kan in het water, maar ook daarbuiten worden ingezet. Er moet tij-
dens het gebruik buiten het water absoluut een minimale afstand van 50 cm tot brandbare voorwer-
pen in acht worden genomen.*
Attentie! Gebruik met kleurenschijven is buiten het water niet toegestaan. Het gevaar bestaat dat de
kleurenschijven smelten.
Max. indompeldiepte 4 meter! IP 68 4 m
*
U kunt de onderwaterschijnwerper geheel volgens eigen keuze bevestigen:
- met de behuizingsstrip direct op een houder
- of met de voetbuis (12) op muren, stenen platen enz.
Vervangen van de lamp (zie afb. 2)
Als vervanging kunt u in de handel gebruikelijke halogeen gloeilampen 12V/100W met sokkel GY 6,35
gebruiken.
1. Netstekker uit het stopcontact trekken en beveiligen tegen hernieuwde inschakeling.
2. Schijnwerper compleet uit het water nemen en laten uitdruppelen.
3. Draai de schroeven (5) met een kruiskopschroevendraaier los en verwijder deze.
4. Trek de ring (3) van de behuizing (1) af.
5. Glas (4) en refl ector (8) worden door de afdichting (2) omsloten.
6. Pak de afdichting (2) op één plek vast en trek deze met glas (4) en refl ector (8) uit de behuizing (1).
7. Pak de afdichting (2) op één plek vast en verwijder deze door hem over het glas (4) heen te trekken.
8.
Attentie!
De refl ector (8) mag aan de binnen kant niet met vervuilde of met blote handen worden
aangeraakt!
9. Reinig het glas (4) en de afdichting (2) met helder water en droog deze af.
10. Trek de halogeen gloeilamp (9) uit de refl ector (8) en de fi tting (11).
11.
Attentie!
Raak de nieuwe halogeen gloeilamp niet met blote handen aan. Mocht dit toch gebeuren,
dan dient deze met alcohol te worden gereinigd, voordat zij wordt ingeschakeld.
12. Vervang de halogeen gloeilamp (9), door deze met de 2 pinnen in de gaten van de fi tting (11) te steken.
Attentie!
Wees voorzichtig als u veel kracht moet gebruiken tijdens het indrukken. Indien de halogeen
gloeilamp breekt, bestaat er kans op verwondingen.
13. Controleer of de nieuwe halogeen gloeilamp functioneert door de netstekker één keer in het stopcontact
te
steken.
14. Monteer de schijnwerper in omgekeerde volgorde.
15. Leg het schone glas (4) midden op de refl ector (8).
16. De afdichting (2) wordt net de grote afdichtingslip onder de refl ector (8) en met de kleine op het glas (4)
gemonteerd. Hiervoor schuift u de afdichting (2) aan de rand langs het glas (4) en de refl ector (8).
17. Druk de afdichting (2) met het glas (4) en de refl ector (8) in de behuizing (1). Let erop dat de afdichting
correct
zit
(2).
18. Steek de ring (3) zodanig op de behuizing (1) dat de bevestigingsstrips boven elkaar liggen.
19. Steek de schroeven (5) van bovenaf door de uitboringen en draai deze met een
kruiskopschroevendraaier
gelijkmatig
vast.
NL
The underwater fl oodlight UWL 12 100 is designed for use in fountains and garden ponds.
It is operated by means of a 12 V protected low voltage.
Operation and Installation (See fi g.1)
The transformer should be run only in a water-protected area!
The connection box should be at least 2m away from the edge of the garden pond.
Caution! The transformer heats up during use.
To ensure adequate cooling, the transformer should not be installed in a poorly
ventilated housing. Only for use with a safety transformer according to VDE 0570.
Fix both cable ends (21) onto the cable connector (25) of the transformer (20).
Temperature fuse
The built-in temperature fuse switches off the transformer when overheated. The transformer should cool
down. The transformer will start again automatically, when cool. In that case check the operating conditions.
Mains voltage according to the type plate of the transformer.
Do not carry, hang or pull by the connection cord.
The fl oodlight with 100 watts has been designed for both submersible and non-submersible use. For
non-submersible use, it is absolutely necessary to keep a min. distance of 50 cm from infl ammable
objects.*
Attention! The coloured discs can be used only submerged. There is the danger that the coloured
discs will melt.
Max. depth 4 m! IP 68 4 m
*
There are various options to fi x the underwater fl oodlight:
- you may either fasten the clip of the fl oodlight casing directly to a fi xture
- or you may fi x it onto walls or stone slabs etc. by means of base-plate (12).
Changing the lamp (see illus. 2)
As a replacement, one may use all commercial halogen incandescent lamps 12 V/100 W socket GY 6,35.
1. Pull out mains plug and secure against reclosing.
2. Take the complete fl oodlight out of the water and leave it to dry off.
3. Loosen the screws (5) by means of a cross-point screwdriver and remove them.
4. Remove the ring (3) from the housing (1).
5. Glass (4) and refl ector (8) are clasped with the sealing ring (2).
6. Touch the sealing ring (2) at one point and take it, together with the glass (4) and refl ector (8) out of
the
casing
(1).
7. Touch the sealing ring (2) at one point and remove it by pulling it over the glass (4).
8.
Caution!
Do not get the refl ector (8) soiled inside and do not touch it with bare hands!
9. Wash the glass (4) and the sealing ring (2) with clean water and dry them.
10. Take the halogen incandescent lamp (9) out of the refl ector (8) and the socket (11).
11.
Caution!
Do not touch the new halogen incandescent lamp with bare hands. If there are accidental
fi ngerprints, clean it with alcohol before switching-on.
12. Replace the halogen incandescent lamp (9) by inserting the 2 pins into the corresponding holes of the
socket
(11).
Caution!
If pushing-in requires a lot of strength, be careful! If the glass breaks,
there is the danger of injury.
13. Test the new halogen incandescent lamp for proper functioning by putting the plug into the socket for a
short
time.
14. Re-assemble the fl oodlight in the reverse order.
15. Place the clean glass (4) on the middle of the refl ector (8).
16. Put the sealing ring (2) around the glass (4) and refl ector (8).The lower big lip of the sealing ring (2) is
placed under the refl ector (8), whereas the upper small lip is put on the glass (4).
17. Press the sealing ring (2), together with glass (4) and refl ector (8), into the casing (1). Ensure that the
sealing ring (2) is positioned properly.
18. Fit the ring (3) onto the casing (1) in such a way that the bores of the fi tting plates are arranged one
above
the
other.
19. Put the screws (5) t hrough the bores from above and tighten them all uniformly with a cross-point
screwdriver.
GB