background image


Start-up 


28 

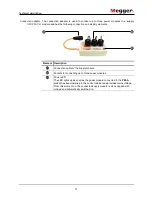
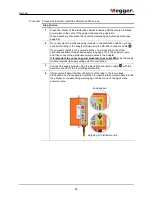
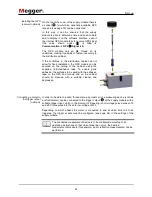
If the power module cannot fit into the fuse base due to design issues, the optionally 

available fork adapter  (see page 10)  can help under certain circumstances. The 

installation is carried out with the help of a Torx and a slotted screwdriver according to 

the following figure. 


After inserting a power module with a fork adapter, check for a firm hold of the blade 

contacts by pulling lightly. 

Installation of the fork 

adapter (optional)


Summary of Contents for SFC250

Page 1: ...Consultation with Megger 1 SFC250 SmartFuse 250 USER GUIDE Issue 6 04 2018 EN Article number 85431...

Page 2: ...Consultation with Megger 2...

Page 3: ...d Kent CT17 9EN T 44 1304 502100 F 44 1304 207342 E uksales megger com Dr Herbert Iann Str 6 D 96148 Baunach T 49 9544 68 0 F 49 9544 22 73 E team dach megger com Hagenuk KMT Kabelmesstechnik GmbH Meg...

Page 4: ...are hereby limited to a period of 12 months from the date of delivery Each component supplied by Megger within the context of warranty will also be covered by this warranty for the remaining period o...

Page 5: ...up and commissioning 33 5 Controlling and monitoring in running operation 34 5 1 Performing switching operations with the remote control 34 5 2 Monitoring analysis and fault location 37 5 2 1 Event an...

Page 6: ...Contents 6 7 Deinstallation 57 8 Maintenance and care 58 9 Troubleshooting 63...

Page 7: ...have to be avoided by reading the manual Serves to highlight warnings and safety instructions that explicitly indicate the risk of an electric shock Serves to highlight important information and usef...

Page 8: ...ivered system is used as intended see page 10 Incorrect use may result in danger to the operator to the system and the connected equipment The thresholds listed in the technical data may not be exceed...

Page 9: ...obal System for Mobile Communications LAN Local Area Network M2M Machine to Machine LH Niederspannungs Hochleistungs Sicherung low voltage high power fuse SIM Subscriber Identity Module SMS Short Mess...

Page 10: ...property damage to the household appliances and building wiring Instead the pre location of detected faults can be carried out under voltage either directly with the internal location algorithm optio...

Page 11: ...evice must under no circumstances be taken into operation If something is missing or damaged please contact your local sales representative The following optional accessories can also be ordered from...

Page 12: ...memory Power supply Power and supply module 100 240 V 50 Hz 60 Hz direct tap at low voltage distributor Power consumption 20 VA 1 W A load current The power module is defined by the following paramete...

Page 13: ...ion Trigger output 15 20 V voltage pulse with fuse tripping Connection coupling for direct connection of a power module or for connection of the three phase adapter Weight 900 g Dimensions W x D x H 1...

Page 14: ...see page 32 Connection cable for direct connection to a power module or for connection to the three phase adapter SFC 250 CA USB port SIM card slot microSD card slot The microSD card contains the sof...

Page 15: ...contacts Status indicator The power switch is switched off and there is no mains voltage in the fuse protected phase output The power switch is on and the protected circuit connected to the power net...

Page 16: ...hed LEDs for display of the amount of current Buttons for switching the power switch on and off or for triggering a pulse in pulse mode The integrated LED signals the status of the power switch the sa...

Page 17: ...ion Connection cable to the supply module Sockets for connecting up to three power modules Power LED The LED lights up as soon as the power module connected to the PM A socket has been installed in th...

Page 18: ...vides the following information necessary for the operation of SmartFuse 250 Element Description The factory preset login information for access via web browser The factory preset name of the wireless...

Page 19: ...tware can be operated remotely just like as it is operated on the device itself However when the symbol indicates in the status bar see page 23 that the cover of the supply module is open it is not po...

Page 20: ...twork What steps are necessary Connect to the wireless network of the supply module and enter the password The factory preset network name and password can be found on the nameplate see page 18 on the...

Page 21: ...eader with information on switching status load flow direction of the individual connected power modules see below Current protection settings tap to open the respective menu Shutdown limit Reclose op...

Page 22: ...switch can be activated by pressing the button The power switch is on and the protected circuit connected to the power network The power switch can be deactivated by pressing the button With the puls...

Page 23: ...t via remote accessing If this icon is not visible the remote control must first be paired and activated see page 47 to be used The supply module is not registered in the GSM network This indicates th...

Page 24: ...emote control remain the same In order to be able to later monitor and configure a currently used SFC250 from the office or the control centre various conditions must be met see page 51 A suitable SIM...

Page 25: ...connects the protected LV distribution line from the supply network Warning threshold Current value above which a warning is displayed in the main menu and depending on the notification settings see p...

Page 26: ...rectly with the device it can be ordered at any time see page 10 After entering the license key it must be saved using the button The basic settings should then also be overwritten see page 45 to save...

Page 27: ...arcing Insertion into the fuse holder may only be performed by qualified electricians During insertion the prescribed personal protective equipment PPE must be used for this type of work Connection se...

Page 28: ...see page 10 can help under certain circumstances The installation is carried out with the help of a Torx and a slotted screwdriver according to the following figure After inserting a power module with...

Page 29: ...will need to connect the optionally available three phase adapter see page 10 to the supply module and then connect the individual power modules to the adapter It is important to connect a power modul...

Page 30: ...to the supply module whose software starts directly afterwards CAUTION Even when switched off the power switch thyristor switch does not represent a galvanic isolation For this reason it must always b...

Page 31: ...third power modules Result The green glowing status indicators signal on the power modules that the circuit breaker is not yet switched on and the feeding bus bar is still disconnected from the outgoi...

Page 32: ...e surfaces to be used with the adhesive tape on the GPS and module and on the cabinet should be cleaned with a suitable cleaner and degreased In order to be able to locate for example a sporadic error...

Page 33: ...for the blue LED to light up permanently and then press the button to close the switches of the installed power modules Alternatively the switching operation can also be performed using the button on...

Page 34: ...switch in the power module Start stop the automatic pulse mode Trigger a single current pulse in manual pulse mode Once you switch on the remote control and are within wireless range you are also con...

Page 35: ...ly 20 m max and the distance to the supply module should be reduced As soon as a radio connection has been established the current switching state of the power switches is signaled by the button It ca...

Page 36: ...e automatic pulse mode can be started stopped However no switching operations are performed on the power modules that are not in pulsed mode The height of the respective surge current is signalled by...

Page 37: ...as a threshold overshoot are signaled directly on the main screen In addition to the peak value of the maximum measured fault current an error message is also displayed which depending on the type of...

Page 38: ...stance calculation could be made This especially occurs in the case of a multi pole fault between more than two conductors e g between two phases and the neutral conductor or between all three phases...

Page 39: ...tion on the last events that have occurred and some events for example warning threshold overruns are displayed only briefly all events that have occurred since the installation can be found in the ev...

Page 40: ...o display a specific voltage or current value just click tap on that point on the curve If required the measured values can also be exported as CSV files and thus conveniently analyzed on a workstatio...

Page 41: ...erred call up menu item Delete data to delete the downloaded files from the internal memory once download is successfully completed so that they do not need to be downloaded again the next time 6 Call...

Page 42: ...r Description PM A PM B PM C Activate deactivate pulse mode for the connected power modules individually Pulse mode can only be enabled if the power switch is off auto man Selection between automatic...

Page 43: ...single pulse manual mode Result In automatic mode a fault ignition is provoked continuously at the set interval In manual mode the button must be pressed again for each additional pulse On the LED ba...

Page 44: ...Action 4 Exit pulse mode after successful fault location by pressing the button in the main menu or the button on the remote control only necessary in automatic mode 5 Disable the pulse mode in the de...

Page 45: ...n calibration see page 61 Firmware update SFC250 PM Starts a manual software update of the connected power module Such an update may also help when the status indicator on the power module does not go...

Page 46: ...GPS reception see page 32 the time and date are determined automatically and cannot be entered manually Service This password protected area is only accessible to authorized service staff and only loc...

Page 47: ...teries AA in the remote control However do not switch the remote control on yet 2 Open the user interface locally on the supply module and open the page SFC250 RC Result The dialogue for managing the...

Page 48: ...ng power module Immediately after pairing the remote control is activated on the software side and remains so until it is manually deactivated in the software A permanently activated remote control ha...

Page 49: ...can specify the events for which a notification should be sent SMS recipient number 1 2 Mobile phone numbers to which notifications will be sent by SMS The country code does not need to be used as lon...

Page 50: ...other colleagues about the change Using the Settings Communication LAN menu the network adapter settings can be modified Parameter Description Static DHCP Because most local networks automatically di...

Page 51: ...rovider or made available through an in house IT department In the SIM card slot of the supply module only data compatible and M2M communication suitable SIM cards in the Mini SIM size should be inser...

Page 52: ...ed purpose by the server provider or the IT department respectively When doing this the configuration files of the server must be adapted so that each supply module logging on as a client is always as...

Page 53: ...of the SFC250 can be accessed with an Internet compatible device differs according to the technical solution selected If the access point in the cellular network and the fixed IP address is made avail...

Page 54: ...ookup smtp gmail com Port Port of the SMTP server Login Login of the email account used Password Password of the email account used The settings must then be saved using the button 6 4 Configuring tri...

Page 55: ...ve into the USB port of the off supply module 5 Connect the supply module to the power module 6 Switch the supply module on using the supplied power supply unit Result When a valid software version is...

Page 56: ...shows the message SFC250 RC found Please update firmware If the message is displayed proceed with the next step to install the update If however no update of the remote control is required you can ign...

Page 57: ...installed power modules are switched off and the status indicators light up green Removal from the fuse holder may only be performed by qualified electricians During removal the prescribed personal pr...

Page 58: ...ular before commissioning and cleaned when necessary NOTE To prevent damage to the interior of the device special care must be used when cleaning the vents The housing must not be opened No liquids ma...

Page 59: ...and to replace it if necessary Step Action 1 Remove the covers on both sides 2 Loosen the hexagon socket screws on both sides 3 Remove the fuse and check it for integrity 4 Insert a fuse or if necessa...

Page 60: ...he cover 2 Remove the fuse and check it for integrity 3 Insert the fuse or if necessary an included replacement fuse with the same characteristics 1 25 A 500 V H type fast blow 6 3 x 32 mm 4 Secure th...

Page 61: ...example via WLAN must be established see page 19 with the supply module and the procedure for touch screen calibration started again Proceed as follows to calibrate the touch screen Step Action 1 Star...

Page 62: ...f the calibration within 5 seconds use the stylus to touch the screen at any point wait 5 seconds without touching the screen with the stylus Result The new calibration data is saved The software retu...

Page 63: ...odule are running the same software version The following symbol appears on the display Buttons on the touch screen are difficult to activate with the stylus or cannot be activated at all Perform a re...

Page 64: ......

Page 65: ...che vecchie z me nor da ka iztr d jumu uz kura t atrodas nedr kst izmest kop ar parastiem m jsaimniec bas atkritumiem T k tas ir izstr d jums ko cits citam p rdod un lieto tikai uz mumi tad to nedr ks...

Reviews: