Entering data using Graffiti®2 handwriting software (Entering Data in Your Meazura™ MEZ1000 RDA)
the input area, as shown in the illustration below.
·
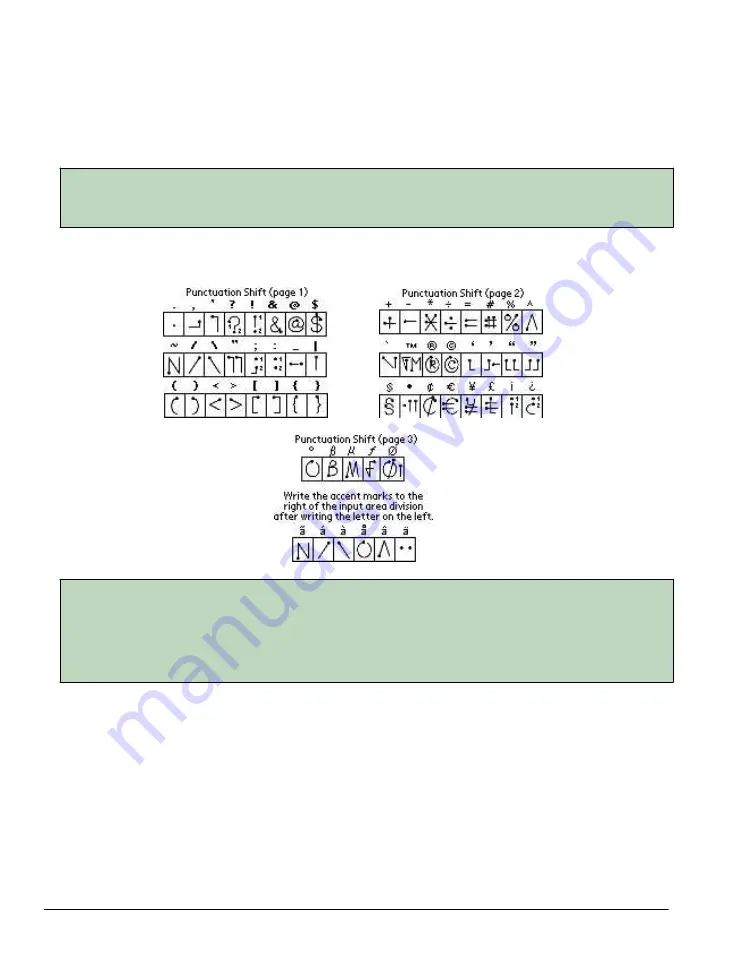
Symbols and other special characters can be written using the Shift command. When you make a
vertical stroke from the bottom to the top in the text input area, the Shift indicator arrow appears
in the lower right corner of the screen. While this arrow is visible , you can make the punctuation
shift characters shown in the illustration below. Once the arrow goes away, the punctuation mark
appears.
TIP
Using an additional Shift stroke to finish writing the character (as shown in the demo) is optional,
but will make the character appear more quickly.
Draw punctuation, symbols or accent marks using the following strokes:
TIP
Samples of the character strokes are available in the Graffiti 2 Help file. To view the Help file, use
the full-screen pen stroke, dragging the stylus from the text input area to the top of the screen.
Note that the accented characters appear on a Punctuation Shift screen, but do not use the Shift
command. To write uppercase accented characters, write the letter across the division mark, just
as you would do with an ordinary letter.
Using the Graffiti®2 tuner
The Graffiti 2 tuner provides alternate strokes for making the T, P, Y, and $ characters. For example,
you may want to form the letter "T" by using strokes similar to a space and an "L". But if this
technique is difficult to control, you can turn off this option.
To use the tuner:
1.
Tap the Home icon to access the Application Launcher menu.
2.
Tap on the Prefs icon.
3.
Select Graffiti 2 from the pick list in the upper right corner of the screen.
Summary of Contents for MEZ1000
Page 1: ...User s Guide for Meazura MEZ1000 ...
Page 9: ...Part 1 Part 1 Introduction to the Meazura MEZ1000 RDA ...
Page 26: ...Part 2 Part 2 Entering Data in Your Meazura MEZ1000 RDA ...
Page 36: ...Part 3 Part 3 Managing Applications ...
Page 46: ...Part 4 Part 4 Working with Applications ...
Page 75: ...75 ...
Page 76: ...Part 5 Part 5 Using the Attention Manager ...
Page 81: ...Part 6 Part 6 Using an Expansion Card ...
Page 87: ...Part 7 Part 7 Performing Common Tasks ...
Page 98: ...Part 8 Part 8 Beaming Information ...
Page 101: ...Part 9 Part 9 Exchanging and Updating Data using HotSync Operations ...


