18
27
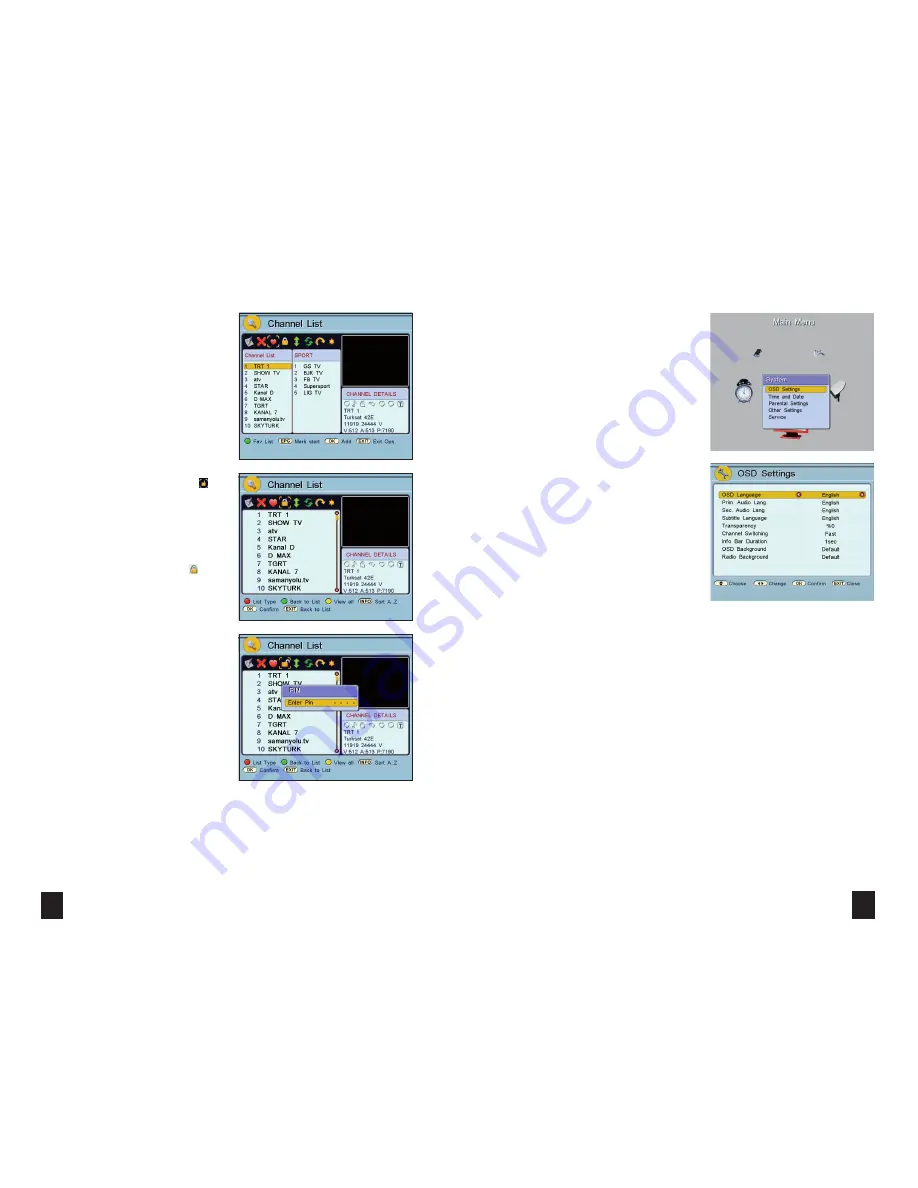
SYSTEM
> The second sub-menu in “Main Menu” is “System”
menu. When in the “Main Menu”, highlight “System”
using “ ”/“ ” and “
✘
”/“
✘
” buttons and press the
“
OK
” button. “System” sub-menu is displayed.
> There are “OSD Settings”, “Time and Date”,
“Parental Settings”, “Other Settings” and “Service”
options in this menu.
OSD SETTINGS
> When in the “Main Menu”, highlight “System”
by using “ ”/“ ” and “
✘
”/“
✘
” buttons and press
the “
OK
” button. Select “OSD Settings” and press
the “
OK
” button again. “OSD Settings” sub-menu is
accessed.
> Highlight “OSD Language” and select a language
using “ ”/“ ” buttons.
> “Prim. Audio Lang”, “Sec. Audio Lang”: Primary and
Secondary audio languages. Some channels broadcast
in multiple languages. The languages that are selected
using these options will be the chosen language for
the channel.
> “Subtitle Language”: Some channels broadcast in
multiple subtitle languages. If the channel that you
are watching has subtitle languages, it is displayed
automatically.
> If you highlight “Transparency” the transparency
can be adjusted to “0%”, “20%”, “40%” or “60%”.
> “Channel Switching” is, freezing the picture,
blanking the screen or fast. Select “Fast”, “Freeze” or
“Blank” by using “ ”/“ ” buttons.
> “Infobar Duration” can be set from 1 second to 5
seconds.
✘
✘
✘
✘
✘
✘
> “OSD Background” and “Radio Background”:
There is one standard OSD and radio background
(“Default”) in your receiver. You can load different
pictures from your PC to the receiver. They appear
in this
option and you can select the picture that you
want.
> Press “
MENU
” or “
EXIT
” button to exit from
“OSD Settings” sub-menu. A message “
Do you
want to store?
” will be displayed if you have
made any
changes. Press the “
OK
” button to store. Press
“
MENU
” or “
EXIT
” button to exit without storing
the changes.
✘
✘
After you have created a new “Favourite Group” you
can change the name of the group. To do this the
“Rename Group” option is used. To add a channel to
the created group, highlight “Add/Rem. Channel” and
press the “
OK
” button. The menu on the right appears
on the screen. The “Channel List” appears as the left
column and the favourite group list appears as the
right column. Select a channel from the “Channel List”
and press the “
OK
” button. That channel will now be
added to the “Favourite Channel” list.
LOCK
: Press the “
GREEN
” button to enter the
“Operation” menu in the “Channel List”. Select by
using “ ”/“ ” buttons. “Lock” operation is activated
and by pressing the “
OK
” button the “PIN” menu
appears. Enter the 4 digit password by using the
number buttons on the remote control. (Factory
setting of your receiver is 0000). The “Lock” menu
is accessed. By using “
✘
”/“
✘
” buttons go to the
channel to be locked and press the “
OK
” button. That
channel will be locked and prefixed by the “ ” in the
“Channel List”.
The “Parental lock” operation can also be used on
channels by using this option. The “PIN” menu
appears when you want to access these channels and
the correct PIN must be used to gain access.
✘
✘


