background image

14

31

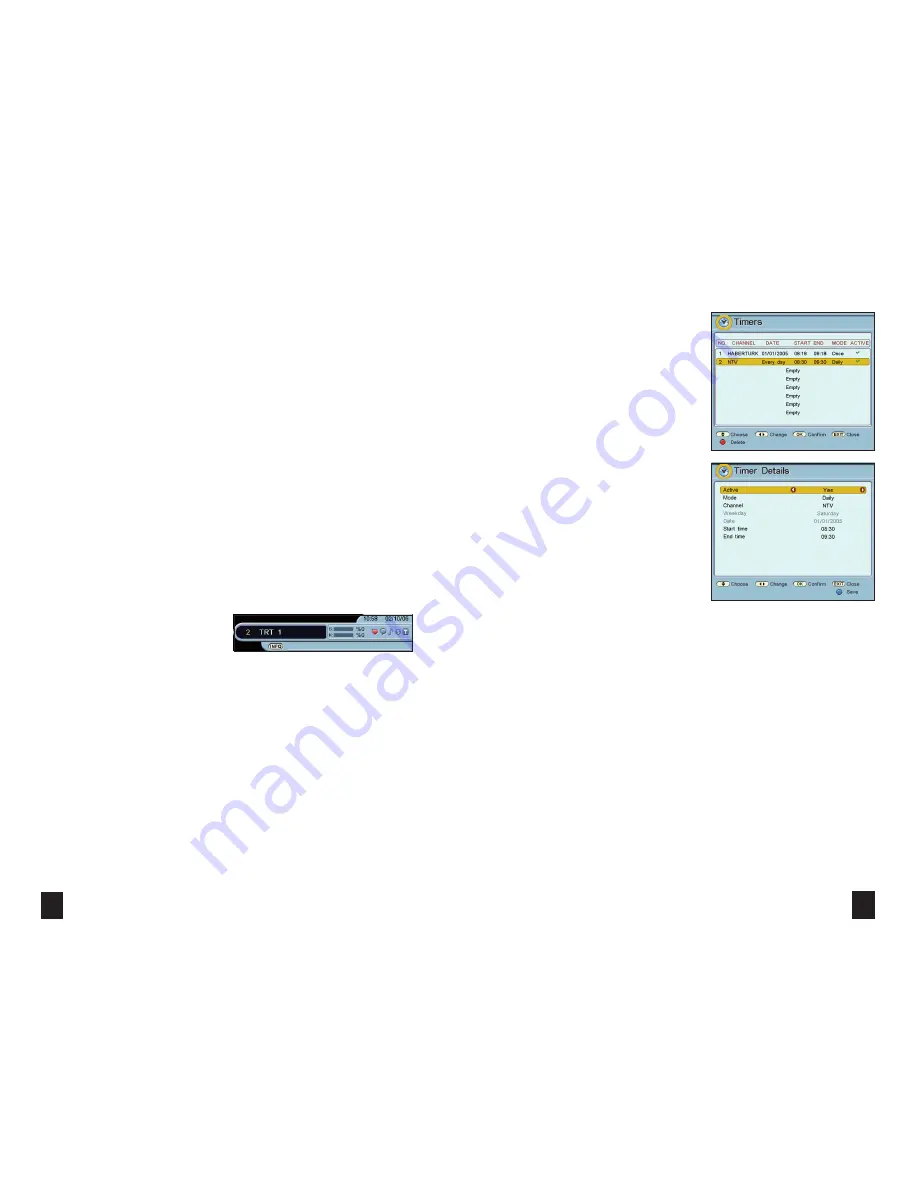
TIMERS

Timers are used to turn the unit on/off at 
programmed times. Your receiver contains 8 timers.
For timer settings:

>  Enter the “Main Menu” and then go to the “Timers” 
sub menu.

>  Select the timer that you want to change by using 

”/“

” buttons, and then press the “

OK

” button. 

The “Timer  Details” menu is displayed.

>  In the “Timer Details” menu select the channel that  
you want to set using the “    ”/“    ” buttons. Enter the 
date of the program in “Date”. Enter the “Start time” 
and “End time” by using the number buttons on the 
handset. (If the start time of the program is later than 
the end time it is assumed to be the next day.)

>  “Mode” can be selected as “Once”, “Daily” or 
“Weekly” by using “    ”/“    ” buttons.

• If you choose “Once”: It turns on the receiver only 

on the date that you entered in “Date”. “Weekday” 
option becomes unavailable.

• If you choose “Daily”, “Weekday” and “Date” 

become unavailable. The program selected will turn 
on/off at that time, every day.

• If you choose “Weekly”, “Date” becomes 

unavailable but you can change the day in “Weekday”. 
If you entered a day in the “Date”, every week it will 
turn on/off on the day that you have chosen.

>  “Active” should be set to “Yes” to activate the timer.

>  Save the changes by pressing the “

BLUE

” button.

>  After completing the changes, press “

MENU

” or 

EXIT

” button to exit from the “Timers” menu.

Notes:

If the power fails for any reason, all timer settings will 
be deleted and all timers turned off.

Before adjusting the timers, time and date should be 
entered in “Time & Date” sub-menu.
The settings should not conflict with one another.

FIRST INSTALLATION AND TV SETTINGS

When you have completed the required connections to your satellite receiver, plug in the mains lead and switch 
on (Please refer to “

Connections

” (page 12) to verify their correctness).

Turn on the TV and satellite receiver and  press the “

MENU

” button on the satellite receiver remote control 

handset. If you are using a scart connection to the TV, no TV settings are required. Whenever you turn on your 
TV and receiver, the TV will automatically display the receiver screen. (Some TVs may not have automatic scart 
switching. In this case, you need to enter the AV mode using the TV remote control handset).

CHANNEL SELECTION

You may use several methods for channel selection.
>  You may select a channel by pressing “

”/“

” buttons while any program is being displayed. The number 

and name of the channel that you have selected will be displayed under the screen.

>  You may select a channel, using the number buttons. The number of the channel you have selected will be
displayed under the screen. You may apply this method in three ways:

1. Press the channel number as four digits. For example, to select the channel 1875, press 1, 8, 7, 5, and to select
the channel 27, press 0, 0, 2, 7.

2. Press the channel number only and then wait a few seconds. For example, to select channel 168, press 1, 6
and 8 and wait. To select channel 56, press 5 and 6, and then wait.

3.  For fast access to the channels, while entering the channel number, keep pressing the last number. For 
example, to access channel 3, press and hold button 3. To access channel 14, press 1 and then press and hold 
button 4.

>  You may call the “Channel List” by pressing 
the “

OK

” button, if the “Channel List” menu is 

not displayed. (Please see “

Channel List

”).

INFOBAR

INFOBAR is displayed at the lower side of the screen with each channel change. This bar will 
show channel number, channel name, signal level and some information relating to the 
channel being displayed. Various symbols will show if the channel, is on the favourite list, has 
alternative languages for that channel, is a radio channel, if the channel is scrambled and if teletext is available.

TELETEXT

If your TV does not have Teletext function you may use your receiver’s Teletext function.
>  The teletext data is available on some channels only.
>  Select the teletext channel you would like to view and press the “

TXT

” button.

>  You may use the “

”/“

” buttons to alter the page number.

>  For direct access to requested programs you may use the number buttons.
>  Pressing the “

TXT

” button while Teletext is active makes the Teletext page transparent.

>  To exit the Teletext press “

MENU

” button.

Summary of Contents for MXL002

Page 1: ...TALLATION OPERATION USER MANUAL MXL002 MXL002 TWIN OMNISAT DOME Common Lane Setchey King s Lynn Norfolk PE33 0AT England Helpline 49 0 1553 811000 Tel 49 0 1553 813300 Email cust_serv maxview co uk We...

Page 2: ...nisat Dome is designed to be used to receive and watch satellite broadcasts in road vehicles e g caravans minibuses RVs and lorries while these vehicles are parked The Omnisat Dome is easy to use but...

Page 3: ...tion 14 Infobar 14 Teletext 14 Channel List Selection of the List Type 15 16 Channel list Operatin Manual 17 20 Radio 21 Favourite Channel List 21 Satellite Selection 21 Main Menu 22 Installation 22 T...

Page 4: ...SECTION 1 INSTALLATION 41 4...

Page 5: ...satellite It is recommended that you do a dry run to find the best position The installation surface should be smooth flat and rigid Important All 4 Fixing Plates must be level to avoid distortion of...

Page 6: ...desired satellite and there are no obstructions blocking the view e g trees buildings The signal receiving performance of the system may decrease with heavy rainfall or snowfall The same result may oc...

Page 7: ...of the system We always recommend using screws and adhesive for fixing 4 We recommend you follow the adhesive manufacturer s guidelines for curing time before driving your vehicle 38 7 SECTION 3 USER...

Page 8: ...coaxial cable Horizontal azimuth moving range 0 360 unlimited Horizontal azimuth moving speed 60 second Vertical elevation moving range 20 70 Vertical elevation moving speed 38 second Operating volta...

Page 9: ...ned to prevent vibration SEE PAGE 12 FOR RECEIVER CONNECTION DIAGRAM 9 36 GENERAL SPECIFICATIONS Animated OSD 8000 Channels Smart channel scan Very fast channel switch Mosaic channels 15 still picture...

Page 10: ...able but weak or no sound REASON Make sure the power connection is correct The input power fuse may have blown Make sure that the unit is connected to the Omnisat antenna correctly Also make sure that...

Page 11: ...he cover Contact an authorised dealer Your receiver is designed for use in a bus boat caravan or similar vehicles Do not connect any unsuitable equipment to the unit as this could cause permanent dama...

Page 12: ...es by using and buttons and press the OK button The Games sub menu is entered ELECTRONIC PROGRAM GUIDE EPG Broadcasted timetables will be available with some programs You may use the EPG feature of th...

Page 13: ...980 to 2099 Year is selected by buttons and Month is selected by buttons Press EXIT or MENU buttons to exit the calendar While in the Extras menu go to Calculator by using buttons and press the OK but...

Page 14: ...and receiver the TV will automatically display the receiver screen Some TVs may not have automatic scart switching In this case you need to enter the AV mode using the TV remote control handset CHANN...

Page 15: ...ls while in stand by mode Press MENU or EXIT button to exit from the Other Settings menu A message Do you want to store will be displayed if you have made any changes Press the OK button to store Pres...

Page 16: ...s are All FTA Only and the scrambled channel names in this menu Highlight the desired option by using buttons and press the OK button If you select All all the channels are listed If you select FTA On...

Page 17: ...he GREEN button to select operation type After pressing the GREEN button in the Channel List highlight Operation by using buttons There are 8 symbols in the Channel List representing these operations...

Page 18: ...ictures from your PC to the receiver They appear in this option and you can select the picture that you want Press MENU or EXIT button to exit from OSD Settings sub menu A message Do you want to store...

Page 19: ...EEN button to enter Operation menu in the Channel List Select by using buttons Move operation is activated When you press the OK button the menu on the right appears The Channel List appears as the le...

Page 20: ...e any changes Press the OK button to store Press MENU or EXIT button to exit without storing the changes SKIP Press the GREEN button to enter Operation menu in the Channel List Select by using buttons...

Page 21: ...press the RED button the frequency that you have chosen will be scanned RADIO Pressing the RADIO button activates the Only Radio mode By using and number buttons you can select a radio channel You ca...

Page 22: ...y using buttons By using buttons you can highlight Frequency Symbol Rate and Polarity By using or number buttons on the remote control their values may be changed By viewing the Signal Strength and Si...

Reviews: