28
17
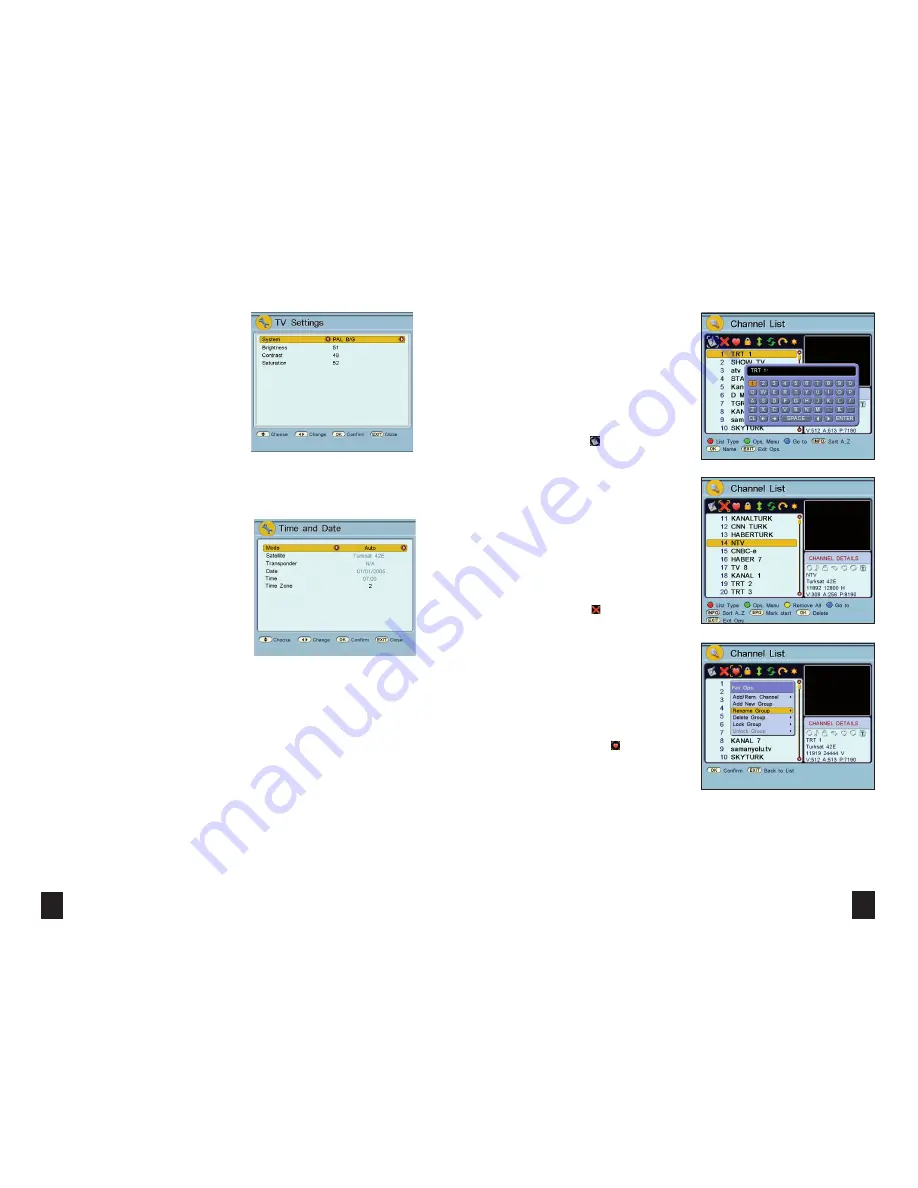
TV SETTINGS
> When in the “Main Menu”, select “System” by using
“ ”/“ ” and “
✘
”/“
✘
” buttons and press the “
OK
”
button. Highlight “TV Settings” and press the “
OK
”
button again. The “TV Settings” sub-menu is accessed.
> In “TV Settings” you can select the TV system as
“NTSC”, PAL B/G” or “PAL I” in the “System” option
using “ ”/“ ” buttons.
> You can set the Brightness, Contrast and Saturation
value between 0-100 by using “ ”/“ ” buttons.
> Press “
MENU
” or “
EXIT
” button to exit from the
“TV Settings” sub-menu. A message, “
Do you want to
store?
” will be displayed if you have made any
changes. Press the
“OK
” button to store. Press
“
MENU
” or “
EXIT
” button to exit without storing the
changes.
TIME AND DATE
> Enter the “Main Menu” and then the “Time & Date”
sub-menu from the “System” menu.
> “Mode” can be selected as “Auto”, “Manual” or
“Selected tp”. In “Manual” mode the time is set by the
user. In “Auto” mode the time is fixed by channel. In
“Selected tp” mode the time is fixed by the selected
transponder.
> You can highlight “Date” and “Time” by using
“
✘
”/“
✘
” buttons and change them by using the
number buttons.
> Press “
MENU
” or “
EXIT
” button to exit from the
menu. A message “
Do you want to store
?” will be
displayed if you have made any changes. Press the
“
OK
” button to store. Press “
MENU
” or “
EXIT
” button
to exit without storing the changes.
Note:
If the equipment power fails for any reason, the
time and date will be lost if they were entered using
the manual mode. “Time Zone” should be entered to
ensure automatic time storage. It is mandatory to set
the time and date before adjusting the timers.
✘
✘
✘
✘
✘
✘
CHANNEL LIST – OPERATION MENU
Different operations are also possible in the
“Channel List” menu. Press the “
GREEN
” button
to select operation type. After pressing the
“
GREEN
” button in the “Channel List”, highlight
“Operation” by using “
”/“ ” buttons. There
are 8 symbols in the “Channel List” representing
these operations.
>
NAME
: The first symbol at the top left of the
column in “Channel List” is used for changing
the channel name. Select by using “
”/“ ”
buttons and press the “OK” button to access the
“Name” operation. You can select the channel
that you want to rename by using “
✘
”/“
✘
”
buttons. When you press the “OK” button
again, a keyboard appears on the screen.
Press“
✘
”/“
✘
”, “
”/“ ” and the “
OK
” buttons
on the remote control to enter the desired letters
on the keyboard. The channel name may have
up to 32 characters. You can use uppercase or
lowercase, numbers, -, & and space in the
channel name.
>
DELET
E: You can delete channels you don’t
want in the “Channel List” by using the “Delete”
operation. Press the “
GREEN
” button to enter
“Operation” menu. Select by using “ ”/“ ”
buttons and press the “
OK
” button to activate
“Delete” operation. When you press the “
OK
”
button, the current channel is selected. You
can highlight the channel you want to delete by
“
✘
”/“
✘
” buttons. If you press the “
OK
” button
again the highlighted channel is deleted
immediately. All channels belonging to that
list will be deleted if the “
YELLOW
” button is
pressed.
>
FAV GROUP
: Press the “GREEN” button to
enter “Operation” menu. Select by using
“ ”/“ ” buttons, “Fav Group” is activated
and by pressing the “
OK
” button the “Fav Ops.”
menu appears. The options in this menu are,
adding/removing a new channel to/from the
favourite channel group, creating a new favourite
channel group, renaming and deleting an
existing group, locking and unlocking a group.
To add a new group, press the “
OK
” button while
“Add/Rem. Channel” is selected. A keyboard
appears on the screen. You can now create a new
favourite group using the keyboard.
✘
✘
✘
✘
✘
✘
✘
✘
✘
✘


