background image

68

Maxtronic Orion 410ST User Guide

U

ser Privilege Settings

Quotas

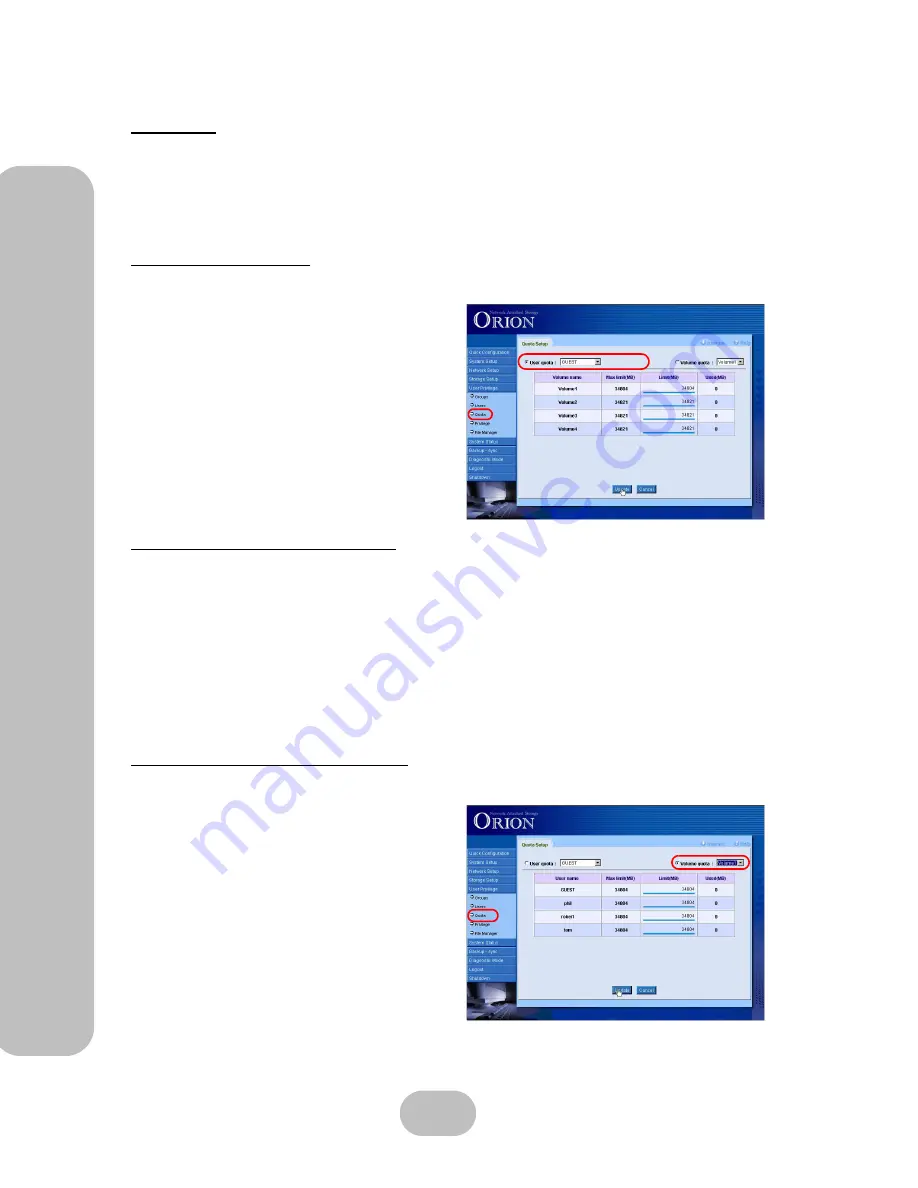
The quotas section allows viewing and modification of the quota allocated to a user or storage 

volume. The system provides two ways of viewing the quota:

• User Quota: Limits the quota of each user in each storage volume.
• Storage Quota: Limits the quota of all users in each storage volume.

User Quota Settings

This screen displays all information regarding user quota settings:

Volume name

: Displays volume name.

Max limit (MB)

: Displays the maximum 

capacity of the volume.

Limit (MB)

: Displays the user’s quota limit.

Used (MB)

: Displays the amount of quota 

used.

Modifying user quota settings

– Check ‘User quota’.
– Select a user from the drop-down box.

 There are two ways in which the quotas can be changed:

– Click on the limit bar and drag to set the user’s quota limit.
– Manually type in the user’s quota limit.

The quota is limited to the number of users and the capacity of the drive volume.

Storage Volume Quota Settings

Modifying storage volume quota settings

• Select ‘Storage Volume’.
• Select a volume from the drop-down box.
• Select the storage volume whose quota you 

wish to adjust and then use the same method 
as before to change the values.

Summary of Contents for Orion 410ST

Page 1: ...MaxTronic Orion 410ST RAID Enabled NAS System User Manual...

Page 2: ......

Page 3: ...ack View 2 Important Notice 3 2 Getting Started Hardware Installation 5 Power Connection 5 Network Connection 6 Hard Disk Drive Installation 7 Using the Front Control Panel 10 Control buttons 10 LED i...

Page 4: ...FTP 50 Storage Setup Settings 51 Volume Setup 53 Share Setup 55 N Sync Setup 56 User Privilege Settings 62 Groups 62 Users 64 Quotas 68 Privilege Setup 69 File Manager 71 Backup sync 73 Jobs 74 Logs...

Page 5: ...Maxtronic Orion 410ST User Guide IP sharing unit setup Broadband Router 0 85 IP sharing unit Broadband Router D link DI704up0 85 Enabling passive mode for the FTP tool0 90...

Page 6: ...Maxtronic Orion 410ST User Guide...

Page 7: ...s Orion 410ST NAS System and related documentation are protected by copyright and are distributed under licenses restricting their use copying and distribution No part of this documentation may be rep...

Page 8: ...fall causing serious damage to the product Keep the Orion 410ST NAS System away from magnetic forces Do not use the Orion 410ST NAS System near water Keep the Orion 410ST NAS System away from dust san...

Page 9: ...ause a risk of fire or electric shock Unplug the power cord from the wall outlet before cleaning Keep the Orion 410ST NAS System dry Do not use liquid cleaners aerosol cleaners or a wet cloth Use a da...

Page 10: ...The NAS system LCD panel can be damaged by exposure to direct sunlight Limit exposure to subdued or indirect sunlight only The NAS system should be used only in clean environments that are free from a...

Page 11: ...and easier to use Product Features Automatic detection of overheating DC voltage 3 3V 5V and 12V Automatic formatting data synchronization and recovery Firmware upgradeable User friendly configuration...

Page 12: ...ponents of the Orion 410ST Front View Back View UPS Connector System Fan Power Supply LAN Connector Three pin power connector Power Switch Power LED indicator Control buttons HDD LED indicators HDD ca...

Page 13: ...the HDD caddy s from the system 3 Power on the system 4 Hot plug the HDD caddy s into the system Please make sure the HDDx added OK displays on the LCD screen then continue the next drive installation...

Page 14: ......

Page 15: ...r on the rear side of the Orion 410ST 2 Connect the three pin power plug into a power outlet Turn on the Power Press the power switch at the rear side of the Orion 410ST Turn off the power To shutdown...

Page 16: ...will be lit orange 1 Insert one end of the LAN cable into the router 2 Insert the other end of the LAN cable into the LAN connector on the rear side of the Orion 410ST When network connection is set...

Page 17: ...ct the power cord and LAN cable 2 Unlock the HDD caddy with the key provided 3 Pull out the handle of the HDD caddy 4 Pull out the HDD caddy and remove from the tray four caddies 5 Power on the system...

Page 18: ...are exceptions 1 The HDD s have been initialized by the same Orion 410ST and have been performing daily routine tasks 2 Performing Disk Roaming procedure to reduce system down time To perform Disk Ro...

Page 19: ...y for it supports hot wrap and it is unnec essary to shutdown the system when removing a HDD or replacing one drive Step for assembling 1 Place the HDD in the caddy and fix it firmly with screws into...

Page 20: ...ons 2 LED indicators besides control buttons 2 LED indicators on each caddy 8 in total Control buttons Use the up down ENT enter and ESC escape buttons to configure settings and view menus in differen...

Page 21: ...Color Description Power Green Shows the Orion 410ST is powered on and is operating normally Network Status Orange If the indicator is flashing the Orion 410ST is con nected to the Network If the indi...

Page 22: ...cators 2 LED indicators on each HDD caddy show the HDD status LED Indicators Color Description Upper LED Green Indicates normal operation of the HDD Red Indicates HDD malfunction Lower LED Blue Indica...

Page 23: ...LCD screen while the Orion 410ST is operated normally Each parameter is displayed for about 2 seconds on the LCD screen including Product model name System name can be changed later Time Date Etherne...

Page 24: ...d 111 CH0 Status 1 Press ENT button to enter 00000000 8 zeros 2 Press ESC button to confirm and enter the main menu The default administrator password is 00000000 8 zeros To change the administrator p...

Page 25: ...message will be dis played Please check if the LAN cable is correctly con nected Ethernet status can not be updated automatically Press ENT to check Channel 0 status again to make sure the connection...

Page 26: ...con firm the input 5 After the netmask IP address setup is complete press ENT to confirm 6 Press ESC to exit the netmask IP setup screen The new sub netmask IP address is displayed 1 Use the up or dow...

Page 27: ...ture and can t be changed 1 Use the up or down button under the 11 Channel 0 submenu to enter the 116DHCP Sta tus and press ENT to confirm 2 The DHCP status will be displayed 3 To set the DHCP status...

Page 28: ...digit press ENT to con firm the input 5 Press ESC to exit the date setup screen The new date is displayed 1 Use the up or down button under the 21Clock submenu to enter the 212Time and press ENT to co...

Page 29: ...ystem and press ENT to confirm 2 A query message shows on the LCD screen Use the up or down button to select Yes or No Yes Reboot the system No Exit the query screen and go back to the 221Reboot Syste...

Page 30: ...value of each digit Before entering the next digit press ENT to confirm the input 4 After you have entered the new password the system will ask you to confirm this password 5 Enter the exact value of...

Page 31: ...tor password back to the factory default Perform this option only when the new administrator password is for gotten or lost 1 Use the up or down button to enter the Factory Default Restore Settings me...

Page 32: ......

Page 33: ...ailable in your network environment Using User Interface 1 Open your Internet browser 2 Type the IP address of the Orion 410ST into the browser address bar to access the user interface 3 Log in using...

Page 34: ...mber Displays a 6 digit num ber which is viewed as a product ID Software version Displays the current software version used on this system To update this see under the System setup menu Running time D...

Page 35: ...will be displayed for each active user Share A shared folder used by the logged in user User User name of the active client Time logged in Login time of the active client Protocol Type of protocol us...

Page 36: ...Warning Yellow Represents all sys tem warning messages Error Red Represents all system error messages To download and clear logs refer to Logs sec tion in chapter 6 for detailed information FTP Log T...

Page 37: ...Server Name All Orion 410ST NAS Systems have a default factory name As the administrator you can change this to a name of your choice To change the server name 1 Type the new server name into the bla...

Page 38: ...10ST to connect to a NTP server to update the date and time settings follow these steps Select Yes and one option from the drop down box or Manually to config ure the NTP settings yourself If Manually...

Page 39: ...Maxtronic Orion 410ST User Guide 29 Using User Interface 4 The Orion 410ST will update the system information 5 A confirmation message will appear Click Next to proceed to the next step...

Page 40: ...interface 1 If the IP address or subnet mask address are changed modify the fields entering the new IP and subnet mask addresses 2 After all fields are modified click Update and next 3 The system wil...

Page 41: ...ing User Interface 5 If Reboot is selected a reboot warning message appears 6 The system will reboot 7 Once rebooted click Login to log into the Orion 410ST browser interface again If Next is selected...

Page 42: ...you can set up volumes quickly and effectively on this screen 1 Click Add 2 In the next window there are five types to choose from Single disk RAID 0 RAID 1 RAID 3 and RAID 5 3 Select the disks on whi...

Page 43: ...Maxtronic Orion 410ST User Guide 33 Using User Interface 5 The new volume is complete Click Add to create another new volume or click Next to proceed to the next step...

Page 44: ...ings can only be changed when enable is selected To set the user level 1 Select the required user level from the drop down box 2 Type in the name for this workgroup server description and WINS server...

Page 45: ...35 Using User Interface As the administrator you can now adjust other settings in more detail via the administrator tools in the user interface For any help needed whilst using the user interface clic...

Page 46: ...36 Maxtronic Orion 410ST User Guide Using User Interface...

Page 47: ...r functions Administrator Login Once the Orion 410ST NAS System has booted enter the IP address in your web browser window to bring up the administrator login screen Enter nasroot as the User name and...

Page 48: ...EP Status Enable is selected by default When a system event occurs a beep is activated by system buzzer Next to each system component is a speaker icon You may click on the icon to deselect event noti...

Page 49: ...an SNMP system administrator name here The name does not have to be the same as that of the system administrator NAS location Enter a description to easily identify the NAS location Update Click to sa...

Page 50: ...the local hard disk of your computer The backup file is named as NameofNas_config bin When backing up system settings a directory must be specified to save backup files Restoring data When restoring s...

Page 51: ...Choose from the drop down box Time to shutdown If the UPS watch option is enabled the default shutdown delay is 5 minutes In the case of a detected power loss the system will shut down immediately Det...

Page 52: ...net work status The display shows the following NIC Displays the network interface card type Attach Displays connection status of net work interface Setup Displays the type of network inter face manua...

Page 53: ...ver descrip tion for the NAS server WINS Server IP Enter WINS Server IP address if necessary Click Update to update all Windows Settings A confirmation screen will appear Domain Level Select Domain le...

Page 54: ...D domain name ADDC Administrator Name Enter the ADDC administrator name ADDC Administrator password Enter the ADDC administrator password uid range Enter the required uid range gid range Enter the req...

Page 55: ...nication protocol Check Enable NIS domain to get authenti cation for user access Enter the NIS domain name Update Click to save changes Cancel Click to cancel any changes Select Share Setup in Storage...

Page 56: ...mmand from NFS clients to mount the Orion 410ST mount command to mount file system t nfs indicates the file system type to NFS IP address of the NAS shares Volume1 test path of the share folder on NAS...

Page 57: ...ble data sharing between clients using the Mac OS systems This section outlines the settings of required parameters Check Enable to enable Apple Talk Select a zone name Click Update to save all change...

Page 58: ...alk tab Check the Make AppleTalk Active option and then open your Safari web browser Replace http in the address bar with afp and press enter You will be prompted for your username and password You wi...

Page 59: ...410ST User Guide 49 Network Setup Settings Connecting via SMB is a similar process Select Connect to server from the Go menu Enter the NAS IP address and click Connect Select a mount and click OK Log...

Page 60: ...IP address Passive IP address in PASV EPSV SPSV replies for NAT Passive Port Specifies the port range for passive connection replies Passive ports larger than 65535 or less than 1024 are not allowed...

Page 61: ...error has occurred during the data transmission between hard disk and IDE controller When a CRC error occurs the read write command is attempted again The greater the number of errors the more unstabl...

Page 62: ...ut down abnormally and if there is a RAID 1 RAID 3 or RAID 5 set up in the storage volume the system will automati cally duplicate backup data in RAID 1 For RAID 3 or RAID 5 setup the system synchroni...

Page 63: ...nd click Modify to modify the required fields This mode allows only the rebuilding speed to be changed Format Formats a specific storage volume Adding a storage volume Click Add to go to the Add Volum...

Page 64: ...e you wish to delete and click Delete You will be prompted to confirm the delete action Click OK and the volume will be deleted Formatting a volume Select the volume you wish to format from the Volume...

Page 65: ...he name of the share folder that will be displayed on the system Storage Volume Specify the volume in which the share folder will be created Path Specify the path where the share folder will be stored...

Page 66: ...abled will be shown in the N Sync client list Disable Disables N Sync Server Name Share name of the system exported by N Sync server Path Share path of the system Comment Description for the shared fo...

Page 67: ...kup attribute Add Click to add a Sync job Start Click to start the Sync Job Stop Click to stop the Sync Job Scheduler An N Sync scheduler periodically runs N Sync jobs that are described by profiles A...

Page 68: ...Setup Select the target share from the Select local share list Click Next to proceed or Back to return to the previous screen 2 Remote Share Setup Log in with the administrator nas root password in se...

Page 69: ...e required variable from the drop down box Select Finish to end configuration or Back to return to the previous screen When you click Finish the completed pro file information screen will appear Modif...

Page 70: ...Settings Deleting a profile Select the profile you wish to delete from the Select profile list Click Delete profile Disabling a profile Select the profile you wish to disable from the Select profile...

Page 71: ...has been completed successfully A failed N Sync job is shown by a red error code Refer to the following list for error code definitions 1 Syntax or usage error 2 Protocol incompatibility 3 Errors sele...

Page 72: ...to go to the Group Setup screen The Group Setup screen details the contents of each user group Group Name Displays group name Group ID Displays group ID number Members Displays the members that belong...

Page 73: ...new group is created the system assigns it a unique ID number There is no need for you to modify this number Members Select a user in the Not Members list and click the left direction arrow to move t...

Page 74: ...Update Click to save all changes Cancel Click to cancel all changes Back Click to return to the Group setup screen Users This section displays user account settings and user information User Displays...

Page 75: ...r Setup screen User Enter a short user name for login User Name Enter the user s full name Password Enter a password for the user This will be the login password Confirm Password Enter the password ag...

Page 76: ...e name in the User Setup screen and click Delete A prompt will appear Click OK to delete the user When a user is deleted all the contents in its personal folder will be erased The system has no way to...

Page 77: ...Name Enter a new full user name Change Password Enter a new password Confirm Password Enter the new pass word again Groups Click on the direction arrows to move users to and from groups Update Click...

Page 78: ...ys the maximum capacity of the volume Limit MB Displays the user s quota limit Used MB Displays the amount of quota used Modifying user quota settings Check User quota Select a user from the drop down...

Page 79: ...ccess Writable Check to allow writable access Deny access Check to deny access Update Click to update and save all changes Cancel Click to cancel all changes Unix Valid host subnet Displays valid host...

Page 80: ...cess from the drop down box OK Click to save all changes Cancel Click to cancel all changes Back Click to return to the previous screen Modifying an NFS client privilege Export path Displays export pa...

Page 81: ...Date Displays the date on which the file was created or last modified X Click to delete a file or folder Note that the User privilege setting mentioned in the previous section is Share level and a hig...

Page 82: ...splays the owner user of the object CREATOR GROUP Displays the owner group of the object OK Click to save all changes Cancel Click to cancel all changes Back Click to return to the previous screen The...

Page 83: ...server list refresh interval from the drop down menu The default is set at half an hour Allow users select client code page Check to allow users to select client code page for each job Log Level Sele...

Page 84: ...to be backed up In afb smb it should be the shared folder s name If the fields Form IP address and Remote username are not empty then the user may click this link to select a directory from the shared...

Page 85: ...ss of the source host from where backup is made Remote username Select either As guest or As normal user If you select As guest no further user information is required If you select As normal user ent...

Page 86: ...m schedule and save all changes Cancel Click to cancel all changes Back Click to return to the previous screen Schedule List This list displays all information relating to jobs and their schedules Job...

Page 87: ...perating logs perform downloads and delete actions here using various fil ters such as time range user or job ID Time Displays the time when the job was created Owner Job ID Displays the owner of the...

Page 88: ...data created by the backup sync function Backup Select to backup your config file Restore Select to restore a config file from a previous backup OK Click to backup restore Reset Click to reset all fi...

Page 89: ...oblems and log them for later viewing Run Time Select the length of time for the diagnostic mode to run from the drop down boxes Start Click to begin diagnostic mode Clear Click to clear all fields Do...

Page 90: ...axtronic Orion 410ST User Guide Diagnostic Mode Click OK to bring up the Diagnostic Log screen This displays the time remaining for diagnostics To stop the diagnostic mode click Stop A prompt will app...

Page 91: ...gnostic mode logs A prompt for network password and username will appear Enter username and password A download prompt will appear Open Click to open the log directly after download Save Click to save...

Page 92: ...owser window will close and the NAS shuts down Shutdown Click to confirm system shutdown A second confirmation screen will appear OK Click to confirm shutdown Cancel Click to cancel and return to the...

Page 93: ...een User Level Access A client user may access the NAS via the web browser without the need to go through the Adminstrator The client must log in with a valid user name and password Four options are a...

Page 94: ...ging to them as well as config uring their ACL prvilege See ACL set tings on page 72 for more details Backup sync The client user may also create their own backup sync jobs as well as view the job log...

Page 95: ...pports FTP usage when only one fixed public IP is available as described earlier The IP sharing unit broadband router will need to be set up correctly to work with this feature There are various IP sh...

Page 96: ...r the fixed private IP address 1 Enter 21 in the Private port Public port field the standard FTP port number 2 Select Always under Schedule 3 Click Apply and a dialogue box will appear 4 Click Continu...

Page 97: ...r the fixed private IP address 1 Enter 548 in the Private port Public port field the standard AFP port number 2 Select Always under Schedule 3 Click Apply and a dialogue box will appear 4 Click Contin...

Page 98: ...r the fixed private IP address 1 Enter 80 in the Private port Public port field the standard WEB port number 2 Select Always under Schedule 3 Click Apply and a dialogue box will appear 4 Click Continu...

Page 99: ...50000 in the Private port Public port field 2 Select Always under Schedule When all the virtual servers are set properly you will see the above screen showing all the details highlighted in the red r...

Page 100: ...rion 410ST through the FTP protocol you can use the preferred FTP tool Because there is only one fixed public IP is available make sure the FTP tool with pas sive port option is enabled 1 Open Interne...

Reviews: