4
5
GB
GB
•This tool should not be used by people under the age of 16 years
•If the drill bit becomes unexpectedly jammed (causing a sudden, dangerous reaction), immediatelyswitch
off the tool
•Use suitable detectors to find hidden utility lines or call the local utility company for assistance
(contactwith electric lines can lead to fire or electrical shock; damaging a gas line can result in an explosion;
penetrating a water pipe will cause property damage or an electrical shock)
•Hold the power tool only by the insulated gripping surfaces when performing an operation where
theaccessory may contact hidden wiring or its own power cord
(contact with a “live” wire will also make
exposed metal parts of the power tool “live” and shock the operator)
•Dust from material such as paint containing lead, some wood species, minerals and metal may beharmful
(contact with or inhalation of the dust may cause allergic reactions and/or respiratory diseases to the
operator or bystanders);
wear a dust mask and work with a dust extraction device when connectable
•Certain kinds of dust are classified as carcinogenic (such as oak and beech dust) especially in
conjunctionwith additives for wood conditioning;
wear a dust mask and work with a dust extraction
device when connectable
•Follow the dust-related national requirements for the materials you want to work with
•
Do not work materials containing asbestos
(asbestos is considered carcinogenic)
•If the cord is damaged or cut through while working, do not touch the cord, but immediately
disconnectthe plug
•Never use the tool when cord is damaged; have it replaced by a qualified person
•Always check that the supply voltage is the same as the voltage indicated on the nameplate of the
tool(tools with a rating of 230V or 240V can also be connected to a 220V supply)
•Be aware of the forces that occur as a result of jamming (especially when drilling metals); always
useauxiliary handle and take a secure stance
•
Always disconnect plug from power source before making any adjustment or changing any accessory
WHEN CONNECTING NEW 3-PIN PLUG (U.K. ONLY):
•Do not connect the blue (= neutral) or brown (= live) wire in the cord of this tool to the earth terminal
ofthe plug
•If for any reason the old plug is cut off the cord of this tool, it must be disposed of safely and not
leftunattended
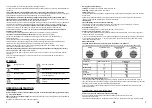
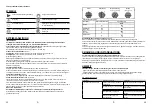
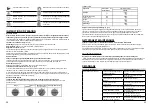
SYMBOLS
Read the manual
Wear ear protection
Warning
Wear dust mask
Double insulation
Do not dispose of old appliances in the
household garbage
Wear eye protection
Keep your hands and feet away from all
opening
OPERATING INSTRUCTION
Initial operation
Before starting work, always examine the working area for concealed electric lines, gas and water pipes,
e.g. with a metal detector.
Always use the correct supply voltage!
The voltage specifications on the rating plate must correspond with
the supply voltage.
The power cord and plug must be in perfect condition.
Working on the drill stand
Locking
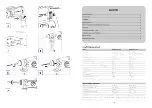
: Press ON/OFF switch 8 and lock with button 10.
Unlocking
: Press ON/OFF switch 8 and release.
Speed control
The drilling speed can be adjusted during operation by increasing or decreasing the pressure on the ON/
OFF switch 8.
Speed control makes possible the slow starting of holes in plaster or tiles .This prevents the drill from
slipping .the hole becoming enlarged or the material splitting.
Inserting tools
Clean and lightly grease tool shank before inserting.
Twist the tool into the tool holder and push it in until it engages. The tool shank locks in position
automatically. Pull the tool to check if it is locked correctly.
Removing the tool
Push back the locking sleeve 2 of the tool holder and remove the tool.
Positive and reversing function:
1. Please put the positive and reversing function button to “R” during drilling, the bit rotates right, then
switch on the switch to start drilling.
2. At end of the drilling operation, the bit may be embedded in the drilled object, please put the positive
and reversing function button to “L”, switch on the switch, the bit rotates left, thus, the bit may slowly
retreat from the drilled object.
Mode selector knob
The mode selector knob 7 may be set only when the machine is switched off.
Press the release button 6 on the mode selector knob 7 and move the knob to the desired position.
Adjust and lock the chiseling angle:
If it is required to adjust the chiseling angle during chiseling, please put the function knob to “Picture”,
then, you can adjust the chiseling angle as per the chiseled object, at end of such adjustment, put back the
function knob to “Picture, thus the chiseling angle will be locked.
*The above values are approximate values and must be varied in accordance with hole diameter and
material characterist
CLEANING AND MAINTANCE
Before any work on the machine itself, pull the mains plug.
For safe and proper working, always keep the machine and the ventilation slots clean.
Clean the tool mount daily.
If the machine should happen to fail despite the care taken in manufacture and testing, repair should be
Drilling
Percussion drilling
Chisel adjustment
(Vario-lock)
Chiseling
(Rotation OFF)
Speed table
Application
Mode selector switch
Speed control
SE/SER
Chiseling
Impact drilling
Concrete/rock
Drilling
Wood/steel
Screw driving
(Fig.1)
(Fig.1)
(Fig.6)
(Fig.2)(Fig.3)
(Fig.7)
Summary of Contents for 111-0900
Page 3: ......
Page 26: ...46 47 RU RU o o www maxpro tools com...
Page 31: ...56 57 FA FA 7 6 7 Vario lock SE SER 96 EC 2002 Maxpro O O 7...
Page 32: ...58 59 FA FA 16 13 Maxpro orpxaM 16 230 240 220 8 10 8 2 1 R 2 L 2 3 6 1 1...
Page 34: ...62 63 AR AR O O oiraV RES ES 2002 EC 96 7...
Page 35: ...64 65 AR AR 230 240 220 8 10 8 8 2 1 R 2 L 7 6 7 16 13 Maxpro Maxpro 16 1 1 2 6 6 3...
Page 37: ...www maxpro tools com...


