background image


Installation manual 


Liftgate GPC 22 X-1, Series 11 

Document no.: S 20 912 436 

13 

Version 2021  


3. 

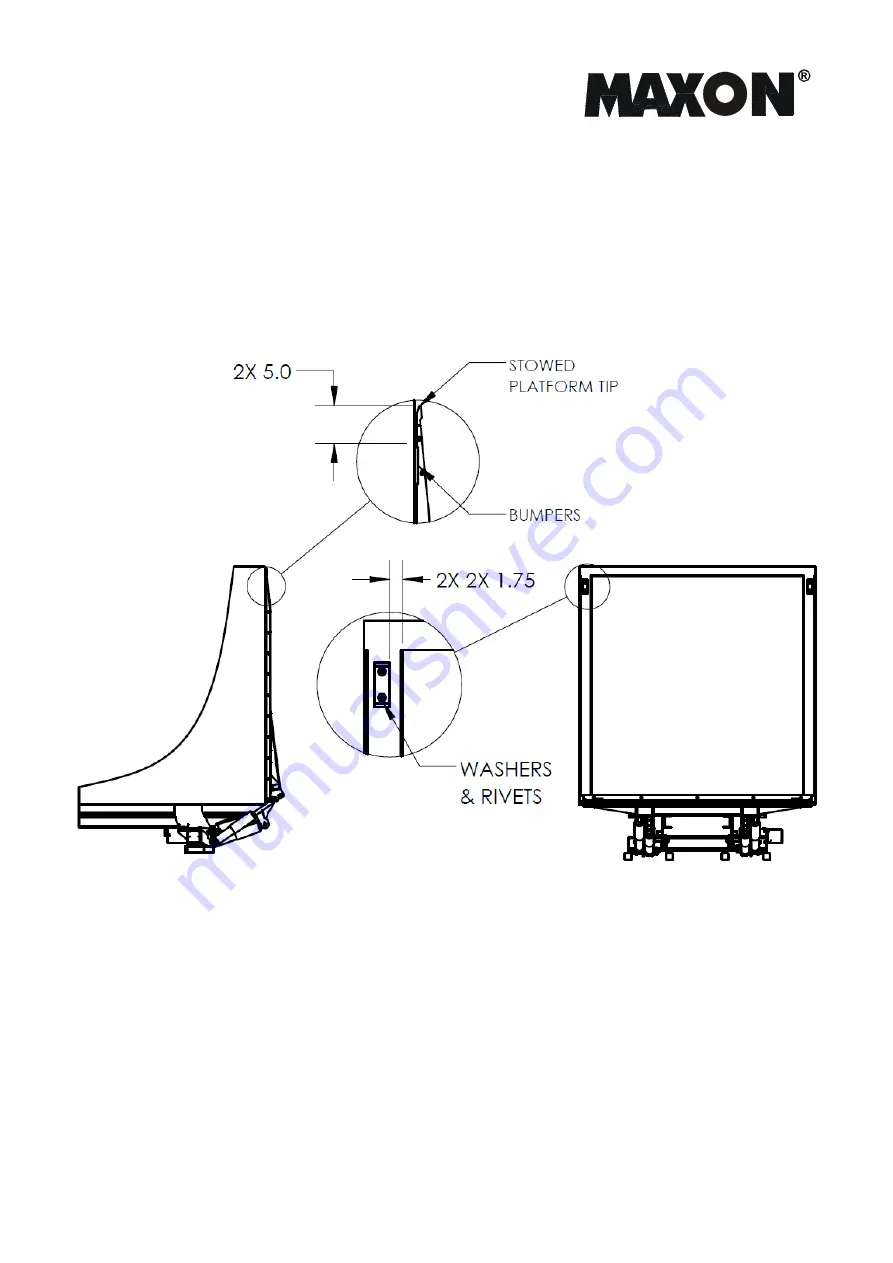
Bumpers installation 

• 

with platform stowed, mark lines 5.0" platform tip (as shown), both sides. 

• 

with platform unstowed, place bumpers top on lines, 1.75" away from in inside post, both 
sides. 

• 

use bumper as templates, transfer holes location onto truck sill. 

• 

use the bar as a template to transfer holes locations on truck body.  

• 

drill 4x .26" +/- .005" diameter holes; remove burrs and sharp edges. 

• 

use proper rivet tool to install provided rivet with washers between rivet head and bumper. 


Summary of Contents for GPC 22 X1

Page 1: ...GPC 22 X 1 liftgate Installation Manual LIFT CORP 11921 Slauson Avenue Santa Fe Springs CA 90670 2221 P 800 227 4116 562 464 0099 F 888 771 7713 Date 03 2021 Part no S 20 912 436...

Page 2: ......

Page 3: ...20 912 436 3 Version 2021 Contact information MAXON LIFT CORP Corporate Office 11921 Slauson Avenue Santa Fe Springs CA 90670 2221 P 800 227 4116 562 464 0099 F 888 771 7713 Customer Service Parts US...

Page 4: ...d the maximum load carrying capacity see rating plate Be sure to correctly position the load on the platform Do not operate the liftgate with the vehicle in motion Do not use the liftgate to lift any...

Page 5: ...ious injury Do not modify cover or remove product labels warning labels instructions rating plates Check for damages after arrival For damages on the liftgate which occurred during transportation the...

Page 6: ...rds and complications DANGER Failure to heed this notice can result in death or serious injury WARNING Failure to heed this notice can result in death or serious injury CAUTION Failure to heed this no...

Page 7: ...e max 3200 PSI max 220 bar The hydraulic system is designed using state of the art technology Do not damage or modify hydraulic components or hoses Danger from pressurized liquids and gases Hydraulic...

Page 8: ...talling are to be checked to see if they are in proper working condition before they are used CAUTION Unsuitable transport equipment When transporting and lifting heavy parts use transport equipment e...

Page 9: ...n page 20 of the installation manual 3 The Stabilizer bar must be mounted before liftgate is installed on the truck body lnstall the 1 2 spacer on the body This spacer bar is always used with exceptio...

Page 10: ...d the tail lights If there are any U shaped mounting brackets with threads on both sides brackets rivets spare wheels or couplings in the installation area of the mounting brackets they need to be rem...

Page 11: ...forcement should be put back in to maintain structural integrity of the rear sill Recommendations for the rear sill cutouts to install the models GPC 22 X 1 Dimensions GPC 22 X 1 Platform min max M1 c...

Page 12: ...installation before lift gate installation for 102 wide truck use full length of the 98 length spacer bar for 96 width truck shorten spacer bar by 3 equally from two ends place and clamp the spacer b...

Page 13: ...ides with platform unstowed place bumpers top on lines 1 75 away from in inside post both sides use bumper as templates transfer holes location onto truck sill use the bar as a template to transfer ho...

Page 14: ...021 Placement of GPC 22 X 1 mount fixture IMPORTANT Measure body opening and mark center line Mark center line on GPC mounting fixture IMPORTANT Place the mount fixture tight against the 1 2 spacer be...

Page 15: ...ifting gear and vehicle Install the mounting brackets loose secure lifting machanism with Bolt clamp and connect the positive and ground cables at the battery Lift up the Lift arms in order and to ass...

Page 16: ...ies 11 Document no S 20 912 436 16 Version 2021 IMPORTANT Before assembling the lifting gear it is imperative that the bolt A is loose It will be tightened after adjusting the lifting gear Please refe...

Page 17: ...Installation manual Liftgate GPC 22 X 1 Series 11 Document no S 20 912 436 17 Version 2021 Assembly drawing of lifting mechanism with synchronizer bar...

Page 18: ...6 18 Version 2021 Place the lifting gear of the GPC on a pallet and put it in fitting position under the vehicle with a forklift truck Put the GPC in the correct fitting position and align it IMPORTAN...

Page 19: ...r frame of the vehicle and secure them against unintentional movement Secure the mounting fixture with clamps weights or by welding it to the rear sill Weld on the brackets at the vehicle frame accord...

Page 20: ...s customer service will contact the technical department to check whether the installation considering the dimensions of the vehicle is possible If the installation is possible you will get a special...

Page 21: ...MPORTANT Before mounting Liftgate see if any modification to the vehicle body is needed to access battery cable from the Main Frame Housing A hole in vehicle frame could interfere with welding 1 conti...

Page 22: ...icle manufacturer s installation guidelines and all welding should be done in accordance to AWS welding standards Remove underbody coating in the area of the mounting points contact surfaces between v...

Page 23: ...B Bring the platform with forklift or crane to the lifting mechanism and mount the bolt Installation of the platform Remove the pins in the liftarm to the installation fixture Lower the lift arm far...

Page 24: ...will be adjusted until the rear frame and the platform are parallel After the adjustment both bolts of the synchronizer bar fastening are to be tightened Adjustment of the platform for installation in...

Page 25: ...stops only with the head of the spring against the rear beam and that the side plates can be pushed freely against the lifting arm head Eventually reinforce the rear beam in the area where the lifting...

Page 26: ...be done with the adjustment fork on the right lift arm if an adjustment is necessary If the bolt is turned to the right the lifting arm is tightened more against the rear beam A A Turning the bolt cl...

Page 27: ...hort circuit and explosion of the battery Risk of damage to property fire and injury Follow the vehicle manufacturer s instructions for correctly handling the battery NOTICE When installing cables mak...

Page 28: ...fter assembling the platform the cable set from the central power unit must be affixed alongside the lifting arm with the delivered cable straps in such a way that no pinching or rubbing is possible C...

Page 29: ...le and cable from battery Follow the vehicle manufacturer s instructions for correctly handling the battery Locate accessible place for cabin on off switch on dash panel in vehicle cab Mark and drill...

Page 30: ...ng diagram on page 46 and 47 Connect the wires from the cabin on off switch 20 906 974 to the wires of the cable 20 906 905 as follows yellow with gray yellow blue with 1 red with 2 Route cable 20 906...

Page 31: ...attery to the power unit and connect it to the motor relay Please connect the power unit plus and ground cable directly on the battery CAUTION The guidelines of the vehicle manufacturer must be follow...

Page 32: ...panel Mount the control panel at the right end of the vehicle so that the platform can be observed from the operating position IMPORTANT The minimum distance should be 16 2 CAUTION The mounting guidel...

Page 33: ...not compatible with former versions 2 1 IMPORTANT After installation or repair of the liftgate Drive the platform the horizontal position press button 1 upper left three times then press button 2 uppe...

Page 34: ...free space above the controls of the control box This spot should be in area that is visible to the operator at all times Caution Secure the load against moving Or use mechanical supports 20 904 940 S...

Page 35: ...ix the danger notice sticker Safe handling of the liftgate IMPORTANT This sticker is supplied with all new liftgates The installing company must place it in an easily visible location on the inside of...

Page 36: ...must be performed by the vehicle manufacturer IMPORTANT Roughen the powder coated surface before painting Mask the black connecting rods before painting Carefully remove extra paint and masking mater...

Page 37: ...eed lifting and lowering must not exceed 6 second If lifting and lowering are too fast please compare the battery voltage and amperage with the values of the power unit These values must be identical...

Page 38: ...ssary the pressure valve must be adjusted so that the load can be lifted securely IMPORTANT The pressure valve is adjusted in the factory a correction is generally not necessary If it has to be done a...

Page 39: ...ning Torque in ft lb Nm Bolt Connections Tightening Torque in ft lb Nm M4 2 2 7 G1 4 29 40 M6 7 9 5 G3 8 70 95 M8 17 23 G1 2 96 130 M10 33 46 Connection Nuts M12 59 80 M16 x 1 5 44 60 M14 96 130 M18 x...

Page 40: ...efaced it must be replaced Free replacement is available from MAXON Lift Corp Parts Department max bed hight assemble o rings to arms as shown Apply grease to bearings located in arms prior assembly C...

Page 41: ...e been corrected Do not overload the Lift The load limit is based on evenly distributed cargo over the entire Platform surface If you are using a pallet jack be sure it can be maneuvered safely Do not...

Page 42: ...ted and OK The switch occurs in horizontal position This allows adjusting the automatic lifting inclination Checking the pressure switch S4 Start lowering with both foot control buttons LED blinks As...

Page 43: ...al emergency function Option body lighting in series 11 The clamping strip located on the service switch can be used to connect the body lighting To connect the body lighting connect the lightning cab...

Page 44: ...Installation manual Liftgate GPC 22 X 1 Series 11 Document no S 20 912 436 44 Version 2021 Body Seal Kit s...

Page 45: ...Installation manual Liftgate GPC 22 X 1 Series 11 Document no S 20 912 436 45 Version 2021 Hydraulic circuit diagram...

Page 46: ...Installation manual Liftgate GPC 22 X 1 Series 11 Document no S 20 912 436 46 Version 2021 Electrical circuit diagram...

Page 47: ...Installation manual Liftgate GPC 22 Series 11 Document no S 20 912 436 47 Version 2020 On Off Switch diagram...

Page 48: ...Installation manual Liftgate GPC 22 Series 11 Document no S 20 912 436 48 Version 2020 Optional food control diagram...

Reviews: