background image


Unit settings: 


Note: 
After changing any of the settings, press ‘ACTION/RECALL’ to store the new 
value.


DMX address 


Selects the unit’s DMX address (start channel).  
The Atomic Colors uses 1, or 2 DMX channels depending on the fan speed control setting. The 
first DMX channel (start channel) controls the movement of the gel string, and the second 
channel, if remote fan control (Fnr) is selected, controls the cooling fan speed. 
The unit will automatically select the two DMX channel mode if the fan speed setting is set for 

Fnr’ 

(see below)

otherwise the unit will remain in single DMX channel mode. 

To change the address, press 

‘UP’


or


‘DOWN’ 

button once


to increment/ decrement the value; 

hold down the 

‘UP’


or


‘DOWN’ 

button for fast increments/ decrements of the value.


Fan speed (Fn) 

Sets the speed of the gel-cooling fan, and 1 or 2 channel DMX operation.  
There are four fixed fan speeds levels, 

Fn1’

 being the slowest and 

Fn4’

 being the fastest. The 

Fnr’ 

option allows you to control the fan speed through the second DMX channel. 

Please note

 that extended operation with low gel-cooling fan speeds may have a detrimental 

effect on the life of the gel string. 
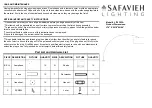
 

Second DMX Channel


Channel Level 

(Dec)


Channel Level 

(%)


Speed

Level 

Fan 

Speed 

00-61


0-24


Fn4 

62-127


25-49


Fn3 

128-190


50-74


Fn2 

191-255


75-100


Fn1 

Fastest 


Slowest 


Gel saver (GL) 

Toggle the gel saving feature on 

GL1’

 or off 

GL0’

. This feature slowly moves the chosen gel(s) 

back and forward slightly, so that heat from the lamp is dissipated over a larger area. This can 
extend the life of the gel string. 
 
Note: - Visually check that the gel is correctly positioned before using the gel saver feature. If the 
gel position is not correct, adjacent colors may show, and the joining tape may overheat. 

(See programming notes)


Speed (SP)


Set the scroll speed. 
Select normal speed 

‘SP1’

 for quieter operation or fast speed 

‘SP2’ 

for faster color changes.


Display (dP) 

Switch the display on 

‘dP1’

 or off 

‘dP0’

. This feature can be used to blank displays that may be 

an unwanted distraction. When off, the display will re-activate when any button is pressed. 


Light activated fan (LF) 

Toggle the automatic, light-activated cooling feature on 

‘LF1’

 or off 

‘LF0’

. This setting allows 

the gel cooling fans to be activated by the light output of the Atomic 3000 strobe. When on, light 
from the strobe automatically switches the fans to their set speed, and activates the Gel saver 
function (if

 ‘

GL’

 set at 1

).


Atomic Colors User Manual                           Operating the unit 

16

Summary of Contents for Atomic Colors

Page 1: ...Atomic Colors user manual...

Page 2: ...ined 2003 Martin Professional A S Denmark All rights reserved No part of this manual may be reproduced in any form or by any means without permission in writing from Martin Professional A S Denmark Pr...

Page 3: ...ETY INFORMATION 4 INTRODUCTION 5 PREPARATION FOR USE 6 MOUNTING THE UNIT 9 CONNECTING THE UNIT 10 OPERATING THE UNIT 14 CHANGING THE GEL STRING 20 SERVICE 24 SPECIFICATIONS 25 Atomic Colors User Manua...

Page 4: ...at no objects or items are near the front aperture or can get trapped in the roller mechanism Make sure the power supply for the Atomic Colors is connected and switched on before operating the Atomic...

Page 5: ...size of power supply required is dependant on how many Atomic Colors you are using Eight Atomic Colors for example can be driven with a standard 8 unit scroller power supply The scroller power supply...

Page 6: ...02 and MPU 08 will function on any standard worldwide voltage frequency electrical supply You may need to attach a plug on the mains cable for power supply To install a plug on the mains lead The main...

Page 7: ...X channels depending on which control mode it is set for The first DMX channel start channel controls the movement of the gel string and the second channel if selected allows for remote control of the...

Page 8: ...w Please take care when constructing these cables A high percentage of problems are a direct result of poor cable construction Detail of connector wiring typical The correct wiring between male and fe...

Page 9: ...trobe as shown with the top hooks resting on the loose Taptite screws Align the lower front screw holes and replace the lower front screws 5 Tighten all screws 6 Rig Atomic 3000 DMX Colors fixture and...

Page 10: ...evices Ensure that all cables are securely fixed and do not present a safety hazard of any sort MPU 02 MPU 08 Power Supplies The MPU 02 and MPU 08 power supplies are specifically designed for use with...

Page 11: ...he power supply For more information on building a data link please refer to the Atomic DMX 3000 user manual Continue daisy chaining the DMX link by connecting the 5 pin DMX thru socket on the power s...

Page 12: ...Atomic Colors fixture 1 to the XLR 4 input on the Atomic Colors fixture 2 5 Repeat step 4 until you have a maximum of four Atomic Colors fixtures connected together 6 Connect the XLR 4 output on the...

Page 13: ...System connection diagram using the MPU 08 power supply For clarity only the Atomic Colors are shown Atomic Colors User Manual Connecting the unit 13...

Page 14: ...ay it is set up and the value of the DMX signal that the unit is receiving Push Button Operation Use the ACTION RECALL button to scroll through the different modes of operation Use the UP or DOWN butt...

Page 15: ...hrough 180 by pressing and holding the ACTION RECALL button then pressing the DOWN button Display Blank The display can be set to auto blackout after short time This is selected through the mode menu...

Page 16: ...the gel string Second DMX Channel Channel Level Dec Channel Level Speed Level Fan Speed 00 61 0 24 Fn4 62 127 25 49 Fn3 128 190 50 74 Fn2 191 255 75 100 Fn1 Fastest Slowest Gel saver GL Toggle the gel...

Page 17: ...d the ACTION RECALL button and press the UP button for 1 second The Factory default settings are Fan Speed Gel Saver Gel Speed Display Light activated Fan Display Flip Fn4 fast GL1 On SP1 normal dP1 O...

Page 18: ...off the gel saving mode Press UP or DOWN once to switch between on 1 and off 0 Note Ensure that the gel is centered by channel DMX value before implementing this mode or the next color may show throu...

Page 19: ...el Level Dec Channel Level Speed Level Fan Speed See notes below 00 61 0 24 Fn4 62 127 25 49 Fn3 128 190 50 74 Fn2 191 255 75 100 Fn1 Fastest Slowest Important notes 1 Please note that over time the g...

Page 20: ...top before attaching it to the anchors New users are recommended to use the manual loading method until they become familiar with the procedure When installing a gel string always start by applying th...

Page 21: ...ft Use small pieces of flat back tape 25mm 1 to secure the gel to the TUR hubs on either side top and bottom 3 Press the DOWN push button to advance the gel string onto the TUR 4 Continue this process...

Page 22: ...Installation of a gel string Atomic Colors User Manual Changing the gel string 22...

Page 23: ...Gel string construction Atomic Colors User Manual Changing the gel string 23...

Page 24: ...lengths are too long No cable return line Check all scroller speed settings Check the cable length and configuration Ensure there is a cable return line in the system Units have dim display indicator...

Page 25: ...ess 0 075 0 125mm 0 003 0 005 in For the best results use gel strings supplied by your dealer Gel frame capacity 2 11 gel frames Construction Housing Steel Finish Black electrostatic powder coat Insta...

Reviews: