©
2014 Magnum Energy, Inc.
Page 107
Using a PT Controller: Setup
◊
Relay Disengage Delay
–
This setting determines how long the
Relay Disengage Volts
parameter must be continuously maintained before the Aux Relay disengages. Use this set-
ting to delay the time that the Aux Relay disengages once the battery voltage trip point has
been reached—so the Aux Relay does not cycle unnecessarily
.
Default setting:
10 Sec
Range:
0-127 Sec, 1-127 Min (1-sec increments up to 127 sec, then 1-min increments)
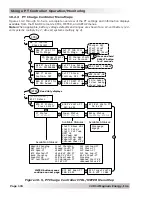
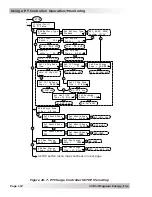
• 06G PT Alarm
–
The alarm in the PT controller can be programmed to be a high or low bat-
tery voltage alarm when VDC is selected from the
CTRL: 04C PT Alarm Control
menu. Use the
following settings to adjust the battery voltage levels (with an adjustable delay) that deter-
mine when the alarm turns on and off.
◊
Set Alarm ON Volts
–
This setting is the battery voltage trip point at which the
Alarm
ON Delay
time begins. Once the battery voltage has reached this setting continuously for the
duration of the
Alarm ON Delay
setting, the alarm will turn on. This setting can be below or
above the
Alarm OFF Volts
setting, depending on if you want the alarm to work as active low
or active high.
Default setting:
10.0 VDC (12V), 20.0 VDC (24V), 40.0 VDC (48V)
Range:
8.0-16.6 (12V), 16.0-33.2 (24V), 32.0-66.4 (48V)
◊
Set Alarm ON Delay
–
This setting determines how long the
Alarm ON Volts
parameter
must be continuously maintained before the alarm turns on. Use this setting to delay the time
that the alarm turns on once the battery voltage trip point has been reached—so the alarm
does not turn on unnecessarily.
Default setting:
10 Sec
Range:
0-127 Sec, 1-127 Min (1-sec increments up to 127 secs, then 1-min increments)
◊
Set Alarm OFF Volts
–
This setting is the battery voltage trip point at which the
Alarm
OFF Delay
time begins. Once the battery voltage has reached this setting continuously for the
duration of the
Alarm OFF Delay
setting, the alarm will turn off. This setting can be below or
above the
Alarm ON Volts
setting, depending on if you want the alarm to work as active low
or active high.
Default setting:
14.0 VDC (12V), 28.0 VDC (24V), 56.0 VDC (48V)
Range:
8.0-16.6 (12V), 16.0-33.2 (24V), 32.0-66.4 (48V)
◊
Set Alarm OFF Delay
–
This setting determines how long the
Alarm OFF Volts
parameter
must be continuously maintained before the alarm turns off. Use this setting to delay the time
that the alarm turns off once the battery voltage trip point has been reached—so the alarm
does not turn off unnecessarily.
Default setting:
10 Sec
Range:
0-127 Sec, 1-127 Min (1-sec increments up to 127 secs, then 1-min increments)
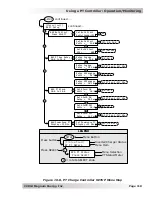
• 06H PowerSave PT Display
–
The PowerSave feature is provided to conserve energy by
turning off any indicator that is not needed. While the PT controller is in the PowerSave mode,
the period (or decimal) of each LED segment (3 periods total) comes on one at a time (from
left to right, then right to left). The rest of the PT display and its four relevant LED indicators
are off to conserve energy. During the day—while charging—the charger status LED will still
be on during PowerSave; at nighttime—since there is no charging—the charger status LEDs
will be off.
The controller goes into PowerSave mode if there hasn’t been a button press or fault message
for a set period of time, depending on the setting (
15 Min
is the default setting). Whenever
the controller goes into PowerSave mode, the display and its relevant LEDs can be reactivated
by pressing any pushbutton.
If the AUX relay is energized, the AUX LED will remain on during PowerSave mode. If there
is a fault during PowerSave, the display and Fault LED will come on and stay on as long as a
fault is active.
Default setting:
15 Min
Range:
OFF, 1-60 Min (1-min increments)

