


46
Chapter 3: Data Source Management
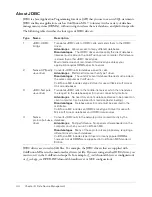
Adding data sources in the Administrator
You use the ColdFusion MX Administrator to quickly add a data source for use in your
ColdFusion applications. When you add a data source, you assign it a data source name (DSN)
and set all information required to establish a connection.
Note:
ColdFusion MX includes data sources that are configured by default. You do not need the
following procedure to work with these data sources.
To add a data source:
1.
In the ColdFusion MX Administrator, select Data & Services > Data Sources.
2.
Under Add New Data Source, enter a Data Source Name; for example, MyTestDSN. The
following names are reserved; you cannot use them for data source names:
■
service
■
jms_provider
■
comp
■
jms
3.
Select a Driver from the drop-down list box; for example, Microsoft SQL Server.
4.
Click Add.
A form for additional DSN information appears. The available fields in this form depend on
the driver that you selected.
5.
In the Database field, enter the name of the database; for example, Northwind.
6.
In the Server field, enter the network name or IP address of the server that hosts the database,
and enter any required Port value; for example, the bullwinkle server on the default port.
7.
If your database requires login information, enter your Username and Password.
Tip:
The omission of required username and password information is a common reason why a
data source fails to verify.
8.
(Optional) Enter a Description.
9.
(Optional) Click Show Advanced Settings to specify any ColdFusion specific settings; for
example, to configure which SQL commands can interact with this data source.
10.
Click Submit to create the data source.
ColdFusion MX automatically verifies that it can connect to the data source.
11.
(Optional) To verify this data source later, click the verify icon in the Actions column.
Note:
To check the status of all data sources available to ColdFusion MX, click Verify All
Connections.
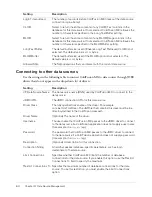
Specifying connection string arguments
The ColdFusion MX Administrator lets you specify connection string arguments for data sources.
In the Advanced Settings page, use the Connection String field to enter name-value pairs
separated by a semicolon. For more information, see the documentation for your database driver.
Note:
As of ColdFusion MX, the
cfquery
connectstring
attribute is not supported.
Summary of Contents for COLFUSION MX 7 - INSTALLING AND USING COLDFUSION...
Page 1: ...COLDFUSION MX7 Configuring and Administering ColdFusion MX ...
Page 6: ...6 Contents ...
Page 10: ......
Page 78: ...78 Chapter 4 Web Server Management ...
Page 84: ...84 Chapter 5 Deploying ColdFusion Applications ...
Page 102: ...102 Chapter 7 Using Multiple Server Instances ...
Page 104: ......
Page 108: ...108 Chapter 8 Introducing Verity and Verity Tools ...


