Q u i c k S t a r t G u i d e
33
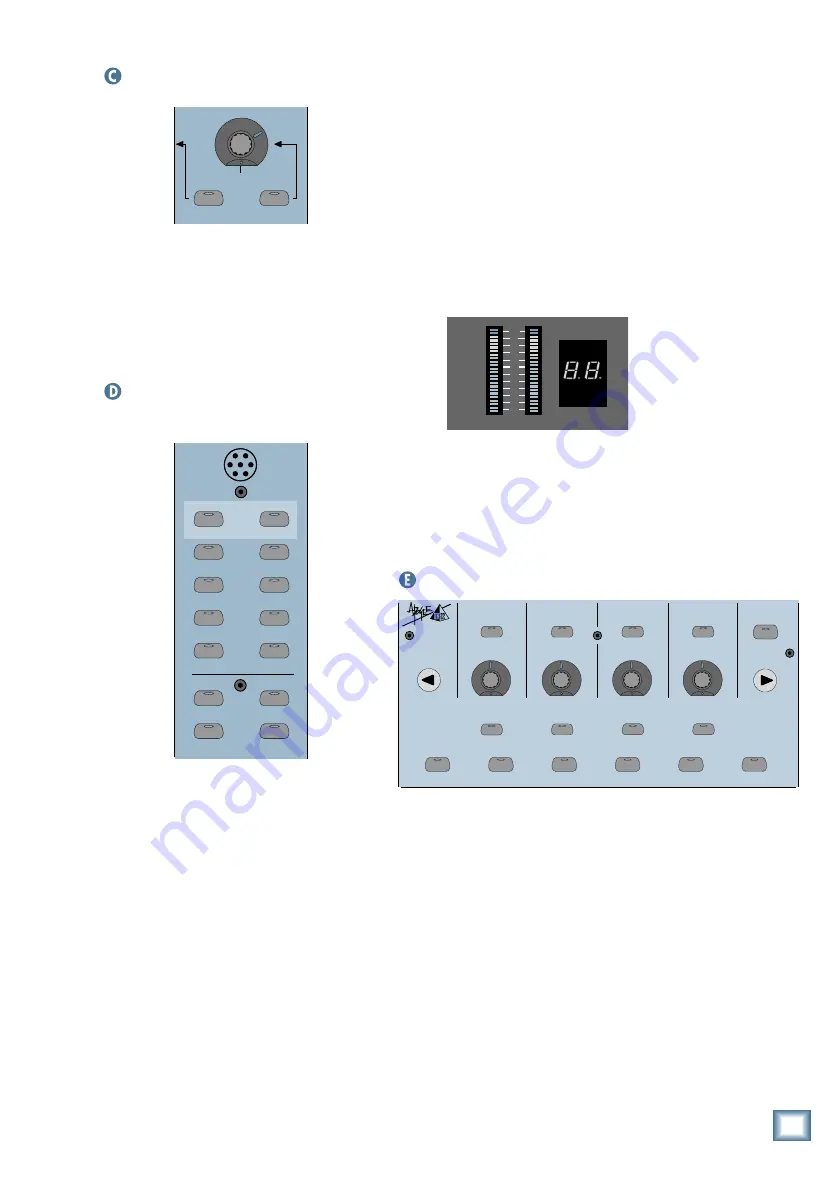
Master V-Pot Section
MASTER
PAN
SOLO
The Master V-Pot acts as a master level con-
trol for the currently selected Aux bus. If the
PAN button is selected, the Master V-Pot be-
comes inactive and all the channel strip V-Pots
become Pan controls. When the Master SOLO
button is selected, the currently selected aux bus
is soloed (it’s possible to solo more than one
aux bus).
V-Pot Assign Section
AUX 7
AUX 8
AUX 5
AUX 6
AUX 1
AUX 3
AUX 2
AUX 4
LEVEL TO TAPE
DIGITAL TRIM
AUX 9
-
10
AUX 11
-
12
PAN
PAN
1-24
1-48
This is where you assign the V-Pots on each
channel to control individual aux send levels.
(See “Using Internal Channel Processing and
Internal Effects” on page 16 for information on
Aux Sends to internal effects.)
Aux 9–10 and Aux 11–12 are stereo aux
sends, and have individual LEVEL and PAN
buttons that assign the channel V-Pots to con-
trol the send level and stereo balance
respectively.
Included in this section are the LEVEL TO
TAPE and DIGITAL TRIM buttons. LEVEL TO
TAPE allows you to use the channel V-Pots to
adjust the Tape Out levels. Since the Tape Out-
puts are pre-fader, this allows you to optimize
the tape send for your tape recorder.
DIGITAL TRIM assigns channel V-Pots to
control digital preamp trim for channels 1–48,
adjusting incoming signals just after the A/D
converters, and before DSP, Fader, and Mute.
Just above the V-Pot Assign Section is the
Talkback Mic. Sounds arriving at this in-panel
microphone are routed to the Cue Mixes. You
can also route the talkback signal to the Studio
Outputs by pressing the TALKBACK TO STU-
DIO button in the Solo/Studio Section. Above
the Talkback Mic are the L-R meters which in-
dicate the signal level at the Main Left and
Right Outputs (when L-R is selected in the
Control Room Section), post-Main Fader. If a
SOLO button is engaged, the L-R Meters indi-
cate the Solo level.
CHANNEL
OL
LEFT
RIGHT
2
50
4
7
10
15
20
25
30
35
40
Right next to the L-R meters is the CHAN-
NEL SELECT Display. This indicates the last
channel selected by any channel select button.
The channel that is indicated in the CHANNEL
SELECT display is also the currently active
channel selected for editing in the Fat Channel
(channels 1–72).
Fat Channel Section
This is where you adjust parameters for the
EQ, compressor, and gate on each channel. You
also select and adjust the settings for the inter-
nal effects here, as well as selecting system
options and general interaction with the
Mackie Real Time OS (operating system), us-
ing the SELECT buttons and V-Pots.
The HELP button is found here, too. Press
the HELP button, then press any other button
to find out more information about how the but-
ton works (this may not be operational in
version 1 of the software).
Use the LOAD PATCH and SAVE PATCH
buttons to open EQ, compressor, gate, and ef-
fects settings you had previously stored, and to
save settings you’ve been working on.
ON
LOW
PREVIOUS
SELECT
LOW MID
HI MID
EQ
COMPRESSOR
GATE
PLUG-INS
LOAD PATCH
SAVE PATCH
SETUP
MEMORY A
MEMORY B
HI
NEXT
SELECT
SELECT
SELECT
HELP
SUPER CD ENCODING
Digital 8•Bus Overview


