background image

is to inform you that an incoming signal is too loud, thereby producing distortion. The
Clip Indicator will turn red when the input is too loud (exceeds 0dB). Reduce the input
level of your audio source so the indicators remain in the blue region rather than the
red. To reset the Clip Indicators, click on each one with your mouse and they will return
to their normal state.
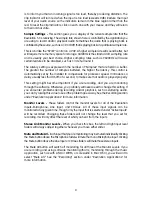
Sample Settings -

This section gives you a display of the current sample rate that the

Revolution 5.1 is receiving. The sample rate shown here is controlled by the application you
are using to record and/or playback audio. Sometimes the audio that is playing back is
controlled by the source, such as a CD or DVD that is playing back at a particular sample rate.

This is a bit like the “SP/EP” control on a VCR. A higher sample rate will sound better, but
will require more memory space for storage. 44100Hz is the standard CD sampling rate
and is usually your best choice. Higher sampling rates such as 96000Hz will cause
certain features to be disabled, such as Circle Surround II. 

The Latency setting is expressed in the number of “Samples” that are held in a buffer.
The greater the number of samples buffered, the higher the latency. This control is
automatically set by the installer to compensate for processor speed. It introduces a
delay, usually less that 1/60th of a second, to make sure that audio is played properly.

This setting might become important if you are recording, and you are monitoring
through the software. Otherwise, you probably will never need to change this setting. If
you encounter problems during recording and/or playback, such as stuttering audio,
you can try raising this value to see if the problem goes away. See the Recording section
under “Revolution Applications” for more information.

Monitor Levels -

These faders control the monitor levels for all of the Revolution

inputs—Microphone, Line Input, and CD/Aux. All of these input signals can be
monitored at any given time, though only the input that is selected under “Active Inputs”
will be recorded. Changing these faders will not change the level that you set for
recording. It will only affect the level of what you hear from the inputs.

Stereo Link Monitor Levels -

When you check this box, the left and right input level

faders will always adjust together whenever you move either slider.

Mute and Mute All -

Each input that you are monitoring may be muted individually. Clicking

the Mute button above the Microphone fader will mute the mono Microphone input. Clicking
the Mute button above the Line Input or CD/Aux faders will mute those stereo inputs.

The Mute All button will switch off monitoring for all three of the Monitor Levels. If you
are recording and using software monitoring (that is, monitoring through the music
application, such as with ASIO or WDM, or coreAudio in Mac OS X), you will want to
select “Mute All.” See the “Recording” section under “Revolution Applications” for
more information.

27

Summary of Contents for REVOLUTION 5.1

Page 1: ...REVOLUTION 5 1 USER GUIDE English...

Page 2: ...Inputs and Outputs 17 Line Inputs 17 Mic Input 17 CD Aux Input 17 Headphone Output Jack 18 Speaker Output Jacks 18 Digital Output Jack 19 Explanation of Surround Formats 19 Revolution 5 1 Control Pan...

Page 3: ...onitor level control for all inputs line outputs and headphone output Pro audio playback performance Dynamic Range 109dB A weighted Signal to Noise Ratio 109dB A weighted THD N 0 00185 95dB Supports D...

Page 4: ...eration Apple Macintosh G4 733MHz QS CD ROM Drive Mac OS 9 2 2 or later Mac OS X version 10 2 6 or later 256 MB RAM Recommended Apple Macintosh G4 800MHz QS or better DVD ROM Drive Mac OS X version 10...

Page 5: ...back software provided on the included CD ROM See Appendix A for WinDVD installation instructions Windows XP Installation 1 Power on your computer and place the Revolution 5 1 Drivers CD ROM in your c...

Page 6: ...ance of capable devices You may disable these settings if you know your drives do not support Digital CD audio or DMA modes Click Next once you have made your choices and the installation will continu...

Page 7: ...nu and then choose Control Panel 2 Open Sounds and Audio Devices then click the Audio tab 3 Under Sound Playback the default device should say Revolution If it does not say Revolution then drop down t...

Page 8: ...o not support Digital CD audio or DMA modes Click Next once you have made your choices and the installation will continue 4 Click Finish to complete the driver installation procedure Windows Me Instal...

Page 9: ...s for enabling digital CD audio for CD DVD drive s and DMA mode for CD DVD drive s are checked We recommend that you leave these settings enabled as they can improve the performance of capable devices...

Page 10: ...her you want to keep the existing file Windows 98SE Installation 1 Power on your computer and place the Revolution 5 1 Drivers CD ROM in your computer s CD ROM tray If you ve not yet installed the Rev...

Page 11: ...on will continue 5 Once the installation is complete you must choose one of the following Choose to Restart if your Revolution 5 1 card is already installed inside your PC Choose to Shutdown if you ha...

Page 12: ...Audio Revolution 5 1 1 Go to the Start menu and then choose Control Panel 2 Open Sounds and Multimedia on Windows Me and 2000 or Multimedia on Windows 98SE then click the Audio tab 3 Under Sound Playb...

Page 13: ...n 5 1 as your default output device You will also see a Control Panel within the Apple menu named M Audio Revolution 5 1 that you can use to configure the Revolution 5 1 card Refer to the section titl...

Page 14: ...lock icon in the lower left corner of the window that states Click The Lock To Make Changes 6 Enter your password and click OK 7 The next window welcomes you to the installation process Click Continue...

Page 15: ...fter your system has restarted open the Apple Menu and choose System Preferences Select the Sound preference panel and click the Output tab Select Revolution 5 1 Analog 5 1 Out to choose the Revolutio...

Page 16: ...ll install the Revolution 5 1 into If you are replacing another PCI card with the Revolution 5 1 remove this card instead For optimal IRQ and data throughput reasons on Windows systems we recommend th...

Page 17: ...Right speakers located to the left and right of your computer monitor If you have a two speaker stereo setup this is the jack to use 5 Center Subwoofer orange This line level output connects to powere...

Page 18: ...line input This input allows you to record CDs audio from video instruments or any other sound source that outputs line level audio with up to 96kHz 24 bit audiophile quality sampling You can set the...

Page 19: ...is actually the output for both the Center and the Subwoofer channels Most multimedia speakers use 1 8 stereo input jacks If your speaker or receiver jacks are of the RCA type instead you can purchase...

Page 20: ...dtrack It will play out of the left and right speakers Headphones are generally stereo or 2 0 devices 2 1 This is a stereo soundtrack incorporating a separate subwoofer indicated by the 1 Generally th...

Page 21: ...e tabs at the top of the Control Panel display Here is a brief overview of these items The Current Speaker Set pull down menu includes presets for many popular speaker models Click and hold on this me...

Page 22: ...ch icon by right clicking on it and selecting Remove Quick Switch Setting Button and you may replace or rearrange the Quick Switch icons by clicking on the icon next to Current Set and dragging that i...

Page 23: ...uire full CPU power Speaker Size This setting tells the driver software what size your speakers are Select the speaker size that best describes your L R Front Center and L R Surround speakers Large 12...

Page 24: ...higher is required for the test tone function to work in any Windows OS DirectX 8 1 is supplied on the Applications CD included with your Revolution 5 1 card In the DirectX folder on the Applications...

Page 25: ...nel TruSurround XT and Circle Surround II TruSurround XT takes a multi channel source and plays it through two speakers in a way that makes it sound like you re playing it back through multiple speake...

Page 26: ...problem of playing 5 1 multi channel content from a two channel source It delivers a compelling surround sound experience through any multi channel playback system Use this feature to turn stereo sour...

Page 27: ...will be the one that you are able to record All inputs on the other hand can be monitored simultaneously see Monitor Levels on the next page NOTE While the Microphone Input is a mono input it is sent...

Page 28: ...s played properly This setting might become important if you are recording and you are monitoring through the software Otherwise you probably will never need to change this setting If you encounter pr...

Page 29: ...ructions on installation To set up WinDVD 5 for Windows click on the Subpanel button this button looks like an arrow pointing right from within the WinDVD 5 application Then choose Audio Mode and clic...

Page 30: ...ay 5 1 surround music and movies through the Revolution 5 1 As long as the Revolution 5 1 is selected as your default audio device Media Player will play surround recordings through the Revolution 5 1...

Page 31: ...ng if you would like to reduce the latency while you are recording and monitoring through your software often referred to as software monitoring If your recording or playback stutters or glitches simp...

Page 32: ...you may need to search for beta version software drivers which provide increased support for the new software A few features are disabled when a 192kHz or 96kHz sampling rate is selected If a feature...

Page 33: ...alk 100dB Mic In Dynamic Range 101dB A weighted Signal to Noise Ratio 101dB A weighted THD N 0 00284 91dB left 0 00245 92dB right Frequency Response 1 8dB 100Hz to 18kHz Line In Dynamic Range 102dB A...

Page 34: ...icon 2 The Welcome to WinDVD Setup window will pop up Click the Next button 3 A License Agreement box will pop up Assuming that you agree with the terms click the Yes button on the bottom right hand c...

Page 35: ...al input then select S PDIF 5 Set the Audio Speaker Configuration according to how many speakers you are connecting to the Revolution 5 1 s outputs Click OK 6 Now the setup is complete Place a DVD vid...

Page 36: ...QEMP MRJS Q EYHMS JV WWMWXERGI 8IGLRMUYI 4 1 WWMWXERGI 8IGLRMUYI I QEMP WYTTSVX Q EYHMS JV QEG Q EYHMS JV JE 7MXI IF Q EYHMS JV 1 YHMS IVQER YLEPPQERH 3LVMRKIR IVQER 8IGLRMGEP 7YTTSVX I QEMP WYTTSVX Q...

Reviews: