background image

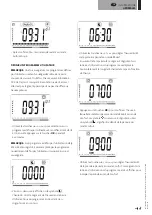
•  Si un programme différent doit être défini pour le jour 

suivant, appuyez sur la touche «

+

» ou «

» jusqu’à ce que 

l’inscription «

no

» soit affichée. Appuyez sur la touche «

OK

» 

pour confirmer.

•  Le numéro du jour sera incrémenté au jour suivant et 

l’heure sera remise à «00:00».

•  Lorsque tous les jours ont été définis, l’inscription «

SAVE

» 

sera affiché. Pour enregistrer le programme, appuyez sur la 
touche «

OK

» pour confirmer.

•  Si le programme ne doit pas être sauvegardé, afin d’éviter 

de supprimer tout autre programme préalablement défini 
par l’utilisateur, appuyez sur la touche représentant une 
flèche vers la gauche «

». L’écran revient alors à l’écran de 

sélection de programmes.

RADIATEUR CONNECTÉ À UNE HORLOGE 

CENTRALE PAR UN FIL OU CONNECTÉ 

SANS FIL À UNE CENTRALE LVI TOUCH E3

•  Lorsque le radiateur est connecté à un programmateur 

filaire, le mode Auto doit être sélectionné sur le radiateur 
afin qu’il suive les commandes du programmateur.

REMARQUE: 

Le programme de préréglage d1 doit être 

sélectionné.

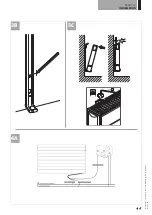
CENTRALE DE PROGRAMMATION CÂBLÉ 2 ORDRES  
(figure 4A)

MODE AUTOMATIQUE  

•    Le mode confort/température est actif. L’icône   , dans 

la section 1 de l’écran LCD, est constamment affichée.

•    Le mode réduit/température est actif. L’icône  , dans la 

section 9 de l’écran LCD, clignote et le symbole   est 
constamment affiché.

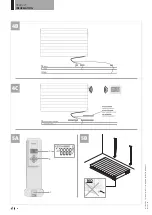
CENTRALE DE PROGRAMMATION CÂBLÉ 6 ORDRES  
(figure 4B)

MODE AUTOMATIQUE  

•    Le mode confort/température est actif. L’icône   , dans 

la section 1 de l’écran LCD, est constamment affichée.

•    Le mode réduit/température est actif. L’icône   , dans 

la section 9 de l’écran LCD, clignote et le symbole   est 
constamment affiché.

•    Le mode protection contre le gel/température est actif. 

L’icône   , dans la section 9 de l’écran LCD, clignote et le 
symbole   est constamment affiché.

•    Le mode veille est actif. L’icône  , dans la section 9 de 

l’écran LCD, clignote et le symbole   est constamment 
affiché.

• 

-1

  Le mode confort/température -1 °C est actif. L’icône 

-1

 , dans la section 9 de l’écran LCD, clignote et le  

symbole   est constamment affiché.

• 

-2

  Le mode confort/température -2°C est actif. L’icône 

-2

 , dans la section 9 de l’écran LCD, clignote et le 

symbole   est constamment affiché.

LVI TOUCH E3 (figure 4C)

•  Lorsque le radiateur est associé à une centrale Touch E3, il 

suit toutes les commandes provenant de cette dernière, 
même s’il n’est pas en mode Auto.

•  Veuillez consulter les instructions fournies avec la 

centrale Touch E3 et la section 4 de ce manuel pour savoir 
comment associer le radiateur et la centrale Touch E3.

FR


INFORMATIONS  

GÉNÉRALES

13

YA

LI P

A

R

A

D

A - Y

A

LI R

A

M

O GU

ID

E D

’IN

ST

A

LL

AT

IO

N E

T D

’U

TI

LI

SA

TI

O

N

201

8-

02

-01

YA

LI P

A

R

A

D

A - Y

A

LI R

A

M

O GU

ID

E D

’IN

ST

A

LL

AT

IO

N E

T D

’U

TI

LI

SA

TI

O

N

201

8-

02

-01

Summary of Contents for YALI PARADA

Page 1: ...ION EN RÉVOLUTION CLASSE II 230V 50 HZ NL MONTAGE EN BEDIENINGSHANDLEIDING EEN NIEUWE GENERATIE GEEN EVOLUTIE MAAR REVOLUTIE KLASSE II 230V 50 HZ GB INSTALLATION AND OPERATING MANUAL A NEW GENERATION THAT TURNS EVOLUTION INTO A REVOLUTION CLASS II 230V 50 HZ YALI PARADA YALI RAMO ...

Page 2: ...m Min 100mm Min 100mm B mm C mm 46 473 A mm 100 150 100 150 46 173 H mm 300 600 A C B H A PRODUCT INFORMATION H mm A mm B mm C mm 300 100 150 46 173 600 100 150 46 473 2 YALI PARADA YALI RAMO INSTALLATION AND OPERATING MANUAL 2018 02 01 ...

Page 3: ...PRODUCT INFORMATION CLICK CLICK 3mm 3C 3B 4A 3 YALI PARADA YALI RAMO INSTALLATION AND OPERATING MANUAL 2018 02 01 ...

Page 4: ...PRODUCT INFORMATION 4B 5A 5B 4C A B C NO 4 YALI PARADA YALI RAMO INSTALLATION AND OPERATING MANUAL 2018 02 01 ...

Page 5: ... 8 9 10 11 12 13 14 15 16 17 18 19 20 21 22 23 4 24 0h 1 2 3 4 5 6 7 8 9 10 11 12 13 14 15 16 17 18 19 20 21 22 23 5 24 0h 1 2 3 4 5 6 7 8 9 10 11 12 13 14 15 16 17 18 19 20 21 22 23 6 24 0h 1 2 3 4 5 6 7 8 9 10 11 12 13 14 15 16 17 18 19 20 21 22 23 7 24 D9 0h 1 2 3 4 5 6 7 8 9 10 11 12 13 14 15 16 17 18 19 20 21 22 23 1 24 0h 1 2 3 4 5 6 7 8 9 10 11 12 13 14 15 16 17 18 19 20 21 22 23 2 24 0h 1 ...

Page 6: ...l appareil ni n assureront son entretien FR CONSIGNES DE SÉCURITÉ CERTAINS COMPOSANTS DE CE PRODUIT PEUVENT DEVENIR TRÈS CHAUDS ET PROVOQUER DES BRÛLURES UN SOIN PARTICULIER DEVRAIT ÊTRE PRIS QUAND DES ENFANTS OU DES PERSONNES VULNÉRABLES SE TROUVENT À PROXIMITÉ POUR ÉVITER TOUT RISQUE DE SURCHAUFFE NE PAS COUVRIR LE RADIATEUR NE PAS COUVRIR SIGNIFIE QUE LE RADIATEUR NE DOIT PAS ÊTRE UTILISÉ POUR ...

Page 7: ... fixation pour sécuriser le radiateur sur le mur le type et l état du mur en lui même ainsi que toutes contraintes ou poids potentiellement additionnel Les fixations fournies sont uniquement adaptées pour des murs en bois massif en briques en béton ou en ossature bois dans laquelle la fixation est directement en contact avec la structure Toutes les parois considérées ont une finition ne dépassant ...

Page 8: ...teur de demande de chaleur 8 Indicateur du Comportement ou barre d informations sur le programme 9 Indicateur de mode en mode Automatiques 10 Indicateur du jour de la semaine 11 Indicateur de connexion RF avec Touch E3 12 Symbole de main 13 Indicateur de fonction Fenêtre ouverte Clavier B figure 5A Touche de navigation droite Touche de navigation gauche Touche plus Touche moins OK Touche de valida...

Page 9: ...de confort doit toujours être supérieure à la température réduite Si il est impossible de réduire la température de confort à la valeur désirée abaisser la température en mode Reduit à une valeur encore plus faible S il n est pas possible d augmenter la température réduite à la valeur désirée maximum 19 C augmenter la température en mode confort à une valeur encore plus haute COMMENT VISUALISER LA...

Page 10: ...uyant deux fois sur la touche OK ATTENTION Sachez que si votre maison n est pas chauffée vos canalisations pourraient geler Pour protéger le produit et la maison à des températures très basses nous vous recommandons d utiliser le mode Hors gel ATTENTION Dans ce mode les radiateurs sont encore reliés au réseau électrique MODE DE SÉLECTION DE PROGRAMMES REMARQUE Il est impossible d accéder au mode d...

Page 11: ...cran ci dessus sera affiché où le symbole l heure 00 00 et le segment de l heure dans la barre d informations du programme en bas de l écran clignoteront en continu Utilisez les touches et pour régler l heure d arrêt de la première période en mode Réduit En suivant le temps écoulé le segment clignotant sur la barre d informations du programme se déplacera horizontalement le long de l échelle de te...

Page 12: ...me vont s afficher pour indiquer la période en mode Confort Appuyez sur la touche OK pour confirmer l heure à laquelle le radiateur passera du mode Confort au mode Réduit Le symbole commence à clignoter au lieu du symbole signifiant le début de la période du mode Réduit S il est nécessaire de programmer plus de deux périodes en mode Confort répétez les étapes précédentes Lorsque toutes les période...

Page 13: ...empérature est actif L icône dans la section 9 de l écran LCD clignote et le symbole est constamment affiché CENTRALE DE PROGRAMMATION CÂBLÉ 6 ORDRES figure 4B MODE AUTOMATIQUE Le mode confort température est actif L icône dans la section 1 de l écran LCD est constamment affichée Le mode réduit température est actif L icône dans la section 9 de l écran LCD clignote et le symbole est constamment af...

Page 14: ...neau avant REMARQUE En vue d utiliser de façon permanente le radiateur à 60 C ou 75 C au maximum le facteur de correction suivant devrait être appliqué pour la puissance INDICE DANS LA SECTION 2 TEMPÉRATURE DE SURFACE PANNEAU SIMPLE PANNEAU DOUBLE 1 60 C max 0 55 0 80 2 75 C max 0 70 0 90 3 90 C max 1 1 Par exemple un panneau simple 1000 Watt programmé à la puissance correspondant à 75 C produira ...

Page 15: ... AFFICHÉS Appuyez sur OK pour saisir ce paramètre Sélectionnez avec ou et validez en appuyant sur OK C Celsius F Fahrenheit 02 __ _ CALIBRAGE DE LA SONDE INTERNE Le calibrage doit être fait après avoir travaillé 1 journée avec la même température de consigne selon la description suivante Mettre un thermomètre dans la pièce à 1 5 m de distance du sol comme le thermostat et vérifier la température r...

Page 16: ...de début du chauffage varient pour chaque période de chauffage lorsque cette fonction est activée 07 SLA non utilisé Le réglage en usine est mis sur no et ne doit pas être modifié 08 CLr RÉGLAGE D USINE Appuyez sur la touche OK et la maintenir enfoncée pendant 6 secondes pour remettre les températures de consigne et les paramètres utilisateur de ce menu aux réglages d usine par défaut REMARQUE L a...

Page 17: ...0335 2 30 EN 62233 EN 55014 1 EN 55014 2 EN 61000 3 2 EN 61000 3 3 EN 60529 LV Directive 2006 95 CE EMC Directive 2004 108 CE R TTE Directive 1999 5 CE RoHS Directive 2002 95 CE ECO Directive 2009 125 CE CERTIFICATS NF Electricité Sécurité NF Electricité Performance Hauteur limitée à 600 mm Veuillez contacter le fabricant ou son distributeur en cas de fuite Au moment de mettre le radiateur au rebu...

Page 18: ... tussen de 3 en 8 jaar mogen het toestel niet aansluiten aan de stroomvoorziening noch het toestel bedienen of reinigen of er onderhoud aan plegen NL VEILIGHEIDS INFORMATIE BEPAALDE DELEN VAN DIT PRODUCT KUNNEN ERG HEET WORDEN EN BRANDWONDEN VEROORZAKEN ALS ER KINDEREN OF KWETSBARE PERSONEN IN DE BUURT ZIJN DIENT ER EXTRA GOED OPGELETTE WORDEN VOORKOM OVERVERHITTING DOOR DE RADIATOR NIET AFTE DEKK...

Page 19: ... type en de staat van de wand zelf en eventuele bijkomende potentiële krachten of gewichten De meegeleverde bevestigingsmaterialen zijn uitsluitend bedoeld voor bevestiging aan wanden van massief hout baksteen of beton of aan houten systeemwanden waar de bevestiging in het hout plaatsvindt De wand waaraan een radiator zal worden bevestigd mag niet afgewerkt zijn met een laag dikker dan 3 mm Voor a...

Page 20: ...ebehoefte indicator 8 Gedrag indicator of programma informatiebalk 9 Modus indicatoren in Auto modus 10 Dag van de week indicator 11 Aanduiding RF aansluiting met Touch E3 12 Handpictogram 13 Raam open functie indicator Toetsenpaneel B afbeelding 5A Rechter navigatietoets Linker navigatietoets Plus toets Min toets OK Bevestigingstoets HOE U DETIJD INSTELT Bij de eerste inschakeling gaat de digital...

Page 21: ... de verlaagde temperatuur Als het niet mogelijk is om de comforttemperatuur tot de gewenste waarde te verlagen moet u de verlaagde temperatuur op een nog lagere waarde instellen Of als het niet mogelijk is om de verlaagde temperatuur tot de gewenste waarde te verhogen maximaal 19 C moet u de comforttemperatuur op een nog hogere waarde instellen WEERGEVEN VAN DE GEMETEN KAMERTEMPERATUUR Druk tweema...

Page 22: ... ieder willekeurig moment zien wat de gemeten kamertemperatuur is LET OP Uw leidingen kunnen bevriezen wanneer u uw pand niet verwarmt Ter bescherming van het product en uw pand in geval van extreem lage temperaturen raden wij u aan de Vorstvrije modus te gebruiken LET OP In deze modus zijn de radiatoren nog steeds met de stroomvoorziening verbonden PROGRAMMAKEUZEMODUS NOOT Als het apparaat is aan...

Page 23: ... de gebruiker gedefinieerd programma wordt opgeslagen Het bovenstaande scherm zal worden afgebeeld waarbij het symbool de tijdwaarde 00 00 en het tijdsegment in de programma informatiebalk onderaan het scherm constant zullen knipperen Gebruik de or knoppen en stel de tijd af waarop de eerste Gereduceerde periode zal eindigen Net als de tijdindexen zal het knipperende segment op de programma inform...

Page 24: ...evestigen waarop de modus zich zal wijzigen van Comfort in Gereduceerd Het symbool gaat knipperen in plaats van het symbool wat de start van deze Gereduceerde periode aangeeft Als er meer dan twee Comfort periodes gewenst zijn moet u de vorige stappen herhalen Als alle Comfort periodes zijn gedefinieerd kunt u de knop gebruiken om voorbij het tijdstip 23 30 te gaan Het bovenstaande scherm zal word...

Page 25: ... mode temperatuur is actief De in gedeelte 1 van het lcd scherm wordt constant afgebeeld Gereduceerde modus temperatuur is actief De in gedeelte 9 van het lcd scherm knippert en het symbool wordt constant afgebeeld Vorstbeschermingsmodus temperatuur is actief De in gedeelte 9 van het lcd scherm knippert en het symbool wordt constant afgebeeld Stand bymodus is actief De in gedeelte 9 van het lcd sc...

Page 26: ...PERVLAKTE TEMPERATUUR ENKEL PANEEL DUBBEL PANEEL 1 60 C max 0 55 0 80 2 75 C max 0 70 0 90 3 90 C max 1 1 Oftewel Een 1000 Watt radiator met één paneel en ingesteld op een maximale oppervlakte temperatuur van 75 C zal maximaal 700 Watt leveren Een 1000 Watt radiator met dubbel paneel en ingesteld op een maximale oppervlakte temperatuur van 60 C zal maximaal 800 Watt leveren U dient rekening te hou...

Page 27: ...DE VOELER Het kalibreren dient uitgevoerd te worden nadat het systeem minimaal 1 dag met dezelfde ingestelde temperatuur heeft gewerkt Bij het kalibreren dient u als volgt te werk te gaan Plaats een thermometer in de ruimte op 1 5 m boven de vloer net als de thermostaat en controleer na 1 uur wat de daadwerkelijke temperatuur is Als u vervolgens naar de kalibratieparameter gaat wordt de daadwerkel...

Page 28: ...tijd te bereiken NOOT Verwarmingsstarttijden zullen verschillen voor elke verwarmingsperiode wanneer deze functie is ingeschakeld 07 SLA ongebruikt Fabrieksinstelling is no en moet niet gewijzigd worden 08 CLr FABRIEKSINSTELLINGEN Houd de OK toets gedurende 10 seconden ingedrukt om de ingestelde temperaturen en de gebruikers parameters in dit menu terug te zetten naar de fabrieksinstellingen NOOT ...

Page 29: ...jaar geldt 7 TECHNISCHE ECIFICATIES OMGEVING Bedrijfstemperatuur Opslagtemperatuur 30 C tot 50 C 30 C tot 70 C TEMPERATUURBEREIK Comfortmodus Verlaagde modus Vorstbeveiligingsmodus 5 5 C tot 30 0 C moet hoger liggen dan de Verlaagde modus 5 0 C tot 19 0 C moet lager liggen dan de Comfortmodus 5 0 C tot 10 0 C ELEKTRISCHE ISOLATIE Klasse II ELEKTRISCHE BESCHERMING IP44 STROOMTOEVOER 230 VAC 50 HZ R...

Page 30: ...nvolved Children aged from 3 years and less than 8 years shall not plug in regulate and clean the appliance or perform user maintenance WASTE DISPOSAL ACCORDING TO THE WEEE DIRECTIVE 2002 96 EC THE SYMBOL ON THE PRODUCT LABEL INDICATES THAT THE PRODUCT MAY NOT BE HANDLED AS DOMESTIC WASTE BUT MUST BE SORTED SEPARATELY WHEN IT REACHES THE END OF ITS USEFUL LIFE IT SHALL BE RETURNED TO A COLLECTION ...

Page 31: ...ditional potential forces or weights prior to finalising installation The fixing materials provided are only intended for installation on walls made of solid wood bricks concrete or on timber frame stud walls where the fixing is directly into the timber All walls being considered should have no more than a maximum of 3 mm wall finishing For walls made of other materials for example hollow bricks p...

Page 32: ...t navigation key Left navigation key Plus key Minus key OK Validation key HOWTO SETTHETIME When first powered on the digital control enters into time setting mode Time setting mode can also be entered into by pressing the OK key for 3 seconds while in any of the heating modes NOTE If power is lost from a power cut or the product is switched off even just for a few seconds the time and day setting ...

Page 33: ...he comfort temperature HOW TO VIEW THE MEASURED ROOM TEMPERATURE Press the OK key twice On the first press the screen will illuminate and on the second press the measured room temperature will be displayed together with the room temperature icon in section 5 of the LCD display The display will return automatically to the active operation mode after 8 seconds HEATING When the radiator is heating th...

Page 34: ...LVITouch E3 it is not possible to enter into the program selection mode as the clock symbol is made unavailable SELECTING A PROGRAM Use the or keys to select one of the preset programs d1 to d9 picture 6 or one of the user definable programs U1 to U4 The program number will blink The program sequence for the current day is displayed along the bottom of the screen Press the OK key to confirm the pr...

Page 35: ...Comfort The symbol will start to blink instead of the symbol signifying the start of this Comfort period Use the and keys to adjust the time at which the first Comfort period will end The segments in the program information bar will populate to show the Comfort period Press the OK key to confirm the time at which the mode will change over from Comfort to Reduced The symbol will start to blink inst...

Page 36: ...program onto the next day press the OK key Press the OK key for any further days the program is to be copied over to If a different program is to be defined for the next day press the or key until the word no is displayed Press the OK key to confirm The day number will increment to the next day and the time will be set back to 00 00 When all of the days have been defined the word SAVE will be disp...

Page 37: ...e with the OK key Set the desired temperature using the and keys and confirm with the OK key Adjust the period using the and keys between 1 hour and 44 days Confirm with the OK key The icon will start to blink and the desired temperature and hand icon are displayed until the end of the set period If you want to stop the timer before the end of the set period select another mode using the left or r...

Page 38: ...he or keys and confirm your adjustment with the OK key To exit the parameter menu choose the parameter END and press the OK key DEFAULT VALUE OTHER POSSIBILITIES 00 rFi WIRELESS RADIO INITIALIZATION PAIRING Press OK to enter this initialization sequence Select with or the radio communication type and confirm by pressing the OK key rF un unidirectional communication NOT USED rF bi bidirectional com...

Page 39: ... an open window is detected room temperature drops by more than 2 C in less than 10 minutes The open window icon will start to blink and continue to blink as long as the function is active To return to the previous or automatic mode press the OK key twice If no manual intervention has been detected the radiator will check automatically after 30 minutes if the room temperature has increased window ...

Page 40: ...gent When the radiator reaches the end of its service life follow the regulations concerning the disposal of oil 6 WARRANTY The product is covered by a 10 years warranty except for the electrical and electronic components that are covered by a 2 year warranty 7 TECHNICAL CHARACTERISTICS ENVIRONMENTAL Operating temperature Storage temperature 30 C to 50 C 30 C to 70 C SETTING TEMPERATURE RANGE Comf...

Page 41: ...s only manual heat charge control with integrated thermostat N A manual heat charge control with room and or outdoor temperature feedback N A electronic heat charge control with room and or outdoor temperature feedback N A fan assisted heat output N A Type of heat output room temperature control single stage heat output and no room temperature control no two or more manual stages no room temperatu...

Page 42: ...LVI_ YALI_PARADA_RAMO_2018 02 01 ...

Reviews: