


YA
LI P
A
R
A
D
A - Y
A
LI R
A
M
O I
N
ST
A
LL
AT
IO
N A
N
D O
PE
R
AT
IN
G M
A
N
U
A
L
201
8-
02
-01
YA
LI P
A
R
A
D
A - Y
A
LI R
A
M
O I
N
ST
A
LL
AT
IO
N A
N
D O
PE
R
AT
IN
G M
A
N
U
A
L
201
8-
02
-01
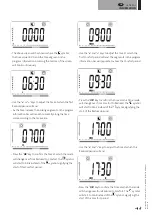
WIRED 2 ORDER PROGRAMMER (Picture 4A)
AUTOMATIC MODE
• Comfort mode/temperature is active. The , in
section 1 of the LCD display, is constantly displayed.
• Reduced mode/temperature is active. The , in
section 9 of the LCD display, blinks and the symbol
is constantly displayed.
WIRED 6 ORDER PROGRAMMER (Picture 4B)
AUTOMATIC MODE
• Comfort mode/temperature is active. The , in
section 1 of the LCD display, is constantly displayed.
• Reduced mode/temperature is active. The , in
section 9 of the LCD display, blinks and the symbol
is constantly displayed.
• Frost protection mode/temperature is active. The , in
section 9 of the LCD display, blinks, and the symbol is
constantly displayed.
• Standby mode is active. The , in section 9 of the LCD
display, blinks, and the symbol is constantly displayed.
•
-1
Comfort mode/temperature -1°C is active. The
-1
, in
section 9 of the LCD display, blinks, and the symbol is
constantly displayed.
•
-2
Comfort mode/temperature -2°C is active. The
-2
, in
section 9 of the LCD display, blinks, and the symbol is
constantly displayed.
LVI TOUCH E3 (Picture 4C)
• When paired with a Touch E3, the radiator will follow all
commands of the Touch E3, even if it Auto mode is not
selected on the radiator.
• Please see the instructions supplied with the Touch E3 and
section 4 of this manual on how to pair the radiator with
the Touch E3.
OTHER FUNCTIONS
TIMER FUNCTION
The timer function allows you to override the
programmed settings (temperature and operating mode)
for a chosen period of time, starting from the moment
that the timer function is activated.
• Move the frame cursor to the timer icon.
• Confirm your choice with the “
OK
” key.
• Set the desired temperature using the“
+
” and “
–
” keys
and confirm with the “
OK
” key.
• Adjust the period using the “
+
” and “
–
“ keys between 1
hour and 44 days. Confirm with the “
OK
” key.
• The icon will start to blink and the desired
temperature and hand
icon are displayed until the
end of the set period.
• If you want to stop the timer before the end of the set
period, select another mode using the left “
” or right
“
” navigation key and confirm with the “
OK
” key.
FRONT PANEL TEMPERATURE LIMITATION
This power setting can be used to limit the output of the
heating element in the front panel and as a consequence
will limit the surface temperature of the front panel.
• Move the frame cursor to the power icon
.
• Confirm your choice with the “
OK
” key.
• Use the “
+
” and “
–
” keys to change the output of the
front panel from 100% (Index 3 in section 2 of the LCD -
Factory setting) to 70% (Index 2 in section 2 of the LCD)
or 55% (Index 1 in section 2 of the LCD) (corresponding
to a maximum surface temperature of 90, 75 or 60°C)
and confirm with the “
OK
” key.
• The thermostat will return to the “Comfort” mode.
• The display will then show in the right upper corner
(section 2 of the LCD) the index corresponding to the
maximum surface temperature of the front panel.
NOTE:
When considering the permanent use of the
radiator at 60°C or 75°C maximum, the following
correction factor should be applied for the output.
INDEX IN
SECTION 2
SURFACE
TEMPERATURE
SINGLE
PANEL
DOUBLE
PANEL
1
~ 60°C max
~ 0.55
~ 0.80
2
~ 75°C max
~ 0.70
~ 0.90
3
~ 90°C max
1
1
E.g. A 1000 Watt single panel programmed for a
maximum surface temperature of 75°C will deliver
maximum 700 Watts. A 1000 Watt double panel
programmed for a maximum surface temperature of
60°C will deliver maximum 800 Watts. These values
should be considered when selecting the number and
type of panels to cover the calculated heat losses.
37
GB
GENERAL
INFORMATION


