background image

14

Luma 300 Series Wi-Fi Cube IP Camera

Physical Installation

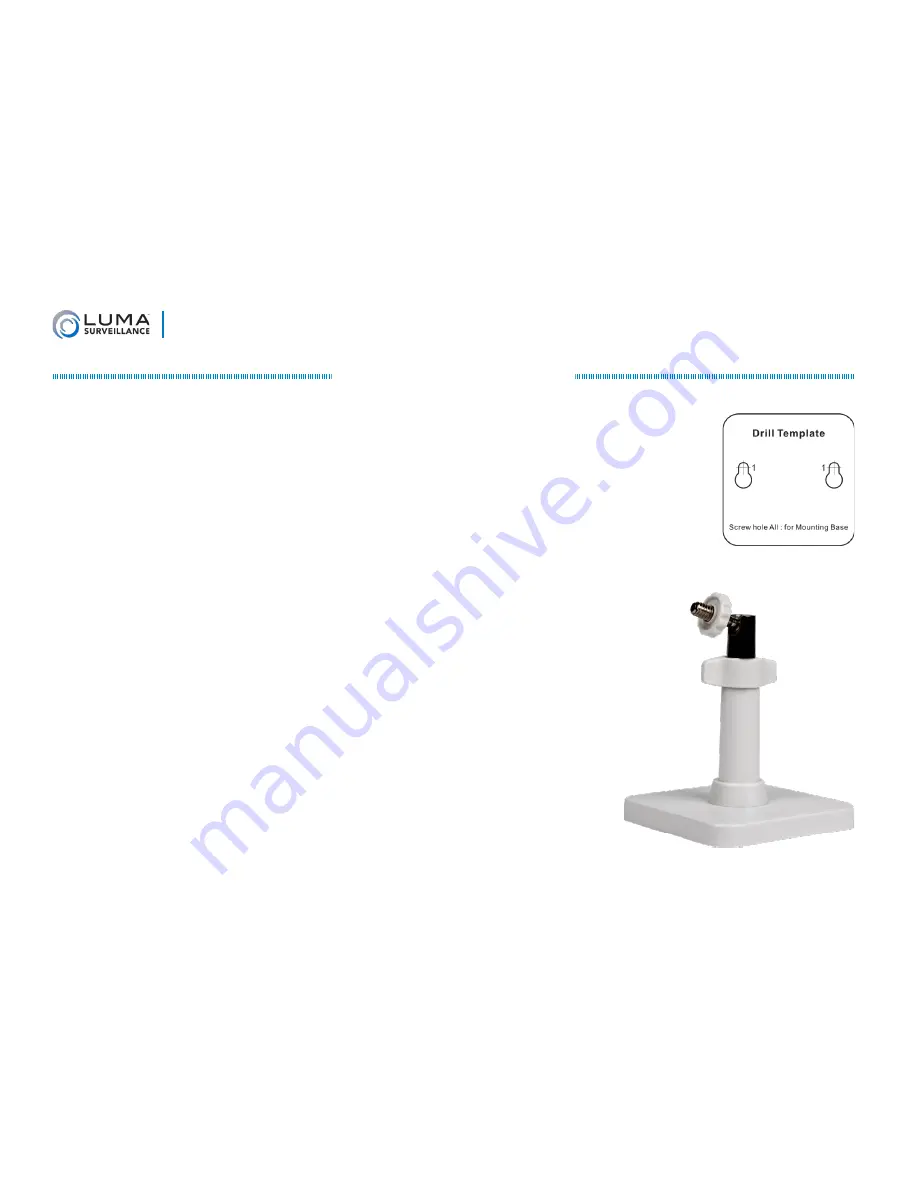
1.  If you intend to secure the camera’s base to a wall, drill pilot holes for your screws 

using the supplied template shown. Ensure that the template is upright when drilling. 
For mounting on a flat surface, no drilling is necessary. 

We do not recommend 

mounting this unit on a ceiling, as it is difficult to mount securely.


2.  Mount the camera base. 
3.  Loosen the locking wingnut on the stand. Orient the mounting arm in the desired 

direction, then tighten the locking wingnut. 

4.  Loosen the camera lock nut as far as it can go. Screw the camera onto the mounting arm. Ensure that it is 

upright. When the camera is oriented properly, tighten the camera lock nut. 

5.  Attach power to the camera. 


}

If using PoE,

 attach the RJ45 cable to the connector.  


}

If using 12V DC 

for power, attach the power supply to the input. 

6.  If you will be using the alarm in or alarm out capabilities, insert those 

wires into the terminals as marked (input, output, and ground).

Locking 

Wingnut

Camera 

Lock Nut

Summary of Contents for 300 Series Cube

Page 1: ...300 Series Cube Wireless HD Surveillance Camera with Microphone Installation Manual Important Ensure your NVR has the latest firmware...

Page 2: ...computer If your surveillance system is not on a network you ll have to use the NVR s local interface for installation See the NVR user s manual for details Required Equipment A network connection and...

Page 3: ...registers stoves or other such heat generating equipment The performance and lifespan of the SD card if used is affected by temperature For best results use this device in temperatures ranging from 14...

Page 4: ...If the mounting surface is cement use the included expansion screws to install the camera If mounting to a wood surface use self tapping wood screws not included to secure the camera If the product d...

Page 5: ...mera Before installing familiarize yourself with the parts of your camera Front Rear Stand SD Card Slot Alarm Terminal Lens IR Emitter Passive Infrared Sensor 12V DC Power Input Ethernet Port Reset Bu...

Page 6: ...ons given on pages 14 17 3 Plug your camera into your recorder The NVR autodetects your camera activates it giving it the same admin password that it has and assigns it an IP address 4 Complete the in...

Page 7: ...taller You can click through and accept the defaults Pre Installation Camera Configuration You ll find installation to be easiest if you connect the camera to your PC prior to physical installation ma...

Page 8: ...IP address in your camera s entry or copy the address in your browser to launch the web interface Since the camera is still inactive the window prompts you for a new secure password Passwords cannot...

Page 9: ...ntry for surveillance Click that and OvrC displays your Wi Fi Cube as an unclaimed device available to add Click the checkbox to select it add a name and press Save Note If you opt to add the camera s...

Page 10: ...point s Security Mode and encryption type from the dropdown menu 5 Enter your router or access point s password in the Key1 text field 6 Save your settings Confirm and Lock the Settings 7 In the Wire...

Page 11: ...ity Mode Encryption Type or Key 1 5 Check the checkbox to enable WPS 6 Choose the connection mode as PBC 7 Press the WPS button on the router access point once For details please see its user guide 8...

Page 12: ...low to connect Generate a PIN with the Camera To generate a PIN with your camera click the Generate button A generated PIN code expires in 120 seconds Thus you have 2 minutes to enter this PIN in your...

Page 13: ...ge your ports and record the new numbers Consult your manual for reserved port numbers to avoid To confirm changes enter the password that you created and then click Save Complete Port Forwarding Port...

Page 14: ...sen the locking wingnut on the stand Orient the mounting arm in the desired direction then tighten the locking wingnut 4 Loosen the camera lock nut as far as it can go Screw the camera onto the mounti...

Page 15: ...window Log in as admin using the password you created You might get a pop up message that asks whether you want to run the Luma Web Components plug in You must allow the plug in to access your system...

Page 16: ...the Domain box This creates a personalized server address which is shown under Device URL If someone has already registered your desired domain the system adds two to four digits to your domain Examp...

Page 17: ...ividual users names so that you always know which user is involved with any activity Passwords cannot be longer than 16 characters To ensure compatibility with the NVR s local interface passwords can...

Page 18: ...nchronize your system to Coordinated Universal Time We strongly recommend using NTP to keep your system well calibrated If you want to use manual time sync or if your system is isolated from the Inter...

Page 19: ...s unarmed Status This is not used but is included for forward compatibility Link This flashes amber while the camera is connected to the network It is unlit when no network is found Hard Reset If you...

Page 20: ...es parts and labor repairs on all components found to be defective in material or workmanship under normal conditions of use This warranty shall not apply to products that have been abused modified or...

Reviews: