background image


Chapter 11 Monitoring 


11-23 

2. Display type of the device of the selected row will be changed. 


Notes 


  a. BOOL type if viewed in unsigned decimal will be displayed “On/Off”. 

  b. Hexadecimal is displayed with small letter ‘16#’ as shown in “16#h10AC”. 

  c. String is displayed in “”as shown in “adcd”. 

  d. Separately applicable from the monitoring option. 

  e. Display menus will be active or inactive based on available display type. 


11.3.3    Operation of Monitoring 


1) Start Monitoring 

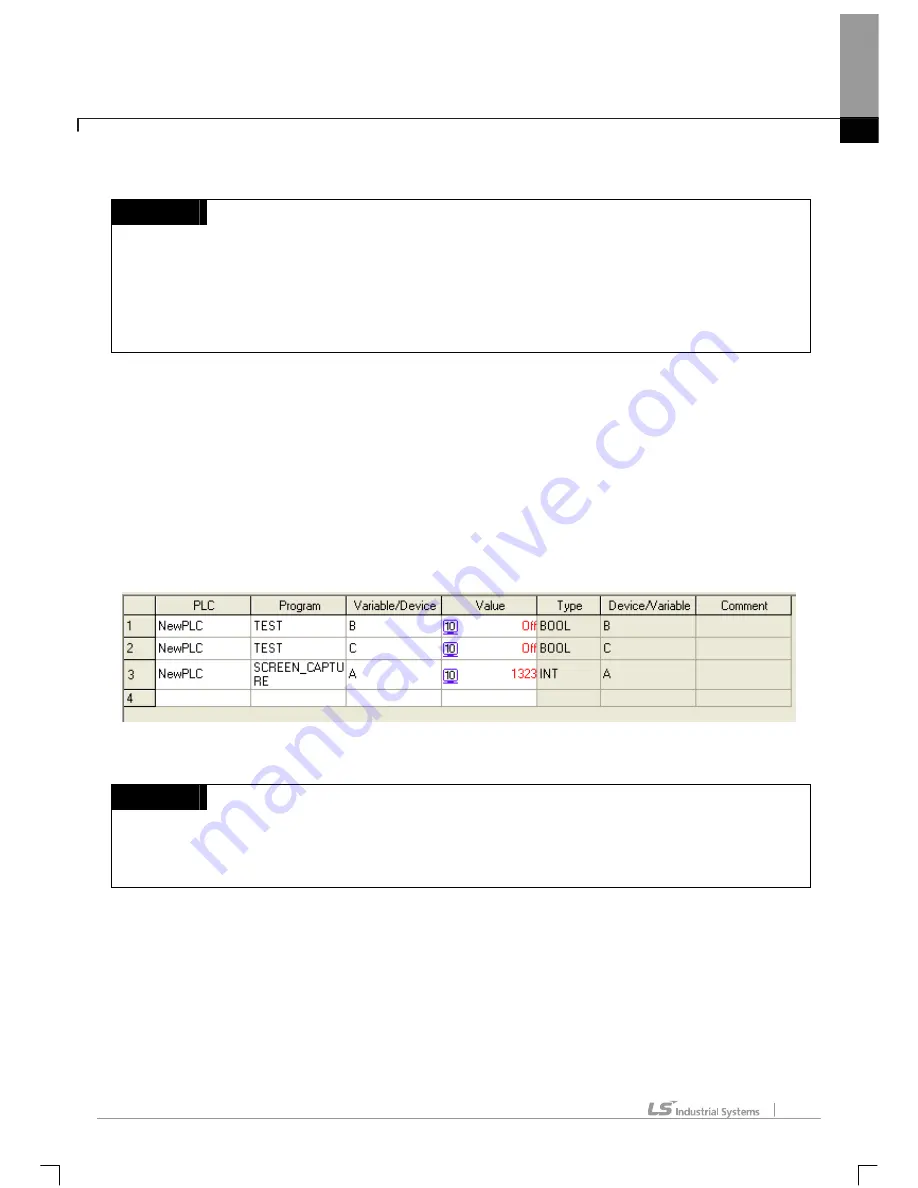
It is used to start the monitoring of the device registered on the variable monitoring. 


[Steps] 

1. Select [Monitor]-[Start/Stop Monitoring] on the menu. 

2. The item with identical Start Monitoring PLC name and the item with no error will execute Monitoring. 


  Variable Monitoring Window being monitored 


Notes 


  a. PLC’s device value will not be displayed if not monitored. 

  b. Any item with error will not be monitored. 

  c. Edit, Add and Delete are available even during monitoring. 


2)  Change Current Value 

Current value of the device can be changed in monitoring mode. 


Summary of Contents for XG5000

Page 1: ...of choosing us for your partner Programmable Logic Controller XG5000 User s Manual z Read this manual carefully before installing wiring operating servicing or inspecting this equipment zKeep this man...

Page 2: ...he meaning of the terms is as follows This symbol indicates the possibility of serious injury or death if some applicable instruction is violated This symbol indicates the possibility of slight injury...

Page 3: ...6 8 OR contact modified 5 4 9 Input variable device modified 5 5 5 14 10 View variable comment modified 5 39 11 LD screen properties modified 5 41 12 Basic parameter modified 9 3 9 7 13 I O Skip modif...

Page 4: ...rements and installation procedure Modified 2 Contents on basic parameter added 3 PLC information Password function modified CH1 CH9 1 CH10 9 1 CH10 9 3 The number of User s manual is indicated right...

Page 5: ...gly In addition you may connect our website http eng lsis biz and download the information as a PDF file Relevant User s Manuals Title Description No of User s Manual XGI XGR XEC Instructions Programm...

Page 6: ...1 Open Project 2 16 2 2 2 Close Project 2 16 2 2 3 Save Project 2 16 2 3 Convenient Edit Functions 2 17 2 3 1 Cut Paste 2 17 2 3 2 Copy Paste 2 18 2 3 3 Drag Drop 2 20 2 4 Shortcut Setting 2 23 2 5 Ed...

Page 7: ...ble 4 1 4 1 2 Direct Variable Comment 4 2 4 1 3 Flag 4 4 4 2 Global Direct Variable Edit 4 6 4 2 1 Global Direct Variable Registration 4 6 4 2 2 Copy Cut Delete and Paste 4 8 4 2 3 Insert line 4 11 4...

Page 8: ...ill 4 69 4 8 6 Drag Drop 4 71 4 8 7 Undo Redo 4 73 4 8 8 Export to file 4 73 4 9 Data type edit 4 75 4 9 1 Data Type Registration 4 75 4 9 2 Copy Cut Delete and Paste 4 77 4 9 3 Insert line 4 80 4 9 4...

Page 9: ...o of Contact Point 5 40 5 3 9 LD Screen Properties 5 41 5 4 Edit FunctionAdditional 5 43 5 4 1 Block Mask Instruction 5 43 5 4 2 Bookmark 5 45 5 4 3 Go To 5 51 Chapter 6 SFC Edit 6 1 6 49 6 1 Limit 6...

Page 10: ...iewAll Device 7 1 7 1 2 Output Cross Reference Instantly 7 3 7 1 3 Check Duplicated Coil Instantly 7 5 7 2 Used Device 7 7 7 2 1 Execute Used Device 7 7 7 2 2 View Device Uses 7 8 7 3 Check Program 7...

Page 11: ...3 Write 10 13 10 4 Read 10 15 10 5 Change Mode 10 16 10 6 Compare to PLC 10 17 10 7 Reset PLC 10 18 10 8 Clear PLC 10 19 10 8 1 Clear Item 10 19 10 8 2 Clear Memory 10 20 10 9 PLC Information 10 21 1...

Page 12: ...0 11 4 7 Information Display of Power Module 11 31 11 4 8 Information Display of CPU module 11 32 11 4 9 Information Display of Communication Module 11 33 11 4 10 Information of Special Module 11 34 1...

Page 13: ...11 9 1 Basic instructions 11 105 11 9 2 Save file 11 107 11 9 3 Open file 11 109 11 9 4 Setting adjustment of loop name 11 111 11 9 5Add Delete selected loop 11 112 11 9 6 Print Print Preview 11 113...

Page 14: ...1 15 10 15 1 Create User Function Function Block 15 2 15 1 1 Create User Function Function Block Program 15 2 15 1 2 Create User Function Function Block I O Variable 15 4 15 1 3 User Function Function...

Page 15: ...5 2 Selection from character string list 17 19 17 5 3 Selecting member variable from character string list 17 20 17 5 4 Setting Removing Block Mask 17 21 17 5 5 Setting Removing Line Block Mask 17 23...

Page 16: ...E Event History Window 19 7 19 2 4 Status Bar 19 9 19 3 Basic Parameter Setting 19 10 19 3 1 Setting Items 19 10 19 4 I O Parameter Setting 19 11 19 4 1 Setting Item 19 11 19 5 View Module Information...

Page 17: ...Drop function on most of editors such as Project Variable Comment LD Edit Variable Monitor etc 3 Setting User s Shortcut Keys Shortcut Keys provided as default can be changed or added as specified as...

Page 18: ...ecific position with Bookmark function Memory of selected device can be referred when editing LD 7 Various Monitoring Functions Various monitoring functions are provided such as variable monitoring de...

Page 19: ...0 Item Requirement Personal computer and memory Computer with PENTIUM 256MB memory or more Communication port RS 232 serial port or USB port Hard disk at least 200MB area Mouse connectable to PC Monit...

Page 20: ...y special package need to be installed If the installation screen appears press Install button 3 Select Yes in the following window Time to install the special package varies according to PC and may b...

Page 21: ...Chapter 1 Introduction 1 5 4 Installation Wizard will prepare for installation as below 5 Enter your name and company name and then click Next button...

Page 22: ...and make or select a new folder XG5000 needs about 30M Bytes of installation space in hard disk which will ask you to select a disk with enough capacity If the installation space is not enough a warn...

Page 23: ...r and click Next button 9 Installation will be started as shown below 10 In case PC is being connected with PLC through USB at the final stage of installation USB device driver installation window app...

Page 24: ...Chapter 1 Introduction 1 8 11 Wait a second for the installation to be complete...

Page 25: ...le PC is being connected with PLC through USB USB device driver installation window appears automatically refer to CH1 3 10 Steps 1 Ensure that Drivers folder is created in the folder where XG5000 is...

Page 26: ...n Found New Hardware Wizard Dialog Box select Installation from a list or specific location Advanced and click Next to continue 4 Among driver searching options select Search for the best driver in th...

Page 27: ...r 1 Introduction 1 11 5 Click Browse button On Browse Folder Dialog Box select Drivers folder where XG5000 is installed 6 Click OK button Now computer will search for the driver files in the selected...

Page 28: ...driver operated stably based on Windows OS you may click Continue Anyway button 8 If the device driver has been installed completely the Installation Complete Dialog Box will be displayed as follows...

Page 29: ...elect Manage on the menu 2 Computer Management Dialog Box will be displayed as shown in the figure below On the left tree list of Dialog Box click Computer Management Local System Tools Device Manager...

Page 30: ...Chapter 1 Introduction 1 14 2 Abnormal Case The device driver has not been installed successfully if the following figure is displayed...

Page 31: ...ver for XGT PLC is not installed successfully reinstall the USB driver for XGT PLC in the following steps Steps 1 On the device driver with the icon with an exclamation mark click the right button of...

Page 32: ...t sequence is manually the same as in Installation of Device Driver If the USB driver for XGT PLC is not installed successfully reinstall the USB driver for XGT PLC in the following steps Steps 1 If t...

Page 33: ...Chapter 1 Introduction 1 17 2 On search and installation options select Don t Search I will choose the driver to install and click Next 3 Click Have Disk on the Dialog Box below...

Page 34: ...nstallation Dialog Box is displayed on the disk click Browse button 5 From the Browse File Dialog Box move to the folder XG5000 is installed in Select drivers folder to display GmUSBD inf file With th...

Page 35: ...tem of manufacturer s file to copy a directory with the file of the device driver will be displayed Click OK button 7 On the compatible H W display list of the device driver Select Dialog Box select L...

Page 36: ...1 20 8 Hardware Installation Dialog Box will appear Click Continue Anyway to go on with the installation 9 Found New Hardware Wizard Complete Dialog Box will appear Click Finish button to end the inst...

Page 37: ...Chapter 2 Basic Application 2 1 Chapter 2 BasicApplication 2 1 Screen Configuration XG5000 screen is composed as shown below Screen of XG5000 a b c f d e g...

Page 38: ...tor the variable e Status bar used to display the status of XG5000 the information of connected PLC etc f Edit window The presently LD Edit window is displayed g Message window Diverse message shows d...

Page 39: ...ct variable Imports Global Direct variable from the file Program Imports the program from the file I O parameter Imports the I O parameter from the file Basic parameter Imports the basic parameter fro...

Page 40: ...on expression of cursor positioned rung or specified block area Set Remove Sets or cancels a bookmark Remove All Cancels all the bookmarks specified Previous Bookmark Moves to the previous bookmark Bo...

Page 41: ...ssage window s Check Program tap Variables Displays the variable name in the program Devices Displays the device name in the program Devices Variables View Displays the device and the variable in the...

Page 42: ...er program comment on PLC Compare with PLC Compares the project to the project saved in PLC Reset PLC Resets PLC Clear PLC Deletes parameter program comment saved in PLC PLC Information Displays PLC i...

Page 43: ...fies the device to monitor the change of the data 7 Debug Instruction Description Start Stop Debugging Converts to Debug mode to Start Stop Debugging Go Runs to the break point Step Over Runs step by...

Page 44: ...on Description XG5000 Help Opens Help for XG5000 application XGK XGB Instruction Help Opens Help for XGK XGB PLC instructions XGI Instruction Help Opens Help for XGI instructions LSIS Web Site Connect...

Page 45: ...ecking the check box in front of each tool box name on the list b New used to create a new tool box c Reset initializes the tool box 2 Tool Box Fill It is used to fill the Tool Box created as above wi...

Page 46: ...Instruction It is an instruction tap of the customized Dialog Box b Categories used to select the existing tool box c Buttons used to select a tool desired d User s Tool Box From the c Button drag a...

Page 47: ...Mode display used to display the PLC mode If several PLCs are in a project the selected PLC mode will be displayed d Warning Display used to display the error status in PLC e Cursor Position Display u...

Page 48: ...Chapter 2 Basic Application 2 12 1 Move Position with the left mouse button pressed drag the mark to a desired position The figure below shows the project window moved downward...

Page 49: ...13 2 Change to Open Window Click the right mouse button positioned on the desired window and select Float in Main Window on the menu 3 Hide Click the right mouse button positioned on the desired windo...

Page 50: ...apter 2 Basic Application 2 14 2 1 5 Application of Dialog Box Dialog Box provides blanks for Input OK Options and List Box where the user can input or specify the value as desired Dialog Box c b d e...

Page 51: ...list Press the list box arrow to display the list with the item to click and select as desired c Options used to select just one item in the same group Use the mouse to select the item desired d OK If...

Page 52: ...e to check the project comment in the comment area 2 2 2 Close Project Steps 1 Select Project Close Project on the menu Default of the Shortcut Key is not specified 2 If the project is not saved after...

Page 53: ...and Project Window Variable Comment and Excel can share the edited details with each other 2 3 1 Cut Paste It is used to select blocks to move to other places Steps 1 Cut Paste menu is used to move th...

Page 54: ...identical to the data of the selected area At this time in case that the variable name should not be duplicate as described in Variable Comment an applicable warning message will appear Refer to the...

Page 55: ...Chapter 2 Basic Application 2 19...

Page 56: ...Paste under conditions When dragging and dropping in a same area such as same LD or IL window it applies Cut Paste if dragging and dropping with two and more XG5000 Program instances opened it applies...

Page 57: ...Chapter 2 Basic Application 2 21 The above figure shows the results when dragging and dropping a selected area in two instances...

Page 58: ...he duplication by the program However it should be also checked manually by a user Program does not respond if Cut Copy or Paste is operated in an unavailable area Cut Copy or Paste from to different...

Page 59: ...deleted Steps 1 Select Tools Shortcut Settings on the menu Dialog Box Description of Dialog Box Select a macro used to select the menu to specify its shortcut key on the list Create Shortcut used to c...

Page 60: ...rtcut button 4 Click the shortcut key to set For example if Shift F8 is desired to apply press F8 together with Shift being pressed on the keyboard Then a shortcut key will be displayed on the Edit Wi...

Page 61: ...e magnification rate changes by minimum 5 within the range of 50 200 Steps 1 1 Select View Zoom In or View Zoom Out on the menu as necessary Or use the combo box to select or input a desired magnifica...

Page 62: ...Chapter 2 Basic Application 2 26...

Page 63: ...egory XG5000 options applied to entire program and operations applied according to language are classified as tree type b Setting contents If you select category applicable contents are displayed c Co...

Page 64: ...when making new project b Select Folder Search folder c Specifies the number of backup file to restore project file Up to 20 is available d Specifies the number of recently opened project displayed at...

Page 65: ...option is not selected you can check the result of memory use by selection View Cross Reference b Check duplicate coil instantly check duplicate coil and display at duplicate coil window during editi...

Page 66: ...ap on the Option Dialog Box Dialog Box Description of Dialog Box a Items Used to select the area to specify its font or color b Font activated when item is Variable Comment specifies font of Variable...

Page 67: ...Tools Option on the menu 2 Select the Online tap on the Option Dialog Box Dialog Box Description of Dialog Box a Type used to specify the display format of the data value Example If Hexadecimal is sel...

Page 68: ...Chapter 2 Basic Application 2 32 Monitor Display Format Example Application Instruction ADD Unsigned Decimal Signed Decimal Hexadecimal As instruction...

Page 69: ...option View connection settings when connecting is selected the following Dialog Box will appear whenever PLC is connected with c Show Message when changing the PLC mode When changing the PLC mode dis...

Page 70: ...x a Display above text When displaying text above diagram decides whether to display height of text as variable type according to the number of character or as fixed type according to setting b Displa...

Page 71: ...fies font color Dialog box Description of dialog box a Items Used to select the area to specify its font or color b Font activated when item is Variable Comment specifies font of Variable Comment c Co...

Page 72: ...nd block b Show print area shows print able area with the thick dotted line c Show page number shows page number in print able area d Step column width specifies column width of step transition e Acti...

Page 73: ...step column width is 20 200 Range of action column width is 70 400 2 6 9 SFC Font Color You can change font color used in SFC editor Steps 1 Select Tools Option 2 After changing Font Color in SFC cate...

Page 74: ...riable Comment specifies font of Variable Comment c Color activated when item is not Variable Comment specifies color d Default for selected item restore default value e Preview displays the setting v...

Page 75: ...ntrol statement such as IF WHILE SWITCH and pressing Enter key complete the statement according to ST grammar d Tap size specifies space size when pressing Tap key e Show tip text When move cursor on...

Page 76: ...s font color Dialog box Description of dialog box a Items Used to select the area to specify its font or color b Font activated when item is Variable Comment specifies font of Variable Comment c Color...

Page 77: ...Chapter 3 Project 3 1 Chapter 3 Project 3 1 Project Configuration The items of the project configuration are follows Dialog Box a b c d e f h k g i j l n m...

Page 78: ...fines a structure type h Scan Program used to specify the program always executable in the sub item i New program means the user defined program always executable j Program 2 means the user defined pr...

Page 79: ...2 1 New Project It is used to create a new project At this moment a folder whose name is identical to the project name will be also created where the project file will be created Steps 1 Select Projec...

Page 80: ...ct type selects XGK or XGB or XGI format IEC programming Once it is selected the two formats are not compatible one another e PLC type used to select the PLC unit f Program name enters a name of progr...

Page 81: ...ment will appear on the comment which will help the user to select the project If project file is selected Click Open 3 2 3 Open from PLC It is used to read the project stored in PLC to make a new pro...

Page 82: ...ails on connection settings 3 A new project will be created Notes The project read from PLC will be saved in PC through the menu Project Save Project Notes Select Online Read to read the items of PLC...

Page 83: ...layed at the side of the project name of the project window 3 2 5 Save as It is used to save the project as a different file name Steps 1 Select Project Save As on the menu 2 Input a new project file...

Page 84: ...of the project file The extension of the project file will be xgp b File directory a folder whose name is identical to the project name as specified by the user will be automatically created where th...

Page 85: ...as follows Program LD Direct variable comment Global variable The list of items excluded from conversion of the GMWIN project file is as follows Basic Parameter I O Parameter High speed link IL SFC Pr...

Page 86: ...functions such as JMP and SCAL a Basic conversion Items like contact type coil type horizontal line and vertical line are converted alike in GMWIN and displayed accordingly However the variables used...

Page 87: ...INIT_DONE Notes The label referred to subroutine in GMWIN file is changed to the extended function SBRT c Conversion of Function Function Block In case of function function block it converts the only...

Page 88: ...Function block There are functions of which type is changed although they are contained in the standard function function block and APP library For the function type changed refer to the following ta...

Page 89: ...T_TIME COS COS DATE_TO_type DATE_TO_ DEC_type DEC DECO_type DECO DEG_type DEG DELETE DELETE DI DI DINT_TO_type DINT_TO_ DIREC_IN DIREC_IN DIREC_O DIREC_O DIV DIV DIV_TIME DIV_TIME DT_TO_type DT_TO_ DW...

Page 90: ...T LT LWORD_TO_type LWORD_TO_BOOL MAX MAX MCS MCS MCSCLR MCSCLR MEQ_type MEQ MID MID MIN MIN MOD MOD MOVE MOVE MUL MUL MUL_TIME MUL_TIME MUX MUX NOT NOT NE NE NUM_TO_STRING type _TO_STRING OR OR PUT_CH...

Page 91: ...T SQRT STOP STOP STRING_TO_type STRING_TO_ SUB SUB SUB_date_type SUB_DATE SWAP_type SWAP TAN TAN TIME_TO_type TIME_TO_ TOD_TO_type TOD_TO_ TRUNC TRUNC UDINT_TO_type UDINT_TO_ UINT_TO_type UINT_TO_ ULI...

Page 92: ...T CTUD CTUD_INT DUTY DUTY F_TRIG F_TRIG FIFO_type FIFO LIFO_type LIFO R_TRIG R_TRIG RS RS RTC_SET RTC_SET RTC_SET1 RTC_SET1 SCON SCON SEMA SEMA SR SR TMR TMR TMR_FLK TMR_FLK TMR_UINT TMR_UINT TOF TOF...

Page 93: ...IGH Output LOW HIGH BYTE_BIT I O type Q01 Q08 Output Q01 Q08 ARY_SWAP I O type IN2 Output OUT ARY_SFT_C I O type CY0 Delete output CY0 output type OUT ARY_ROT_C I O type CY0 Delete output CY0 output t...

Page 94: ...ect 3 18 3 4 Project Item 3 4 1 Add item PLC task and program can be inserted into the project additionally 1 Add PLC Steps 1 On the project window select the Project Item 2 Select Project Add Item PL...

Page 95: ...s shown below Notes PLC is kind of a project as in previous KGLWIN XG5000 allows the user to specify the project as a unit of PLC and include several projects PLC in one project to manage conveniently...

Page 96: ...Chapter 3 Project 3 20 Steps 1 On the project window select the PLC Item 2 Select Project Add Item Task on the menu Dialog Box a b c d f e h g...

Page 97: ...gram which belong to other task will not be executed Fixed Cycle The task will be executed at an interval of specified time The time shall be inputted in ms unit External contact point The task will b...

Page 98: ...name Priority Task Number and Execution Condition and then click OK to create a new Task as shown below 3 Add Program Steps 1 On the project window select the Program Location to add The program can b...

Page 99: ...Chapter 3 Project 3 23 2 Select Project Add Item Program on the menu 3 Input Program name language and Program Description and then click OK...

Page 100: ...Imports item from saved item files The contents from PLC program is inserted into project Variable comment basic parameter I O parameter etc is overwritten on the previous item Notes Since Variable Co...

Page 101: ...e PLC Item 2 Select Project Import Item from File Variable Comment on the menu 3 Select the file and then click OK 3 I O Parameter Steps 1 On the project window select the PLC Item 2 Select Project Im...

Page 102: ...mport Item from File Basic Parameter on the menu 3 Select the file and then click OK 5 Program Steps 1 On the project window select the Program Location to add The program can be added to Scan Program...

Page 103: ...rameter bsp Program prg Use function function block fun 1 PLC Steps 1 On the project window select the PLC Item 2 Select Project Export to File PLC on the menu 3 Input the file name and then click OK...

Page 104: ...asic Parameter Item 2 Select Project Export to File Basic Parameter on the menu 3 Input the file name and then click OK 5 Program Steps 1 On the project window select the Program Item 2 Select Project...

Page 105: ...4 4 Item register information The name and comment of respective item can be viewed to change 1 Project properties Steps 1 On the project window select the Project Item 2 Select View Properties on th...

Page 106: ...ject Save As to save as a different file 3 After the change click OK 2 PLC Properties Steps 1 On the project window select the PLC Item 2 Select View Properties on the menu 3 After the change click OK...

Page 107: ...ence 1 Order Change with the menu Steps 1 Move the cursor onto the program to change the order of execution 2 Click the right mouse button to select Move Up Program or Move Down Program on the menu 2...

Page 108: ...ts can be compared with each other based on respective item Compare result will be displayed on the Result window Steps 1 Select Project Compare Projects on the menu 2 On the Compare Projects Click Op...

Page 109: ...Chapter 3 Project 3 33 4 Select the items to compare with At this moment the selected items of both projects must be identical 5 Click Compare 6 Compare result will be displayed on the Result window...

Page 110: ...file password has nothing to do with the password of PLC Notes Password is available in Korean and English however with the capital small letters sorted out in English Up to 8 characters of password...

Page 111: ...2 Select View Properties on the menu 3 On the project dialog box select the Password tap 4 Input the password in New password 5 Input the password once again in Confirm password as identical as input...

Page 112: ...Chapter 3 Project 3 36 3 6 2 Change password Steps 1 On the project window select the Project Item 2 Select View Properties on the menu 3 On the project Dialog Box select the Password tap...

Page 113: ...password in Old Password 5 Input a new password in New password 6 Input the new password once again in Confirm Password as identical as input in the 5 above 7 Click OK 3 6 3 Delete Password Steps 1 On...

Page 114: ...Chapter 3 Project 3 38 2 Select View Properties on the menu 3 On the project dialog box select the Password tap 4 Input the previous password in Password 5 Click Delete...

Page 115: ...able 4 1 Global Direct Variable Global Direct variable consist of global variable direct variable comments and flags Global variable declares the variable to be used for a program or displays a list o...

Page 116: ...Chapter 4 Variable 4 2 4 1 2 Direct Variable Comment It displays the comment of direct variable entered or declared from the variables Dialog Box a b...

Page 117: ...variable it displays the data of the direct variable comment b Show defined comments displays list of defined comment Notes Direct variable varies depending on CPU type Bit View is activated when Sho...

Page 118: ...g kind In case of the system flag all the details only will be displayed on the screen If All is not checked only the flag applicable to Parameter number and Block index will be displayed c Parameter...

Page 119: ...his will be active only for HighSpeed link and P2P flag Only the flag item of the input block index will be displayed Example If Block index 120 is inputted it will be as shown below Notes Flag can no...

Page 120: ...ddition a new global variable can be added to the list of the global direct variables 4 2 1 Global Direct Variable Registration This is used to register global direct variables to use in the program I...

Page 121: ...E STRING Induced type 3 ARRAY i e ARRAY 0 6 0 2 0 4 OF BOOL factor limit up to 3rd STRUCT i e STRUCT name display STRUCT type is not available in STRUCT FB_INST i e FB name display d Memory address en...

Page 122: ...s Use the mouse to select the cell of 0 0 in order to select the whole table Select Edit Select All in order to select the whole table Use the mouse to select the column header of the cell in order to...

Page 123: ...4 Paste It displays the data saved in the clipboard on the selected position If the data is already displayed the Dialog Box will be called to select and change the data If the data saved in the clip...

Page 124: ...st of variables comments will be deleted to add a new list of variables comments f Cancel The existing list of variables comments will not be deleted and a new the list of variables comments will not...

Page 125: ...he Replace column Notes If all items are identical the cell can not be edited while if partially identical the cell can be edited If the number of the columns saved in the clipboard is greater than th...

Page 126: ...ariable 4 12 Notes If no cell is selected one line will be added to the first line If Enter key or Tab key is selected at the last of the lines a new line will be created It is available only in Globa...

Page 127: ...hapter 4 Variable 4 13 4 2 4 Delete line It is used to delete the lines as many as the lines of the selected area Steps 1 Select the area to delete the lines from 2 Select Edit Delete Line on the menu...

Page 128: ...l Variable 4 2 5 Automatic fill It is used to increase or decrease variables and direct variables to add on the list of variables comments Steps 1 Move the mouse to the end of the cell and the mouse c...

Page 129: ...Chapter 4 Variable 4 15...

Page 130: ...ed in a cell as copied f Retain it is checked as copied g Used it can not be modified because of Read Only h Comment If Automatic Fill is executed with Ctrl key being pressed the figures area will aut...

Page 131: ...Chapter 4 Variable 4 17...

Page 132: ...rop is available onto Direct Variable Comment of other XG5000 programs Notes Data is not moved but just copied always when dragged and dropped Paste is not available in Flag 4 2 7 Undo Redo Undo is us...

Page 133: ...lobal Variable if the data is moved to other windows or a variable is added in LD and IL all the information for Undo Redo will disappear In Direct Variable Comment if the direct variable item changes...

Page 134: ...dule by referring to the special module information specified in I O parameter The user can modify the variable and the comment Steps 1 Set the special module on the slot in I O parameter 2 Select Glo...

Page 135: ...21 4 Select Edit Register Special Module Variables on the menu Notes Deletes all the existing information of the Global variable to add on the list of variables comments referring to the presently spe...

Page 136: ...Variable 4 22 4 2 10 Preview This function is used to previously show the screen which will be printed Steps 1 The window to previously show shall be displayed on the screen 2 Select Project Preview o...

Page 137: ...ow to print shall be displayed on the screen 2 Select Project Print on the menu Notes By changing the size of the column the details to be printed on paper can be adjusted In Direct Variable Comment a...

Page 138: ...rtcut Keys Shortcut Keys Comment Home Used to move to the first in the cell End Used to move to the end in the cell Ctrl Home Used to move to the first cell position Ctrl End Used to move to the last...

Page 139: ...Local Variable Local Variable declares the variables used in the program or displays the list of declared variables based on variables 4 3 1 Local Variable It declares variables and displays the list...

Page 140: ...nt can be edited In addition it adds the local variables used in the program to the list of local variables 4 4 1 Local Variable Registration Register local variable to use in the program To register...

Page 141: ...c types 20 BOOL BYTE WORD DWORD LWORD SINT INT DINT LINT USINT UINT UDINT ULINT REAL LREAL TIME DATE TIME_OF_DAY DATE_AND_TIME STRING Induced types 3 ARRAY i e ARRAY 0 6 0 2 0 4 OF BOOL factor limit u...

Page 142: ...Edit Select All in order to select the whole table Use the mouse to select the column header of the cell in order to select the whole columns Use the mouse to select the row header of the cell in orde...

Page 143: ...d the Dialog Box will be called to select and change the data If the data saved in the clipboard is a part of columns Steps 1 Select the position to paste on 2 Select Edit Paste on the menu 3 If the v...

Page 144: ...of variables comments will be deleted to add a new list of variables comments f Cancel The existing list of variables comments will not be deleted and a new the list of variables comments will not be...

Page 145: ...ct All used to check all the check boxes in the Replace column f Unselect All used to cancel all the selected check boxes in the Replace column Notes If all items are identical the cell can not be edi...

Page 146: ...t the area to insert the lines into 2 Select Edit Insert Line on the menu Notes If no cell is selected one line will be added to the first line If Enter key or Tab key is selected at the last of the l...

Page 147: ...lete line It is used to delete the lines as many as the lines of the selected area Steps 1 Select the area to delete the lines from 2 Select Edit Delete Line on the menu Notes If no cell is selected D...

Page 148: ...ase or decrease variables and direct variables to add on the list of variables comments Steps 1 Move the mouse to the end of the cell and the mouse cursor will change to shape 2 Move the mouse upward...

Page 149: ...lways executes Automatic Fill because memory allocation can not be declared in duplicate If it contains a number it searches for the part and increases it automatically e Initial value it is filled in...

Page 150: ...selected items to paste on different positions Steps 1 Select the area to drag and drop 2 The mouse cursor will change to the state available for drag and drop 3 With the left mouse button being press...

Page 151: ...nto Global Variable of other XG5000 programs Notes Data is not moved but just copied always when dragged and dropped 4 4 7 Undo Redo Undo is used to cancel the edited detail in order to return to its...

Page 152: ...lable for Align Only in Global Variable 12 If EXTERNAL variable is added it executes Undo Redo 4 4 8 Export to file It is used to save the previously declared list of global variables on the file and...

Page 153: ...condition at information of Global Variable Item b Global Variable item at declared global variable item displays items according to item types All general variable special module related variable c S...

Page 154: ...Chapter 4 Variable 4 40 Global variable item All Global variable item General Variable...

Page 155: ...Chapter 4 Variable 4 41 Global variable item special module related variable...

Page 156: ...mand such as timer and counter and declares the variable of operation unit using the results of operation memorized by several scans or displays the list of declared variables based on the variables 4...

Page 157: ...value retain use or not and comment items can be edited In addition a new FB variable can be added to the list of the FB variables 4 6 1 FB Variable Registration This is used to register FB variables...

Page 158: ...NT INT DINT LINT USINT UINT UDINT ULINT REAL LREAL TIME DATE TIME_OF_DAY DATE_AND_TIME STRING Induced type 3 ARRAY ARRAY 0 6 0 2 0 4 OF BOOL factor limit up to 3rd STRUCT i e STRUCT name display STRUC...

Page 159: ...Edit Select All in order to select the whole table Use the mouse to select the column header of the cell in order to select the whole columns Use the mouse to select the row header of the cell in orde...

Page 160: ...d the Dialog Box will be called to select and change the data If the data saved in the clipboard is a part of columns Steps 1 Select the position to paste on 2 Select Edit Paste on the menu 3 If the v...

Page 161: ...of variables comments will be deleted to add a new list of variables comments f Cancel The existing list of variables comments will not be deleted and a new the list of variables comments will not be...

Page 162: ...he Replace column f Unselect All used to cancel all the selected check boxes in the Replace column Notes If all items are identical the cell can not be edited while if partially identical the cell can...

Page 163: ...Chapter 4 Variable 4 49 Notes If no cell is selected one line will be added to the first line If Enter key or Tab key is selected at the last of the lines a new line will be created...

Page 164: ...hapter 4 Variable 4 50 4 6 4 Delete line It is used to delete the lines as many as the lines of the selected area Steps 1 Select the area to delete the lines from 2 Select Edit Delete Line on the menu...

Page 165: ...omatic fill It is used to increase or decrease variables and direct variables to add on the list of variables comments Steps 1 Move the mouse to the end of the cell and the mouse cursor will change to...

Page 166: ...Chapter 4 Variable 4 52...

Page 167: ...filled in a cell as copied g Retain it can not be declared as Read Only h Used it can not be declared as Read Only i Comment a number is automatically increased if automatic fill is executed with Ctrl...

Page 168: ...Chapter 4 Variable 4 54...

Page 169: ...available onto local variable of other XG5000 programs Notes Data is not moved but just copied always when dragged and dropped Paste is not available in Flag 4 6 7 Undo Redo Undo is used to cancel the...

Page 170: ...s available for Align Only in Global Variable 12 If External variable is added it executes Undo Redo 13 Undo Redo is available for above the items 14 Undo Redo is available for below the items 4 6 8 E...

Page 171: ...condition at information of Global Variable Item b Global Variable item at declared global variable item displays items according to item types All general variable special module related variable c S...

Page 172: ...Chapter 4 Variable 4 58 Global variable item All Global variable item General Variable...

Page 173: ...Chapter 4 Variable 4 59 Global variable item special module related variable...

Page 174: ...ts such as 4 arithmetic operations and comparative operations and declares the variable of operation unit using the operation results or displays the list of declared variables based on the variable 4...

Page 175: ...tems can be edited In addition a new FUN variable can be added to the list of the FUN variables 4 8 1 FUN Variable Registration This is used to register FUN variables to use in the program In order to...

Page 176: ...ic types and 3 induced types Basic types 20 BOOL BYTE WORD DWORD LWORD SINT INT DINT LINT USINT UINT UDINT ULINT REAL LREAL TIME DATE TIME_OF_DAY DATE_AND_TIME STRING Induced types 2 ARRAY i e ARRAY 0...

Page 177: ...Edit Select All in order to select the whole table Use the mouse to select the column header of the cell in order to select the whole columns Use the mouse to select the row header of the cell in orde...

Page 178: ...d the Dialog Box will be called to select and change the data If the data saved in the clipboard is a part of columns Steps 1 Select the position to paste on 2 Select Edit Paste on the menu 3 If the v...

Page 179: ...of variables comments will be deleted to add a new list of variables comments f Cancel The existing list of variables comments will not be deleted and a new the list of variables comments will not be...

Page 180: ...in the Replace column f Unselect All used to cancel all the selected check boxes in the Replace column Notes If all items are identical the cell can not be edited while if partially identical the cell...

Page 181: ...he first line If Enter key or Tab key is selected at the last of the lines a new line will be created 4 8 4 Delete line It is used to delete the lines as many as the lines of the selected area Steps 1...

Page 182: ...Chapter 4 Variable 4 68 Notes If no cell is selected Delete Line will not be executed...

Page 183: ...to increase or decrease variables and direct variables to add on the list of variables comments Steps 1 Move the mouse to the end of the cell and the mouse cursor will change to shape 2 Move the mouse...

Page 184: ...f not it adds a number at the end and counts it automatically d Type it is filled in a cell as copied e Trigger trigger is filled in a cell as copied f Used it can not be declared as Read Only g Comme...

Page 185: ...selected items to paste on different positions Steps 1 Select the area to drag and drop 2 The mouse cursor will change to the state available for drag and drop 3 With the left mouse button being press...

Page 186: ...Monitoring Window b Drag and drop is available onto LD Window c Copy is available when drag and drop is executed onto Excel program d Drag and drop is available onto FB Variable of other XG5000 progra...

Page 187: ...s available for Cut 6 Undo Redo is available for Paste 7 Undo Redo is available for Automatic Fill 8 Undo Redo is available for Insert Line Only in Global Variable 9 Undo Redo is available for Delete...

Page 188: ...4 74 1 Select Edit Export to File on the menu If you press Save file is saved as inputted file name at selected folder location If you press Cancel file is not created and dialog box is closed File is...

Page 189: ...can be edited In addition it adds the data type used in the program to the list of data types 4 9 1 Data Type Registration Register a data type to use in the program In order to register on the list o...

Page 190: ...pe when entering a variable b Type 21 types are available 20 basic types and 1 induced types Basic types 20 BOOL BYTE WORD DWORD LWORD SINT INT DINT LINT USINT UINT UDINT ULINT REAL LREAL TIME DATE TI...

Page 191: ...Edit Select All in order to select the whole table Use the mouse to select the column header of the cell in order to select the whole columns Use the mouse to select the row header of the cell in orde...

Page 192: ...d the Dialog Box will be called to select and change the data If the data saved in the clipboard is a part of columns Steps 1 Select the position to paste on 2 Select Edit Paste on the menu 3 If the v...

Page 193: ...of variables comments will be deleted to add a new list of variables comments f Cancel The existing list of variables comments will not be deleted and a new the list of variables comments will not be...

Page 194: ...he Replace column f Unselect All used to cancel all the selected check boxes in the Replace column Notes If all items are identical the cell can not be edited while if partially identical the cell can...

Page 195: ...Chapter 4 Variable 4 81 Notes If no cell is selected one line will be added to the first line If Enter key or Tab key is selected at the last of the lines a new line will be created...

Page 196: ...hapter 4 Variable 4 82 4 9 4 Delete line It is used to delete the lines as many as the lines of the selected area Steps 1 Select the area to delete the lines from 2 Select Edit Delete Line on the menu...

Page 197: ...9 5 Automatic fill It is used to increase or decrease variables and direct variables to add on the list of variables comments Steps 1 Move the mouse to the end of the cell and the mouse cursor will c...

Page 198: ...Chapter 4 Variable 4 84...

Page 199: ...it can not be modified f Comment If Automatic Fill is executed with Ctrl key being pressed the figures area will automatically increase and if with Ctrl key not pressed it will be copied Notes If Auto...

Page 200: ...Chapter 4 Variable 4 86...

Page 201: ...Undo is used to cancel the edited detail in order to return to its previous state Redo cancels again the operation of Edit Cancel Details 1 Undo Redo is available for Cell Edit 2 Undo Redo is availabl...

Page 202: ...13 Undo Redo is executed below the item 4 9 8 Export to file It is used to save the previously declared list of global variables on the file and to open and read in the external programs Steps 1 Sele...

Page 203: ...ctor and step consist of variable and device Variable and device need to be observed by external device To be observed by external program saves variable and device as CSV file Flag and Variable Comme...

Page 204: ...Chapter 4 Variable 4 90 2 Select Project Save Variable Names to File Dialog box a b d e c...

Page 205: ...ows art right grid b Application only selected variable is saved c File Path specifies file path where CSV file is saved d Save if you click on this button the following dialog box shows Set the file...

Page 206: ...AX1 BOOL A Tag GlobalVariable sfasdf AX2 BOOL A Tag GlobalVariable adfasdf AX3 BOOL Type Scope Variable Address DataType Property Comment Tag Flag System _1OFF FX156 BOOL R 1 scan OFF Tag Flag System...

Page 207: ...riable displayed in XGK XGI format Data Type displays data type displayed in XGK XGI format Property displays whether this variable is Auto variable A read only variable R Comment displays comment of...

Page 208: ...Chapter 4 Variable 4 94 2 Select area to use external variable in High speed Link Block and click on right button of mouse Select Import variable name in the created context menu...

Page 209: ...Chapter 4 Variable 4 95 3 Click File Open and select file created by step 1 Then click on Open 4 If you select item in data item the variable list shows Select variable in variable list and click OK...

Page 210: ...Chapter 4 Variable 4 96 5 In High Speed Link window Read area variable variable comment is shown as below...

Page 211: ...lines available to copy at a time Up to 300 Maximum Paste lines Maximum Paste lines to paste at a time Up to 300 5 2 Program Edit 5 2 1 Edit Tools The input of LD Edit items shall be started after th...

Page 212: ...to the start of the program Back space Deletes the present data and moves to the left Moves the present cursor to the right by a blank Moves the present cursor to the left by a blank Moves the present...

Page 213: ...to input 3 After the device name is input on the Variable Input Dialog Box click OK Refer to 5 2 3 Variable Device Input for details on the Variable Input Dialog Box Notes Select Tool Option on the me...

Page 214: ...rsion detection OR contact point Steps 1 Move the cursor where you want connect OR 2 Select contact point kind at Toolbar and click editing area Or press shortcut key corresponding to OR contact point...

Page 215: ...Chapter 5 LD Edit 5 5 5 2 4 Input Variable Device It is used to input the Device or Variable Comment Dialog Box Description of Dialog Box...

Page 216: ...e applicable String is not registered as a variable in the Variable Comment the Variable Comment Add Dialog Box will be displayed b Local variable displays the list of declared local variable c New Va...

Page 217: ...hapter 5 LD Edit 5 7 e Delete Variable deletes the selected variable from local variable list f OK applies the inputted or selected items and closes the dialog box g Cancel closes dialog box Dialog bo...

Page 218: ...isplays the declared global variable list Can be registered as EXTERNAL variable b Global variable list classify the entire list into all general variable special module related variable c New Variabl...

Page 219: ...variable this item is not provided e Delete variable this item is not provided f OK registers the inputted or selected variable as External variable at local variable list and closes the dialog box g...

Page 220: ...able displays direct variable list b Bit View for bit type direct variable displays direct variable in diverse type Displayed in Bit X0 byte B0 0 word W0 0 double word D0 0 long word L0 0 c New Variab...

Page 221: ...s the dialog box to edit the direct variable comment e Delete Variable deletes the selected direct variable from direct variable list f OK applies the inputted or selected item and closes the dialog b...

Page 222: ...st based on parameter number block index d Parameter number inputs setting number per the selected flag item For high speed link range is 0 12 For P2P range is 0 8 For PID range is 0 63 Those can be d...

Page 223: ...variable and there is no comment recalls the dialog box to add the direct variable comment b Direct Variable displays the inputted direct variable c Type displays the type of direct variable d Comment...

Page 224: ...Settings button is activated You can allocate memory for structure member e Initial Value inputs initial value of variable In case data type is array or structure Initialization button is activated Yo...

Page 225: ...ve the cursor onto the location to connect to 2 Select the Shortcut Key of Horizontal Line Input Or select Horizontal Line on the tool box and select the Edit area to input the Horizontal Line in 2 Ve...

Page 226: ...the location to input the coil on 2 On the tool box select the type of the coil to input and then click the edit area Or click the Shortcut Key applicable to the coil to input 3 After a variable name...

Page 227: ...n block for operation Steps 1 Move the cursor to the location to input the function block 2 On the tool box select the function block to input and then click the edit area Or click the Shortcut Key ap...

Page 228: ...f function a user can set the properties of an input parameter in case of function block a user can select the name and class of an instance g OK Applies the input details and closes the Dialog Box h...

Page 229: ...nction is displayed on the top If the present list is Most Use the top item is determined by the frequency of function block used Notes A function block is registered if the function block is selected...

Page 230: ...rovides a method that a user registers a function block to frequently use in the project Steps 1 Select a Favorite Function in the Selection box 2 Edit the list of function by Edit button and close th...

Page 231: ...to the Favorite Function d Remove deletes a selected function from the Favorite Function e Up move a selected item to a higher level of the favorite function f Down move a selected item to a lower lev...

Page 232: ...t to the LD program 5 2 9 Input Comment It is used to input the Rung and Output Comment The comment displayed on the start position of Rung is called Rung Comment and the comment for the output factor...

Page 233: ...t used to select the Rung Comment to input b Label used to select the Label to input c OK applies the selected details and closes the Dialog Box d Cancel closes the Dialog Box 3 If the Rung Comment Di...

Page 234: ...closes the Dialog Box c Cancel closes the Dialog Box 2 Output Comment Steps 1 Move the cursor to the location to input the output comment on 2 Double click the left mouse button or press Enter key 3 I...

Page 235: ...to refer to from the extended function of JMP Steps 1 Move the cursor to the location to input the label on 2 Select Edit Comment Label Input 3 On the Dialog Box select Label and then press Enter or c...

Page 236: ...e Label being used the selected item is input Notes Up to 16 characters in English 8 in Korean is available for the label Capital Small letters are sorted out for the label The first letter of the lab...

Page 237: ...ded Function on the menu 3 Select an extended function to insert and click OK Dialog Box Comment of Dialog Box a Extended Command inputs an extended function or displays the input extended function b...

Page 238: ...t Cell It is used to insert a new cell in the present cursor position Steps 1 Move the cursor to the location to insert the cell in 2 Select Edit Cell Insert Notes If inserting a cell in Function Bloc...

Page 239: ...new line will be inserted in the present cursor position If an area is selected for Line Insert new lines as many as the lines in the selected area will be inserted If function block is contained line...

Page 240: ...s such as the input contact point and horizontal line to draw in the next cell Steps 1 Move the cursor to the location to delete the cell from 2 Select Edit Delete Cell Notes If there is no data where...

Page 241: ...ve the cursor onto the line to delete 2 Select Edit Delete Line 5 2 17 Copy Cut Paste It is used to copy the data in the selected area or cut the data to copy on the specified position Differently fro...

Page 242: ...Chapter 5 LD Edit 5 32 2 Select Edit Copy on the menu 3 Move the cursor to the area to paste on 4 Select Edit Paste on the menu 2 Cut Steps 1 Select the area to cut 2 Select Edit Cut on the menu...

Page 243: ...aste on 4 Select Edit Paste on the menu 5 2 18 Undo and Redo It is used to Undo the details edited by Program Edit back to its previous state or execute again the details cancelled 1 Undo example of D...

Page 244: ...xecution is unlimited 5 2 19 Program Edit Mode LD Program supports two modes Insert Mode and Overwrite mode It is applied when inserting a contact point or function block Insert mode Overwrite mode 1...

Page 245: ...ntact point type Insertion operation is as same as Insert Cell 2 If inserting a function block Overwrite mode inserts a function block into the present position Insert mode it inserts a space as high...

Page 246: ...Edit 5 36 5 3 View Program It is used to specify the Program View options 5 3 1 View IL Program It is used to convert the LD program to the IL program and displays with the IL program Steps 1 Select...

Page 247: ...f the LD program displayed on the screen 1 Zoom In Sequence 1 Select View Zoom In on the menu 2 Zoom Out Sequence 1 Select View Zoom Out on the menu Notes Ctrl Upward Wheel if available perform Zoom O...

Page 248: ...s used to display the name of the variable for the variable or device used as the contact point coil and function block If no variable is declared for the device it will be displayed as the device nam...

Page 249: ...nly will be displayed Steps 1 Select View Devices Comments Item Notes If View Options are changed it may take some time according to the amount of the edited program steps Print function of the Device...

Page 250: ...utput position Steps 1 Select View Change Columns Increase Columns on the menu If the data in the very right of the present screen is larger than the number of contact points to display it may be disp...

Page 251: ...n Properties It is used to designate the properties of View LD Screen In the screen properties the options of device variable and comment view can be set while magnification and the number of contact...

Page 252: ...e dialog box f Apply applies the settings to the present LD window g Default sets the present settings as the defaults of LD window If creating a new LD program it is displayed in the presently set vi...

Page 253: ...functions will be described below for convenient edit 5 4 1 Block Mask Instruction This is used to specify or cancel the area Block Mask in PLC among the LD programs 1 Block Mask Instruction Setting...

Page 254: ...Chapter 5 LD Edit 5 44 2 Select Edit Set Block Mask 2 Block Mask Instruction Cancel Steps 1 Move the cursor to the rung to cancel the Block Mask instruction...

Page 255: ...ect Edit Remove Block Mask on the menu 5 4 2 Bookmark It allows the user easily to move to an interesting area with the bookmark specified on the line 1 Set Bookmark Steps 1 Move the cursor to the lin...

Page 256: ...Chapter 5 LD Edit 5 46 2 Select Edit Bookmark Set Remove on the menu 2 Bookmark Reset Steps 1 Move the cursor to the line to cancel the bookmark from 2 Select Edit Bookmark Set Reset on the menu...

Page 257: ...Chapter 5 LD Edit 5 47...

Page 258: ...Chapter 5 LD Edit 5 48 3 Reset All Bookmark Steps 1 Select Edit Bookmark Remove All on the menu...

Page 259: ...Chapter 5 LD Edit 5 49 4 Previous Bookmark Steps 1 Select Edit Bookmark Previous Bookmark on the menu...

Page 260: ...5 50 5 Next Bookmark Steps 1 Select Edit Bookmark Next Bookmark on the menu Notes Bookmark will be specified in line unit Bookmark is not an item to edit thus the Set Reset options will not be include...

Page 261: ...escription of Dialog Box a Go to what used to input the line to go to b Program list used to display the list of the present PLC programs c Go to closes the Dialog Box to go to the selected program s...

Page 262: ...list of all the labels will be displayed b Labels list inside the program used to display the list of the labels used in the selected program c Go To closes the Dialog Box to go to the selected label...

Page 263: ...ist of all the rung comments will be displayed b Rung comment list used to display the list of the rung comments used in the selected program c Go to closes the Dialog Box to go to the selected rung c...

Page 264: ...ist of all the END instructions will be displayed b END instruction list used to display the list of the END instructions used in the selected program c Go to closes the Dialog Box to go to the select...

Page 265: ...variable in the program 2 048 Max row no Maximum row available to edit 65 535 Max column no Maximum column available to edit 65 535 6 2 Program Edit 6 2 1 Edit Tools The input of SFC Edit items shall...

Page 266: ...r upward by a blank End Moves the present cursor downward by a blank Ctrl End Moves to the end of the column Notes Among Shortcut Keys in Edit Toolbox s stands for Shift key c for Ctrl key a for Alt k...

Page 267: ...ep is inputted Item of location selected Step Transition Transition start line of parallel branch label selection branch termination line Transition Step Step Block start line of selection branch para...

Page 268: ...to selected edit area Location item Right Action s location is the right of step when selecting step Bottom Action s location is the bottom of action when selecting action The no of step connected wit...

Page 269: ...3 New block Transition is inputted Notes Block input location standard is same with step input 6 2 5 Input label Inputs label Steps 1 Move the cursor to the location you want edit 2 On the tool box s...

Page 270: ...Label is inputted ahead of the selected step or block 6 2 6 Input Jump Inputs Jump Steps 1 Move the cursor to the location you want edit 2 On the tool box select the Jump to input and then click the...

Page 271: ...ansition The Jump is available within same program 6 2 7 Input left branch Input left branch Example is the selection branch 1 Make branch Steps 1 Move the cursor to the location to start branch 2 On...

Page 272: ...ion location 6 The branch is made Notes When selecting the branch start location the selection branch or parallel branch is made according to branch start location Item of branch start location Line s...

Page 273: ...eft branch and click the edit area or press shortcut key 3 New branch is inputted Notes Branch s increase no is not limited but because of horizontal row limit you may not increase it more than row li...

Page 274: ...Move the cursor to the location to start the branch 2 On the tool box select the right branch and click the edit area Or press shortcut key 3 It displays the branch start location and the branch conne...

Page 275: ...rmination location 6 The branch is made Notes The principle to make the selection or parallel branch is same with left branch So refer to the 6 2 7 input left branch 2 Increase branch Steps 1 Move the...

Page 276: ...ranch and click the edit area Or press shortcut key 3 New branch is inputted 6 2 9 Edit Step Property Edit step name comment and etc Steps 1 Move the cursor to the location you want to edit 2 Press En...

Page 277: ...ocal variable list f OK save the contents and close window g Cancel closes window Notes The initial step is execution start step of program You can designate only one When checking the program it chec...

Page 278: ...ion as variable or program d List displays the other transition used in the current program e Find You can designate variable from local variable list f Less hides the list g OK saves the contents and...

Page 279: ...Chapter 6 SFC Edit 6 15 Steps 1 Move the cursor to the location you want edit 2 Press Enter key or double click the mouse left button Dialog box...

Page 280: ...after executing the action deactivates the coil in the action e List displays the other actions used in the current program f Qualifier It can act differently according to action qualifier g Time inp...

Page 281: ...cution during one scan SD Stored time Delay If step is activated action starts after setting time and it continues its execution unit R qualifier is executed If R qualifier is executed before setting...

Page 282: ...y or double click the left mouse button Dialog box Dialog box description a Name inputs block s name b Comment inputs block s comment c List displays other block used in the current program d Less hid...

Page 283: ...Chapter 6 SFC Edit 6 19 6 2 13 Edit label property Edit label s name Steps 1 Move the cursor to the location you want to edit 2 Press Enter key or double click the left mouse button Dialog box...

Page 284: ...Label inputs label s name b List displays other label used in the current program c OK saves the contents and close window d Cancel closes the dialog box 6 2 14 Jump property Edit jump s name Steps 1...

Page 285: ...on Dialog box Dialog description a Jump inputs jump s name b List displays other label used in the current program c OK saves the contents and close window d Cancel closes the dialog box Notes Jump na...

Page 286: ...rity Steps 1 Move the cursor to the select branch s start location 2 Select Edit Set Branch Priority on the menu 3 Click the select branch s start location in order and set branch priority 4 If you cl...

Page 287: ...r When not setting branch priority compile is done from let to right Program is executed from left to right 6 2 16 Erase Branch Priority Erase branch priority Steps 1 Move the cursor to the branch tha...

Page 288: ...n be deleted with step transition and block according to selected location Sometimes deleting is not available In this case editing is canceled automatically after warning message When deleting the br...

Page 289: ...Chapter 6 SFC Edit 6 25 4 Move the cursor to the location you want to paste 5 Select menu Edit Paste...

Page 290: ...ally When copying the branch start point the factor under branch is copied with branch start point When pasting the branch select the branch start point The selection branch can be pasted into the sel...

Page 291: ...Chapter 6 SFC Edit 6 27 3 Move the cursor to the location to paste 4 Select edit paste on the menu...

Page 292: ...Chapter 6 SFC Edit 6 28 6 2 19 Undo and Redo Here describes how to undo and redo contents 1 Undo example Steps 1 Move the cursor to the location you want to delete 2 Select Edit Delete on the menu...

Page 293: ...e menu 4 Editing is canceled 2 Redo Example 1 Select Edit Redo the menu Notes Undo and Redo is available about all factor edited It doesn t matter how many times you undo 6 2 20 Program Edit Mode SFC...

Page 294: ...t View Zoom In on the menu 2 Zoom Out Steps 1 Select View Zoom Out on the menu Notes Ctrl Upward Wheel if available perform Zoom Out step by step Ctrl Downward Wheel if available perform Zoom In step...

Page 295: ...t area d Step column width sets width of vertical column of step transition location e Action column width displays width of vertical column of action location f Utilize SFC split window You can use S...

Page 296: ...Chapter 6 SFC Edit 6 32 Notes Step column width s range is 20 200 Action column width s range is 70 400 1 Show comment Not Showing comment Showing comment 2 Show print area 3 Show page number...

Page 297: ...Chapter 6 SFC Edit 6 33 4 Step column width Step column 68 pixel basic screen Step column 100 pixel screen 5 Action column width Action column100 pixel basic screen Action column 150 pixel screen...

Page 298: ...Chapter 6 SFC Edit 6 34 6 Utilize SFC split window With split window Without split window...

Page 299: ...Chapter 6 SFC Edit 6 35 7 Split window contents Viewing the selected action transition when selecting action Viewing the identical SFC program...

Page 300: ...Chapter 6 SFC Edit 6 36 Viewing the fix split window contents displays the previous screen 8 Split window position Right...

Page 301: ...C Edit 6 37 Bottom 6 3 3 View Block Action Transition List You can check other program list used in the SFC program and edit name and comment Steps 1 Select menu View Block Action Transition List 2 Di...

Page 302: ...e location you want to open program 2 Select View Open Action Transition on the menu 3 Open the selected program with the new window 6 3 5 Devices Variables Displays variables or devices used in the c...

Page 303: ...gram amount When printing Devices Variables Comments is supported For more details refer to the Ch 14 6 3 7 Adjust Contact No It is used to adjust the number of contact points displayed in the screen...

Page 304: ...9 31 The number of contact points minimally set in LD program used for SFC action and transition is 5 6 3 8 LD Properties In here you can edit View Options about device variable comment Magnification...

Page 305: ...loses dialog box f Apply applies setting contents to LD window g Default sets current setting as default When you make new LD program it is displayed with current setting h Reset restores the current...

Page 306: ...on For convenience of edit here describes additional function 6 4 1 Bookmark If you set Bookmark you can go there easily 1 Bookmark setting Steps 1 Move the cursor to the location you want to set book...

Page 307: ...Chapter 6 SFC Edit 6 43 2 Remove Bookmark Step 1 Move the cursor to the location you want to remove bookmark 2 Select Edit Bookmark Set Remove on the menu...

Page 308: ...Chapter 6 SFC Edit 6 44 3 Remove all bookmark Steps 1 Select Edit Bookmark Remove all on the menu 4 Previous Bookmark Steps 1 Select Edit Bookmark Previous Bookmark on the menu...

Page 309: ...6 45 5 Next Bookmark Steps 1 Select Edit Bookmark Next Bookmark on the menu Notes Bookmark will be specified in cell unit Bookmark is not an item to edit thus the Set Reset options will not be include...

Page 310: ...Dialog box Dialog box description a Go to line inputs line you want to go b Program list displays the program list of PLC c Go to closes dialog box and goes to selected step d Close Closes dialog box...

Page 311: ...lect All program it displays list of all label b Label list displays list of label used in the selected program c Go to closes dialog box and goes to selected label d Close closes dialog box without s...

Page 312: ...l program it displays list of all rung comment b Label list displays list of rung comment used in the selected program c Go to closes dialog box and goes to selected rung comment d Close closes dialog...

Page 313: ...All program it displays list of all END command b Label list displays list of END command used in the selected program c Go to closes dialog box and goes to selected END comment d Close closes dialog...

Page 314: ...ces and variables used as the operand of extended function 7 1 1 View All Device It is used to display all the devices used in the present PLC Steps 1 Select View Cross Reference on the menu Cross Ref...

Page 315: ...Whenever the column is clicked it will be aligned in the ascending and then descending sequence repeatedly A triangle will be displayed on the basic column of the present alignment The normal triangle...

Page 316: ...function Click the right mouse button to select Lock Data 5 Delete Data It deletes all the details of the Cross Reference Window Notes It may take some time accordingly based on the number of devices...

Page 317: ...Chapter 7 Programming Convenience 7 4...

Page 318: ...the Edit page to apply Output cross reference instantly function 7 1 3 Check Duplicated Coil Instantly It is used to inspect the applicable device or variable if used as duplicated whenever the coil i...

Page 319: ...Notes If Check duplicated coil instantly is used the edit speed may get slow Select Tools Options Edit Ladder Mnemonic on the Edit page to apply Check duplicated coil instantly function Check duplica...

Page 320: ...display the number of the applicable bit devices used in the program The devices of S area T area and C area are displayed The column displays the devices of the types smaller than these designated wh...

Page 321: ...and Long word can be selected Notes Select Update Used Device on the context menu to display the used devices After Used Device is executed if you edit the program the content of the Used Device is n...

Page 322: ...e of a device used in the program e Type displays the device type used in the program f IN OUT displays whether the device is used as Input or Output g Instruction Type shows for which instruction typ...

Page 323: ...items are as follows Logic Error checks for LD connection errors Grammar Error checks for errors related with grammar used in SBRT CALL FOR NEXT etc Duplicated Coil Error checks for errors if output f...

Page 324: ...clared subroutine which was not used Ignore Warning or Error can be selected e Duplicated coil error used to check for the Duplicated Coil error used to select Error or Warning for the Duplicated Coi...

Page 325: ...Chapter 7 Programming Convenience 7 12 Notes In XGI series PLC many programs can be added to the PLC item and the SBRT call is available between programs Dialog Box...

Page 326: ...x a Checking Device Specification sets the device and variable area to check b Checking Option designates whether to check duplicated coil for a function block output c OK applies the setting and clos...

Page 327: ...plicated Coil In the Function block output check the range is determined by the parameter type 7 3 2 Check Result Trace If any error occurs on the program its details will be displayed on the Program...

Page 328: ...ction Correct the LD program in order not to let input and output disconnect 2 L0100 It is a short circuit This error will occur if the area connected with OR is connected with the horizontal line wit...

Page 329: ...ted This error will occur if OR LOAD connected incorrectly Action Search for OR LOAD incorrectly connected and then correct the LD program 5 L0400 Specified number of contact points is exceeded This e...

Page 330: ...input terminal 7 L0402 Incorrect input This error will occur if the input unnecessary is existent Action Delete the input unnecessary from the input terminal 8 L0404 The maximum number of MPUSH exceed...

Page 331: ...ction in error This error will occur if the application instruction nonexistent in XGI series PLC is used Action Replace the instruction with the one provided by XGI series PLC Notes This error will o...

Page 332: ...tion Delete the duplicated label or change the name of the label 2 E1002 Label Label Name nonexistent This error will occur if JMP is used to refer to the nonexistent label Action Add the label where...

Page 333: ...he application JMP instruction Notes The error number E1003 E1004 will occur only when Warning or Error is selected for the label not referred to in the Grammar Error Inspect item Refer to 7 3 1 Progr...

Page 334: ...subroutine Subroutine Name The subroutine shall be finished with the RET instruction Action Add the RET instruction in the subroutine block 7 E2010 Subroutine call nonexistent The call of nonexistent...

Page 335: ...22 8 E2003 Subroutine Subroutine Name is positioned prior to END instruction SBRT and RET positioned prior to END instruction cause an error Action Move the application instructions SBRT and RET to th...

Page 336: ...be used or add the CALL instruction Notes The error number E2011 will occur only when Warning or Error is selected for the subroutine not referred to in the Grammar Error Inspect item Refer to 7 3 1...

Page 337: ...d Action Check the number of the subroutines used Notes The maximum number of subroutines usable depends on the PLC type Refer to XGI CPU manual for details 12 E3001 Identical NEXT unavailable If the...

Page 338: ...will cause an error Action Let the number of FOR instructions and NEXT instructions identical 14 E3003 FOR NEXT can not be duplicated more than 16 times FOR NEXT can be duplicated up to 16 blocks If...

Page 339: ...If RET or END is included between FOR and NEXT it will cause an error Action Change the location of END and RET instruction positioned between FOR NEXT blocks 16 E3005 BREAK singly used BREAK instruct...

Page 340: ...le program item to the Project Scan Program 18 00003 There is no program to check There is no program in the present PLC item Action add a scan program and try again 19 E1300 An element instruction no...

Page 341: ...more INIT_DONE instruction to end the initialization task Action although the initialization task is added the conditions to end the initialization task are not designated In order to normally end the...

Page 342: ...ction 27 L0704 Invalid output connection Action the line connection of function block is only available for BOOL type Since line can not be connected to other type but BOOL check the line output 28 L0...

Page 343: ...e size of array used in MOVE function as the IO parameter should coincide 31 L0708 Unknown function Action unavailable function Check whether the function is user defined function 32 L0709 Instance na...

Page 344: ...if this check box is selected the result will be yielded to Find 2 result windows d Direction used to specify the location to find upward or downward from the line presently selected in the respective...

Page 345: ...ayed on the find window only with Find All executed Since Find All finds all details in the applicable documents it is insignificant to select the direction Advanced is displayed only in Ladder editor...

Page 346: ...vice It is used for LD SFC IL Global Direct Variable Variable and Local Variable in common Details of this function will be described below based on LD Steps 1 Select the basic cell of the direction 2...

Page 347: ...nd Replace 8 4 3 Specify the device to find the direction and the options 4 Click Find Next If on the Dialog Box any device is found identical to the detail as specified move to the device whose cell...

Page 348: ...vice identical right from the next cell of the selected cell to the last of the programs and then the device identical again from the first of the programs to the basic cell 8 1 2 Find All Device It i...

Page 349: ...Replace 8 6 4 On the find window select the line to find and then click Enter to move the cell to the line of the applicable LD program Notes Find All finds the device in all the programs included in...

Page 350: ...2 XG5000 has two Find result windows Basically the result is yielded to Find 1 result window but if this check box is selected the result will be yielded to Find 2 result windows e Direction used to s...

Page 351: ...ed on the Find windows 1 and 2 only with Find All executed Since Find All finds all details in the applicable documents the direction is not significant to select Advanced is displayed only in LD edit...

Page 352: ...ext It is used for LD SFC IL Global Direct Variable Variable and Local Variable in common Details of this function will be described below based on LD Steps Select the basic cell of the direction 1 Se...

Page 353: ...ce 8 10 2 Specify the String to find the selection options and the direction 3 Click Find Next If on the dialog box any string is found identical to the detail as specified it moves to the string whos...

Page 354: ...yed Namely if the direction is set Downward it will start to find the String identical right from the next cell of the selected cell to the last of the programs and then the String identical again fro...

Page 355: ...Chapter 8 Find Replace 8 12 2 Specify the string to find the selection options and the direction 3 Click Find All Find All will yield its result on the find message window as below...

Page 356: ...eplace 8 13 4 On the find window select the line to find and then click Enter to move the cell to the line of the applicable LD program Notes Find All finds the String in all the programs included in...

Page 357: ...Find Replace 8 14 a b c d e i f k j g l h m 8 3 Replace Device This function is used to change the device previously made in LD Editor IL Editor or Variable Comment Editor Dialog Box Description of Di...

Page 358: ...rd less than L area respectively h Direction used to specify the location to find upward or downward from the line presently selected in the respective editor i Range if selecting Range Device Change...

Page 359: ...editor SFC editor and Variable Comment in common This is the function to fine the previously created device Details of this function will be described below based on LD Steps 1 Select the basic cell...

Page 360: ...d replace the type and the direction 4 Click Replace If the device of the cell presently selected is identical to the detail to find replace the present cell to the detail as specified on the dialog b...

Page 361: ...ce to move to the next cell identical to the detail to find as specified on the dialog box regardless of the execution of Replace Replace will find all the present programs based on the selected cell...

Page 362: ...is used for LD editor SFC editor and Variable Comment editor in common This is used to find the previously created device Details of this function will be described below based on LD 1 All Change Ste...

Page 363: ...ge It is used to change the consecutive devices in bulk For example the devices of MX1 MX10 can be changed to MX100 MX109 ex If the detail to fine is MX1 the detail to change is MX100 and the number o...

Page 364: ...Chapter 8 Find Replace 8 21 3 Click Replace All Notes Replace with range is available only for the devices not for the constants...

Page 365: ...be also replaced as applicable when the string is replaced If this is not checked the variable will not be included in the replace when the string is replaced f Direction used to specify the location...

Page 366: ...en Advanced button is used 8 4 1 Replace String It is used for LD editor SFC editor and Variable Comment editor in common It is used to find the previously created device Details of this function will...

Page 367: ...place the selection options and the direction 4 Click Replace If the string of the cell presently selected is identical to the detail to find replace the present cell to the detail as specified on the...

Page 368: ...s specified on the dialog box regardless of the execution of Replace Replace will find all the present programs based on the selected cell when the device Replace dialog box is displayed 8 4 2 Replace...

Page 369: ...the details to Find and Replace the selection options and the direction 3 Click Replace All 4 If Replace All is complete in the present program the following message box will appear for you to decide...

Page 370: ...27 8 5 Find Again Find Again is used to find the details of Find Device or Find String again if once executed previously If Find was not executed previously it will be inactive Steps Select Find Repla...

Page 371: ...ith PLC operation Steps 1 On the project tree double click Parameter Basic Parameters 1 Basic Operation Setting Dialog Box Description of Dialog Box a Basic Operation Settings used to specify setting...

Page 372: ...t even while being debugged h Keep Output when an error occurs used to decide to output the data to the module as usual or not even when an error or a specific input occurs i Keep Output when converti...

Page 373: ...y for Retain Area in the Basic Parameter information b M area Retain setting sets the M area retain area to preserve the data when turning on PLC c Set the size of the data preservation area It can be...

Page 374: ...tinuously run although an error occurs on the fuse connection status of the module during PLC RUN c If this option is selected PLC will continuously run although an error occurs on I O module during P...

Page 375: ...s transferred in 7 or 8 data bits d Stop bit changes the time if time is measured by bit required to transfer each String e COM speed The maximum speed of the data to transfer through this port will b...

Page 376: ...re as follows Cold Restart a It is executed when setting the restart mode of parameter as cold restart b First of all it clears every data but variables of which initial value is set to 0 c Even thoug...

Page 377: ...og Box Description of Dialog Box a Module List displays the base module information and the module information based on slots If no module is designated in the slot it will be displayed in default b S...

Page 378: ...ule information Notes Refer to XG PD manual for details on the communication module information setting Refer to APM manual for details on the positioning module information setting b Print prints the...

Page 379: ...elect the base module to delete from the device list 2 Click the right mouse button to select Delete Base 3 Delete or OK message box will be displayed Click OK button to delete the information of the...

Page 380: ...module 4 Select the description column and then click the right mouse button to select Edit And input the description String for the applicable slot Notes Up to 128 characters in English up to 64 char...

Page 381: ...3 I O Parameter Edit Function Data editing details of Copy Cut and Paste will be described below based on slots 1 Copy Paste Steps 1 Select the slot to copy 2 Click the right mouse button to select Co...

Page 382: ...Chapter 9 Parameter 9 12 4 Click the right mouse button to select Paste 2 Cut Paste 1 Select the slot to cut 2 Click the right mouse button to select Cut...

Page 383: ...Chapter 9 Parameter 9 13 3 Select the slot to paste 4 Click the right mouse button to select Paste 3 Undo Steps 1 Select the slot to delete...

Page 384: ...Chapter 9 Parameter 9 14 2 Click the right mouse button to select Delete 3 Click the right mouse button to select Undo 4 Redo Steps 1 Click the right mouse button to select Redo...

Page 385: ...g the slot columns where the slot number is displayed as many as desired 9 2 4 Detailed Module Information Setting How to set the detailed module information will be described Double click the mouse o...

Page 386: ...ic Parameters The input filter used to inspect the input signal will process the applicable signal as normal input if kept identical for the filtering time The figure below is with the input filter va...

Page 387: ...is assigned for 8 points and the emergent output mode can be specified per channel b OK applies the specified items and closes the Dialog Box c Cancel closes the Dialog Box Notes Emergency output val...

Page 388: ...applies the changed items and closes Dialog Box d Cancel closes Dialog Box Notes I O module is mixed type of input module and output module The input part has the characteristics identical to the inpu...

Page 389: ...alog box automatically If the user changes the parameter value to any other value than the default the String color will change Black Blue c OK applies the changed items and closes the dialog box d Ca...

Page 390: ...ter value If the user changes the parameter value to any other value than the default the String color will change Black Blue b OK applies the changed items and closes the Dialog box c Cancel closes t...

Page 391: ...meter 9 21 7 High speed Counter Module On the I O Parameters Setting Dialog box select High Speed counter module and then click Details to display the Parameters Setting Dialog Box as shown below Dial...

Page 392: ...r 2 phase 1 multiplier Additional Function Mode N A Count clear Count latch Sampling count Measure input frequency Measure rotations per unit time Count Disable N A Range Value ms 0 60000 0 Compared O...

Page 393: ...Notes Refer to APM manual for details on the positioning module Refer to XG PD manual for details on the communication module 9 2 5 I O Parameter Print Function This function is used to print the spec...

Page 394: ...le information for specified slot module 2 Print Preview Steps 1 Select Print Button Print on the I O Parameter Dialog Box 2 Click Preview on the Print Dialog Box 3 Copy to Clipboard It is used to pri...

Page 395: ...fy the connection network with PLC 10 1 1 Local Connect Setting RS 232C or USB connection is available for Local Connect Setting Step 1 Select Online Connect Settings on the menu Dialog Box Descriptio...

Page 396: ...ction to PLC is not resumed within the specified time g Retrial times used to specify the times to retry to connect with PLC if the communication connection fails h Read Write data size in PLC run mod...

Page 397: ...port number Connection in XG5000 and Connection in XG PD device monitor and system monitor are available with one PLC at the same time However it shall be of identical Connect Options 2 Connection of...

Page 398: ...ick OK to save the Connect Options Dialog Box Notes Ethernet shall be connected with PC to connect to Ethernet IP is as specified in Ethernet communication module Use Ping in Execute on Windows start...

Page 399: ...communication port c Baud rate specifies modem s communication speed d Phone number used to input modem s number of phone if it s dial up modem e Station number used to input the station Number specif...

Page 400: ...ation module s slot number of local PLC base d Station number used to input communication module s specified station Number of Remote 1 e IP address used to input communication module s specified IP a...

Page 401: ...net are available for the communication modules b Base number used to specify communication module s base number of local PLC base c Slot number used to specify communication module s slot number of l...

Page 402: ...ns Steps 1 Select Online Connect on the menu 2 The Dialog Box will appear while connecting 3 If connected to PLC the Online menu and Online status will be displayed 4 If password is setup in the PLC P...

Page 403: ...roject name on the project window and on the status display line If any other application program is already connected while PLC connected its main Online functions are unavailable After PLC connected...

Page 404: ...status of PLC is normal 2 USB z Check if USB cable connection between Computer and PLC is correct z Check if the computer found the PLC as an USB device correctly a Connect the computer and PLC with...

Page 405: ...on the XG5000 menu bar is clicked z Check if the Ethernet module responds correctly if the IP and Gateway of Ethernet module is correct a Click Execute which can be seen when Start button of Windows i...

Page 406: ...Chapter 10 Online 10 12 z Check if the status of PLC is normal...

Page 407: ...Dialog Box a Selection Tree selects the data to transfer to PLC b OK starts to transfer the data to PLC if clicked c Cancel cancels to write data d Clear PLC recalls dialog box to clear internal memo...

Page 408: ...ll items size c Displays progressing rate of the present item d Displays progressing rate of all items e Displays progressing time elapsed till present f Cancel Stops transferring the data Notes The s...

Page 409: ...ject Steps 1 Select Online Connect to connect to PLC 2 Select Online Read 3 Click OK after items to upload from PLC are selected The uploaded items will be applied to the present project Notes Refer t...

Page 410: ...rm that the program is being converted to an executable code inside PLC This Dialog Box may not be closed for up to 30 seconds according to the program size If converted to Run mode the following Dial...

Page 411: ...PLC 3 Select an object to compare and then click Compare Dialog Box Description of Dialog Box a Current project means the project open in XG5000 b Compare compares between the selected items c Projec...

Page 412: ...set PLC Dialog Box Notes Reset and Overall reset are available for its type Reset when PLC powered back it will delete error warning information to allow power on Error warning may occur continuously...

Page 413: ...elect Online Connect to connect to PLC 2 Select Online Clear PLC 3 Select items to delete and then click Clear to start Clear PLC 10 8 1 Clear Item It deletes the contents of the project saved in PLC...

Page 414: ...Box Description of Dialog Box a List of memory areas to select shows the memory areas in PLC Start End address to delete can be specified by the user b Clear deleted the selected items c Select All s...

Page 415: ...an be set 10 9 1 CPU Information Detailed information of PLC CPU can be checked Steps 1 Select Online Connect to connect to PLC 2 Select Online PLC Information 3 Select the CPU tap Dialog Box Descript...

Page 416: ...log Box a Scan Time shows the Maximum Minimum Current scan time of PLC connected If Fixed Cycle Operation is set in the basic parameter it displays the fixed cycle b Program Memory used shows the down...

Page 417: ...Chapter 10 Online 10 23 Dialog Box Description of Dialog Box a List shows the list and size of the programs saved a...

Page 418: ...onnect to PLC 2 Select Online PLC Information 3 Select the Password tap Dialog Box Description of Dialog Box a Current Password used to input the password saved in PLC b New password used to input a n...

Page 419: ...o 8 letters is available for the password Letters used as password will be classified into capital or small Special letters can be used for password If password is setup in the PLC the PLC asks the pa...

Page 420: ...t Online PLC Information 3 Select the PLC RTC tap Dialog Box Description of Dialog Box a State shows PLC timer setting status If the timer is not specified PLC time will not be read b Date displays da...

Page 421: ...ys the history data of error warning Change Mode and Shut down Log saved in PLC 10 10 1 Error Log Steps 1 Select Online Connect to connect to PLC 2 Select Online PLC History 3 Select the Error Log tap...

Page 422: ...ted from the history along with action to take against the error c Read All reads and displays all PLC histories d Update reads PLC history again e Save saves PLC history on file f Clear deletes PLC h...

Page 423: ...Chapter 10 Online 10 29 10 10 3 Shut down Log History It shows the Shut down Log history of PLC Dialog Box Notes Base number where the power is cut also will be displayed...

Page 424: ...e saved on csv file This file can be open through Excel or other String editing programs Double click the first column of the list to change the arrangement method On each Dialog Box displayed 100 his...

Page 425: ...ng dialog box will appear If the error is I O parameter discordant I O installation error fuse error I O Read Write error special communication module error the applicable error s slot information wil...

Page 426: ...it runs PLC through the program in the flash memory PLC operation in Run mode it means that the operation mode changes from Stop to Run and that the operation mode is Run when PLC is powered back on S...

Page 427: ...memory operation mode is specified the program can be copied to the flash memory after Program Write or Modification Write during Run The flash memory operation mode setting is prepared to recover th...

Page 428: ...etting Forced I O of the I O refresh area can be specified in PLC Steps 1 Select Online Forced I O Setting Notes To obtain Forced I O information it will take about 5 sec at a speed of 115200bps with...

Page 429: ...Chapter 10 Online 10 35 Dialog Box a b c d f i e h k g j l...

Page 430: ...ble The data displays the forced value If selected 1 will be the forced value and if not 0 will be the forced value However it is effective only when the flag is in Enable status Flag Data Forced Valu...

Page 431: ...module installed on the actual PLC is 64 bit and less the flag and data can be specified for the other bits than the output module points Ex If 32 poit output module is installed on the main base 1 sl...

Page 432: ...Chapter 10 Online 10 38 1 Forced I O Setting Steps Example the 4th bit of Base 0 Slot 0 forced output 1 7th bit forced output 0 1 Select base 0 and slot 0...

Page 433: ...Chapter 10 Online 10 39 2 Select the flag and data of the bit 3 QW0 0 0 is registered to the established device...

Page 434: ...t 7 As the forced output value of the bit 7 is 0 no data needs to be selected Since QW0 0 0 is already registered to the pre set device it is not added again 4 Select the Forced Output Enable Flag and...

Page 435: ...Chapter 10 Online 10 41 2 Forced I O Cancel Steps Example the 4th and 7th bit of Base0 Slot 0 forced value to cancel 1 Move to QW0 0 0 Use the button or directly input the area desired to move to...

Page 436: ...display the value of the calculation result of the program In the case of the forced input monitoring will be with the forced value since the forced input value is updated in the monitor area In the...

Page 437: ...decide to skip the base I O or not If the base module is skipped all slots in the base will be I O skipped b Slot Skip I O used to decide to skip the slot I O or not c Show Existing Base Only shows e...

Page 438: ...Chapter 10 Online 10 44 1 Skip I O Setting for each slot Steps 1 Select the base with the slot to specify Skip I O 2 Select the slot to specify the Skip I O...

Page 439: ...Chapter 10 Online 10 45 3 Select the check box of the status column At this moment mark will be added to the base 4 If you press OK the changed items are displayed...

Page 440: ...base to cancel the Skip I O 2 Select the slot to cancel the Skip I O 3 Cancel the selected check box of the status column mark will be deleted if there is no slot any more where Skip I O is specified...

Page 441: ...Chapter 10 Online 10 47 3 Base Skip I O Setting Steps 1 Select the base to specify the base Skip I O 2 Select the check box...

Page 442: ...Chapter 10 Online 10 48 3 If you press OK the changed items are displayed 4 Base Skip I O cancel Steps 1 Select the base to cancel the base Skip I O...

Page 443: ...2 Cancel the check box selected As the base Skip I O is canceled the Skip I O for each slot can be specified or canceled 3 If you press OK the changed items are displayed Notes Click OK button to appl...

Page 444: ...y base module s fault mask or not If the base module s mask is specified all slots in the base will be of the fault mask b Slot Fault Mask used to decide to apply the fault mask for each slot or not c...

Page 445: ...ormation dialog box which is similar to Fault Mask or I O skip dialog box when Online I O Information is selected I O Sync Button will be activated when PLC is STOP Mode The I O Parameter of XG5000 pr...

Page 446: ...ng PLC operation Note Module Changing Wizard can be executed only in Run mode In case there is PLC error you can t start Module Changing Wizard Steps 1 Select Online Module Changing Wizard 2 Select th...

Page 447: ...es List displays the information of the slot installed on the base module d Back It will be inactive at the module selection stage e Next used to move to the module confirming stage It will be active...

Page 448: ...ed to move to the module selection stage d Next used to move to the Removing Module e Cancel closes the Module Changing Wizard 4 Click Next button if the information displayed is identical to the modu...

Page 449: ...ed to move to the module installation stage d Cancel closes the Module Changing Wizard 6 If the module removed click Next button Or click Back button to move back to the previous stage Or click Cancel...

Page 450: ...e c Next used to move to the confirming stage of the module installation d Cancel closes the Module Changing Wizard 8 If the module installed click Next button Or click Back button to move back to the...

Page 451: ...ialog Box Description of Dialog Box a Description displays the comment of the module change complete stage b Back It will be inactive since going back to previous stage is unavailable after the module...

Page 452: ...Skip I O for the module to change 2 Set the Fault Mask for the module to change 3 Remove the module from PLC 4 Install a new module 5 Release the Skip I O for the applicable module 6 Select Online PL...

Page 453: ...ents are registered in PLC which will monitor the registered events and record the event history if generated The event history can be used to operate and debug the system 10 17 1 Example The event is...

Page 454: ...Chapter 10 Online 10 60 Steps 1 Make a program as follow 2 Write the program to the PLC and select Monitor Custom Event on the Online menu...

Page 455: ...each items as figure below In Event setting window input M100 in Device area and Select Transition on Event condition and Information in Type 4 Open Associated Device Setup dialog box and setup the bi...

Page 456: ...g box and click OK button A message box will be displayed as figured below since the event setup has been changed Click Yes button on the message box 6 Change the PLC mode RUN 7 Select Monitor Custom...

Page 457: ...Online 10 63 8 An Event History dialog box will be displayed when an event item is selected and Properties button on the menu is clicked where the list of associated device and the details of event c...

Page 458: ...Chapter 10 Online 10 64 10 17 2 Event Setting Steps 1 Select Monitor Custom Events 2 Click the event setting tab on the user event dialog box Dialog Box a b c d e f...

Page 459: ...tom Events presently specified Notes Refer to 1 User Event Item Add for details on each item of the events list c Menu button displays the event setting menu d Apply PLC applies the changed items to P...

Page 460: ...ted the user event will occur whenever the event device value changes d Type used to specify the user event type An applicable type can be selected among Information Alarm and Warning Notes Event type...

Page 461: ...tion of Dialog Box a Available displays the sum of the size of the each Associated device type input which is available up to 16 bytes b Associated devices list used to input the Associated devices Up...

Page 462: ...vice input Supported data type and its respective byte size are as shown below Type Size Type Size BIT 1 Byte REAL 4 Bytes USINT 1 Byte LREAL 8 Bytes UINT 2 Bytes INT 2 Bytes UDINT 4 Bytes DINT 4 Byte...

Page 463: ...ter 10 Online 10 69 2 Select Edit Event 3 Click OK to apply the changed items or click Cancel to cancel it 3 Delete Event It deletes the user event input Steps 1 Select the event to delete 2 Select de...

Page 464: ...the event or click Disable not to allow 5 Event Allowance Setting Each event will be decided to be enabled or not Steps 1 Select the event to make enabled 2 Select the Event Allowance column If the ev...

Page 465: ...Chapter 10 Online 10 71 2 Move to the position to paste on 3 Select Paste 7 Custom Event Cut Paste Steps 1 Select the event to cut 2 Select Cut...

Page 466: ...4 Select Paste 8 Delete All Steps 1 Select Delete All 9 Save Event Since the user defined event is saved in PLC it shall be additionally saved to manage as files Steps 1 Select Save Event 2 Input a f...

Page 467: ...ined event setting from the file Steps 1 Select Open Event 2 Select a file to read and then click OK button Notes The event if opened will be added to the list of the present events Up to 10 events is...

Page 468: ...74 10 17 3 Event History It reads the user event history saved in PLC to display its applicable details Steps 1 Select Monitor Custom Event 2 Select the Event History tab on the user event dialog box...

Page 469: ...related menu c Apply PLC inactive on the event history page d OK applies the changed items and closes the Dialog Box e Cancel closes the Dialog Box Notes Refer to 1 Detailed Event History for the resp...

Page 470: ...he date an event occurs in Year Month Date b Time displays the time an event occurs in Hour Minute Second MS c Condition displays event details specified in event setting items Notes Refer to 1 Custom...

Page 471: ...button clicked on View in hexadecimal or View as specified e Back displays the previous event history f Next displays the next event history g Copy copies the present event history h Close closes the...

Page 472: ...Chapter 10 Online 10 78 Step View Information 2 Select View Information Step View Warning 3 Select View Warning Step View Alarm 4 Select View Alarm...

Page 473: ...ect on the menu for on line connection to PLC 2 Select Monitor Start Stop Monitoring on the menu to start monitoring 3 If LD or IL program is active it will be now in monitoring mode changed Notes Whe...

Page 474: ...t Online Connect on the menu for on line connection to PLC 2 Select Monitor Start Monitoring on the menu to start monitoring 3 Select device or variable on the program or variable monitoring window 4...

Page 475: ...ent value changed will be too in hexadecimal b The value may not be input according to its display type In other words if displayed in hexadecimal it can be input in unsigned decimal c When OK button...

Page 476: ...n it is momentarily stopped Steps Select Monitor Resume on the menu to restart monitoring Notes a PLC is in Run mode even if monitoring is momentarily stopped b Momentarily stopped monitoring only can...

Page 477: ...name to stop monitoring momentarily f Condition used to select conditions to stop monitoring momentarily g Set value used to input condition value to stop monitoring momentarily h Type displays a vari...

Page 478: ...Monitoring can be set up to 10 b Items in error will not be saved even if OK button pressed c Error is displayed in pink d String type does not support the function of Pause Monitoring e Among 5 condi...

Page 479: ...m will be changed to monitoring mode 3 Change Current Value Select Monitor Change Current Value on the menu Monitor display of contact point 1 Ordinarily open contact point If applicable contact point...

Page 480: ...lue b Reverse coil If applicable coil s value is On status device or variable value will be displayed in red and the power flow inside the coil will not be displayed c Set coil displayed as identicall...

Page 481: ...tart Stop Monitoring on the menu Notes a All kinds of Edit are unavailable except Modification during Run Mode when monitored b Refer to the 1st clause of this chapter Monitor in Common for details on...

Page 482: ...device d Value used to display applicable device value when monitored The value can be changed through Change Current Value of monitoring e Type displays the type of a variable f Device Variable pres...

Page 483: ...Only the part displayed on the screen will be monitored e The larger the number of devices is the slower the monitoring may be renewed f Even if not in monitoring mode register is available on variabl...

Page 484: ...ll appear if PLCs are 2 or more included in the project or if 2 or more programs are included in a PLC Select the PLC and program to register Select Device 3 If Select dialog box appears select variab...

Page 485: ...a Variable inputs variable names to find b Local variable selects local variable list c List shows local variable list d OK closes dialog box and registers at variable monitoring window e Cancel close...

Page 486: ...iable list c Global variable list classifies global variable list into All general variable special module related variable d List displays global variable list e OK closes the dialog box and register...

Page 487: ...t View for bit type direct variable displays direct variable in diverse type Displayed in Bit X0 byte B0 0 word W0 0 double word D0 0 long word L0 0 d List displays direct variable list e OK closes th...

Page 488: ...block index e Parameter number inputs setting number per the selected flag item For high speed link range is 0 12 For P2P range is 0 8 For PID range is 0 63 Those can be different according to PLC ty...

Page 489: ...x b The selected item is added at the last line of the variable monitoring windows c An item identical to previously registered item can be also registered 2 Register All Many direct variables can be...

Page 490: ...ct a PLC and program to register 3 Register All dialog box will appear Dialog Box Description of dialog box a Start Device used to input start address of the device to register Device Ex IX0 0 0 QB1 2...

Page 491: ...ng windows Paste is available onto Excel or other String editor c Paste Paste is available onto variable monitoring after Copy from Excel or other String editor d Delete used to delete not the selecte...

Page 492: ...left button after positioned on the row of the variable monitoring window to insert the selected items into 4 The selected items will be registered on the variable monitoring window Notes a The large...

Page 493: ...ow Notes a Briefly will hide the columns for PLC Program Type Device Variable and Comment b Even if in Brief View mode the hidden columns can be viewed through View function c The number of rows is de...

Page 494: ...This function is also available in Detailed View mode c The value column does not support Hide function d If converted to Detailed or Brief View mode hidden columns will be displayed as default e Stri...

Page 495: ...type 11 3 3 Operation of Monitoring 1 Start Monitoring It is used to start the monitoring of the device registered on the variable monitoring Steps 1 Select Monitor Start Stop Monitoring on the menu 2...

Page 496: ...ction Notes a On the variable monitoring Find function is not available b On the variable monitoring Change function is not available c Value is regarded as string not as figure when Find function is...

Page 497: ...d cell to the first or the last cell to the left or right above or below Tab Moves the present cell from the left to the right Shift Tab Moves the present cell from the right to the left Enter Moves t...

Page 498: ...ending sequence Notes a If aligned in descending sequence a downward arrow image will be displayed And if aligned in ascending an upward arrow image will be displayed b It is not aligned yet when the...

Page 499: ...available to execute System Monitoring a Select Monitor System Monitoring on the XG5000 menu b Select Start Program XG5000 System Monitoring on the Start menu Module Information Window displays the in...

Page 500: ...n the module information window Steps 1 Specify Connect options 2 Confirm that cable is installed applicably to connection method 3 Select PLC Connect on the menu to connect 4 Select PLC Disconnect on...

Page 501: ...nnection status with PLC 2 Select PLC All I O modules ON on the menu 2 All I O modules OFF It makes the data value of all the I O modules installed on PLC be Off Steps 1 Confirm the connection status...

Page 502: ...ent value it shall be in the connection status with PLC and in monitoring mode Click the contact point to change the data value of the selected contact point to ON or OFF Steps 1 Confirm the connectio...

Page 503: ...ose below to display the module information a With Power Module selected select PLC Module Info on the menu b With Power Module selected click the right button of the mouse to select Module Informatio...

Page 504: ...tus I O skip and Fault Mask status Steps 1 Confirm the connection status with PLC 2 Select one method among those below to display the CPU module information a With CPU Module selected select PLC Modu...

Page 505: ...he COM module information a With Communication Module selected select PLC Module Info on the menu b With Communication Module selected click the right button of the mouse to select COM Module Info on...

Page 506: ...formation a With Special Module selected select PLC Module Information on the menu b With Special Module selected click the right button of the mouse to select Special Module Info on the menu c With S...

Page 507: ...vides special module s present status error code information 11 4 11 Start Stop Monitoring It reads PLC s I O data to display on the screen 1 Start Monitoring Steps 1 Confirm the connection status wit...

Page 508: ...oring 11 36 Notes Special Module Monitor can not be used in Positioning Module and the only module info can be used Positioning module s monitoring function shall be applied along with its exclusive s...

Page 509: ...ad the system information file previously saved Steps 1 Select File Open on the menu a Double click an applicable file name b Drag drop the file onto the System Monitoring to open it 11 4 15 Move Base...

Page 510: ...can modify the area to be printed Steps 1 Click Preview a Select File Preview on the menu 2 Modify the area of the image displayed 3 Move the mouse to the edge 4 Mouse cursor will be changed 5 Move t...

Page 511: ...Hide Show Frame Hides or shows frame at screen Steps Select the module of system area and click the right button of mouse Then select Hide Frame Select the module of system area and click the right bu...

Page 512: ...device In addition Device Monitoring can display the data value variously when displayed or input on the screen according to bit format and display method 11 5 1 Basic Application Steps There are 2 me...

Page 513: ...G5000 menu will be in Connect Monitor status b If not in Monitoring mode the device if open will display the previous data value c Basically the data value will be initialized to 0 11 5 2 Device Areas...

Page 514: ...o display data on the screen Display Setting Description Data Size 1 bit 8 bits 16 bits 32 bits and 64 bits Display Format Binary BCD Unsigned decimal Signed decimal Hexadecimal Real String 1 1 bit Da...

Page 515: ...er 11 Monitoring 11 43 Notes a The device of a selected cell is displayed in the progression bar 2 8 bits Data size of the device is displayed in 8 bits Steps 1 Select View View Options 8 bits on the...

Page 516: ...Chapter 11 Monitoring 11 44 3 16 bits Data size of the device is displayed in 16 bits Steps 1 Select View View Options 16 bits on the menu...

Page 517: ...Chapter 11 Monitoring 11 45 4 32 bits Data size of the device is displayed in 32 bits Steps 1 Select View View Options 32 bit on the menu...

Page 518: ...Chapter 11 Monitoring 11 46 5 64 bits Data size of the device is displayed in 64 bits Steps 1 Select View View Options 64 bit on the menu...

Page 519: ...ng 11 47 6 Binary Data is displayed in binary Steps 1 Select View View Options Binary on the menu Detailed Description a Data value is displayed by 1 and 0 Application Example Hexadecimal 1234 Binary...

Page 520: ...Monitoring 11 48 7 BCD Data is displayed in BCD Steps 1 Select View View Options BCD on the menu Detailed Description a Data value is displayed by the figures of 0 9 Application Example Hexadecimal 12...

Page 521: ...ed decimal Data is displayed in unsigned decimal Steps 1 Select View View Options Unsigned Decimal on the menu Detailed Description Data value is displayed by the figures of 0 9 Application Example He...

Page 522: ...layed in signed decimal Steps 1 Select View View Options Signed Decimal on the menu Detailed Description a Data value is displayed by the figures of 0 9 Application Example Hexadecimal 1234 Signed dec...

Page 523: ...Chapter 11 Monitoring 11 51 Steps Select View View Options Hexadecimal on the menu 11 Real Data is displayed in real Steps Select View View Options Real on the menu...

Page 524: ...ption a Data value is displayed in real b Real format is available in 32 bits and 64 bits Application Example Hexadecimal 5678 1234 Real 6 818927e 013 12 Text Data is displayed in ASCII string Steps 1...

Page 525: ...Data value is displayed in ASCII string Application Example Hexadecimal 1234 Text 4 11 5 4 Edit Data Data value shall be specified to write device data on PLC or to write the selected area only on PL...

Page 526: ...menu 3 Copy It is used to copy the data of the selected area to save it in the clipboard Steps Select the area to copy Select Edit Copy on the menu 4 Delete It is used to delete the data of the select...

Page 527: ...d right left 4 Release the left button of the mouse 11 5 5 Save Device There are 3 methods available to save the device 1 Save All Device Areas Steps 1 Select File Save on the menu 2 Select File Save...

Page 528: ...ng 11 56 3 Save Respective Device Area if all windows closed Steps 1 Select File Export Device to File on the menu 2 Select the device to save from the combo box a File extension will be set as i devi...

Page 529: ...ng 11 57 11 5 6 Open Device There are 3 methods available to open the device 1 Open All Device Areas Steps 1 Select File Open on the menu 2 Import Device from File Steps 1 Select File Import Device fr...

Page 530: ...ct the device to open from the combo box Notes a If in monitoring mode Open and Open Device from File are inactive 11 5 7 Data Value Setting Data value of the device can be specified according to its...

Page 531: ...Chapter 11 Monitoring 11 59...

Page 532: ...Chapter 11 Monitoring 11 60...

Page 533: ...its and the display format c Bit value used to decide the size of data d Setup area used to decide the range the data value is applied to in the device e Display used to decide the input format of dat...

Page 534: ...1 Monitoring 11 62 11 5 8 Clear Data It is used to delete all data value of the device Steps 1 Select Edit Clear Data on the menu 2 A message will be called to ask if you want to delete the whole devi...

Page 535: ...ansfer the device data saved in on line computer to PLC Steps 1 Ensure PLC is connected and the monitoring mode is inactive 2 Select PLC Write to PLC on the menu 3 Select the device to write on Write...

Page 536: ...ected in the device area Notes a F device s exclusive Read areas can not be written on PLC Exclusive Read areas are based on the type of CPU 11 5 10 Read from PLC It is used to read the device data sa...

Page 537: ...ea c Unselect All used to cancel all the devices selected in the device area 11 5 11 Write Selected Area on PLC It is used to write the device data in the selected area on PLC connected Steps 1 Select...

Page 538: ...ring It stops reading the device data from PLC in the on line status Steps 1 Confirm the connection status with PLC 2 Select PLC Stop Monitoring on the menu Notes a If in monitoring mode the data can...

Page 539: ...ormat is displayed in 32 8 bits c Display used to display the data display format to change the current value d Set Value used to display the data value to change the current value Notes a If the curr...

Page 540: ...type displays the presently set CPU type or changes the CPU type 11 5 15 Screen Zoom In Zoom Out It is used to zoom in or out the size of the screen displayed 1 Screen Zoom In It zooms in the screen...

Page 541: ...Select View Width Auto Fit on the menu 2 Automatic Height Adjustment It adjusts the row height to the string height of the cell Steps 1 Select View Height Auto Fit on the menu 11 5 17 View Properties...

Page 542: ...o change color of data value in monitoring mode 11 5 18 Page Setting It is used to specify the device page printed Page margins title and grid lines can be showed or hidden as necessary In addition th...

Page 543: ...Chapter 11 Monitoring 11 71...

Page 544: ...mation list of the special module presently installed on the PLC system for the user to select a module on the list and then to click Monitor in order to show Special Module Monitoring dialog box as s...

Page 545: ...Chapter 11 Monitoring 11 73 Fig 2 Monitoring Test Screen High speed Count Module Monitoring Screen b d c Parameter Setting Screen a...

Page 546: ...Chapter 11 Monitoring 11 74 Fig 3 Monitoring Instruction Screen of HS Counter Module FLAG e f Screen for Contact Point Input Signal Status Instruction Screen...

Page 547: ...to stop monitoring d Test After changing the parameter at the bottom of the Monitoring Test screen click Test Start button to start to test the operation of applicable special module which will direc...

Page 548: ...alue converted from word to data format specified 11 7 1 Start Trend Monitoring Steps 1 Connect to the PLC 2 Select Monitoring Trend Monitoring on the menu Trend Monitoring Window Description of Trend...

Page 549: ...or may be different with the actual data In order to monitor accurate timing please use the data trace function b For the details of data trace function refer to 11 8 11 7 2 Setting Trend Monitoring S...

Page 550: ...he Max sample to displayed is as shown below In the figure below Graph is of a graph area presently displayed on the screen which is available to scroll horizontally as many as the max samples display...

Page 551: ...g Trend Device It is used to input the trend device to monitor Steps 1 Select the trend graph tap on the Setting Monitoring dialog box 2 Input the device of word type Or double click the variable colu...

Page 552: ...scription of Dialog Box a Show grid used to decide to show XY grid or not on the screen b Show X axis data used to decide to show X axis data or not c X axis data option used to specify the display me...

Page 553: ...aph index No Index Left Upper Right Upper Left Bottom and Right Bottom are available for the Bit Index Position f Trend graph legend used to specify the position of trend graph index No Index Left Upp...

Page 554: ...onitoring 11 82 1 Graph Color Settings Steps 1 Select the device to change its graph color 2 Click the color column to display applicable dialog box On the dialog box select desired color and then cli...

Page 555: ...e device to change its Graph Option 2 Select or cancel the Check Box of View Column 11 7 4 Setting Graph Window It is used to decide to change View Graph Option and display the data value as necessary...

Page 556: ...data value the mouse is positioned on Steps 1 Select Graph View Cursor on the menu 2 Click the left mouse button to select the graph Whenever the mouse moves the data value the cursor is positioned o...

Page 557: ...raph Scroll Sync on the menu 1 Move the horizontal scroll bar to scroll the bit graph and the trend graph at the same time based on Scroll Synchronization specified 3 Adjust X axis magnification It is...

Page 558: ...ect Graph Zoom In X axis Zoom Out X axis Reset X axis on the menu Based on the selected item X axis s time interval will be increased decreased or back to basic value 4 Adjust Y axis magnification It...

Page 559: ...matically It is used to decide to adjust X axis automatically If the automatic adjustment is set the horizontal scroll bar will disappear and all the data can be seen at a glance Steps 1 Select Graph...

Page 560: ...nput a file name to save with and then click OK 8 Save as Text It is used to save the graph data on the file in text Samples as many as the max samples kept specified in setting the max graph will be...

Page 561: ...PLC Decide to allow trace or not And specify trigger condition sample properties and trace device Refer to 11 8 2 for more details Write trace setting items on PLC Refer to 1 Write Trace Setting Item...

Page 562: ...olor d Bit graph displays the data of bit device e Word graph Index displays word device and graph color f Word graph displays the data of word device g Status bar displays the status of data trace h...

Page 563: ...Connect on the menu Notes a Refer to 10 1 Connect Options in XG5000 manual for details on Connect Options 11 8 2 Trace Setting It is used to specify trace conditions and trace device Steps 1 Select o...

Page 564: ...r of samples in total to collect The number of samples in total will be decided based on the input sample device i Samples after trigger specifies the number of samples to collect after triggered j OK...

Page 565: ...It uses the variation of the word device value as a trigger condition Steps 1 Select the check box of word condition 2 Input the device to use as a word condition Word device format only is available...

Page 566: ...2 bytes c Device list displays the list of the bit devices specified d Input the device of bit type Click the right mouse button and select Add Line to add a line Click the right mouse button and sel...

Page 567: ...on of Dialog Box a Number of device displays the number of word devices specified b Size of data displays the size of the data specified The size will be decided based on the specified data type c Dev...

Page 568: ...b Supported data types are as follows Type Size Type Size SINT 1 byte REAL 4 bytes INT 2 bytes LREAL 8 bytes DINT 4 bytes INT 2 bytes LINT 8 bytes DINT 4 bytes USINT 1 byte LINT 8 bytes 11 8 3 Setting...

Page 569: ...ailable for the Bit Index Position d Word graph legend used to specify the position of word graph index No Index Left Upper Right Upper Left Bottom and Right Bottom are available for the Word Index Po...

Page 570: ...ad Trace Settings It is used to read trace setting from PLC Steps 1 Select Trace Read Trace Settings on the menu 3 Read Data Traces It reads trace data from PLC Steps 1 Select Trace Read Trace on the...

Page 571: ...en Available data update cycles are 20 50 100 200 500 1000 and 2000ms value b OK applies the changed items and closes the dialog box c Cancel closes the dialog box 2 Start It is used to start Simulati...

Page 572: ...basic functions 1 Move Trigger It moves the trigger to its generated point of time Steps 1 Select Graph Go to Trigger Position on the menu 11 8 7 File function It is used to save or read trace setting...

Page 573: ...Samples as many as the max samples kept specified in setting the max graph will be saved Steps 1 Select File Send Save Trace data as Text on the menu 2 Input a file name to save with and then click OK...

Page 574: ...Chapter 11 Monitoring 11 102 3 Data It displays trace data in value View Data will be active only with trace data available Steps 1 Select View Trace Data on the menu...

Page 575: ...Chapter 11 Monitoring 11 103 Dialog Box a c d b e...

Page 576: ...ings displays the trace details c Data Grid displays the current value specified in the sequence of the samples The sample data will be displayed in negative before triggered and in positive after tri...

Page 577: ...p unit and monitor it for PID control XGI XGR supports 8 blocks 256 loops Representative function of PID monitor is as follows 1 Read Write PID data from PLC 2 Read Save PID data from file 3 PID monit...

Page 578: ...lue among PID monitor value as trend graph b Monitor window monitors real data value of PID variable you can t edit value in the monitor window c Detail setting window indicates value of setting item...

Page 579: ...lue into file 1 Save All Loops Sequence Select menu File Save All Loops After inputting file name press Save button 2 Save Block How to save at menu Sequence Select File Save Block Select block number...

Page 580: ...Save Loop How to save at block information window Sequence Select loop to save at block information window Push the right button of mouse and select Save Loop After inputting file name press Save butt...

Page 581: ...value from file 1 Open All Loops Sequence Select File Open All Loops After inputting file name push Open button 2 Open Block How to open at menu Sequence Select File Open Block at menu Select Block nu...

Page 582: ...After inputting file name push Open button 3 Open Loop How to open at block information window Sequence Select loop to open at block information window Press the right button of mouse and select Open...

Page 583: ...p name It is used to name PID loop Sequence Press the right button at block information window and select Establish Loop Name Input name you want and press OK Check name of loop Note You can set adjus...

Page 584: ...ock information window Check if selected loop is added or not at Select Loop tap of block information window Delete selected loop Sequence Push the right button and select Add Del Selected Loop at blo...

Page 585: ...eview Print function Sequence Select File Print or Print at preview window Note Print Print Preview supports only one loop at one time 11 9 7 Connection to PLC Connects PID monitor to PLC After connec...

Page 586: ...dow Push the PLC Write button or select PLC Write Loop 11 9 9 Write all data to PLC It writes all loop data to PLC You can check progress through progress bar at bottom of PID monitor Sequence Select...

Page 587: ...ds PID data value in PLC connected and indicates at screen Sequence Check if PLC is connected Select PLC Start Monitoring 2 End Monitoring It stops monitoring PID data value of PLC Sequence Select PLC...

Page 588: ...window Push the right button and select Change Current Value or push the ENTER key Change value and press OK Dialog box Dialog box description a Information indicates PID information to set b Data Ty...

Page 589: ...The horizontal axis is renewed every 1 second 11 9 15 Graph related function 1 Horizontal scroll bar If 25 second passes after starting monitoring horizontal scroll is created automatically If you pre...

Page 590: ...ph color setting It is used to change color of PV Present Value MV Manipulated Value SV Setting Value graph Sequence Select Graph Graph Color Setting Select graph color part you want to change Select...

Page 591: ...among detail setting value of PID monitor Sequence Select cell to copy and after pressing the right button of mouse select Cell Copy Note Since copy of bit data is not possible Cell Copy menu is not a...

Page 592: ...ting Paste It is used to paste all detail setting of PID monitor Sequence Select detail setting window grid to copy and select Setting Copy by pushing right button of mouse Select detail setting windo...

Page 593: ...e Debug is unavailable if PLC operation is in Run mode Debug function is available with XG5000 program and PLC program identical to each other If they are not identical download the applicable program...

Page 594: ...Program Debugging It is used to specify functions to debug the prepared LD program 12 2 1 Set Remove Breakpoints It is used to set or remove the Breakpoint per step 1 Set Breakpoint Step 1 Move the B...

Page 595: ...ng 12 3 2 Select Debug Set Remove Breakpoints on the menu Notes The break can not be set on the area specified by a Block Mask instruction Application instruction will set the breakpoint on the instru...

Page 596: ...Chapter 12 Debugging 12 4 2 Remove Breakpoint Steps 1 Move the Breakpoint to the step to remove 2 Select Debug Set Remove Breakpoints on the menu...

Page 597: ...program debugging using the specified Breakpoint With the Go function the program can be run up to the Breakpoint specified Sequence 1 Select Debug Go on the menu The program will be run till the brea...

Page 598: ...gging 12 6 2 Select Debug Go on the menu again to go to the next Breakpoint 12 2 3 Go to Cursor It is used to make the program run up to the cursor position Sequence 1 Move the cursor to the position...

Page 599: ...ing debugging its progress will be made step by step When debugging program Step Into Step Out and Step Out functions will be provided 1 Step Into It runs the program to the next step If the present s...

Page 600: ...Chapter 12 Debugging 12 8 1 Select Debug Step Into on the menu...

Page 601: ...Notes If not with CALL instruction or if the CALL running condition unsatisfied the program will be run to the next step 2 Step Out It is used to step out of the subroutine block once entered with St...

Page 602: ...Chapter 12 Debugging 12 10 Sequence 1 Select Debug Step Out on the menu...

Page 603: ...program will be run to the next step 3 Step Over It is used to run the program to the next step Differently from Step Into even if the present step is a application instruction CALL it will not enter...

Page 604: ...Chapter 12 Debugging 12 12...

Page 605: ...int being used is not deleted b Program displays the name of the program where the breakpoint is used c Step displays the Step number where the breakpoint is caught d Count After executed the number o...

Page 606: ...all the checked items previously allowed i Go to used to move to the position where the selected breakpoint is used j Remove deletes the selected breakpoints from the list k Remove All deletes all th...

Page 607: ...e Break Applicable debugging is available based on the data value and the application of the variable 1 Setting Variable Break Sequence 1 Select Debug Breakpoint Conditions Variable Break point on the...

Page 608: ...cancelled the value even if saved will not make the value break engaged g Value if the specified device value is reached the break will be engaged The maximum minimum value is based on the variable t...

Page 609: ...ied among breakpoint variable break scan break etc will apply the break c Click the left mouse button on the program name to move to the program position where the variable break is applied d If the v...

Page 610: ...If the check in the box is cancelled the specified scan break times even if saved will not be executed while PLC runs debugging b Scan Count used to input scan times to apply the break 1 2147483647 is...

Page 611: ...Chapter 12 Debugging 12 19...

Page 612: ...tion of Sequence a Open Project Select Project Open Project on the menu Open the project identical to the PLC project to perform Online Editing Select Project Open from PLC on the menu a Open Project...

Page 613: ...diting is available while monitoring Start Stop Monitoring is available during Online Editing d Start Online Editing Select Online Start Online Editing on the menu Online Editing will be available aft...

Page 614: ...e Editing is the same as specified in the off line Edit In case of the LD the edited rung is indicated with f Write Modified Program Select Online Write Modified Program on the menu The applicable pro...

Page 615: ...that add delete and change are available Item Description Edit Item Description Edit Add X Add Delete X Delete X Project properties Change X User defined function function block Change X Add X LD Edit...

Page 616: ...he contents in the project in regular sequence It is also used to select items to be printed specify necessary setting options for printing per item and execute Preview and Print instruction Steps 1 S...

Page 617: ...t Page Setting Margin Setting etc Notes Details button in the Project Level Diagram will be active only with the right mouse button positioned on Cover Program I O parameter as selected presently Refe...

Page 618: ...ge Setup It is used to specify margins of paper to print on Steps 1 Click f Setting on the main Print Dialog Box or click the right mouse button in the a Project Level Diagram 2 Select Page Setup on t...

Page 619: ...to default the basic value specified when the program installed e Margin Setting specifies margins of paper printed f Printer used to change the setting options of the printer Notes Be careful not to...

Page 620: ...put and Field at the same time Example If the content of The date today is d is input on the header footer The date today is 2004 06 01 will be printed Field Content Date d yyyy mm dd Time t hh mm ss...

Page 621: ...Print 14 6 14 1 4 Cover Setup It is used to specify the print cover Steps 1 Select Cover in the Project Level Diagram on Print Dialog Box 2 Click Details button or press Enter key Dialog Box a b c d...

Page 622: ...he cover where the content font and position can be changed d Edit used to edit the content of the presently selected Edit Box Double click the mouse on c Edit Box or press Enter key when the Edit Box...

Page 623: ...teps 1 Press Add button 2 Move the mouse on the paper 3 The mouse cursor will change as shown 4 Click the left mouse button on the paper 5 Edit Dialog Box will appear 6 Pressing ESC will change the mo...

Page 624: ...dit Box on the center of paper String Left Align aligns the content of the selected Edit Box on the left in the Edit Box The edge of the Edit Box will not be printed Edit Box can be moved by Drag and...

Page 625: ...Print 14 10 14 2 LD Program Print It is used to print the selected LD program 14 2 1 Print Setting Steps 1 Select the program item to print 2 Select Project Print on the menu Dialog Box a b c d e h i...

Page 626: ...ifies print range e Print Color used to decide to apply Color print or not If the check box is selected the print will be in color and if not it will be in black and white f Print Grid used to decide...

Page 627: ...tion function block which is not provided by XG5000 The User Function Function Block can be created as follows Create the user function function block program Create the user function function block I...

Page 628: ...5 2 a b c d e 15 1 Create User Function Function Block 15 1 1 Create User Function Function Block Program In order to create a User Function Function Block select Project Add Item Function or Project...

Page 629: ...ock If not selecting EN ENO a user should declare BOOL type variable in the first input and first output parameters of the function function block d Return Data Type designates a type of the results a...

Page 630: ...ion of Local Variable a VAR_RETURN A type of variable representing the value of user defined function It is automatically created as a variable with the same name of the user defined function with ret...

Page 631: ...ocal variable screen Notes Input variable and output variable should be at least one or more respectively but the number is limited to 64 15 1 3 User Function Function Block Programming Steps 1 If dou...

Page 632: ...Chapter 15 User Function Function Block 15 6 2 Create a program based on the variable input in the local variable screen...

Page 633: ...er Function Function Block 15 7 Notes If local variable edit and program edit are finished select function function block toolbar instruction to check whether the edited User Function Function Block i...

Page 634: ...Function Function Block 15 8 15 2 Use User Function Function Block Steps 1 Open the program to use a User Function Function Block and move the cursor to the position to input 2 Click Function Functio...

Page 635: ...pter 15 User Function Function Block 15 9 3 Select a User Function Function Block in the function function block dialog box 4 Input the variable to be used in the input output of function function blo...

Page 636: ...of step 2 PLC Online function Besides program monitoring function provided by XG5000 an operator may user online diagnosis functions such as system monitor device monitor trend monitor data trace and...

Page 637: ...probably resulting interruption of access In addition even the recommended requirements may suffer from the same symptoms Then irrespective of system requirements access may be interrupted according...

Page 638: ...tart end monitor Write Pause monitor Compare to PLC Resume monitor Flash memory setup set Monitor pause setup Flash memory setup cancel Change current value PLC Reset System monitor PLC Removal Device...

Page 639: ...s favorable channels In case of module it displays the only modules set in I O parameter Module is displayed in a format of B0 base number S00 slot number module name 2 I O condition It displays sing...

Page 640: ...ntinuous I O condition executed Shows continuous I O condition is executed during which yellow LED blinks 16 2 2 Channel List 1 Module Channel Double click an item to view its channel in the tree view...

Page 641: ...he function to forcibly record a user present value into a specific device when meeting conditions that are entered by a user For instance in a statement if Device IX0 0 0 is 1 set all the values of d...

Page 642: ...smaller than Single comparison 9 Smaller than 2 Add 3 Subtract 0 Multiply Four operations 1 Divide 12 Bit multiply 13 Bit sum Bit operation 14 Beta bit sum 10 Logical multiply Logic operation 11 Logic...

Page 643: ...nterface 1 Input I O condition Steps a Move to a position to enter new I O condition b Select Edit Properties in Menu c Edit I O condition dialog box and click OK 2 Edit I O condition Steps a Select I...

Page 644: ...t the I O condition to cut b Select Edit Cut in Menu c Move to a position to paste and select Edit Paste in Menu 4 Copy Past I O Condition Steps a Select I O condition to copy b Select Edit Copy in Me...

Page 645: ...Chapter 16 XG SIM 16 10 5 Delete I O Condition Steps a Select I O condition to delete b Select Edit Delete 6 Insert line Steps a Select a position to insert a line b Select Edit Insert Line in Menu...

Page 646: ...7 Delete line Steps a Select a position to delete a line b Select Edit Delete Line in Menu 3 Single I O Condition Single I O condition copies the value entered into a selected device channel if meeti...

Page 647: ...user designated condition e Execution by Button sets it to execute a preset condition only when a user presses buttons f Execution by condition expression sets it to execute a condition only when meet...

Page 648: ...rrespective of user designated condition e Execution by Button sets it to execute a preset condition only when a user presses buttons f Execution by conditional expression sets it to execute a conditi...

Page 649: ...re Condition while Execution not setting Repeated Execution if Always execute conditional statement is true 7 6 5 4 3 2 1 Setting Ignore Condition while Execution not setting Repeated Execution 7 6 5...

Page 650: ...ts value b Value the only constant such as integer real number hexadecimal or True False may be entered c OK saves edited items and exits the dialog box d Cancel cancels values entered 2 Select Device...

Page 651: ...dited items and exists the dialog box 3 Input value Steps a Move a cursor to enter a value b Enter a value 4 Auto Filling Steps a Select an area b Cursor is changed if placing it on the right corner o...

Page 652: ...nd Monitor Steps a Deselect Tools Use Single I O Condition or Tools Use Continuous I O Condition in Menu Notes Program scan is the procedure that operations are repetitively executed from the first to...

Page 653: ...unction for I or Q area in case of special module it supports the monitoring function for analogue value receiving from or sending to outside 1 Module setting The module simulation function provided b...

Page 654: ...to XG5000 Manual To apply the details of I O parameter set in XG5000 it is necessary to download I O parameter to XG SIM again If the type of a selected module is changed XG SIM should be executed ag...

Page 655: ...ut current range Digital output format 1 5V 4 20mA 0 16000 0 5V 0 20mA 8000 8000 0 10V 1000 5000 10 10V 0 10000 XG SIM supports the following analog input parameters Parameter Support Parameter Suppor...

Page 656: ...SIM supports the following voltage current range and input data type Input data type Output voltage range Output current range 0 16000 1 5V 4 20mA 8000 8000 0 5V 0 20mA 1000 5000 0 10V 0 10000 10 10V...

Page 657: ...e input mode Comparison output 1 min value Preset Comparison output 1 max value Ring counter min value Output status setting Ring counter max value Additional function mode Comparison output 0 mode Se...

Page 658: ...ng very upper limit Sensor type Process warning upper limit Temperature unit Process warning lower limit Filter constant Process warning very lower limit Averaging process Process warning hysterisis A...

Page 659: ...rted by XG SIM refer to the following table Module name Support XGF PO1A open collector axis 1 XGF PO2A open collector axis 2 XGF PO3A open collector axis 3 XGF PD1A line driver axis 1 XGF PD2A line d...

Page 660: ...APM_LIN Linear interpolation start X APM_CIN Circular interpolation start X APM_SST Synchronous start APM_VTP Speed position conversion X APM_PTV Position speed conversion X APM_STP Stop APM_SKP Skip...

Page 661: ...ordinate of which origin is not determined 291 Synchronous start command may not be executed during operation 294 Synchronous start command may not be executed in an absolute coordinate of which origi...

Page 662: ...saved 0 0 B0S0 apm 0 10 B0S10 apm 1 0 B1S0 apm 1 11 B1S11 apm 2 0 B2S0 apm 2 12 B2S12 apm For detail settings of APM module parameter refer to APM package user s manual It is possible to check the sta...

Page 663: ...e the station no of communication counterpart Reading area designation BOOL P2PRD_BOOL Designate the bit data reading area Reading area designation BYTE P2PRD_BYTE Designate the byte data reading area...

Page 664: ...on character is program language and conforms to IEC 61131 3 17 1 Writing ST program Scan program user function FB SFC can be written by ST language 17 1 1 Adding Scan Program Step 1 Select Scan Progr...

Page 665: ...Chapter 17 ST Edition 17 2 3 Input program name and description Select ST in Language 17 1 2 Adding User Function Function Block Step 1 Select User Function Function Block in the project window...

Page 666: ...Chapter 17 ST Edition 17 3 2 Select Project Add Item Function or Function Block 3 Input name and description Select ST in Language In case of Function select Return data type...

Page 667: ...which the user wants to input program in SFC program 2 After selecting transition double click it or press Enter 3 Input name and comment Select Program in Type 4 Select ST as Language inAdd Program...

Page 668: ...Chapter 17 ST Edition 17 5 2 Select ST as Language in theAdd Program window...

Page 669: ...cut key The followings are shortcut key The user can change shortcut key in Tools Shortcut key Settings Action Shortcut key Description Copy Ctrl C Copies selected character string Paste Ctrl V Pastes...

Page 670: ...of previous word Ctrl Del Deletes by start of next word Ctrl BS Deletes by start of current word Shift Move Selects from current cursor location to location to move Note 1 The described shortcut key...

Page 671: ...the user doesn t select the area it is inserted 3 Only text is pasted 17 3 3 Undo Redo Undo cancels edition and Redo cancels Undo action Step 1 After executing Paste selects Edit Undo Pasted contents...

Page 672: ...link P2P PID f All selects whether only flags related with Parameter number Block index are displayed or not g Parameter number inputs number to sort flags 0 12 for high speed link 0 12 for P2P 0 63...

Page 673: ...inputs initial value of variable f Trigger inputs trigger status about variable g Retain inputs Retain status about variable h Description inputs Description about variable 2 Inserts variable at the...

Page 674: ...n Block about the inputted name c List it is used to sort Function Function Block d Category indicates category of Function Block e Function List displays list of Function Block in the selected catego...

Page 675: ...Chapter 17 ST Edition 17 12 3 Function Function Block is inserted Note I O parameters of function function block are not inserted automatically The user should edit them additionally...

Page 676: ...tring by keyboard variable or Function FB starting with same character are displayed c Auto macro statement when inserting the control text of ST IF WHILE SWITCH control text is completed according to...

Page 677: ...Font Step 1 Select Tools Options 2 Select ST Font Color 3 Change Font Note 1 The user can t change the character size 2 Default font is Fixedsys 3 For more details refer to chapter 2 6 2 Color Step 1...

Page 678: ...T program doesn t support Zoom function 17 4 4 Tap When using Tap Tap size is designated Step 1 Select Tools Options 2 Select ST 3 Change Tap size Tap size 4 screen Tap size 8 screen Note 1 Default ta...

Page 679: ...Chapter 17 ST Edition 17 16 17 4 5 Showing line numbers Shows hides line numbers in the ST program Step 1 Select Tools Options 2 Select XG5000 Common Editor 3 Check Show line numbers...

Page 680: ...ditional Edition Function Describes additional edition function for convenient 17 5 1 Book mark The user can set bookmark and go there easily 1 Setting book mark Step 1 Move the cursor to set bookmark...

Page 681: ...Chapter 17 ST Edition 17 18 2 Removing bookmark Step 1 Move the cursor to remove bookmark 2 Select Edit Bookmark Set Remove 3 Removing all bookmark Step 1 Select Edit Bookmark RemoveAll...

Page 682: ...Next Bookmark Note 1 Bookmark is set by line unit 2 Undo Redo can t cancel action about bookmark 17 5 2 Selection from character string list When inputting character string character string starting...

Page 683: ...4 Function name 5 Function block instance name 6 User defined function name 7 User defined function block instance name 17 5 3 Selecting member variable from character string list It is used to select...

Page 684: ...iable to input 3 Press Enter or double click 17 5 4 Setting Removing Block Mask Sets or removes the Block Mask area The Block Mask area is not executed Block Mask area is indicated by symbol and 1 Set...

Page 685: ...Chapter 17 ST Edition 17 22 2 Select Edit Set Remove Block Mask 2 Removing Block Mask 1 Select area in which Block Mask is already set...

Page 686: ...tion 17 23 2 Select Edit Set Remove Block Mask 17 5 5 Setting Removing Line Block Mask Selected line is not executed Symbol Is used to set Line Block Mask 1 Setting line block mask 1 Select area to se...

Page 687: ...Chapter 17 ST Edition 17 24 2 Select Edit Set Remove Line Block Mask 2 Removing line block mask 1 Select area to remove line block mask...

Page 688: ...Chapter 17 ST Edition 17 25 2 Select Edit Set Remove Line Block Mask 17 5 6 Indent Outdent Makes indent outdent at the selected area 1 Indent 1 Select area to make indent...

Page 689: ...Chapter 17 ST Edition 17 26 2 Press TAB 2 Outdent 1 Select area to make outdent...

Page 690: ...Chapter 17 ST Edition 17 27 2 Press Shift TAB...

Page 691: ...18 Dedicated XGR Function This function is for XGR series 18 1 Redundancy Parameter Double click Redundancy Parameter on Project Window to set redundancy parameter Redundancy parameter is consisting o...

Page 692: ...31 base d M Area It synchronizes data of M area It can set from the position of first word to the position of final ward By checking the box it determines whether synchronizing M area or not If it is...

Page 693: ...side PLC Run mode c A side PLC Warning No display if warning is not existed d A side PLC error No display if error is not existed e Standby CPU image Shaded PLC f CPU status display Standby A side g...

Page 694: ...witchover the Master CPU It displays state of redundancy changeable state If it is disable it displays the possible case to make redundancy change c Change Redundancy change command If redundancy chan...

Page 695: ...unction 18 5 18 3 2 Standby CPU control Description of dialog box a Standby CPU Available Standby CPU state b Standby CPU mode Standby CPU Run Stop mode change c Standby CPU reset Only Standby CPU Res...

Page 696: ...Chapter 18 Dedicated XGR Function 18 6 18 4 System Monitoring System configuration and base information is displayed by System Monitoring 18 4 1 System Configuration Selects PLC System Configuration...

Page 697: ...time and distance 4 It displays data synchronization cable between Master and Standby CPU 5 It displays base information of selecting base by clicking mouse button or pressing enter key 18 4 2 Node C...

Page 698: ...sted of Ring topology LED indicates On 4 RED If it is operated by Redundancy operation LED indicates On 5 MASTER If it is master mode LED is On 6 CPU A If CPU Ais On LED indicates On 7 CPU B If CPU B...

Page 699: ...dule b O S version OS version of expansion drive module c Node Status It displays connection status between bases whether it is Ring or Bus operation d Base Total Count Total number of nodes e Port 1...

Page 700: ...ecting Base step selects base for changing and click Next button Dialog box Description of dialog box a Information Information of Selecting Base step b Base module tree It displays base module Change...

Page 701: ...xt button Dialog box Description of dialog box a Information Information of Removing Base step b Back Cancel Removing Base step go to previous step c Next Move to Installing Base step d Cancel Cancel...

Page 702: ...Installing New Base b Back It is inactive mode after base is removed c Next Move to Changing Base Finished step d Cancel Cancel the Base Changing Wizard Notes Error in Installing New Base is occurred...

Page 703: ...hen base changing without Base Changing Wizard Step 1 Set I O Skip setting to change on base 2 Set Fault Mask on base 3 Remove the base from PLC 4 Install the base to change 5 Release I O Skip setting...

Page 704: ...for the operation and monitoring of the XGF SOEA module of XGT series 2 This package provides a function that enables independent operation of the SOE monitor regardless of the XG5000 3 This enables d...

Page 705: ...ning shot of the SOE monitor Dialog 1 Select Monitor SOE Monitor in the menu Dialog description a Menu basic menu is provided for using the software program b Tools menu can be easily selected and exe...

Page 706: ...ter 19 Exclusive Functions for Event Input Module 19 3 19 2 1 Menu Structure If you select a menu item commands appear The commands can be executed with mouse or keyboard Some menus provide shortcut k...

Page 707: ...t first Show the data in the order of old to recent in the monitor window Find event Search desired event Module Property Show parameter setting in online operation 3 Online Command Description Connec...

Page 708: ...ose all Close all the windows of the XG5000 6 Help Command Description About SOE monitoring Provides the information on the SOE monitor 19 2 2 Tools Frequently used menu items are provided with respec...

Page 709: ...he check box in front of the items to make the toolbar appear disappear b New tool create a new toolbar c Reset initialize the toolbar 2 Add tools to toolbar Add tools in the toolbar created above Seq...

Page 710: ...e 19 7 Dialog Dialog description a Command the Command tab in the user definition dialog b Type select the existing toolbar c Button select the desired tool User toolbar drag drop the desired tool wit...

Page 711: ...tomatically when connected with PLC CPU Double click on the desired module to run the event monitor window Dialog Dialog description a CPU event history select the event saved in the CPU module b Modu...

Page 712: ...e 19 9 19 2 4 Status Bar Dialog Dialog description a Event No show the number of the events in the event monitor window b PLC name show the name of the PLC connected with the SOE monitor c Online show...

Page 713: ...the XGF SOEA module in the CPU module Sequence 1 Click on the Parameter Basic Parameter in the project tree 2 Basic operation setting Dialog Dialog description a Overwrite with recent history used to...

Page 714: ...r toolbar of the XG5000 19 4 1 Setting Item Sets up the method of saving the external event history in the XGF SOEA module Sequence 1 Click on the Parameter I O Parameter in the project tree 2 In the...

Page 715: ...tions for Event Input Module 19 12 3 In the above window click on the arrow button A window where respective module can be selected will appear Select the desired module 4 After selecting the module c...

Page 716: ...his to save the most recent event If the events exceed 300 the oldest event is deleted and the last one is saved Maintain the initial history use this to retain the first event If the events exceed 30...

Page 717: ...ng Condition A Input filter 1ms B Detail event setting Rise Fall events simultaneously Sequence diagram of event occurrence 1 Input signal 2 Event behavior 12 times 3 Filter time Filter time check 4 E...

Page 718: ...ime duration if this chatter detection time has been passed from the time the first effective event was detected the chatter detection function for the specific event frequency will be terminated even...

Page 719: ...ior 6 times 3 Filter time Filter time check 4 Event occurrence 5 No of events 2 5 0 75 1 25 1 1 1 1 0 5 1 0 0 5 0 5 0 5 0 5 0 5 1 25 Events ignored by chatter detection function Chatter time measureme...

Page 720: ...Event Input Module 19 17 19 5 View Module Information XG5000 supports viewing event input module information Sequence 1 Online Connect select I O Information 2 Clicking on the Detail Info will show X...

Page 721: ...dule 19 18 19 6 Event History Monitor The events entered into the CPU and event input modules can be monitored with the SOE monitor Sequence 1 Online Connect select Monitor SOE Monitoring Unless in On...

Page 722: ...Chapter 19 Exclusive Functions for Event Input Module 19 19 a SOE Monitor will be executed b Select Online Connect The information of the event input module in the connected system will appear a b...

Page 723: ...history stored in the CPU module b Module event history the event history stored in the SOEA module Double clicking on the CPU event history or module event history will activate the event monitor wi...

Page 724: ...ent Input Module 19 21 d Click on the module event history SOE 02 Base 00 Slot 04 double click Online Refresh Event 2 Event history information Time of occurrence Base No Slot No Input Condition Input...

Page 725: ...ut Module 19 22 2 View This function provides user convenience including searching and comparing of events 1 Module event display select View Filtering to look up all the events regardless of the filt...

Page 726: ...the bit at which the event has occurred b Designate event type designate the input condition at which the event has occurred c Show SOE installed position only used only for CPU event history filterin...

Page 727: ...etting a Event occurrence point setting No 0 bit b Event type setting Rise event Select View Filtering Base and time designation filter setting a Base Slot designate all the bases and slots b Begin En...

Page 728: ...last first Priority to the recent events the recent events have priority over the old events in the display list Priority to old events the old events have priority over the recent events in the displ...

Page 729: ...s for Event Input Module 19 26 Sequence a Select View Oldest first 5 Event Comparison Compare the events stored in the CPU and event input modules and show the result Sequence a Select View Compare Ev...

Page 730: ...elete Event History Delete CPU history the history stored in the CPU module is deleted Sequence a Select Online Clear PLC Event History Clear SOE module event history delete the history stored in the...

Page 731: ...Chapter 19 Exclusive Functions for Event Input Module 19 28 Clear All SOE module History delete the history stored in all the SOEA modules Sequence a Select Online Clear All SOE module History...

Page 732: ...as an Excel file 1 Save as an Excel file The event file is saved as an Excel file Sequence 1 Select the event history to be converted into an Excel file in the event monitor window 2 Select File Expo...

Page 733: ...y window show the elements of the current project b Event monitor window show the event data of the selected module of the project This conversion to an Excel file is effective only for the currently...

Page 734: ...Chapter 19 Exclusive Functions for Event Input Module 19 31 4 Click on the Save button to create a new Excel file 5 Open file in the Excel application to read the saved event file in Excel...

Page 735: ...ed by improper conditions environment or treatment 2 Problems caused by external devices 3 Problems caused by the user remodeling or repairing the PLC 4 Problems caused by improper use of the product...

Page 736: ...86 20 8326 6287 e mail chenxs lsis com cn LS Industrial Systems Chengdu Office _ Chengdu China Address 12FL Guodong Buiding No 52 Jindun Road Chengdu 610041 P R China Tel 86 28 8612 9151 9226 Fax 86 2...

Reviews: