background image

45

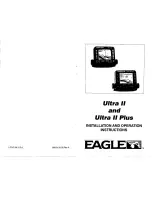
Satellite Status Page showing satellite lock-on with a 3D position

acquired (latitude, longitude and altitude), including WAAS reception.
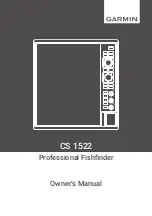
Navigation Page

This screen has a compass rose that not only shows your direction of
travel, but also the direction to a recalled waypoint. To get to the Navi-
gation Page: Press 

PAGES

 or 

 to 

N

AVIGATION

|

EXIT

.

This page represents a GPS function, so it is discussed in much greater
detail in Sec. 6.

Navigation Page, recording a trail, traveling southwest.
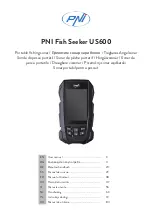
Map Page

The Map Page screens show your course and track from a "bird's-eye"
view, on a moving map. By default, this unit shows the map with north
always at the top of the screen. The arrow in the center of the screen is
your present position. It points in the direction you're traveling.

Summary of Contents for LMS-320

Page 1: ...Pub 988 0105 971 www lowrance com LMS 320 LMS 320DF Fish finding Sonar Mapping GPS Operation Instructions...

Page 2: ...ource Database copyright 2001 2002 Zenrin Co Ltd Exit Authority and eXitSource are trademarks of Zenrin Co Ltd Lowrance Electronics may find it necessary to change or end our policies regulations and...

Page 3: ...paration 23 Shoot Thru Hull Installation 25 Sensor Chart 27 Optional Speed Sensor Installation 28 GPS Antenna Receiver Module 29 Power Connections 30 NMEA DGPS Cable Connections 31 Mounting the Unit B...

Page 4: ...tion 71 Overlay Data 71 Ping Speed HyperScroll 74 Reset Options 75 Reset Water Distance 76 Set Keel Offset 76 Sensitivity Auto Sensitivity 77 Sonar Color Mode 79 Sonar Page Sonar Chart Display Options...

Page 5: ...avigate to Cursor Position on Map 115 Navigate to a Point of Interest 117 Creating and Saving a Trail 117 Displaying a Saved Trail 119 Navigating Trails 119 Visual Trailing 120 Navigate a Trail Forwar...

Page 6: ...by Projecting a Position 138 Sec 8 System GPS Setup Options 141 Alarms 141 Auto Satellite Search 142 Check MMC Files and Storage Space 143 Communications Port Configuration 143 Configure DGPS 144 Con...

Page 7: ...WAAS Alarm 165 Software Version Information 165 Sounds and Alarm Sound Styles 166 Track Smoothing 166 Trail Options 167 Delete All Trails 167 Flash Trails on Screen Option 167 Update Trail Option 167...

Page 8: ...to a way point but will also visually check to make sure a clear safe path to the waypoint is always available WARNING When a GPS unit is used in a vehicle the vehicle operator is solely re sponsible...

Page 9: ...our book so that you don t have to read the whole thing from front to back for the information you want At the start or end of each segment we ll tell you what content is coming up next If it s a conc...

Page 10: ...320 s GPS command func tions organized in alphabetical order When you come to a GPS menu command on the LMS 320 screen you can look it up in the manual by skimming over the table of contents just flip...

Page 11: ...ltiple lighting levels backlit keypad Input power 10 to 15 volts DC Current drain Sonar only 500 ma lights off 600 ma lights on With GPS and lights on 700 ma Case size 5 4 H x 6 9 W x 3 4 D 13 8 x 17...

Page 12: ...onal speed sensor sensor in cluded with LMS 320DF GPS Receiver antenna External LGC 12w 12 parallel channel GPS WAAS DGPS beacon receiver optional Recording MMC SD memory cards for recording GPS trip...

Page 13: ...n to read about the relatively new technology of GPS But if you ve never owned a sonar fish finder this segment will tell you the under water basics Sonar is an abbreviation for SOund NAvigation and R...

Page 14: ...need to be a computer expert to find your way The unit includes a keypad and a screen with menus so you can tell LMS 320 what to do The screen also lets LMS 320 show your location on a moving map as w...

Page 15: ...ld data ranging from 8 MB to 128 MB in size Compare that to a floppy disk s 1 44 MB capacity LMS 320 uses all that MMC space for two key GPS purposes The MMC is also used to record sonar logs see page...

Page 16: ...l weather global navigation system for the armed forces of the U S and its allies Civilian use was also avail able at first but it was less accurate because the military scrambled the signal somewhat...

Page 17: ...n Therefore in order for LMS 320 to determine direction of travel you must be moving and the faster the better This is not to say that it won t work at walking or trolling speeds it will There will si...

Page 18: ...ulates position it can t know what s between you and your destination for example It s up to you to safely navigate around obstacles no matter how you re using this product How to use this manual typo...

Page 19: ...he Map Page press MENU MENU to MY TRAILS ENT 2 Press to Trail 1 ENT to NAVIGATE ENT 3 You are asked to wait while it converts the trail into a route 4 The wait message disappears and the unit begins s...

Page 20: ...12 Notes...

Page 21: ...h the power cable route 5 Install the transducer and route the transducer cable to the so nar GPS unit 6 Install the GPS antenna and route the antenna cable to the so nar GPS unit 7 Install the power...

Page 22: ...none Dual frequency transom installations Tools two adjustable wrenches drill 20 0 161 drill bit flat head screwdriver Supplies four 1 long 12 stainless steel slotted wood screws Single frequency trol...

Page 23: ...away from other wiring on the boat Electrical noise from engine wiring bilge pumps and aerators can be displayed on the sonar s screen Use caution when routing the transducer cable around these wires...

Page 24: ...lations give excellent high speed opera tion and good to excellent depth capability There is no possibility of damage from floating objects It can t be knocked off when docking or loading on the trail...

Page 25: ...angle adjustment for a 14 transom Most outboard and stern drive transoms have a 14 angle Align plastic ratchets in bracket B Two piece bracket Locate the four plastic ratchets in the trans ducer s ha...

Page 26: ...cer s face isn t parallel with the ground remove the transducer and ratchets from the bracket Place the ratchets into the holes in the bracket with the letter B aligned with the dot stamped in the bra...

Page 27: ...with the bracket alignment mark Place them on the transducer aligned with the 12 o clock posi tion on the transducer stem Reassemble the transducer and bracket and place them against the transom Agai...

Page 28: ...the mounting screw pilot holes You will drill one hole in the center of each slot Drill the holes For the one piece bracket use the 29 bit for the 10 screws For the two piece bracket use the 20 bit fo...

Page 29: ...o the sonar unit Make sure to leave some slack in the cable at the transducer If possible route the transducer cable away from other wiring on the boat Electrical noise from the engine s wiring bilge...

Page 30: ...rnal tooth washer is supplied with the TMB S Attach motor mounting bracket to transducer 2 Slide the adjustable strap supplied with the TMB S through the slot in the transducer bracket and wrap it aro...

Page 31: ...printed then the nose of the transducer is angled too far down and needs to be raised NOTE Periodically wash the transducer s face with soap and water to re move any oil film Oil and dirt on the face...

Page 32: ...ur hull can result in damage that could sink your boat Contact your boat dealer or manufacturer to confirm your hull specifications To choose the proper location for thru hull mounting anchor the boat...

Page 33: ...ce of the transducer with 100 grit sandpaper The surface of the hull must be flat so the entire transducer face is in contact with the hull prior to bonding Epoxy transducer to hull 2 Follow the instr...

Page 34: ...Temp 3 The first Water temperature sensor is built into the transducer This is the sensor that measures surface water temperature If you want two or more temperature readings from other locations you...

Page 35: ...installation Three temperature sensor installation with speed Three temperature sensor installation TS 3X temperature sensor SP X speed sensor MY 4X Cable TS 2X temperature sensor Temperature sensor b...

Page 36: ...the sensor behind strakes or ribs These will disturb the water flow to the speed sensor Make sure the sensor will remain in the water when the boat is on plane Also make sure the lo cation doesn t int...

Page 37: ...ant used for the screws The sensor is now ready for use Connect the sensor to the in line con nector on the MY 4X adapter cable If you have any questions concern ing the installation of the sensor pl...

Page 38: ...view of the sky Power Connections The unit works from a 12 volt battery system For the best results at tach the power cable directly to the battery You can attach the power cable to an accessory or p...

Page 39: ...he NMEA inter face on the LMS 320 and receive positioning information The LMS 320 can exchange information with any device that transmits or receives NMEA 0183 data DGPS is an acronym for the Differen...

Page 40: ...o form the power data cable see the drawing on page 33 Com 1 uses the yellow wire to transmit the orange wire to receive and the shield wire for signal ground Com 1 wiring to receive DGPS position inf...

Page 41: ...supply If you use the supplied bracket you may be interested in the optional R A M bracket mounting system This converts the unit s gimbal bracket to a swivel mount which can be used on the dash or ov...

Page 42: ...ch the power transducer and GPS antenna receiver module cables A draw ing on the next page shows the dimensions of a gimbal mounted LMS 320 unit Holes in the bracket s base allow wood screw or through...

Page 43: ...ough the hole from the top If you wish you can fill in the hole around the cables with a good ma rine caulking compound Some marine dealers stock cable hole covers to conceal the opening No matter wha...

Page 44: ...ower pack The power pack the magnet equipped antenna module and an optional portable transducer expand the uses for your sonar GPS unit The PPP 11 makes it easy to transfer your unit from a boat to a...

Page 45: ...e about the size of a postage stamp An SD card is slightly thicker than an MMC As this manual went to press MMCs were available in storage capacities of 8 MB 16 MB 32 MB and 64 MB SD cards were availa...

Page 46: ...y to the left until it is firmly seated in the slot 3 Close the compartment door and fasten the thumb screw finger tight Other Accessories Other LMS 320 accessories include MMC cards MMC card readers...

Page 47: ...s Remember you don t need to read this manual from cover to cover to get going We designed it so you can skip around to the section you want to read Face Cover Your LMS 320 comes with a white protecti...

Page 48: ...40 Notes...

Page 49: ...e screens and how they all work together BUT if you just can t wait to get on the water turn to the one page Quick Reference on page 49 Keyboard LMS 320 series sonar GPS unit front view showing map wi...

Page 50: ...the entire water column from surface to bottom On the Map Page this lets you see a larger geographic area on the map Less detail is seen as you zoom out 9 ZIN Zoom In This key lets you zoom the screen...

Page 51: ...are Screen command changes the contrast or brightness of the display screen Sounds command enables or disables the sounds for key strokes and alarms and sets the alarm style Alarms command turns GPS...

Page 52: ...he PAGES key then using or to select a Page Clear the Pages Menu by pressing EXIT Pages Menu showing some Sonar display options Satellite Status Page The Satellite Status Page provides detailed inform...

Page 53: ...to the Navi gation Page Press PAGES or to NAVIGATION EXIT This page represents a GPS function so it is discussed in much greater detail in Sec 6 Navigation Page recording a trail traveling southwest...

Page 54: ...r Page The Sonar Page displays the sonar chart This is a cross section view of the water column beneath the boat The chart moves across the screen displaying sonar signal echoes that represent fish st...

Page 55: ...wing sonar chart display option commands At right Sonar Page in full sonar chart display mode Sonar chart display options from left split zoom and split frequency Sonar chart display options from left...

Page 56: ...of those features and options in Sec 4 but to show you how easy the LMS 320 is to operate the following page contains a sim plified 10 step quick reference that will cover most fish finding situa tion...

Page 57: ...tion of the screen The full sonar chart will scroll from right to left showing you what s under the boat as you cruise across the water You can change the display by Zoom in to enlarge the chart for...

Page 58: ...see more detail try increasing the sensitivity a little at a time There are situa tions when too much clutter appears on the screen Decreasing the sensitivity can reduce the clutter and show the stro...

Page 59: ...turned on the unit will continue to track the bottom and make minor adjustments to the sen sitivity level with a bias toward the setting you selected Adjusting sensitivity in Manual Sensitivity Mode...

Page 60: ...r example and not the popular Fish I D fish symbol feature Here s why Fish I D is an easier way for a sonar novice to recognize a fishy signal return when he sees it However locating fish by symbol on...

Page 61: ...ine noise rejection surface clarity etc of the recorded file Color interpretation of sonar signals can be user defined Operates like a Windows Multimedia Player with forward re verse pause fast forwar...

Page 62: ...ctly like your real sonar GPS unit Using the Sonar Simulator and GPS Simulator features it allows you to play back sonar logs run GPS routes and trails even create real waypoints you can use in the fi...

Page 63: ...unwanted marks on the display The ASP feature has four settings Off Low Medium and High If you have high noise levels try using the High ASP setting However if you are having trouble with noise we su...

Page 64: ...the deep alarm s set ting For example if you set the shallow alarm to 10 feet the alarm will sound a tone if the bottom signal is less than 10 feet It will continue to sound until the bottom goes deep...

Page 65: ...rn off the alarm press MENU MENU to ALARMS ENT to SONAR ALARMS ENT to DEEP ALARM ENABLED ENT EXIT EXIT EXIT To switch to a different depth setting open the Sonar Alarms menu and repeat the instruction...

Page 66: ...work A different tone sounds for each fish symbol size shown on the display Sonar Alarms menu with Fish Alarm selected The check box to the left is blank indicating the alarm is turned off To turn th...

Page 67: ...t is maximum we recommend that you leave the speed set there for virtually all fishing conditions However you might consider experimenting with chart speed when you are stationary or drifting very slo...

Page 68: ...ge fish is 34 64 feet deep The cursor can be moved to any location on the screen letting you pin point the depth of a target 1 From the Sonar Page press MENU to DEPTH CURSOR ENT 2 The depth cursor app...

Page 69: ...th range A horizontal black bar highlights the selected range 4 When the new range is selected press EXIT to clear the menu To turn Auto Depth Range on again 1 From the Sonar Page press MENU to AUTO D...

Page 70: ...st number then press to move the cursor to the next number and re peat until the depth is correct then press EXIT 3 To set the lower limit press to LOWER LIMIT ENT Press or to change the first number...

Page 71: ...nditions as fish The microcomputer analyzes all echoes and eliminates surface clutter thermoclines and other signals that are undesirable In most instances remaining targets are fish The Fish I D feat...

Page 72: ...n Remember Fish I D is one of the many tools we provide so you can analyze your sonar returns for maximum fish finding information This and other features can help you successfully see beneath the boa...

Page 73: ...step 1 FishTrack The FishTrack feature shows the depth of a fish symbol when it ap pears on the display This lets you accurately gauge the depth of tar gets This feature is available only when the Fis...

Page 74: ...weed beds and other cover The normal mode of operation with FishReveal turned off shows the weakest echoes as black and the strongest echoes in light gray Since all weak echoes are black fish arches...

Page 75: ...the maximum limit a tone sounds Sonar chart in regular grayscale mode left and in FishReveal mode right Notice how shallow fish formerly hidden in the surface clutter become visible in FishReveal mod...

Page 76: ...ill give you better detail and definition but less depth penetration The 50 kHz transducer will give you greater depth penetration but a little less detail and less definition Remember all sonar units...

Page 77: ...bottom returns a strong signal which causes a wide gray line If you have two signals of equal size one with gray and the other with out then the target with gray is the stronger signal This helps dist...

Page 78: ...84 percent In Figure 1B no fish are near the left structure but the right structure shows fish holding next to the structure Notice in figures 2B and 3B how Gray line displays a hard rocky bottom the...

Page 79: ...ogging command selected The menu says the MMC has 5 42 MB of free space which will record the scrolling chart for 28 minutes and 44 seconds To record or log chart data 1 Press MENU to LOG SONAR CHART...

Page 80: ...type shifts to the top of the data list and a check mark appears beside the data type If you wish you may now use or to select other Data Types for display Data list showing Ground Speed selected to...

Page 81: ...a Type press or to select Data Size ENT The data will be shown in the new font size To return to the previ ous page press EXIT EXIT At left Map Page showing boat cruising Puget Sound Washington with O...

Page 82: ...nd chart scroll speed can keep pace with the boat as it moves quickly over the bottom terrain When using HyperScroll you may also need to manually decrease the sensitivity for optimum performance Depe...

Page 83: ...screen The allows you to better see the virtually instantaneous sonar returns just as you would on a flasher sonar unit For more informa tion on FasTrack see it s entry in this section Reset Options...

Page 84: ...rge vessels with deep drafts the distance be tween the transducer installation and the keel or lower engine unit can be several feet In those cases an inexact depth reading could result in grounding o...

Page 85: ...A low sensitivity level from zero to 50 percent excludes much of the bottom information fish signals and other target information High sensitivity levels let you see this detail but it can also clutte...

Page 86: ...at the desired level press EXIT When you reach the maximum or minimum limit a tone sounds At left Sonar Menu with Sensitivity command selected At right the Sensitivity Control Bar To adjust sensitivit...

Page 87: ...in this section To change the chart mode color scheme 1 From the Sonar Page press MENU to SONAR FEATURES ENT 2 Press to SONAR COLOR MODE ENT 3 Press or to Mode Name ENT 4 Press EXIT EXIT to return to...

Page 88: ...n for more information Full Sonar Chart The Overlay Data depth and water temperature are both set to the small text size Split Zoom Sonar Chart A split chart shows the underwater world from the surfac...

Page 89: ...at left and 200 kHz view at right You can adjust the sensitivity in each window To adjust sensitivity in auto mode 1 Press MENU ENT 2 The unit asks which you wish to adjust Press or to select the one...

Page 90: ...ensors Digital Data Chart Customizing the Digital Data Chart Screen The Digital Data Chart screen can be customized to show digital data different from the defaults first shown To customize this scree...

Page 91: ...ow to change When the selected window title bar flashes press ENT or to select data type ENT Repeat these steps until you re finished customizing then press EXIT to return to the Sonar Page Flasher Th...

Page 92: ...PAGES PAGES The window with the black title bar at the top of the screen is the active window To switch back just press PAGES PAGES again Sonar Simulator This unit has a built in simulator that lets y...

Page 93: ...To see how read the entry in this section on Log Sonar Chart Data To play back your own sonar chart make sure the MMC containing the chart is installed then 1 Press MENU MENU to SONAR SETUP ENT to SO...

Page 94: ...transducer it may enter a demo mode The words demo mode flash on the bottom of the screen and a sonar chart plays much like the simulator Unlike the simulator the demo mode is for demonstration only a...

Page 95: ...he display It does this by changing the sensitivity of the receiver decreasing it near the surface and gradually increasing it as the depth increases There are three levels of surface clarity availabl...

Page 96: ...the size 2X of all echoes on the screen Pressing it again quadruples the size of the echoes 4X The zoom bar on the far right side of the screen shows which echoes will be displayed on the screen when...

Page 97: ...e lets you rapidly move the zoomed area up and down to different depths By pointing your zoom at different portions of the chart as it scrolls you can get a good close up look at structure or cover be...

Page 98: ...90 Notes...

Page 99: ...emo mode make sure the transducer is securely connected before turning the unit on Unit freezes locks up or operates erratically 1 Electrical noise from the boat s motor trolling motor or an accessory...

Page 100: ...The technical term for this is cavitation 2 Electrical noise from the boat s motor can interfere with the sonar This causes the sonar to automatically increase its Discrimination or noise rejection f...

Page 101: ...ansducer cable away from the wiring that is causing the interference VHF radio antenna cables radiate noise when transmitting so be certain to keep the sonar s wires away from it You may need to route...

Page 102: ...94 Notes...

Page 103: ...d idea to learn about the different keys the four Page screens and how they all work together BUT if you just can t wait to get outside turn to the one page Quick Reference on page 107 Keyboard LMS 32...

Page 104: ...avigation functions 8 ZOUT Zoom Out This key lets you zoom the screen out On the Sonar Page this key returns you to a full sonar chart display showing the entire water column from surface to bottom On...

Page 105: ...nd their functions are Screen command changes the contrast or brightness of the display screen Sounds command enables or disables the sounds for key strokes and alarms and sets the alarm style Alarms...

Page 106: ...ur Page displays that represent the four major operating modes They are the Satellite Status Page the Navigation Page Map Page and the Sonar Page They are accessed by pressing the PAGES key then using...

Page 107: ...shows satellite lock on with a 3D posi tion acquired latitude longitude and altitude and WAAS reception This screen shows a graphical view of the satellites that are in view Each satellite is shown on...

Page 108: ...s rose that not only shows your direction of travel but also the direction to a recalled waypoint To get to the Navi gation Page Press PAGES or to NAVIGATION EXIT The navigation screen looks like the...

Page 109: ...hows the current cross track error This shows the distance you are off course to the side of the desired course line The course line is an imaginary line drawn from your position when you started navi...

Page 110: ...lt this unit shows the map with north always at the top of the screen This can be changed See the topic Map Orientation in Sec 8 If you re navigating to a waypoint the map also shows your starting loc...

Page 111: ...etail custom map has not been loaded on the MMC for this area If you re using only the factory loaded background map the maximum zoom range for showing additional map detail is 20 miles You can con ti...

Page 112: ...s and streets all the landmark features such as summits schools radio towers etc more rivers streams smaller lakes and ponds and their names What s more important is the large scale map detail that al...

Page 113: ...though their display is turned off you can still search for POIs and their icons will pop up when your unit finds them for you The Map Page has its own menu which is used for several functions and for...

Page 114: ...o clear the menu 3 To change the window size again or revert back to the original dis play just follow the steps above Most dual window displays use half the screen for each window by default You can...

Page 115: ...map by Zoom in closer to see greater detail press ZIN zoom in key Zoom out to see more area less detail press ZOUT zoom out key Scroll map north south east or west using arrow keys To stop scrolling...

Page 116: ...rner of the screen 1 Press the ZIN key zoom in to move in closer and see greater detail in a smaller geographic area 2 Press the ZOUT key zoom out to move farther away and see less map detail but a la...

Page 117: ...rching is one of the most powerful features in the Lowrance GPS product line In this example we ll look for the nearest fast food restaurant For more information on different types of searches refer t...

Page 118: ...now we will just accept the nearest one Press ENT 5 The POI information screen appears This is how you can use LMS 320 as a business phone directory If you wanted to navigate there you could press Ent...

Page 119: ...have a high detailed custom map containing POI data for the area you are searching loaded on the MMC you may not find anything Set a Waypoint A waypoint is simply an electronic address based on the l...

Page 120: ...ved and automatically given a name with a sequential number such as way point 003 The waypoint symbol and number appear on the map Sequence for setting a waypoint Step 1 while traveling quickly press...

Page 121: ...ext character and re peat until the latitude is correct Press ENT 4 Press to LONGITUDE ENT Enter the longitude by pressing or to change the first character then press to the next character and re peat...

Page 122: ...f you re out of sight of land Of course the first thing to do is remain calm and then use all standard safety procedures to rescue the person This unit has a man overboard feature that shows navigatio...

Page 123: ...l navigation to MOB press MENU MENU to CANCEL NAVIGA TION ENT to YES ENT LMS 320 stops showing navigation information Navigate to Cursor Position on Map The GO TO CURSOR command navigates to the curre...

Page 124: ...wing navigation information to your destination See the following examples The 15 mile zoom figure at left clearly shows the dotted course line connecting your current position to your destination The...

Page 125: ...handy when you are trying to retrace your trip and go back the way you came On the screen trails are represented by a solid line extending from the back of the current position arrow LMS 320 is set at...

Page 126: ...ress EXIT EXIT EXIT EXIT As you left the Edit Trail menu you will notice that a new trail was started with a new sequential number In the example figure below the new trail is number 15 showing zero p...

Page 127: ...2 Press to enter the Saved Trail list then use or to select the desired Trail Name ENT 3 Press to ACTIVE to VISIBLE ENT To return to the previous page press EXIT EXIT EXIT EXIT To turn on trail displ...

Page 128: ...our current position arrow traces along the trail you have just made Tip Generally when using this method the smaller the zoom range the more accurately you will be able to steer along the trail Navig...

Page 129: ...the navigated trail as a dotted line The bearing arrow on the compass rose points to the next waypoint on the trail As you travel the arrival alarm will go off when you near a trail way point and the...

Page 130: ...vigation information along the trail in reverse NOTE If you are already located at or near the end of your trail the arri val alarm will go off as soon as you hit Enter Just press EXIT to clear the al...

Page 131: ...rd to LMS 320 s internal memory before the unit can read them Here s how 1 Insert the MMC into your unit Press MENU MENU to SYSTEM SETUP ENT to TRANSFER MY DATA ENT and the screen below appears The Tr...

Page 132: ...IT From left to right these figures show the menu sequence for naming and saving a GPS Data File from LMS 320 s memory to an MMC 4 Loading to unit memory There may be more than one GPS Data File USR o...

Page 133: ...n MMC into LMS 320 s memory Cancel Navigation You can turn off any of the navigation commands after you reach your destination or at any other time by using the Cancel Navigation com mand Press MENU M...

Page 134: ...126 Notes...

Page 135: ...is 292 2 miles At right the distance from the boat s current position to the boat ramp is 0 52 miles Find Distance From Point to Point You can also measure distance between two other points on the ma...

Page 136: ...t your current position while you are navigating Create Icon on Map 1 Use the arrow keys to move the cursor to the place where you want to make an icon 2 Press ENT and the screen shows a Select Icon S...

Page 137: ...press ENT A message appears saying all icons with the selected symbol have been deleted The Delete From Map command will prompt you to move the cursor over an icon to select it After selecting the ico...

Page 138: ...nd editing a route in the unit or you can make a route on your computer with our MapCreate 6 software PC created Routes MapCreate is the easiest method for preparing a route simply because your PC s l...

Page 139: ...e Zoom keys and arrow keys to move the map and cursor until the cursor is centered on the spot where you want your route to begin If you are starting at your current position or the current cursor pos...

Page 140: ...nt 5 ends the route at a tree stand in the hunting area Fig 6 Press EXIT to save the route and you return to this screen 5 Move the cursor to the next point in the route a spot where you need to turn...

Page 141: ...AP PAGE press MENU MENU to ROUTE PLANNING ENT 2 Press to route name ENT ENT 3 Press or to change the first character then press to move the cursor to the next character and repeat until the name is co...

Page 142: ...is selected in the Action box 2 Press to select route name ENT to NAVIGATE ENT ENT 3 Upon arrival at your destination cancel navigation press MENU MENU to CANCEL NAVIGATION ENT to YES ENT The followi...

Page 143: ...miles away Fig 4 shows route navigation on the Map Page In this figure the traveler has reached Wpt 2 and is half way along the leg between Wpts 2 and 3 Trails Delete a Trail This is the command used...

Page 144: ...on the trail At right the Edit Trail menu Edit a Trail Color To edit a trail color press MENU MENU to MY TRAILS ENT to trail name ENT to COLOR ENT Press or to select a color style then press ENT Pres...

Page 145: ...ist press WPT ENT ENT ENT to waypoint name ENT to DELETE WAY POINT ENT to YES ENT To return to the previous page press EXIT EXIT To delete a waypoint from the map 1 Use the arrow keys to select the wa...

Page 146: ...the arrow keys and center the cursor over the waypoint A highlighted halo will appear around the waypoint Set a Waypoint by Average Position This feature sets a waypoint at the current position after...

Page 147: ...CE ENT Press or to change the first character then press to the next character and repeat until the distance is cor rect Press ENT 5 Press to BEARING ENT Press or to change the first character then pr...

Page 148: ...140 Notes...

Page 149: ...s set to 1 mile then the alarm flashes a message if you drift 1 of a mile or more to the right or left of the line to the waypoint The anchor alarm is triggered when you drift outside of a preset radi...

Page 150: ...only those satellites When your GPS receiver is turned on for the first time it doesn t know what your position or elevation altitude is It does know the current UTC time and date since these were pr...

Page 151: ...les Press MENU MENU to BROWSE MMC FILES ENT Main Menu left MMC File Browser right Communications Port Configuration LMS 320 has one NMEA 0183 version 2 0 compatible communication port or com port for...

Page 152: ...NS PORT ENT A If you have a Magnavox receiver press to MAGNAVOX ENT B If you have a Lowrance or Starlink receiver press to STARLINK ENT C If you have a Magnavox or Starlink press EXIT EXIT EXIT This i...

Page 153: ...ying and entering position coordinates Menus for changing coordinate system used to display positions To get to Coordinate System Selection 1 Press MENU MENU to GPS SETUP ENT 2 Press to COORDINATE SYS...

Page 154: ...si tions are shown on all screens This includes waypoints To change the coordinate system press ENT while COORDINATE SYSTEM is highlighted Press the or arrow keys to highlight the desired for mat Pres...

Page 155: ...n you can save it as a way point See the waypoint section for information on saving a waypoint Save the reference position as a waypoint Exit from the waypoint screens 1 Press MENU MENU to GPS SETUP E...

Page 156: ...open a list of options Scroll and to select a different display option then press ENT After all options are set press EXIT to return to the page display Customize Map Page While on the Map Page press...

Page 157: ...again return to the GPS Simulator menu se lect the STEER WITH ARROWS command press ENT then Press EXIT EXIT EXIT to return to the previous page Simulating Trail or Route Navigation In Simulator mode...

Page 158: ...T The GPS menus and pages are available once again Initialize GPS This command is handy when you are practicing in simulator mode See the entry in this section for GPS Simulator In simulator mode this...

Page 159: ...es draw the map boundaries or boxes around the areas of high detail or fill land areas with gray You can also turn on or off Map Overlays which display latitude and longitude grid lines or range rings...

Page 160: ...me as the zoom range The sec ond smaller ring is 50 miles in diameter always 1 2 the zoom range The distance from your current position to the smaller ring the ring s radius is 25 miles always 1 4 the...

Page 161: ...to the last page displayed press EXIT EXIT A list of the datums used by this unit is in the back of this manual GPS Setup Menu left Map Datum Menu right Map Detail Category Selection This menu determi...

Page 162: ...right is shown on the right side of the map and so on However if you travel any other direction the map doesn t line up with your view of the world To correct this problem a track up mode rotates the...

Page 163: ...tronic charts on MMCs They work just like a MapCreate custom map on an MMC Left entrance to Chesapeake Bay in a MapCreate 6 custom map 10 mile zoom Center same position on Navionics chart at 11 15 mil...

Page 164: ...press ENT EXIT EXIT Port Information Navionics charts contain Port Services information represented by an chor icons on the map display An example is displayed in the following figure To view Port Se...

Page 165: ...rvices window To scroll through the Detailed Services window from SERVICE CATEGORIES press to DETAILED SERVICES ENT then use or to read the list of available services To return to the Map Page press E...

Page 166: ...ng figure To view Tidal Current information 1 Use the arrow keys to move the cursor over a Tidal Current Station icon When selected a pop up name box appears 2 Press WPT to display the Tidal Current I...

Page 167: ...or year then press ENT 2 Use and to select the desired month day or year then press ENT To clear the information screen press EXIT Tide Information Navionics charts contain Tidal Information represent...

Page 168: ...this date at the present time The graph at the top of the screen is an approximate view of the tidal range pattern for the day from midnight MN to noon NN to midnight MN The dotted line across the gra...

Page 169: ...EXIT to return to the page display System Setup menu left with Pop up Help command highlighted At right this example shows the Pop up Help message for the Go To Cur sor command located on the Map Men...

Page 170: ...T NOTE Reset Options does not erase any waypoints routes icons plot trails or sonar logs Reset Options command left and the Reset Options Menu right Require DGPS You can force LMS 320 to require DGPS...

Page 171: ...ready selected Press or to move the bar The left end of the scale is minimum contrast the right end is maximum contrast Screen Command left and Screen Menu with Contrast bar selected right To adjust t...

Page 172: ...me while navigating Also the time and date are saved when a waypoint is created To access the Set Local Time menu you must first acquire your posi tion Once that is done press MENU MENU to SYSTEM SETU...

Page 173: ...m repeatedly going on and off If you want you have the option of turning off the WAAS Acquired Lost alarm with out affecting how the unit uses WAAS Here s how 1 Press MENU MENU to GPS SETUP ENT to SHO...

Page 174: ...ion high lighted press ENT to check it turn on and uncheck it turn off After the option is set press EXIT EXIT to return to the page display To set Alarm Volume Press to VOLUME Press or to move the ba...

Page 175: ...on highlighted press ENT to check it turn on and uncheck it turn off Update Trail Option This menu lets you change the way the trail updates occur WARNING If you uncheck the Update Trail option automa...

Page 176: ...r arrows to highlight either the UPDATE RATE or UPDATE DISTANCE data entry boxes and press ENT Press or to change the first character then press to the next character and repeat until the entry is cor...

Page 177: ...Units of Measure This menu sets the speed and distance statute or nautical miles me ters depth feet fathoms or meters temperature degrees Fahrenheit or Celsius and heading true or magnetic units To c...

Page 178: ...170 Notes...

Page 179: ...er the Find Way point menu or the Map Page menu Press WPT and the Find Waypoint menu appears for waypoints and Points of Interest POI From the Map Page press MENU and the Map Page menu appears for str...

Page 180: ...select a street name from the list then press ENT The street name you selected is now in the street field Find Address menu left Find Street menu center with Find By Name field active street name ent...

Page 181: ...while it searches for the address If an address is not in the database a message appears saying the ad dress could not be found 7 The unit will display a list of addresses If the address you are look...

Page 182: ...nt Information window ap pears with the Go To Waypoint command highlighted If you want to go ahead and navigate to the POI address just press ENT EXIT Left Map Page showing location of the address on...

Page 183: ...and left and Find Exit menu right 2 First select a highway name by pressing ENT which calls up the Find By Name menu There are two highway search options A You can spell out the highway name in the to...

Page 184: ...u with an exit selected in the Exit List 4 In the Exit Information screen you have two choices A Press ENT to navigate or go to the exit B Press ENT to find the exit on the map Go To Exit option left...

Page 185: ...or to select a subcategory before pressing ENT You will be given two options Search By Name or By Nearest Find Waypoint menu with Lodging POI category selected left and with the RV Parks subcategory s...

Page 186: ...or to the next letter and repeat until the name is correct then press ENT ENT B Jump down to the lower selection list by pressing ENT then press or to select a POI from the list then press ENT to call...

Page 187: ...street name in the First Street dialog box Press ENT to display the Find By Name menu There are two options A You can spell out the street in the top selection box Press or to change the first letter...

Page 188: ...s 80th Street To search for that street press to FIND FIRST STREET ENT A message appears asking you to wait while the unit finds the street When the Streets Found list appears press or to select the s...

Page 189: ...the first letter then press to move the cursor to the next letter and repeat until the name is correct then press ENT ENT B Or you can jump down to the lower box and pick a street from the selection...

Page 190: ...tersection command highlighted left and Working message center At right is the Intersections Found list 6 To search for the intersection of the two streets press to FIND INTERSECTION ENT A message app...

Page 191: ...g then a list of waypoints appears The closest is highlighted at the top of the list and the farthest at the bottom of the list Calculating message left and list of the nearest waypoints right 4 To se...

Page 192: ...is correct then press ENT ENT B Or you can jump down to the lower selection list by pressing ENT then press or to select a waypoint from the list then press ENT The waypoint informa tion screen appea...

Page 193: ...Kenya Tanzania Ascension Island 1958 Ascension Island Astro Beacon E 1945 Iwo Jima Astro DOS 71 4 St Helena Island Astro Tern Island FRIG 1961 Tern Island Astronomical Station 1952 Marcus Island Austr...

Page 194: ...ia Islands ISTS 073 Astro 1969 Diego Garcia Johnston Island 1961 Johnston Island Kandawala Sri Lanka Kerguelen Island 1949 Kerguelen Island Kertau 1948 West Malaysia Singapore Kusaie Astro 1951 Caroli...

Page 195: ...27 Mexico North American 1983 Alaska Canada CONUS North American 1983 Central America Mexico Observaorio Metereo 1939 Azores Corvo Flores Islands Old Egyptian 1907 Egypt Old Hawaiian Mean for Hawaii K...

Page 196: ...n 1969 Guyana South American 1969 Paraguay South American 1969 Peru South American 1969 Trinidad Tobago South American 1969 Venezuela South Asia Singapore Tananarive Observatory 1925 Madagascar Timbal...

Page 197: ...against harmful interference in a residential installation This equipment generates uses and can radiate radio frequency energy and if not installed and used in accordance with the instructions may ca...

Page 198: ...190 Notes...

Page 199: ...onexclusive nonassignable right to use these Databases for supplemental navigation reference purposes but only as long as you comply with the terms and conditions of this License Agreement We reserve...

Page 200: ...BE LIABLE TO ANYONE FOR ANY SPECIAL CONSEQUENTIAL INCIDENTAL OR OTHER INDIRECT DAMAGE OF ANY KIND Some states do not allow the exclusion or limitation of incidental or consequential damages so the ab...

Page 201: ...MENT OR REFUND AS JUST DESCRIBED IS THE EXCLUSIVE REMEDY AVAILABLE TO YOU AGAINST US FOR ANY DEFECT MALFUNCTION OR NON CONFORMITY CONCERNING THE PRODUCT OR FOR ANY LOSS OR DAMAGE RESULTING FROM ANY OT...

Page 202: ...nge or end our shipping policies regulations and special offers at any time We reserve the right to do so without notice in Canada If you re in Canada and you have technical return or repair questions...

Page 203: ...ras com 3 Canadian customers can write Lowrance Eagle Canada 919 Matheson Blvd E Mississauga Ontario L4W2R7 or fax 905 629 3118 Shipping Information If it becomes necessary to send a product for repai...

Page 204: ...Visit our web site Lowrance Pub 988 0105 971 Copyright 2002 All Rights Reserved Printed in USA 102502 Lowrance Electronics Inc...

Reviews:

Related manuals for LMS-320